
Interior/Exterior Carbon Fibre interior bezel kits


Thread Starter
|
4th Gear
Joined: Dec 2006
Posts: 413
Likes: 0
From: Brisbane, Australia
Carbon Fibre interior bezel kits
I know you can get these in chrome, but I am not a fan of them. Does anyone know where you can get them in Carbon Fibre at all? Cheers in advance 


4th Gear
Joined: Jun 2006
Posts: 585
Likes: 0
From: Somewhere that no longer exists
JCW. A stealership or Outmotoring.
http://www.outmotoring.com/mini-coop...rim_rings.html
their CF looks killer. I have the dash.
Beecher
http://www.outmotoring.com/mini-coop...rim_rings.html
their CF looks killer. I have the dash.
Beecher

OVERDRIVE


Joined: Aug 2006
Posts: 7,201
Likes: 8
From: Norfolk, VA
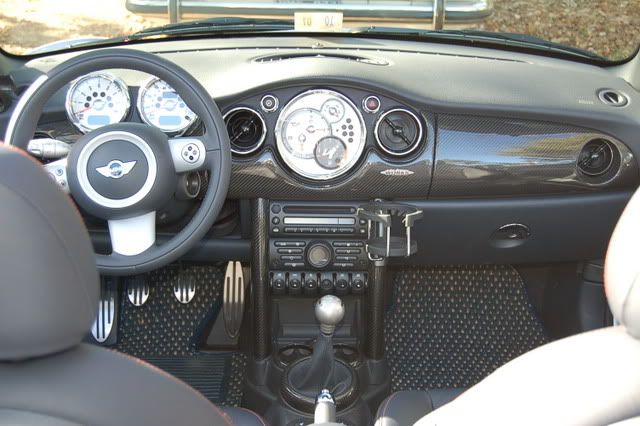
If you're talking about the bezels that go around the dash vents, gauges, hazard switch and dashlight dimmer switch, I've never seen those in carbon-fiber. I went with chrome on mine, except for the hazard and dimmer bezels. I think the limited chrome makes for a nice contrast with all the CF parts (dash, downtubes, shifter trim ring and cupholder trim rings). Note that in this picture, the dimmer and hazard bezels are still chrome - I've since replaced them with the standard matte-black versions.
There are companies that do a "water dip" method where parts are covered with a CF-look print and then clearcoated, but I've never found one that matches the depth and "3-D look" of the JCW carbon fiber parts.
There are companies that do a "water dip" method where parts are covered with a CF-look print and then clearcoated, but I've never found one that matches the depth and "3-D look" of the JCW carbon fiber parts.


4th Gear
Joined: Oct 2007
Posts: 488
Likes: 0
I painted the bezels around the vents, dimmer, speedometer and hazard black, I also painted the Y in the doors, the shift ring, the cup holders and the speaker trims that way, and they look good. I did the downtubes too, and now I can't decide if I want to keep them this way or buy the carbon fiber ones, lol

2nd Gear
Joined: Jul 2007
Posts: 65
Likes: 0
From: Mount Holly, NJ
Trending Topics


Thread Starter
|
4th Gear
Joined: Dec 2006
Posts: 413
Likes: 0
From: Brisbane, Australia
Yeah, I've checked out the NVD motorsport page and they aren't cheap. Here are the prices that I got from them
-*Carbon centre gauge ring**** @ $75U.S.
-*Carbon fibre door latch ring* @ $131U.S./pair
-*Carbon fiber gear shift ring** @ $63U.S.
- Carbon fibre rear cup holder @ $53U.S.
- Carbon fibre speaker ring**** @ $168U.S./pair
- Carbon fiber air vent ring***** @ $99U.S./pair
-*Carbon fibre hazard warning ring*@ $52U.S./pair*
- Carbon fibre speedo metre ring (As I don't have the Chrono pack I would
only have the 1 ring which would be the Tacho Ring) => this is the one on the steereing wheel, right? @ $131U.S.
Anymore suggestions?!
Thread Starter
|
4th Gear
Joined: Dec 2006
Posts: 413
Likes: 0
From: Brisbane, Australia
4th Gear
Joined: Oct 2007
Posts: 488
Likes: 0
Yeah, I've got a couple of them:


I did it with flat black spray paint and then a layer of transparent spray paint to protect it It's been 4 months now and it's still pretty good, I have no noticeable damages to the paint.
I did it with flat black spray paint and then a layer of transparent spray paint to protect it
It's been 4 months now and it's still pretty good, I have no noticeable damages to the paint.

Former Vendor
Joined: Jan 2004
Posts: 8,337
Likes: 4
From: oh10
Stay away from CooperGear at all costs.
OVERDRIVE
Joined: Aug 2006
Posts: 7,201
Likes: 8
From: Norfolk, VA
I'm a little wary of CooperGear as well. I was interested in having him do a couple pieces for my car that aren't available in carbon fiber from JCW. I had him send me a sample piece so I could see how well his faux carbon fiber finish would match with my JCW pieces. The pattern didn't match *at all* (not their fault - they don't advertise it as being a match for the JCW weave), and the piece (a shifter trim ring in this case) didn't have nearly the depth or gloss of the JCW piece. Looking at the clearcoat, there were a lot of sanding scratches and dust nibs visible in the finish, and the overall appearance was the "dry" kind of finish you get when you don't apply the clearcoat in heavy-enough coats. Perhaps I was sent a pre-production unit since I was only interested in the CF pattern for matching purposes, but looking at some of the pictures on their website, I can see the sanding scratches and so-so clearcoat on some of their gallery pictures, and if it's visible in low-res web photographs, I can't imagine it will look better in person.
Thread Starter
|
4th Gear
Joined: Dec 2006
Posts: 413
Likes: 0
From: Brisbane, Australia
 I'm thinking the flat black painted bezels for the Speedo, Centre Air vents, Tweeter/Door Opener, Larger Speaker Surround and Tacho with an Aluminium TT Style bezel on the front of it. I have the silver interior at the moment. The Anthracite is like a dark grey/black isn't it? Maybe I should just swap out to them rather than painting these? How hard is it to get the Speedo, Tacho, Large door speaker and Centre Air Vent bezels off? I can get the Tweeter/Door Opener off as I have had the Door panels off. Thanks for all the help, just so many decisions to make!!
4th Gear
Joined: Oct 2007
Posts: 488
Likes: 0
That looks really good, now you have got me thinking differently!!! I'm thinking the flat black painted bezels for the Speedo, Centre Air vents, Tweeter/Door Opener, Larger Speaker Surround and Tacho with an Aluminium TT Style bezel on the front of it. I have the silver interior at the moment. The Anthracite is like a dark grey/black isn't it? Maybe I should just swap out to them rather than painting these? How hard is it to get the Speedo, Tacho, Large door speaker and Centre Air Vent bezels off? I can get the Tweeter/Door Opener off as I have had the Door panels off. Thanks for all the help, just so many decisions to make!!
I'm thinking the flat black painted bezels for the Speedo, Centre Air vents, Tweeter/Door Opener, Larger Speaker Surround and Tacho with an Aluminium TT Style bezel on the front of it. I have the silver interior at the moment. The Anthracite is like a dark grey/black isn't it? Maybe I should just swap out to them rather than painting these? How hard is it to get the Speedo, Tacho, Large door speaker and Centre Air Vent bezels off? I can get the Tweeter/Door Opener off as I have had the Door panels off. Thanks for all the help, just so many decisions to make!! I was so sure I'd buy the JCW carbon downtubes, then I painted it in the meanwhile because they were the only thing I had left antracite and I didn't like it, and now I'm not so sure I'll buy the JCW ones anymore 
Antracite is dark Grey, yes, but to tell the truth the stock antracite parts had a bluish reflex that I didn't like much, in the end I swapped the dashboard with the carbon one and painted the bezels...
The centre air vent are really easy, you just have to turn them, I don't remmbe rif clockwise or the opposite way but it's pretty easy. The large door speaker is trickier because you have to use a thin screwdriver and then pull out with force so that the four clips get out, it's very tricky in fact I ended breaking a couple clips, but if you're careful you should be able to do it without any damage. The tacho, I don't know because I didn't paint it, only the speedo in the center, and that's a bit of a pain in the *** because you've got to take away the central part of the dashboard, there are two thin torx screws between the air vents and the hazard/dimmer, then there should be two bigger torx screws under the dash (but I only got one, don't ask me why
) once you take those out you've got to pull and you'll probably get the part where the speedo is located off together with the central part of the dashboard. Now you've got to get the speedo ring free from the glue they put on the clips (at least, I had it). Anyway, for the tacho, if you don't have the Chrono pack it is screwed to the steering column with two torx screws, so I think you just have to take those off, then you have to unclip the connector coming to it, and the tacho is free. This done, you just cover the centre with some paper and you can spray away your paint to the bezel without risk of ruining the tacho
Thread Starter
|
4th Gear
Joined: Dec 2006
Posts: 413
Likes: 0
From: Brisbane, Australia
I was so sure I'd buy the JCW carbon downtubes, then I painted it in the meanwhile because they were the only thing I had left antracite and I didn't like it, and now I'm not so sure I'll buy the JCW ones anymore Antracite is dark Grey, yes, but to tell the truth the stock antracite parts had a bluish reflex that I didn't like much, in the end I swapped the dashboard with the carbon one and painted the bezels...
The centre air vent are really easy, you just have to turn them, I don't remmbe rif clockwise or the opposite way but it's pretty easy. The large door speaker is trickier because you have to use a thin screwdriver and then pull out with force so that the four clips get out, it's very tricky in fact I ended breaking a couple clips, but if you're careful you should be able to do it without any damage. The tacho, I don't know because I didn't paint it, only the speedo in the center, and that's a bit of a pain in the *** because you've got to take away the central part of the dashboard, there are two thin torx screws between the air vents and the hazard/dimmer, then there should be two bigger torx screws under the dash (but I only got one, don't ask me why
) once you take those out you've got to pull and you'll probably get the part where the speedo is located off together with the central part of the dashboard. Now you've got to get the speedo ring free from the glue they put on the clips (at least, I had it). Anyway, for the tacho, if you don't have the Chrono pack it is screwed to the steering column with two torx screws, so I think you just have to take those off, then you have to unclip the connector coming to it, and the tacho is free. This done, you just cover the centre with some paper and you can spray away your paint to the bezel without risk of ruining the tacho
 Let me know what you guys think. I am a real fan of the Flat black in the cabin. Just one other question, when you painted the Speaker grills ( All four) how did you go with the paint blocking the small holes? What did you do to stop them from filling up? Thanks guys for this, you are all champions!!
4th Gear
Joined: Oct 2007
Posts: 488
Likes: 0
I guess it's right, the clips are actually more like a plastic welding, I didn't know that before so I kept pulling and in the end they came off, but a couple of the plastic welds broke passing through the hole, the other two are ok though so the speaker stays in place.
For the little holes I didn't use any particular attention, but keep in mind that you've got to spray the paint from a good distance to do a good job, about a foot at least, so I don't think they will fill at all.
For the little holes I didn't use any particular attention, but keep in mind that you've got to spray the paint from a good distance to do a good job, about a foot at least, so I don't think they will fill at all.