

What, no temp gauge? I'll fix that: Gauges in the Mach V Mini


Thread Starter
|
Former Vendor
Joined: Feb 2007
Posts: 1,472
Likes: 2
From: Sterling, VA
What, no temp gauge? I'll fix that: Gauges in the Mach V Mini
It annoys me to no end that my beloved '07 Cooper S has no temp gauge. Not to mention no boost gauge, but hey, none of the OEMs seem to put them on any turbo car, so that's not surprising.
Anyway, I resolved to solve this lack of critical information, and considered several gauge options. My biggest concern was that there just isn't much real estate on the little Mini dash. My second worry was about aesthetics. Even as I gripe about the lack of gauges, I don't want to clutter the dash up with a million stuck-on accessories.
That pretty much narrowed me down to this:


(This picture shows the product on the A-pillar of a Honda S2000, by the way...)
It's the DM-100 gauge system, from PLX Devices. We've been selling PLX wideband O2 systems for a long time, and we've had good luck with them. I had seen the new DM-100 recently, and thought it looked terrific.
The DM-100 is a 52mm gauge-sized display that has a small controller box (the red thing above). You can feed data to it from any/all of several optional gauge sensor modules. I chose boost, oil temp, and air/fuel. I'll use the air/fuel meter later when I do ECU tuning of the car.
I'll say now that we don't have the sensors connected up in the engine bay yet, so don't ask me where I put the fluid temp and boost probes. I'll post back up here when those are done.
But we did get the hardware installed in the car. The control boxes fit neatly under the driver's seat. We positioned the gauge on the dash behind and to the left of the tach. It's nice and discreet when it's turned off, and it's clearly visible throught the steering wheel when it's on.
Here are some pics of the actual install in our shop car:

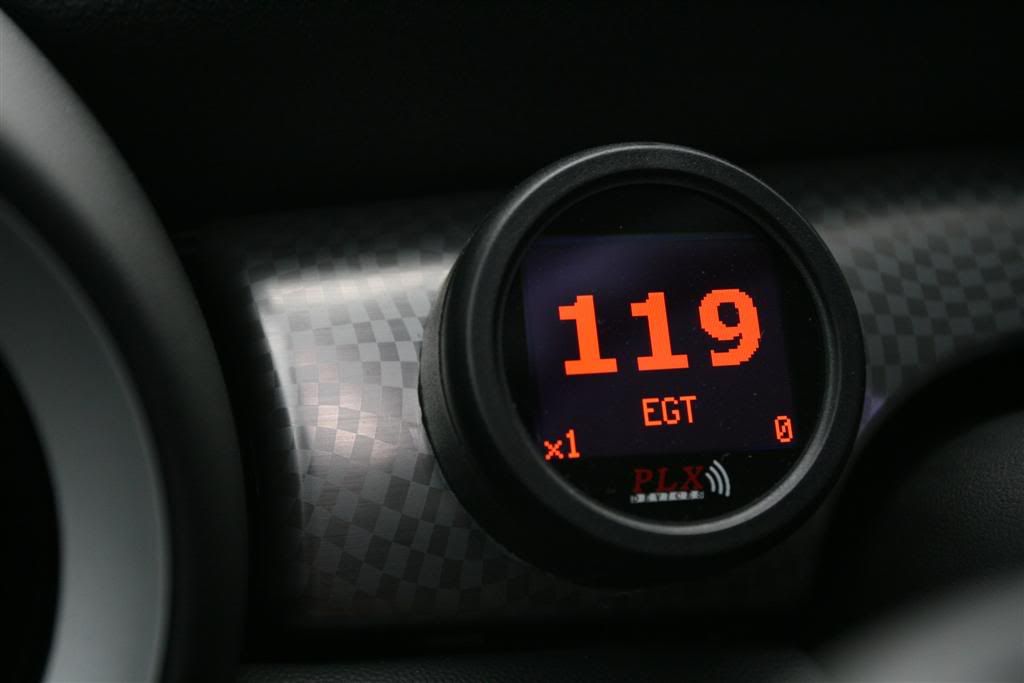
Note that the gauge is displaying different information. It comes with a remote control that allows you to select which sensor you're displaying, and how it's displayed. It can do the "traditional" style gauge, the large numbers shown, plus a line graph and a chart with four inputs displayed simultaneously. And yes, the colors match the factory gauges because I programmed it that way. You could do blue needle with purple numbers and a green center if you wanted...
Not only that, but you can program your own custom gauge if you want. If you want to have a thermometer that goes pop when the temp gets too hot, you can do it...just get out your PC illustrating tool and get busy. You can upload the result to your gauge.
So that's part one of the install. When I get the probes all tapped and connected under the hood, I'll post more details.
--Dan
Mach V
FastMINI.net
Anyway, I resolved to solve this lack of critical information, and considered several gauge options. My biggest concern was that there just isn't much real estate on the little Mini dash. My second worry was about aesthetics. Even as I gripe about the lack of gauges, I don't want to clutter the dash up with a million stuck-on accessories.
That pretty much narrowed me down to this:
(This picture shows the product on the A-pillar of a Honda S2000, by the way...)
It's the DM-100 gauge system, from PLX Devices. We've been selling PLX wideband O2 systems for a long time, and we've had good luck with them. I had seen the new DM-100 recently, and thought it looked terrific.
The DM-100 is a 52mm gauge-sized display that has a small controller box (the red thing above). You can feed data to it from any/all of several optional gauge sensor modules. I chose boost, oil temp, and air/fuel. I'll use the air/fuel meter later when I do ECU tuning of the car.
I'll say now that we don't have the sensors connected up in the engine bay yet, so don't ask me where I put the fluid temp and boost probes. I'll post back up here when those are done.
But we did get the hardware installed in the car. The control boxes fit neatly under the driver's seat. We positioned the gauge on the dash behind and to the left of the tach. It's nice and discreet when it's turned off, and it's clearly visible throught the steering wheel when it's on.
Here are some pics of the actual install in our shop car:
Note that the gauge is displaying different information. It comes with a remote control that allows you to select which sensor you're displaying, and how it's displayed. It can do the "traditional" style gauge, the large numbers shown, plus a line graph and a chart with four inputs displayed simultaneously. And yes, the colors match the factory gauges because I programmed it that way. You could do blue needle with purple numbers and a green center if you wanted...
Not only that, but you can program your own custom gauge if you want. If you want to have a thermometer that goes pop when the temp gets too hot, you can do it...just get out your PC illustrating tool and get busy. You can upload the result to your gauge.
So that's part one of the install. When I get the probes all tapped and connected under the hood, I'll post more details.
--Dan
Mach V
FastMINI.net

Thread Starter
|
Former Vendor
Joined: Feb 2007
Posts: 1,472
Likes: 2
From: Sterling, VA
Oh, and I should send out thanks to NAM member PGT for his excellent installation work.
--Dan
Mach V
FastMINI.net
--Dan
Mach V
FastMINI.net

6th Gear
Joined: Dec 2006
Posts: 1,283
Likes: 0
From: Atlanta, GA
Nice looking gauge! The lack of boost and temp gauges have bothered me too, I used to have them in my GSX and liked having that info. Im definately interested in more details when you get the chance. Thanks!


one per display (medium size) and one per sensor (a bit smaller). I've got pics of the install, but I'll leave it to Dan if he wants to post them.
The gauge was mounted in a standard 2" cup that was cut and carefully countoured to fit the compound curves of the dash (a lot of patience and rotary air sander help tremendously ). The cup was expoxied to the dash - don't fret! - it's a small trim piece that shouldn't be too pricey to replace if you need to revert to stock later on.
The gauge was mounted in a standard 2" cup that was cut and carefully countoured to fit the compound curves of the dash (a lot of patience and rotary air sander help tremendously
). The cup was expoxied to the dash - don't fret! - it's a small trim piece that shouldn't be too pricey to replace if you need to revert to stock later on.
Trending Topics
one per display (medium size) and one per sensor (a bit smaller). I've got pics of the install, but I'll leave it to Dan if he wants to post them.
The gauge was mounted in a standard 2" cup that was cut and carefully countoured to fit the compound curves of the dash (a lot of patience and rotary air sander help tremendously ). The cup was expoxied to the dash - don't fret! - it's a small trim piece that shouldn't be too pricey to replace if you need to revert to stock later on.
The gauge was mounted in a standard 2" cup that was cut and carefully countoured to fit the compound curves of the dash (a lot of patience and rotary air sander help tremendously
). The cup was expoxied to the dash - don't fret! - it's a small trim piece that shouldn't be too pricey to replace if you need to revert to stock later on.Yeah, I realized it was a small piece. Makes me a little more excited about this.
yep! the connector on the display is a d-sub 15....typical computer stuff. It's feasible to buy an extension cable for this if you want to mount the boxes in the rear, but realized you'll also need to extend your connections for all the sensors as well (vacuum tube, wiring, etc). Not a big deal, though I don't know if this will create an issue for the boost sensor...the vaccuum line being so long, but I'll let others more knowledgeable than me chime in on that aspect.
As it was, the cable length on the display was long enough to just reach the underseat location when safely routing it behind trim panels. I think most applications will see these mounted under the dash, glovebox or in the engine compartment (in a dry spot), but in the MINI that's not so easy.
As it was, the cable length on the display was long enough to just reach the underseat location when safely routing it behind trim panels. I think most applications will see these mounted under the dash, glovebox or in the engine compartment (in a dry spot), but in the MINI that's not so easy.

Thread
Thread Starter
Forum
Replies
Last Post
igzekyativ
MINIs & Minis for Sale
34
Jul 16, 2020 12:54 PM
dchang0
Stock Problems/Issues
2
Aug 10, 2015 03:37 PM
dyeLucky
MINI Parts for Sale
3
Aug 7, 2015 07:10 AM