
Interior/Exterior 7507 LED Bulbs Front Turn Signal


Thread Starter
|
4th Gear
Joined: Mar 2005
Posts: 397
Likes: 0
From: SF Bay Area
7507 LED Bulbs Front Turn Signal
I purchased some 7507 LED bulbs from autolumination/superlumination, and I cannot get them to work in the front turn signals. They don't light up at all. I have 1156 and 1157 LED bulbs in the rear and they work with no problems (fast blinking, but I'm OK with that).
Has anyone successfully used 7507 LED bulbs in the front turn signals? Is there something weird about the wiring on Mini front turn signals? Thanks for any help.
Has anyone successfully used 7507 LED bulbs in the front turn signals? Is there something weird about the wiring on Mini front turn signals? Thanks for any help.


OVERDRIVE
Joined: May 2005
Posts: 8,233
Likes: 127
From: San Francisco
You need to swap the wires because the LED bulb requires a specific +/- connection, and it is opposite in the bulb holder. See my post#2 in this thread: https://www.northamericanmotoring.co...ad.php?t=83077
Thread Starter
|
4th Gear
Joined: Mar 2005
Posts: 397
Likes: 0
From: SF Bay Area
Thanks rkw. I will check to see if reversing the polarity will help.
MINIdave - I was referring to LED bulbs with a 1156 or 1157 base. No regulator/amp needed for the rear tail lights.
MINIdave - I was referring to LED bulbs with a 1156 or 1157 base. No regulator/amp needed for the rear tail lights.
Thread Starter
|
4th Gear
Joined: Mar 2005
Posts: 397
Likes: 0
From: SF Bay Area
rkw - Thanks for that tip again.  I followed your directions to reverse the wires, and the LED bulbs light up just fine now. As you said, no cutting is required, and regular bulbs still work without further mods, in case I ever wanted to go back to stock incandescent bulbs.
Here's a photo of the plug that connects to the bulb socket. The plastic "c-clip" is on the left. Remove this with a small screwdriver.

Now the clip is removed, and you can see the two metal tabs exposed. Press down on each one and then pull it out from the back of the plug.

Here's a photo of the back of the plug, with one of the metal tabs pulled all the way out. The other one is still in the plug. Just swap the positions and reassemble everything.
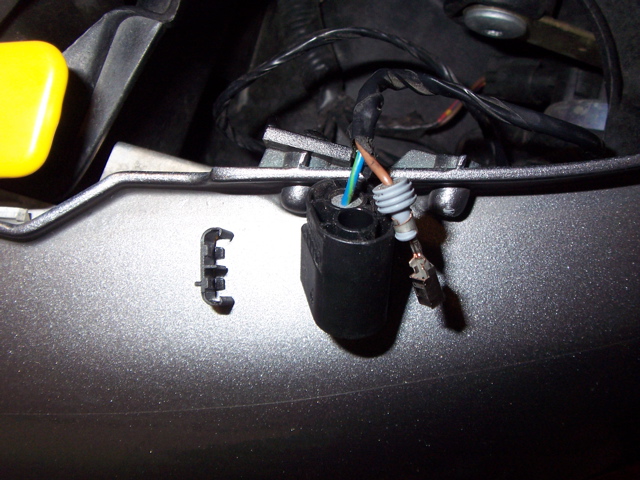
Takes 10-15 minutes if you are super careful and slow. Takes 5 minutes if you have done it before.
I followed your directions to reverse the wires, and the LED bulbs light up just fine now. As you said, no cutting is required, and regular bulbs still work without further mods, in case I ever wanted to go back to stock incandescent bulbs.Here's a photo of the plug that connects to the bulb socket. The plastic "c-clip" is on the left. Remove this with a small screwdriver.
Now the clip is removed, and you can see the two metal tabs exposed. Press down on each one and then pull it out from the back of the plug.
Here's a photo of the back of the plug, with one of the metal tabs pulled all the way out. The other one is still in the plug. Just swap the positions and reassemble everything.
Takes 10-15 minutes if you are super careful and slow. Takes 5 minutes if you have done it before.
Last edited by matma92ser; Jun 25, 2007 at 08:03 PM.
User Title's are Silly
Joined: Jul 2003
Posts: 2,022
Likes: 0
From: Arvada, Colorado
to stop the fast blinking, use something like this
http://www.superbrightleds.com/pdfs/...istor_info.pdf
A load resistor kit...scroll down, and you will see it.
http://www.superbrightleds.com/tail-brake-turn.html
http://www.superbrightleds.com/pdfs/...istor_info.pdf
A load resistor kit...scroll down, and you will see it.
http://www.superbrightleds.com/tail-brake-turn.html

I know, old thread, does anyone have a part number for this socket or the one for the driving clear light in the front?
I have 1x damage for each of those.
Thanks!
I have 1x damage for each of those.
Thanks!
rkw - Thanks for that tip again. I followed your directions to reverse the wires, and the LED bulbs light up just fine now. As you said, no cutting is required, and regular bulbs still work without further mods, in case I ever wanted to go back to stock incandescent bulbs.
Here's a photo of the plug that connects to the bulb socket. The plastic "c-clip" is on the left. Remove this with a small screwdriver.
Now the clip is removed, and you can see the two metal tabs exposed. Press down on each one and then pull it out from the back of the plug.
Here's a photo of the back of the plug, with one of the metal tabs pulled all the way out. The other one is still in the plug. Just swap the positions and reassemble everything.
Takes 10-15 minutes if you are super careful and slow. Takes 5 minutes if you have done it before.
I followed your directions to reverse the wires, and the LED bulbs light up just fine now. As you said, no cutting is required, and regular bulbs still work without further mods, in case I ever wanted to go back to stock incandescent bulbs.Here's a photo of the plug that connects to the bulb socket. The plastic "c-clip" is on the left. Remove this with a small screwdriver.
Now the clip is removed, and you can see the two metal tabs exposed. Press down on each one and then pull it out from the back of the plug.
Here's a photo of the back of the plug, with one of the metal tabs pulled all the way out. The other one is still in the plug. Just swap the positions and reassemble everything.
Takes 10-15 minutes if you are super careful and slow. Takes 5 minutes if you have done it before.

Thread
Thread Starter
Forum
Replies
Last Post
igzekyativ
MINIs & Minis for Sale
28
Dec 23, 2015 10:36 AM
I_drive_slow
R56 :: Hatch Talk (2007+)
7
Aug 18, 2015 10:47 AM
nismo4life
Stock Problems/Issues
3
Aug 5, 2015 08:31 AM