
Interior/Exterior Blue gauge backdrops


6th Gear
Joined: Jun 2006
Posts: 5,692
Likes: 2
Doubtful... Although you can certainly ask. Maybe you can talk one of the MINI techs into doing it on the side.
PS - Oznium now sells the PLCC surface-mount LEDs in a variety of colors @ $.49 each!
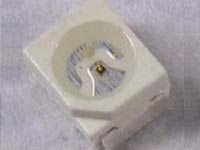
http://www.oznium.com/plcc-2
PS - Oznium now sells the PLCC surface-mount LEDs in a variety of colors @ $.49 each!
http://www.oznium.com/plcc-2

OVERDRIVE
Joined: May 2005
Posts: 8,233
Likes: 128
From: San Francisco
I have the same question as well -- what is a practical solution for working with surface mount components if you don't have access to specialized tools. It is possible to carefully use a clean, small soldering tip for a just few components, but there is plenty of opportunity to mess up if you have to do the many LEDs on a gauge.
6th Gear
Joined: Jun 2006
Posts: 5,692
Likes: 2
I asked a soldering wizard about this and he said to use "tweezer" style tips for pinpoint control. No specific solder was mentioned, however. Honestly, from what I'm hearing the main danger with this MOD is in overheating the LEDs or circuit board - the standard, inexpensive pencil-tip soldering iron that most peeple have access to pumps out so much heat that the LEDs will overheat in a very few seconds and fry out. Any componant next to the LEDs on the same board can also overheat. At the very least, if you cannot get access to a special fine-contriol tip then I'd definitely use a clip-on heat sink or two to help radiate away extra heat.

4th Gear
Joined: Jan 2007
Posts: 349
Likes: 0
I've got a 15 - 30 watt switchable gun with a real small tip. If I recall the packaging, it said 15 watts was good for close quarter and circuit board soldering. I'd probably need solder with a lower melting temp though.


4th Gear
Joined: Oct 2005
Posts: 311
Likes: 0
From: Chicago Burbs - North
As a hardware tech who does soldering this is a mod I look forward to. I am not quite as comfortable in the engine bay.
The Weller pictured should be fine.
Foxtrot: What manufacturer and part# for the LED's?
The Weller pictured should be fine.
Foxtrot: What manufacturer and part# for the LED's?

Sorry for the quiet. Family emergency over the weekend. I have the part #'s at work, and when I get back into the office, I'll post them.
I have two people waiting on me for gauges now - one MINI wants his in WHITE (really looking forward to that) and another wants his in DARK blue. (1nf3rn0's are a lighter blue. I don't recommend the dark blue because of current draw, but... <shrug>)
Cheers,
Mike.
I have two people waiting on me for gauges now - one MINI wants his in WHITE (really looking forward to that) and another wants his in DARK blue. (1nf3rn0's are a lighter blue. I don't recommend the dark blue because of current draw, but... <shrug>)
Cheers,
Mike.
For the blue used in 1nf3rn0's gauges, the MANUFACTURER is Agilent, and their part number is: HSMN-A100-P00J1. Ordered from Digikey, the DigiKey part number is 516-1464-1. Go to Digikey.com and on their home page put that into their search box. You can then view the datasheets and such. (Note that MINI uses OSRAM as their main manufacturer and LED supplier, and some LEDs, like the backwards SMDs used in newer switch panels, and the really micro ones used in the MSFW buttons can ONLY be found from OSRAM.) [Edit: I see Agilent OFFERS the reverse-mount now, haven't checked on availability.]
The LEDs are 2.8mm x 3.5mm. 3.2mm may work, but can't guarantee it - the ends of the LEDs may not reach the soldering pads - and I'm too cheap to try and experiment on another person;s gauges. When ordering the different sizes (like the reverse-mount, or the right-angle mount for the switch panel), be sure to match the nm of the LEDs, so they're all the same hue of the color. Usually you can deviate +-5nm and not notice a difference.
Any solder should work - there could be some higher temp solder out there that won't melt at a low temp for SMD.
On the plus side, I found out that as long as you don't damage anything around the LEDs, ruining a LED circuit will not harm the operation of the gauge - just the look. However, replacing a tach will run you about $280 and a speedo (for nav/chrono) will run about $350 from the dealer. I believe the center-mounted speedo is around $500, tho I haven't called to verify.
Cheers!
Me.
The LEDs are 2.8mm x 3.5mm. 3.2mm may work, but can't guarantee it - the ends of the LEDs may not reach the soldering pads - and I'm too cheap to try and experiment on another person;s gauges.
When ordering the different sizes (like the reverse-mount, or the right-angle mount for the switch panel), be sure to match the nm of the LEDs, so they're all the same hue of the color. Usually you can deviate +-5nm and not notice a difference.Any solder should work - there could be some higher temp solder out there that won't melt at a low temp for SMD.
On the plus side, I found out that as long as you don't damage anything around the LEDs, ruining a LED circuit will not harm the operation of the gauge - just the look. However, replacing a tach will run you about $280 and a speedo (for nav/chrono) will run about $350 from the dealer. I believe the center-mounted speedo is around $500, tho I haven't called to verify.
Cheers!
Me.


3rd Gear
Joined: Feb 2007
Posts: 199
Likes: 0
From: Terryville, CT
THANKS FOR THE NUMBERS!

Oh and how many did u use to do both speedo and tach?
Okay,. update. Here to help you guys:
1. Speedo board - 17 LEDs total. 10 for the Face, 1 for the dimmer button, and 6 for the LCD. Note: Don't change any of the indicator lights without careful exanimation. Several of them are multi-colored LEDs, and if you solder a standard LED into it's spot, you'll create a short.

2. Tach board - 8 LEDs. 4 for the Face, 4 for the LCD.

3. Switch board (later model) - 9 LEDs. 6 for the insignias across the top (not circled in image). 2 for reverse-facing cab lights. 1 for down (right-angle). Older board have 8 - 6 across the top, and two down (right-angle) facing.
Cheers,
Mike.
1. Speedo board - 17 LEDs total. 10 for the Face, 1 for the dimmer button, and 6 for the LCD. Note: Don't change any of the indicator lights without careful exanimation. Several of them are multi-colored LEDs, and if you solder a standard LED into it's spot, you'll create a short.
2. Tach board - 8 LEDs. 4 for the Face, 4 for the LCD.
3. Switch board (later model) - 9 LEDs. 6 for the insignias across the top (not circled in image). 2 for reverse-facing cab lights. 1 for down (right-angle). Older board have 8 - 6 across the top, and two down (right-angle) facing.
Cheers,
Mike.

Tac has 2 screws behind it on the steering collum. Spedo depends on what year your car is. On the 05+ cars just unscrew two little screws above the spedo and pop the interior trim panel infront of it off. You will also need to take the bezels around the hazard and dimmer buttons above the spedo. Then unscrew 4 screws holding the spedo on and take it of.
With the O2, I think you will have to take the top of the dash off. Just search for it...

Neutral
Joined: Jul 2006
Posts: 8
Likes: 0
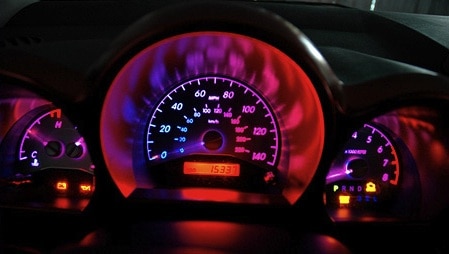
I recently got my gauges changed to blue by Mike (Foxtrot_Xray), and the results are amazing! Thanks to him for a wonderful job, something I never could have done. If anyone is considering this mod, I highly recommend it! (Of course, check with his schedule first unless you can do this yourself!  )
)
Mike had them done right on time, maybe even a little quicker than I thought! He was also good about keeping me updated daily, which was nice. Below are some pics to enjoy for anybody who might still be drooling over the possibility of changing your gauge colours. I know I was...
until now...
New Gauges!

Tachometer:

Speedometer:

High Beams (white indicator)

Tach in 'Test Mode'

Speedo in 'Test Mode'

)Mike had them done right on time, maybe even a little quicker than I thought! He was also good about keeping me updated daily, which was nice. Below are some pics to enjoy for anybody who might still be drooling over the possibility of changing your gauge colours. I know I was...
until now...
New Gauges!
Tachometer:
Speedometer:
High Beams (white indicator)
Tach in 'Test Mode'
Speedo in 'Test Mode'
OVERDRIVE
Joined: May 2005
Posts: 8,233
Likes: 128
From: San Francisco
I discovered on MINI2 that essentialmini.co.uk does the color conversions as a "while you wait" service for UK customers only. They run their own forum and it has pics of some very interesting color combinations: http://www.essentialmini.co.uk/phpbb...opic.php?t=136. Don't miss page 2 of the thread.


I'm not so sure about this crazy color mixing implementation:

I'm not so sure about this crazy color mixing implementation:
I've seen their stuff - I like their color combinations, and I REALLY like White - when I did romtoss's white HighBeam, I loved it. When I get my gauges upgraded to '05s or '06s (so I can get the current speed/current MPG info), I'm thinking about doing mine up in white / green. Their LCDs need a little work tho, I think. (Hard to tell in the pics, tho..)
(Hard to tell in the pics, tho..)