
Interior/Exterior Light that boot! (LED trunk light MOD)


5th Gear
Joined: Oct 2005
Posts: 942
Likes: 4
Jeremy: Sorry dude, I just rethought your post and now realize you are talking about the rear LED strip and package shelf.
What you see in my pics is my temp wiring to prove the concept. Yes, I have a plug and panel mounted jack sitting on my work bench that is scheduled for installation on week 49, hehe, couldn't resist that. Week 49, is next week I think. I went to Radio Shack and could not find anything but a straight plug and jack. A straight plug, even a small one sticks out more than I wanted.
When you start doing this you will realize that most of the area behind the plastic near the stock boot light is backed with metal. There are only a few locations where there is only plastic... such as directly under the stock light under that ledge. I went to a specialty electronics supply house and found a nicer plug and jack where the plug is molded into a 90 degree angle and therefore is very flush and won't stick out and be seen or damaged.
When I want to remove the shelf, then this plug and jack will just be disconnected and I'm good to go. I'll do more pics when I get this part completed. At the specialty store, I also found heat shrink tubing in all sizes and colors that was 36 inches long... this has been hard to find locally for me.
YD


I think its right on! Keep up the great work. I'd like to see some shots of connections

Thread Starter
|
6th Gear
Joined: Jun 2006
Posts: 5,692
Likes: 2

OVERDRIVE
Joined: May 2005
Posts: 8,233
Likes: 128
From: San Francisco
I can also suggest these 2-wire connectors:
http://www.radioshack.com/product/in...ductId=2103292
The package comes with 3 male/female pairs.
http://www.radioshack.com/product/in...ductId=2103292
The package comes with 3 male/female pairs.
3rd Gear
Joined: Aug 2005
Posts: 204
Likes: 0
From: Pulaski, TN
Ok guys you sold me on this one. I've ordered my 2 white LED strips from Oznium. I'm thinking about bypassing the light fixture all together with something like this....

Using spade connectors and plugging directly into the stock wiring. Has anybody mounted their plug in yet? I need some ideas! I'm trying to make it look as stock as possible. The headphone extender plug doesn't seem like a bad idea if I can get most of the cable hidden out of the way. Also the less loose cable in the boot the better. It would be nice to be able to mount something near where the end of the support channel ends.
This project has also inspired another one. I'm replacing the footwell and puddle lights with blue 194 Matrix LEDs from Autolumination. To go along with that look I've ordered 4 of the orange prewired SuperFlux LEDs to install in the door pockets. I saw a thread where someone had dropped battery operated halloween lights in the door pockets and it looked pretty cool. The plan there is to hook 1 or 2 of the SuperFlux LEDs into the puddle light wiring to cast light up from the bottom of the door pocket. A buddy of mine flipped his puddle lights up into the pocket and it looks pretty cool with the doors open. Hoping the orange somewhat matches the factory gage color.
Hopefully the orange will tie in with the dash lights and be complimented by the new blue puddle and footwell lights.
Any thoughts?
Thread Starter
|
6th Gear
Joined: Jun 2006
Posts: 5,692
Likes: 2
Those foot well and puddle lighs are gonna be VERY DIM, just so you know... I started there and eventually swapped the LED bulbs for cold cathode bars, because I couldn't see.  Of course, that was before the LED strip lights from Oznium, so I had to use a relay and get pretty Byzantine wiring-wise.. I'm planning on just replacing the cathodes with blue strip LEDs the next time I get an order together at Oznium - that way I can run power directly from the OEM foot well lights and retain the dimming functions - the one drawback to cathodes is that they cannot dim and must be switched with a relay... LEDs can dim all you like.
Of course, that was before the LED strip lights from Oznium, so I had to use a relay and get pretty Byzantine wiring-wise.. I'm planning on just replacing the cathodes with blue strip LEDs the next time I get an order together at Oznium - that way I can run power directly from the OEM foot well lights and retain the dimming functions - the one drawback to cathodes is that they cannot dim and must be switched with a relay... LEDs can dim all you like.
Thread Starter
|
6th Gear
Joined: Jun 2006
Posts: 5,692
Likes: 2
If you want to get REALLY fancy, try adding extra sets to the inside of the seat back plastic cover:
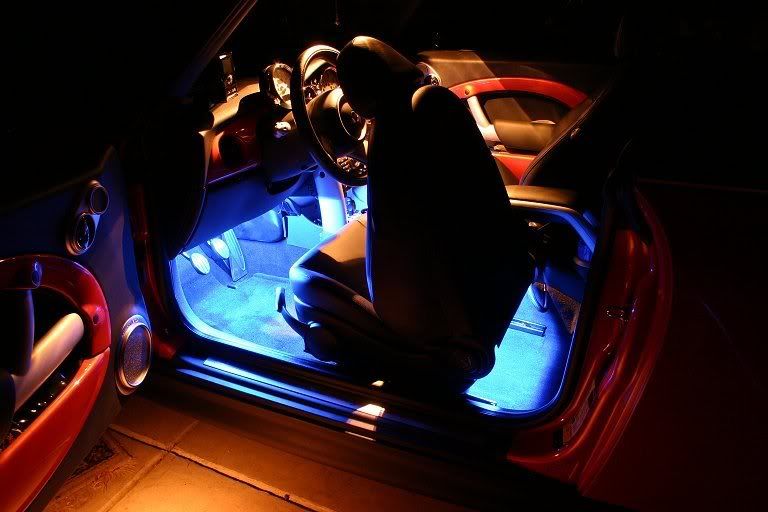
This was before I swapped my dome light and installed my map pocket LEDs, obviously. Hehehe... it's so fun that people are installing the LED strips in MINIs now... I feel like a pioneer.

Thread Starter
|
6th Gear
Joined: Jun 2006
Posts: 5,692
Likes: 2
Dim as in "I couldn't see". The colored light is dimmer than the white light. Of course, I have a Cabrio with the front-mounted dome light, so "darkness" is relative for me... It's hard to see in back even with all the extra lights I've installed. I'd suggest starting with replacement LED 194 bulbs (no wiring necessary - easy!) and then "upgrading" to LED strips if you find you need more light - I know for a fact that someone in Marketplace will snap up a set of barely used LED 194 bulbs if you wanto re-sell.
As for the lights in the seats, those are cold cathode bars actually, not LED strips - Oznium wasn't carrying the strips when I added those. They're wired direct to the batttery and are turned on by a relay triggered by the positive voltage coming from the OEM foot well circuit. The front pair of cathodes are on a single transformer and each stick in the back of the front seats have their own tranny - easier to wire it that way. As I said, though, now that the LED strip lights are out, I'm thinking I'll replace the cathodes with LEDs when it gets warmer - I like that the LEDs can dim along with the rest of the cabin lights. I could lose the entire relay that way, too, which would mean a simplier, cleaner install (always a good thing).
I'd suggest starting with replacement LED 194 bulbs (no wiring necessary - easy!) and then "upgrading" to LED strips if you find you need more light - I know for a fact that someone in Marketplace will snap up a set of barely used LED 194 bulbs if you wanto re-sell.As for the lights in the seats, those are cold cathode bars actually, not LED strips - Oznium wasn't carrying the strips when I added those. They're wired direct to the batttery and are turned on by a relay triggered by the positive voltage coming from the OEM foot well circuit. The front pair of cathodes are on a single transformer and each stick in the back of the front seats have their own tranny - easier to wire it that way. As I said, though, now that the LED strip lights are out, I'm thinking I'll replace the cathodes with LEDs when it gets warmer - I like that the LEDs can dim along with the rest of the cabin lights. I could lose the entire relay that way, too, which would mean a simplier, cleaner install (always a good thing).
5th Gear
Joined: Feb 2006
Posts: 623
Likes: 0
From: VA
OK, for people like me who have absolutely no experience doing anything remotely close to this, and who also have absolutely no background knowledge on things electrical (the closest I get is college physics, and that has since been wiped from my brain), can someone put together a step-by-step guide to doing both the boot and footwell lights? And I mean a seriously dumbed-down guide  . Yo'sDad, your pics of your connections for the boot light are good, but I have no clue how you did it.
. Yo'sDad, your pics of your connections for the boot light are good, but I have no clue how you did it.
Thread Starter
|
6th Gear
Joined: Jun 2006
Posts: 5,692
Likes: 2
Let me take a stab at it in a day or two... Honestly, since I was figuring these things out as i was going along, I neglected to shoot "in progress" pics. It's really simple though - the install basically takes advantage of the existing OEM white foot well light wiring - you're simply shooting for hooking the LED strips' positive and ground wires to the white lights' wires - since the strips draw so little power (less than the white OEM bulb you're replacing) you don't need to worry about additional fuses or anything else fancy.
Look under the dashboard and you'll see the OEM white foot well light - it pops out with a small flat screwdriver. You'll snip the wires leading to that light (turn off the cabin lights first, or, even better, discomnnect the negative battery terminal in the book to avoid a short) and use them with the LED strips. The nice thing about this sort of install is that the OEM ligjht is still there, just disconnected, so if you want to reverse it, all you have to do is remove the LED strips and re-connect the white lamps - literally a 5 minute reversal.
There's a bar under the dash that's perfect for zip-tying the LEDs to. I think it will be pretty clear when you look - it was for me anyway - but I'll give proper documentation a stab.
5th Gear
Joined: Oct 2005
Posts: 942
Likes: 4
Turcicus: I'll try to make you a step by step guide. Others can add more detail where necessary.
First, I want to thank ImagoX for this idea. I am in no way trying to take any credit for this mod... just trying to help others figure it out. Thanks, dude.
1 Decide how many and what color LED stip lights you want and order them from www.oznium.com. I used two of the nine inch white strips for my boot project.
2 Remove the access panel on the passenger side and reach up and push out the stock 194 light fixture. It will be connected with two push on wire connectors. The one that is mostly brown is the ground, the other is the +12 volt line.
3 If you want the stock bulb to burn, then leave it in place. If you don't, then remove it and save it for a future replacement.
4 If you remove the stock bulb, then install a 1K ohm 1/2 watt resistor where the bulb was (a pic that I posted is a few posts back), or you can use one of the diagrams that was also posted earlier that totally eliminates the stock light fixture. The purpose of the resistor is to prevent the LEDs from flickering when they are turned off. Then you will ultimately connect the wires from the LEDs to the two wires that used to connect to the stock boot light, install the resistor across from +12volt to ground and you are electrically finished.
5 Remove your package shelf and turn it upside down. Using black silicone sealer, seal your new LED stips to the under side of the package shelf on the front side of the support beam. The front side when the package shelf is in the proper position, or away from the round cut out for the rear wiper motor.
6 Run the wires over to the right side of the package shelf neatly and run a bead of sealer over them. Let this set up or dry overnight.
7 Now you need to find some sort of quick disconnect, so you can easily remove the shelf when you want. I found a nice disconnect at an electronics supply store (Radio Shack has some, but they were straight connectors and I wanted a 90° connector (I'll post a pic).
8 Drill a hole whever your want in the plastic panel just under the stock light. Connect your wires from the 'jack' side of this quick disconnect to the wires that went to your stock light. Mount the jack side of the quick disconnect from the inside sticking out and install the nut provided with the quick disconnect.
9 Now measure the necessary length of wire needed to get from the LEDs to the disconnect and cut them. Make sure you route them wherever you intend for them to be. There is a lot of room in this procedure for personal preferences, so you need to make some decisions as to what you want here.
10 For a nice finished look slip a length of properly sized heat shrink tubing over all of the wires from the LEDs to the plug end. Then solder the wires to the plug. For these LEDs, the silver wires are the +12volt and the copper wires are the ground.
11 Connect both silver wires to the plug's center post.
12 Connect both copper wires to the plug's outer post.
13 Test all of this electrically before you solder anything. If you get them soldered backwards, just reverse the quick connect original MINI wires.
This is about all there is. I personally got a 90° plug with a six foot cord.... only needed a small portion of that, but I ran that cord up to the LEDs so that I would have a heavier/stronger cord. You'll see in the pics. I pulled the wires out so you can see them, normally they are tucked in the crack of the seat back and the boot plastic.
If you have trouble, PM me.


OVERDRIVE
Joined: May 2005
Posts: 8,233
Likes: 128
From: San Francisco
I installed my white LEDs tonight in my cabrio, and I guess I'm the first to run 3 LED strips. I originally intended to run 2 strips. I mentioned earlier that one of the strips I received had a group of 3 LEDs that would go dark intermittently because of a loose contact (there is a total of 24 LEDs in a strip and the other 21 are fine). Oznium said to toss out the strip, and they immediately shipped me a free replacement. I installed it anyway, and found that 3 strips span nicely across the width of tray.
I created my power cable and quick disconnect from a headphone extension cord. It's a quick temporary setup for now. I'll post more details about my installation.

I created my power cable and quick disconnect from a headphone extension cord. It's a quick temporary setup for now. I'll post more details about my installation.

3rd Gear
Joined: Apr 2004
Posts: 184
Likes: 0
Imageox / Yo'sDad - great mod, great idea, great implementation! Any thought to leaving the stock light in place and having a switch to change from LED's to stock when the shelf is out? I am not much of an electrical wizard, but I think I will try it that way. Any ideas / problems you see?
5th Gear
Joined: Oct 2005
Posts: 942
Likes: 4
Your switching idea would work fine if you incorporate the resistor in the LED side. I saw no reason to have a 'stock only' set up and because I'm a nerd-geek, I didn't want the stock light burning also. No one will ever be poking around in my boot except me, so I'm the only one that I have to keep happy. Just my decision.
YD
YD
Thread Starter
|
6th Gear
Joined: Jun 2006
Posts: 5,692
Likes: 2

YD - can you link me to the power plug you used? I was looking on Radio Shack's site but couldn't find it.
Thanks!
5th Gear
Joined: Oct 2005
Posts: 942
Likes: 4
ImagoX, my son,
I didn't get it at RS. I found them at a mom and pop electonics supply house in Knoxville, TN.
They were off the rack, so to speak.
The brand is:
Philmore
LKG Industries
Rockford, IL
6ft DC Power Cord
2.5mm x 5.5mm DC plug No. TC250
DC Power Jack
2.5mm x 5.5mm No. 248
If you can't find them, let me know and I'll drive by and pick a set up and mail them to you.
If you call them, I'm sure they will send you a set also.
The store is:
Shields Electronics
865-588-2421
This is a very common item (except at RS) and should be easy to find. It was the 90° issue that made it more difficult for me. The straight ones were all over the place. But you know I had to have exactly what was perculating in my little beanie.
BTW, since you know the Oxnium people, mayhaps you might suggest that they carry a line of plugs and jacks??????
YD

3rd Gear
Joined: May 2004
Posts: 243
Likes: 0
From: 3rd Stone from the Sun
It might be good to have the stock light available when the shelf is removed. Perhaps a jack is available that could be wired to disconnect the stock light when the LED plug is inserted. Gotta be careful about the contacts' current rating and non-shorting features however.
According to the data sheet, the contacts are rated at 2A (enough?)