
Interior/Exterior Side marker ... a littlle different


Thread Starter
|
6th Gear
Joined: Nov 2003
Posts: 2,349
Likes: 2
From: Concord, California
Side marker ... a littlle different
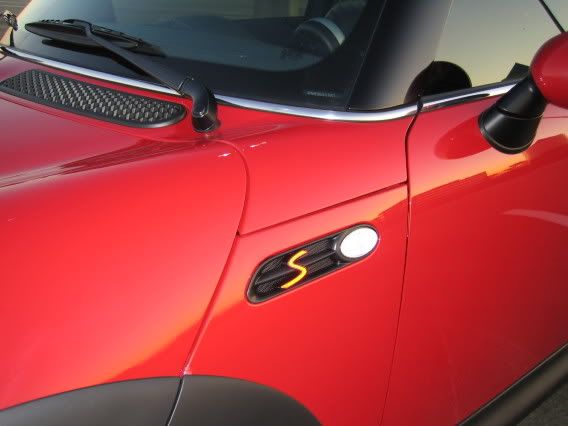
I removed and disasembled the side markers.
Removed the "S" from the chrome part.
Painted the chrome satin black.
and tinted the lens red
Rassembled and installed ...

Removed the "S" from the chrome part.
Painted the chrome satin black.
and tinted the lens red
Rassembled and installed ...
Last edited by COR BLMY; Apr 8, 2006 at 02:00 AM. Reason: spelling


Thread Starter
|
6th Gear
Joined: Nov 2003
Posts: 2,349
Likes: 2
From: Concord, California
It is a satin finish on the black paint
I thought about smoke for the bulb ... but I am CR so it looks different .. may go smoke later.

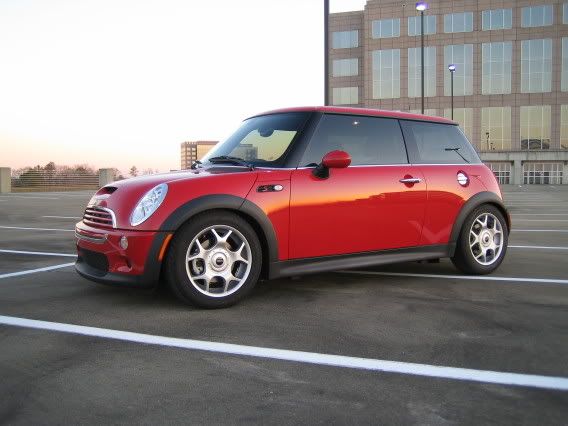
More photos of all parts in gallery
I thought about smoke for the bulb ... but I am CR so it looks different .. may go smoke later.
More photos of all parts in gallery

Trending Topics

Question, what exactly did you use to tint your reflectors that red color. Obviously it wasn't any old red paint, as it is transparent enough to see through to the reflector...
Thanks!
Thanks!

6th Gear
Joined: Sep 2005
Posts: 3,961
Likes: 1
From: Middle of Texas
Originally Posted by jonnieoh
Question, what exactly did you use to tint your reflectors that red color. Obviously it wasn't any old red paint, as it is transparent enough to see through to the reflector...
Thanks!
Thanks!
I'm going to guess that it's spray tint.... maybe not though.
Curious to see where that came from if it is, the only red spray tint I've seen was online and way too much for such a small project.
Curious to see where that came from if it is, the only red spray tint I've seen was online and way too much for such a small project.
Thread Starter
|
6th Gear
Joined: Nov 2003
Posts: 2,349
Likes: 2
From: Concord, California
The material uesd to tint is ORACAL 8300
avaliable in LOTS of colors !
It is an adhesive film that can be streched buy using a heat gun.
Take a look at my gallery I did my tail lights as well.
No moe orange blinkers and you can't see the chrome
Cool thing is it still reflects back so it is "legal"
avaliable in LOTS of colors !
It is an adhesive film that can be streched buy using a heat gun.
Take a look at my gallery I did my tail lights as well.
No moe orange blinkers and you can't see the chrome
Cool thing is it still reflects back so it is "legal"


3rd Gear
Joined: Apr 2006
Posts: 218
Likes: 1
From: Anaheim, CA
Originally Posted by bpago
Interesting ...
I didn't know that the "S" was reflectorized untill taking these shots
I'm going black with a Blue S. And then going with the Black Side markers available at Outmotoring.
That looks clean though, good job. Gives me a little inspiration.


I have to admit to orange lens envy on those MCs... I'm not a huge fan of the clear lens on the MCS... especially on Pepper White...
I was thinking of doing something very similar to what you've done. My experience in such things, however, was limited to the same parts...but on MODEL KITS> ha!
We used to use this Tamiya transluscent glaze. There was a great block glaze that made smoke glass efect, and a red/orange that accomplishes the... red/orange... lens look. I was thinking that there wasn't any reason why a glaze like that applied to the inside face of the lens wouldn't work. The black de-chromed look for the surrounding panel looks awesome, though.

4th Gear
Joined: Sep 2005
Posts: 316
Likes: 0
From: Royal Oak, Michigan
Not quite DIY (do-it-yourself), but OTS (off-the shelf) from a place called OPMD.com - I think that these are from the UK. They are called Black Jewel repeaters, and I think that they these would look great on a dark MINI, or expecially good on a PW with a dechromed look.

I need to pick up some of these for old Mr. Neb.
I need to pick up some of these for old Mr. Neb.
Thanks for the idea and the tips!! I had to steal it, but put a little twist on it.
I did mine this weekend as well, smoked out lights from outmotoring.com come this week...Did you use a spry plastic primer or primer from a can? I used Rust-Oleum Plastic primer in a spray can. I didn't apply as light of a coat as I should have with the primer on mine, mainly because it wasn't actually coating the entire piece with the wind blowing in the afternoon so I let the primer flash dry in the hot sun and applied very light coats to get all the surface areas I needed covered and one final light coat. Once dry I painted multiple coats of black, but found the best coats were when standing further back to get a more textured look.
I let the paint dry in the sun, but was a little over eager on the install and scratched one piece (of course ) so I need to touch it up -but I'm very happy with the outcome.
Before...

After...

Originally Posted by NokturnalMCS
I'm actually in the process of doing the same thing. I had a hard time with the primer adhering to the plastic though.
I'm going black with a Blue S. And then going with the Black Side markers available at Outmotoring.
That looks clean though, good job. Gives me a little inspiration.
I'm going black with a Blue S. And then going with the Black Side markers available at Outmotoring.
That looks clean though, good job. Gives me a little inspiration.
I let the paint dry in the sun, but was a little over eager on the install and scratched one piece (of course
) so I need to touch it up -but I'm very happy with the outcome.Before...
After...

Vendor
Joined: Jan 2006
Posts: 304
Likes: 0
From: La Puente, CA
Originally Posted by babblingdweeb
Thanks for the idea and the tips!! I had to steal it, but put a little twist on it.
I did mine this weekend as well, smoked out lights from outmotoring.com come this week...Did you use a spry plastic primer or primer from a can? I used Rust-Oleum Plastic primer in a spray can. I didn't apply as light of a coat as I should have with the primer on mine, mainly because it wasn't actually coating the entire piece with the wind blowing in the afternoon so I let the primer flash dry in the hot sun and applied very light coats to get all the surface areas I needed covered and one final light coat. Once dry I painted multiple coats of black, but found the best coats were when standing further back to get a more textured look.
I let the paint dry in the sun, but was a little over eager on the install and scratched one piece (of course ) so I need to touch it up -but I'm very happy with the outcome.
Before...
After...
I did mine this weekend as well, smoked out lights from outmotoring.com come this week...Did you use a spry plastic primer or primer from a can? I used Rust-Oleum Plastic primer in a spray can. I didn't apply as light of a coat as I should have with the primer on mine, mainly because it wasn't actually coating the entire piece with the wind blowing in the afternoon so I let the primer flash dry in the hot sun and applied very light coats to get all the surface areas I needed covered and one final light coat. Once dry I painted multiple coats of black, but found the best coats were when standing further back to get a more textured look.
I let the paint dry in the sun, but was a little over eager on the install and scratched one piece (of course
) so I need to touch it up -but I'm very happy with the outcome.Before...
After...
I'm gonna spray on the Flat Black today and give it a few coats. Let it dry a day or so and then I'm gonna use a paint brush to do the S's. Let that dry after a few coats and probably give it a few Clear Coats to seal it down. It's gonna end up a little glossy, but at least it can take the weathering. And at least it's not Chrome.
I'll get pics to you when I'm done though. Are you gonna do the Black Lenses too?
Originally Posted by Megan Racing
Are you gonna do the Black Lenses too?
Also -good call on sanding the plastic down. The primer will rally adhere to the plastic if you do that. I am thinking about repainting mine after I got knicked with a rock yesterday.
No problem! Camera battery died (of course) so I'll snag one at home in the light and at night...it's really an optical illusion, not dark at all. The lens is almost clear, but instead of the white plastic backing (on the standard S lights) it's black...so they appear darker than they really are.