
Interior/Exterior Custom install of Passport 8500 remote mount


Thread Starter
|
6th Gear
Joined: Jul 2004
Posts: 3,054
Likes: 10
Custom install of Passport 8500 remote mount
The Passport 8500 has a remote visual alert and mute button that you can use in conjunction with a permanently wired soulution

I couldn't find a satisfactory place to put it where the light would be in my line of sight while driving, so I got creative! :D
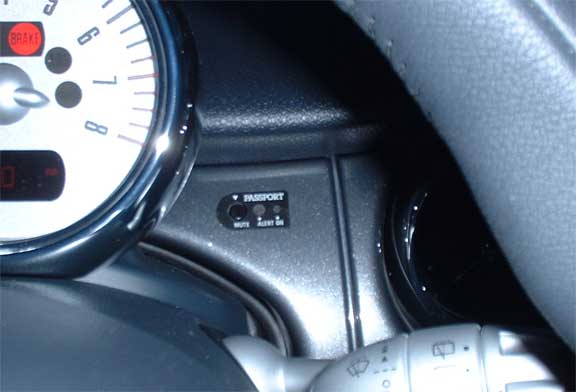
The install was inspired by this: http://www.audi-tt.org/tech/elec102.shtml
He did such a great job with pictures and documentation that I didn't bother.
The install went something like this:
I couldn't find a satisfactory place to put it where the light would be in my line of sight while driving, so I got creative! :D
The install was inspired by this: http://www.audi-tt.org/tech/elec102.shtml
He did such a great job with pictures and documentation that I didn't bother.
The install went something like this:
- Remove the painted dash piece that is over the steering column
- Trim and file away some of the excess plastic bracing on the dash piece
- Disassemble the remote mount and file away large portions of the housing. Save the sticker that lables the buttons and LED's.
- Reassemble the remote mount
- Drill 3 holes through the dash piece for the mute button and 2 LEDs
- Superglue the remote mount to the back side of the dash
- Afix the sticker to the front of the dash for a clean look
- Hardwire the detector following Passport's directions - using Add-a-Circuit
I'm glad you liked the radar remote install. I got the "Direct Wire" kit from Passport (http://www.escortradar.com/shop.htm) and started with that.
If you do this, be sure to take your time and test-fit, test-fit, test-fit. The key is to get a large flat face on the front of the remote detector so it will superglue properly to the back of the dash piece. I had to trim / dremmel / file away some bits on the back of the dash as well as almost destroy the housing of the remote mount... I took the face sticker off, removed the electronics and then spent a few hours (while watching TV), using a long flat rasp (file) to remove lots of excess plastic from the remote housing. I got in a hurry (big mistake) when I was drilling the holes... it was one of the last steps and I got anxious. The whole key to getting this right is to take your time and line it all up, file a bit, line it up again, file some more...
I got lucky when I screwed up the drilling (my holes were neither straight nor the correct distance apart... the bit kept wandering on the smooth dash), because the face sticker is very forgiving.
Also, be careful when you superglue the remote to the back of the dash. If there is any pressure on the side of the mute button, it will get stuck in the 'pressed' state. Remember that the button hole will be covered by the sticker, so you can drill it a bit large (or even a bit cockeyed / oval-ish to adjust the position of the housing) and you will still be OK. Drill the button hole first... check that the housing fits, the button works and that the housing is level... then mark and drill the light holes.
When I connect the detection unit, I use the visor clip and attach it to the headliner, just to the left of the rear veiw mirror. I ran the power cable up the driver's side A pillar and above the headliner. I just tuck it into the headliner when I'm not using the detector and no traces (other than the dash piece) are visable.
Good luck and ask me questions if you have any!
Aaron


Thread
Thread Starter
Forum
Replies
Last Post
igzekyativ
MINIs & Minis for Sale
34
Jul 16, 2020 12:54 PM
squawSkiBum
MINI Parts for Sale
15
Oct 2, 2015 09:21 AM
skippermini
Stock Problems/Issues
2
Aug 13, 2015 06:13 AM