
Interior/Exterior Plasti-Dip Happy Feelings!

Thread Starter
|
1st Gear
Joined: Jan 2013
Posts: 46
Likes: 0
From: Ft. Lauderdale, FL
Remove, definitely. This way you can be sure you're getting complete coverage of the trim and you don't want to over spray onto or into the grill which is a different shade of black.


5th Gear
Joined: Jan 2013
Posts: 750
Likes: 2
From: Orange County, NY
I used it con my front grille, scoop. Saddly ran out of plasti dip to finish the headlights and tail lamps.
Not very sure about the scoop, when I get more and paint the surrond of the headlights will compare with my stock blue scoop (I used another scoop I had hehe). And will also take better pictures
Not very sure about the scoop, when I get more and paint the surrond of the headlights will compare with my stock blue scoop (I used another scoop I had hehe). And will also take better pictures
I've been trying to source another scoop so I can put a cool design right at the opening (before the grill). I ultimately want a black scoop with a nice design in pepper white and red (pinstripe style) - subtle, but noticeable!

Neutral
Joined: Feb 2013
Posts: 6
Likes: 0
Plasti-Dip'd Camden S
I was told about this magic juice a month or so ago and I'm a complete ADDICT!!! EVERY black thing you see is "dip'd". Emblems, door handles, exhaust tips, wheels & headlight, tail light & grill trim. The roof, scoop & stainless trim around car are next. (footnote: Do NOT take your MINI thru a "pull-thru" car wash if you do the wheels... the rub rail scuffs the front driver's wheel enough to peel up the dip...  OOPS! But nuttin' 60 minutes and $6 didn't fix!
  )
)
Here's a link to pics of a clone of mine as it was when I bought it in January: http://www.automobilesreview.com/pic...r-s-50-camden/
... and now. LOVE THE DIP!!!!
Total $ spent so far? $6 a can (at Home Depot) times 6 cans and some masking tape... $40 bucks!!! BTW, Fonzie has the best "how-to" vids and links to buy all the colors at: http://www.youtube.com/user/DipYourCarcom?feature=watch
(No, I'm not a paid spokesman nor do I have any vested interest in Plasti-Dip... the s#it's just incredible!!!


OOPS! But nuttin' 60 minutes and $6 didn't fix! ) Here's a link to pics of a clone of mine as it was when I bought it in January: http://www.automobilesreview.com/pic...r-s-50-camden/
... and now. LOVE THE DIP!!!!
Total $ spent so far? $6 a can (at Home Depot) times 6 cans and some masking tape... $40 bucks!!! BTW, Fonzie has the best "how-to" vids and links to buy all the colors at: http://www.youtube.com/user/DipYourCarcom?feature=watch
(No, I'm not a paid spokesman nor do I have any vested interest in Plasti-Dip... the s#it's just incredible!!!


5th Gear
Joined: Nov 2011
Posts: 1,073
Likes: 2
I used PD on my headlight/taillight surrounds as well as grill (grill is now 3M CF) and the stuff works very well and matches the oem fender material perfectly. There are people who poo poo PD including one well known MINI vinyl installer I know of who claimed PD is cheap and chips and peels if the wind blows stiff. Not true as we all know. My ZpD has been on over a year and still looks new.
Neutral
Joined: Feb 2013
Posts: 6
Likes: 0

This was my 1st day, freshman year of Plasti-dip High... needs to be put on thicker (more coats), and in warmer temps (was 43 degrees when applied). The beauty of this s#it is that it's crazy cheap, easy, and can be redone as many times as necessary... and when the "black out" look goes the way of the leisure suit, just peel it off!


This was my 1st day, freshman year of Plasti-dip High... needs to be put on thicker (more coats), and in warmer temps (was 43 degrees when applied). The beauty of this s#it is that it's crazy cheap, easy, and can be redone as many times as necessary... and when the "black out" look goes the way of the leisure suit, just peel it off!
I've found that the temp is just about the most important part of applying it. too cold and it splatters out of the can and then doesnt blend very well. I used a painters lamp - $4 plus a $5 spot light bulb at Home Depot - the last time I did it. The heat from the lamp was just enough to balance the 45degree air temp.
Practice now and go big as spring gets warmer.
This was my 1st day, freshman year of Plasti-dip High... needs to be put on thicker (more coats), and in warmer temps (was 43 degrees when applied). The beauty of this s#it is that it's crazy cheap, easy, and can be redone as many times as necessary... and when the "black out" look goes the way of the leisure suit, just peel it off!

I just bought a can of Smoke PD, when I get my car back Friday, Saturday morning I will start to PD the side reflectors, it's so ugly the way it looks now. It'll look 100x better when I'm done smoking them out.

1st Gear
Joined: Oct 2013
Posts: 29
Likes: 0

I really like what you've done to your Mini! I've a 2002 MCS in Silver/black and i'm looking at your stripes. The way you've done them is how i'm gonna do it too! But I'm going to use plasti dip first, to see if it suits me.....
do you have more pictures, particularly of the back?
much appreciated...

Neutral
Joined: Nov 2013
Posts: 5
Likes: 0
just did some plasti-dipping today, basically had to re-touch the trim pieces on the car....tailight, headlight/washers, gas cap, and front grill.
I've been thinking about PD'ing my hood scoop and door handles, but I'm still debating. Has anyone had experience with either of those?
I've been thinking about PD'ing my hood scoop and door handles, but I'm still debating. Has anyone had experience with either of those?
1st Gear
Joined: Oct 2013
Posts: 29
Likes: 0
and don't forget the nuts, this time
But anyhow, I can't help but noticing, the plasti dip finish of all these plasti-dipped parts is a bit bobly, not smooth? When I see all these videos from plastidipyourcar.com, I get the idea, it should be a smooth finnish if somewhat matted....
Is this normal behavior or is it just very difficult?
Gijs
Neutral
Joined: Nov 2013
Posts: 5
Likes: 0
Their are many reasons why they can turn out bubbly or blotchy. It all depends on the temperature outside, the wait time before each coat, the distance you are spraying at, and the angle your holding the can. I took my time with the hood scoop. I purchased the spray attachment for the aerosol cans that helped the spray pattern. My first coat was real, real light just to get a texture started on the scoop. Most people rush into it, and want to see results right then and there. I waited about 20 minutes between each coat and it was mid 80's outside. I did a total of 5 coats. It turned out smooth with no bubbles or buildup. I also cleaned the nozzle after each coat to make sure it came out the same way each time.

3rd Gear
Joined: Sep 2013
Posts: 214
Likes: 0
From: Orlando, FL
What exactly are the benefits to plasti-dipping vs wrapping? I work with cars all day long and I cannot understand for the life of me, the whole plasti-dip trend. Sure, the stuff looks good from afar .. but up close, it's gritty, rough, textured, and just totally unclean.
Wrapping takes half the time, comes out smoother than a baby's bottom, and can still be removed anytime.
Is there another benefit to the plasti-dip or do people choose it because it's cheaper?
Wrapping takes half the time, comes out smoother than a baby's bottom, and can still be removed anytime.
Is there another benefit to the plasti-dip or do people choose it because it's cheaper?

2nd Gear
Joined: Sep 2013
Posts: 54
Likes: 0
From: Milwaukee
I was told about this magic juice a month or so ago and I'm a complete ADDICT!!! EVERY black thing you see is "dip'd". Emblems, door handles, exhaust tips, wheels & headlight, tail light & grill trim. The roof, scoop & stainless trim around car are next. (footnote: Do NOT take your MINI thru a "pull-thru" car wash if you do the wheels... the rub rail scuffs the front driver's wheel enough to peel up the dip... OOPS! But nuttin' 60 minutes and $6 didn't fix! )
Here's a link to pics of a clone of mine as it was when I bought it in January: http://www.automobilesreview.com/pic...r-s-50-camden/
... and now. LOVE THE DIP!!!!
Total $ spent so far? $6 a can (at Home Depot) times 6 cans and some masking tape... $40 bucks!!! BTW, Fonzie has the best "how-to" vids and links to buy all the colors at: http://www.youtube.com/user/DipYourCarcom?feature=watch
(No, I'm not a paid spokesman nor do I have any vested interest in Plasti-Dip... the s#it's just incredible!!!
OOPS! But nuttin' 60 minutes and $6 didn't fix! ) Here's a link to pics of a clone of mine as it was when I bought it in January: http://www.automobilesreview.com/pic...r-s-50-camden/
... and now. LOVE THE DIP!!!!
Total $ spent so far? $6 a can (at Home Depot) times 6 cans and some masking tape... $40 bucks!!! BTW, Fonzie has the best "how-to" vids and links to buy all the colors at: http://www.youtube.com/user/DipYourCarcom?feature=watch
(No, I'm not a paid spokesman nor do I have any vested interest in Plasti-Dip... the s#it's just incredible!!!
Any advice is appreciated

1st Gear
Joined: Nov 2013
Posts: 17
Likes: 0
There are a number of contributors to a rough finish, as has been outlined. Environment really has a lot of effect and most people don't seem particular enough to mind a little texture. I went to a guy locally who's been making a killing dipping cars and quickly decided there was no way I'd pay someone for that kind of quality when I'm sure I could do it myself.
I mixed a custom color - the local "pro" did his car before I did mine and my first attempt at "dipping" was my 2012 Scion tC. His car looked like total garbage next to mine - he even made a comment along the same lines.
Random:
Dipping the handles isn't a great idea as it's more likely to come off before you want it to.
Wrapping can take significantly longer than dipping. I'd actually say wrapping on average takes twice as long, costs 3-4x as much, and takes at least twice as long to remove.
1st Gear
Joined: Aug 2014
Posts: 19
Likes: 0
From: Denver, CO
My 2007 Astro Black MC is begging to have some custom PD applied. My only problem is...do I go for the "black-out" look, or something a bit...brighter? When clean, the Astro Black metallic is rather prominent...causing an almost bluish hue to it. I wonder how matte black from the PD on all the trim would look against the not-quite-utterly-black color of the OEM paint.
I'm thinking about doing sort of a burnt orange color (if possible), akin to danigurrl's OEM paint, except this would be in reverse obviously. But again...wondering about the matte contrasting with the Astro Black.
Obviously it's my decision and preference, but if someone has some perspective I've failed to think of it would be much appreciated.
1st Gear
Joined: Aug 2014
Posts: 19
Likes: 0
From: Denver, CO
So here's my first go at Plasti Dip! I think it turned out great. This stuff is indeed very easy to work with. Like anything, quality prep work is essential. Some before and after PD on the wheels as well as Back to Black on the trim:
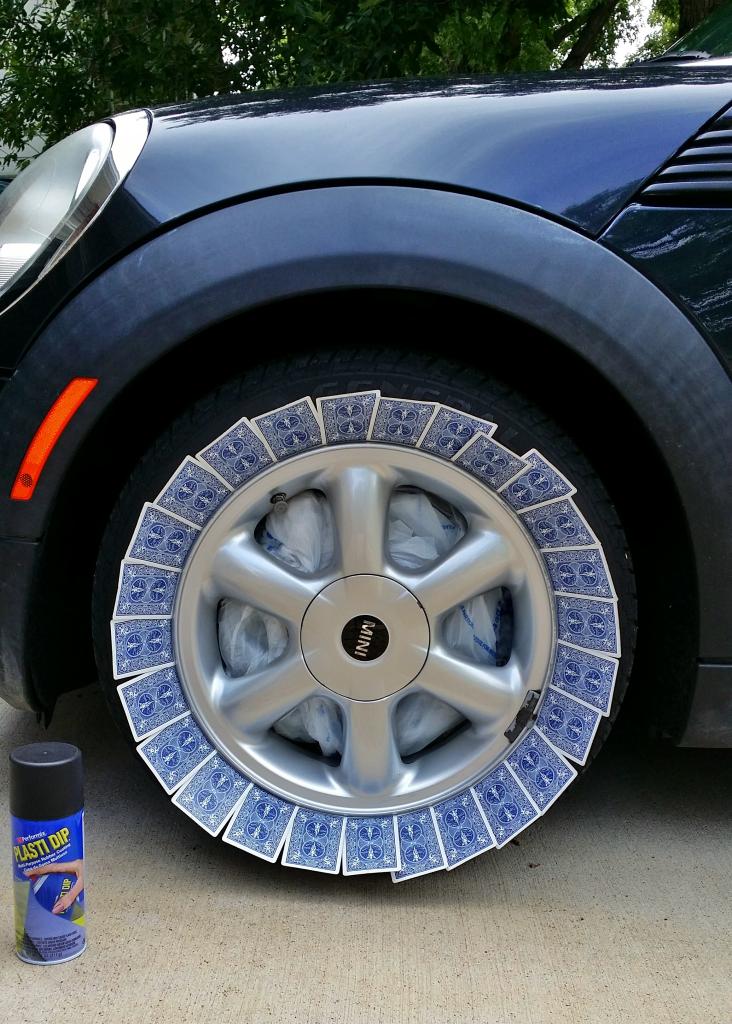
I took off the center caps and taped off the center area of the center caps to spray separately, then installed them after spraying the wheels. Turned out cleeeeean.
...and yes, there's some trim damage to the underside. I didn't notice it until after I bought the car. Gotta look into replacing it...=/
As for the matte finish...I think it looks great as-is. Makes for a nice match to the plastic trim (after Back to Black, of course). So I'm not gonna use Glossifier.
Last edited by Gauntylgrym; Aug 10, 2014 at 07:57 PM.