
Interior/Exterior Brake duct removal


5th Gear
Joined: Nov 2011
Posts: 1,073
Likes: 2
I tried to go at the front a couple times but I saw that I was going to marr something if I kept at it. I've since removed the front end to install an FMIC and could see that removing them from the front as i was trying to do would have been very sketchy and I likely would have broken something. Clips, etc. werent where i was thinking they were and the ducts on my car are in there TIGHT. I decided against painting the ducts afterall even though I'd removed the aero kit. My advice is to remove the front aero kit to get to the ducts. At least if you have a 2012 JCW.

2nd Gear

Joined: Mar 2012
Posts: 147
Likes: 0
I tried to go at the front a couple times but I saw that I was going to marr something if I kept at it. I've since removed the front end to install an FMIC and could see that removing them from the front as i was trying to do would have been very sketchy and I likely would have broken something. Clips, etc. werent where i was thinking they were and the ducts on my car are in there TIGHT. I decided against painting the ducts afterall even though I'd removed the aero kit. My advice is to remove the front aero kit to get to the ducts. At least if you have a 2012 JCW.
I know that there were some change between the 2012 and 2013, but I would assume that they are fairly similar. I watched the Helix video which shows a step-by-step process of removing the bumper cover, but my pop fastners seem to be recessed and difficult to get to.


5th Gear
Joined: Nov 2011
Posts: 1,073
Likes: 2
How do you get the pop fastners off of the underside of the bumper cover? I have a 2013 and am trying to get the bumper off to remove the front badge.
I know that there were some change between the 2012 and 2013, but I would assume that they are fairly similar. I watched the Helix video which shows a step-by-step process of removing the bumper cover, but my pop fastners seem to be recessed and difficult to get to.
Video Link: http://www.youtube.com/watch?v=Hpg4YodLiIw&feature=plcp
Here's a pic of the small threaded pop fasteners I talked about:

2nd Gear
Joined: Mar 2012
Posts: 147
Likes: 0
That Helix video is a bit outdated but similar to the newer JCW front ends in many regards. The main difference is 3 or 4 very small fasteners along the underside of the front lip. They aren't popit fasteners either but work similarly. Instead of popping out the rivet portion you unscrew it via Philips head (IIRC). Problem is they're tiny and the threaded portion will often spin the whole fastener making it impossible to remove. It doesn't help that the holes to reach these are very small. Aside from that, on the underside, there are two larger metal fasteners total. one on each end and two larger popits toward the center. Everything else is pretty much just like the HELIX video
Here's a pic of the small threaded pop fasteners I talked about:
Attachment 67317
Here's a pic of the small threaded pop fasteners I talked about:
Attachment 67317

5th Gear
Joined: Nov 2011
Posts: 1,073
Likes: 2
Glad to help!
What I thinks funny is you wouldn't think those three little tiny things could hold a front bumper so solidly. Don't feel bad, I had to mangle the last one with an angled pair of needle nose pliers to get it out since I'd stripped out the soft plastic Philips head on it. I ended up using a dremel to grind a small flat head slot in it to put it back in. It worked great but Next time I remove the front I'm going to try and find some equivalent size pop-it fasteners to replace those things. Much simpler!
What I thinks funny is you wouldn't think those three little tiny things could hold a front bumper so solidly. Don't feel bad, I had to mangle the last one with an angled pair of needle nose pliers to get it out since I'd stripped out the soft plastic Philips head on it. I ended up using a dremel to grind a small flat head slot in it to put it back in. It worked great but Next time I remove the front I'm going to try and find some equivalent size pop-it fasteners to replace those things. Much simpler!
2nd Gear
Joined: Mar 2012
Posts: 147
Likes: 0
If you really wanted to, you can buy a replacement from Sewell (#14 I think). Either that, or go by your dealer and see if the parts department carries them. I actually had the expanding piece of one of my Philips ones fall inside the bumper cover. Fortunately it came out when I backed it out the drive way. Good idea on the Dremel. I may give it a try on my rounded off one (I don't think I caused it).

Banned
Joined: Jun 2011
Posts: 1,173
Likes: 1
Here are some pics showing the tabs. The bumper does not need to come off. I just replaced both of mine by using a plastic wedge thing I had laying around. In the first pic the three tabs must be popped first then the bottom and then it will come out. Be careful as to much force will break on of those three tabs. Take your time and go slow, using a credit card or something similar to protect the other part, as stated by Mymojomini, as you pry.


Last edited by rum4; Dec 27, 2012 at 04:18 PM.

4th Gear
Joined: May 2013
Posts: 314
Likes: 0
Just to confirm, the only way to cleanly replace there R56 ducts is by removing the bumper?

1st Gear
Joined: Jun 2009
Posts: 38
Likes: 0
From: Chicago
Hi all a bit late to the show? I noticed that my bottom grill where my ducts are located is on piece with the ducts, does this sound right or did I not notice where it splits, I have a JCW 2012 coupe. Any advice would be great the video rocks by the way!

Did mine kite blue , I had ice/sand damage to bumper from ice storm and the BMW body shop did them for free when I asked. I used to have chrome ones but moved those to wifes MINI. I did break a tab removing my black ones so was more carefull the next time.
1st Gear
Joined: Jun 2009
Posts: 38
Likes: 0
From: Chicago
You will need to remove the top grill, undo the bumper screws under the grill (2), if you have the aero kit remove the plastic cover that goes around the lower grill, it's placed on there with clamps and just pressure. Once you do all of that remove the clamps off there lower grill (push in not out) then the clamps around the ducts. I didn't use anything to remove the clamps, since a flat head might scratch the plastic. Once all the claps are out maneuver everything to one side pushing just the grill to the right or left to give you space to remove one duct once you get one off, the grill will come off. To get everything in, place one of the ducts on the bumper and the other clamped on the grill. Slide the lower grill in and be careful to not break any clamps. This will take some time and patience but that's how I did it. I bought the red ducts from outmotoring!
4th Gear
Joined: May 2013
Posts: 314
Likes: 0
Thanks. Well done!
You will need to remove the top grill, undo the bumper screws under the grill (2), if you have the aero kit remove the plastic cover that goes around the lower grill, it's placed on there with clamps and just pressure. Once you do all of that remove the clamps off there lower grill (push in not out) then the clamps around the ducts. I didn't use anything to remove the clamps, since a flat head might scratch the plastic. Once all the claps are out maneuver everything to one side pushing just the grill to the right or left to give you space to remove one duct once you get one off, the grill will come off. To get everything in, place one of the ducts on the bumper and the other clamped on the grill. Slide the lower grill in and be careful to not break any clamps. This will take some time and patience but that's how I did it. I bought the red ducts from outmotoring!
3rd Gear
Joined: Nov 2011
Posts: 292
Likes: 0
From: UT, USA
You will need to remove the top grill, undo the bumper screws under the grill (2), if you have the aero kit remove the plastic cover that goes around the lower grill, it's placed on there with clamps and just pressure. Once you do all of that remove the clamps off there lower grill (push in not out) then the clamps around the ducts. I didn't use anything to remove the clamps, since a flat head might scratch the plastic. Once all the claps are out maneuver everything to one side pushing just the grill to the right or left to give you space to remove one duct once you get one off, the grill will come off. To get everything in, place one of the ducts on the bumper and the other clamped on the grill. Slide the lower grill in and be careful to not break any clamps. This will take some time and patience but that's how I did it. I bought the red ducts from outmotoring!


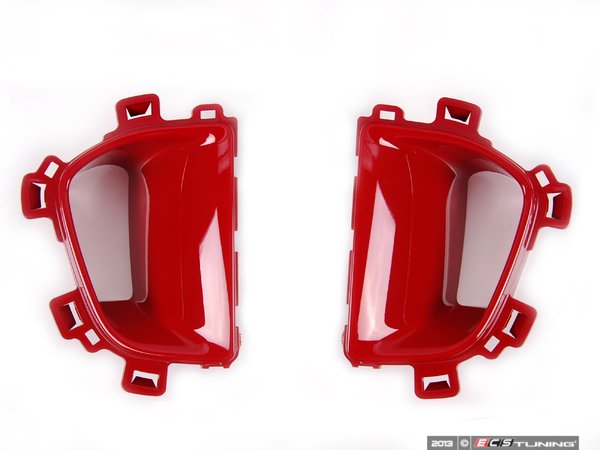
We have the JCW GP2 red ducts here: they look very nice in person. 51747330891KT
http://www.ecstuning.com/Search/SiteSearch/51747330891KT/
Sounds like it just needed some finessing to get around the bumper removal from the top grille section.
http://www.ecstuning.com/Search/SiteSearch/51747330891KT/
Sounds like it just needed some finessing to get around the bumper removal from the top grille section.
__________________

MINI Guru/ MINI Owner Since 2004 | NEW Lifetime Part Replacement | Local Pickup
Milltek | Genuine MINI | Forge Motorsport | NM Engineering | ECS Performance | M7 Speed
Customer Service Hours: 8am-8pm EST|Sales Team Hours: 8am-11pm | SAT 10am-7pm 800.924.5172
MINI Guru/ MINI Owner Since 2004 | NEW Lifetime Part Replacement | Local Pickup
Milltek | Genuine MINI | Forge Motorsport | NM Engineering | ECS Performance | M7 Speed
Customer Service Hours: 8am-8pm EST|Sales Team Hours: 8am-11pm | SAT 10am-7pm 800.924.5172