
Interior/Exterior Joining the DIY splitter club...


5th Gear
Joined: Mar 2007
Posts: 637
Likes: 0
From: Baltimore

It was attached using some nuts, bolts, and washers. There is a nice spot to drill just left of the foglights.

I'm in

I've been thinking about making my own front splitter ever since I read this article at Special Projects Motorsports. A good splitter (especially for a car that's tracked) should be: a. cheap and b. disposable.
I took the template from this thread and set about to make a splitter out of (mostly) found materials during Memorial Day weekend.
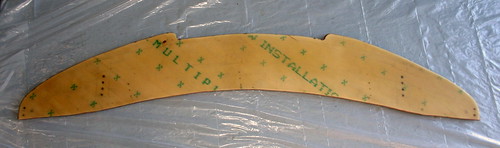
Rough out the splitter out of light-weight plywood. I used some spare under-layment that I sandwiched together with some waterproof glue. Cost: $3 for the glue.
Next I covered it in some resin and fiberglass I had from a previous project. Then I sanded it smooth. Cost: $0.00.
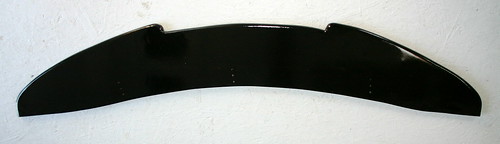
When the resin was dry, I used some automotive spray paint to paint it black and then cover with clearcoat. Also left over from a previous project. Cost: $0.00.
Since the splitter is disposable (and the bumper cover not) I wanted the mount to support the load forces to be applied, but break away under shear force. I made some T-brackets out of spare metal stock and connected the splitter with snow-blower shear-bolts. Cost: $3.50.
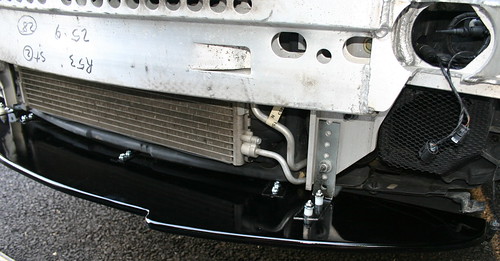
At this point, the mount was strong enough for highway speeds, but it still had quite a bit of flex at, er.... higher speeds. It certainly wouldn't be good enough to pass a tech inspection.
I ordered some slick splitter turnbuckles, but they wouldn't be available in time for the track this past weekend, I headed off to the hardware store again.
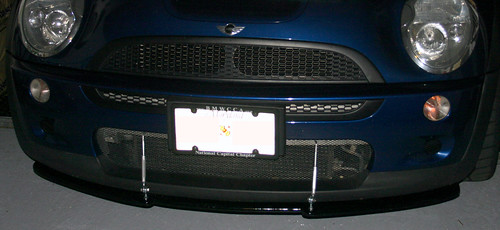
This took some creativity to piece together. I started with a turnbuckle used to support a sagging gate. I replaced one end with an eye bolt. I attached it to another eye bolt attached to the splitter. At the other end of the turnbuckle, I heated and shaped the rod to form two 90-degree angles like a zig-zag and I cut it off about 6 inches from the threaded end. I drilled a hole in the bumper and threaded the zig-zag end like you do a tool hook in a peg-board -- if that makes sense.
Once I put tension on the turnbuckle, it pulled out the gap under the chin spoiler and would now support my weight if I tried to stand on it. The additional hardware turned out to be the most expensive part of this whole project. Cost: $27.
Total Cost: $33.50 (and the better part of a 4-day weekend....) Now that I have the template, I'm going to work up a couple of spares.
I've had it on for a couple of weeks now. Some observations:
-- My gas mileage has improved. I put about 450 miles a week commuting the same route every weekday at more or less the same time of day and at the same speed. My average MPG (even discounting my pathological-lying OBC) has gone up 2 to 3 MPG. Sort of an unexpected bonus.
-- My tire temperatures have evened out. My car is very well balanced, but I wasn't making the most of my rear tires. I would often get a temperature difference front to rear of as much as 20 degrees. With this one aero change, my temps really evened out. The rear tires were within 5 degrees of the fronts.
-- I haven't yet come across a driveway I couldn't get out of, but I have to keep an eye out on speed bumps, especially the tall ones. The lower edge of the splitter is only 4.75 inches off of the ground.
-- The last observation is more philosophical, and I think someone mentioned it earlier (I didn't go back and re-read the thread). Is it really a splitter? I think of a splitter as a horizontal addition that extends forward of the lower edge of the front spoiler. It adds down-force by creating an area of high pressure on top that's trapped by the front spoiler and an area of low pressure from the faster air moving under it in ground effect due to it's proximity to the road surface. In this application, the spoiler is still in place below and behind the "splitter". So the splitter acts as more of an extension to the chin spoiler that's built into the bumper. So does that make it a "chin-splitter"?....

5th Gear
Joined: Jun 2003
Posts: 1,054
Likes: 0
From: USA
I've been thinking about making my own front splitter ever since I read this article at Special Projects Motorsports. A good splitter (especially for a car that's tracked) should be: a. cheap and b. disposable.
I took the template from this thread and set about to make a splitter out of (mostly) found materials during Memorial Day weekend.
Rough out the splitter out of light-weight plywood. I used some spare under-layment that I sandwiched together with some waterproof glue. Cost: $3 for the glue.
Next I covered it in some resin and fiberglass I had from a previous project. Then I sanded it smooth. Cost: $0.00.
When the resin was dry, I used some automotive spray paint to paint it black and then cover with clearcoat. Also left over from a previous project. Cost: $0.00.
Since the splitter is disposable (and the bumper cover not) I wanted the mount to support the load forces to be applied, but break away under shear force. I made some T-brackets out of spare metal stock and connected the splitter with snow-blower shear-bolts. Cost: $3.50.
At this point, the mount was strong enough for highway speeds, but it still had quite a bit of flex at, er.... higher speeds. It certainly wouldn't be good enough to pass a tech inspection.
I ordered some slick splitter turnbuckles, but they wouldn't be available in time for the track this past weekend, I headed off to the hardware store again.
This took some creativity to piece together. I started with a turnbuckle used to support a sagging gate. I replaced one end with an eye bolt. I attached it to another eye bolt attached to the splitter. At the other end of the turnbuckle, I heated and shaped the rod to form two 90-degree angles like a zig-zag and I cut it off about 6 inches from the threaded end. I drilled a hole in the bumper and threaded the zig-zag end like you do a tool hook in a peg-board -- if that makes sense.
Once I put tension on the turnbuckle, it pulled out the gap under the chin spoiler and would now support my weight if I tried to stand on it. The additional hardware turned out to be the most expensive part of this whole project. Cost: $27.
Total Cost: $33.50 (and the better part of a 4-day weekend....) Now that I have the template, I'm going to work up a couple of spares.
I've had it on for a couple of weeks now. Some observations:
-- My gas mileage has improved. I put about 450 miles a week commuting the same route every weekday at more or less the same time of day and at the same speed. My average MPG (even discounting my pathological-lying OBC) has gone up 2 to 3 MPG. Sort of an unexpected bonus.
-- My tire temperatures have evened out. My car is very well balanced, but I wasn't making the most of my rear tires. I would often get a temperature difference front to rear of as much as 20 degrees. With this one aero change, my temps really evened out. The rear tires were within 5 degrees of the fronts.
-- I haven't yet come across a driveway I couldn't get out of, but I have to keep an eye out on speed bumps, especially the tall ones. The lower edge of the splitter is only 4.75 inches off of the ground.
-- The last observation is more philosophical, and I think someone mentioned it earlier (I didn't go back and re-read the thread). Is it really a splitter? I think of a splitter as a horizontal addition that extends forward of the lower edge of the front spoiler. It adds down-force by creating an area of high pressure on top that's trapped by the front spoiler and an area of low pressure from the faster air moving under it in ground effect due to it's proximity to the road surface. In this application, the spoiler is still in place below and behind the "splitter". So the splitter acts as more of an extension to the chin spoiler that's built into the bumper. So does that make it a "chin-splitter"?....
Traffic flows at around 90mph along my commute route, so I would need this thing to be very rigid. Have you considered mounting a camera aimed at the splitter to see if it flutters?

I have been thinking about taking this same route, although I was considering a foam core inside fiberglass. Seems like heavy angle brackets would make better rear mounts.
Traffic flows at around 90mph along my commute route, so I would need this thing to be very rigid. Have you considered mounting a camera aimed at the splitter to see if it flutters?
Traffic flows at around 90mph along my commute route, so I would need this thing to be very rigid. Have you considered mounting a camera aimed at the splitter to see if it flutters?


5th Gear
Joined: Mar 2007
Posts: 637
Likes: 0
From: Baltimore
-- The last observation is more philosophical, and I think someone mentioned it earlier (I didn't go back and re-read the thread). Is it really a splitter? I think of a splitter as a horizontal addition that extends forward of the lower edge of the front spoiler. It adds down-force by creating an area of high pressure on top that's trapped by the front spoiler and an area of low pressure from the faster air moving under it in ground effect due to it's proximity to the road surface. In this application, the spoiler is still in place below and behind the "splitter". So the splitter acts as more of an extension to the chin spoiler that's built into the bumper. So does that make it a "chin-splitter"?....
To answer your philisophical question. What you have is a "Chin Spoiler". A true splitter would extend underneath the car back to the start of the front wheel arches.
NOT trying to take away from your kickin work in any way.

I haven't tried to fix a camera on it yet, but that sounds like a good excuse to purchase a wireless camera.... hmmm.
5th Gear
Joined: Mar 2007
Posts: 637
Likes: 0
From: Baltimore

Banned
iTrader: (2)
Joined: Oct 2005
Posts: 3,499
Likes: 0
From: Car Nut Since 1987, Owner Since Fall 2005, Vendor Since Fall 2007
If this ... "-- My gas mileage has improved. I put about 450 miles a week commuting the same route every weekday at more or less the same time of day and at the same speed. My average MPG (even discounting my pathological-lying OBC) has gone up 2 to 3 MPG. Sort of an unexpected bonus." ... is something others have also seen I'd like to know.
Driving 20K a year, getting 2/3 more MPG would make doing a splitter a real value and look good too. I look forward to your feedback. Thanks D
Driving 20K a year, getting 2/3 more MPG would make doing a splitter a real value and look good too. I look forward to your feedback. Thanks D

1st Gear
Joined: Mar 2008
Posts: 36
Likes: 0
If this ... "-- My gas mileage has improved. I put about 450 miles a week commuting the same route every weekday at more or less the same time of day and at the same speed. My average MPG (even discounting my pathological-lying OBC) has gone up 2 to 3 MPG. Sort of an unexpected bonus." ... is something others have also seen I'd like to know.
Driving 20K a year, getting 2/3 more MPG would make doing a splitter a real value and look good too. I look forward to your feedback. Thanks D
Driving 20K a year, getting 2/3 more MPG would make doing a splitter a real value and look good too. I look forward to your feedback. Thanks D
idk if mine's an improvement but i averaged 33mpg over 300 miles at highway speed with the splitter

iknow its a old thread but i just got my splitter and had a hard time installing...
do i need to go to mechanic with a car lift to install it? i cannot reach underneath and hard time jacking up my car using the emergency jack ... i have limted tools cos in a condo with no garage..
any help is appreciated
do i need to go to mechanic with a car lift to install it? i cannot reach underneath and hard time jacking up my car using the emergency jack ...
i have limted tools cos in a condo with no garage.. any help is appreciated

Thread Starter
|
3rd Gear
Joined: Jul 2006
Posts: 266
Likes: 0
From: Northern Baltimore County
What type of splitter?
I'm not sure what type of splitter you have, or if your car is lowered, however, I did my entire project without even jacking up the car. Remove the bumper cover (Very Easy) and the rest should be a breeze. PM if you have any other questions or just post here. Mine is doing fine, but I do not track the car, nor is it lowered, so that does help.
Gene
Gene