
How To Mini Countryman S ALL4 lowering spring & Sway bar Install

Thread Starter
|
Neutral
Joined: Jan 2020
Posts: 9
Likes: 11
From: Miami, FL
Mini Countryman S ALL4 lowering spring & Sway bar Install
This How-To is to present the install of a set of Eibach Pro Springs & a NM Engineering 22mm rear sway bar on the Mini Countryman S ALL4. All spring set and rear
sway bar changes would have a similar process.
Went with the Eibach Pro because I have used Eibach springs on some of my other cars and I have always been very happy with the results. Both from the height lowered and the ride/handling they provide. They are variable rate springs in all the cars I have installed them on and the Mini is no different. I am very big on the handling of my cars. I am pretty picky. Once I was done with this one, the ride is excellent. Turn in improved and the ride is no harsher when cruising but definitely stiffer when driving with "spirit". Install was simple and I was able to complete it alone.
On the swaybar I went with the NM Engineering 22mm rear sway bar. I went that route because I liked the fact that it was a solid bar with forged ends. THe adjustability was a plus and the billet mounting brackets with the grease fittings closed the deal. A VERY nice swaybar.
A note before I get started. TO complete this install you need to get the car raised in the air to access springs and the underside of the car. You will also be loosening the rear suspension carrier. You need to make certain the car is stable. I will not go into detail on how to do that with a floor jack and jackstands. I use a lift to complete the work. Having said that, please search and read up on the proper procedure to lift your car and how to support it safely. This is very important and no joke. Please support the car well with good sturdy stands that are rated to support much more weight than what the Mini weighs. This is one of those cases where it is not wise to be cheap. Now that I have that disclaimer out of the way....
Tools needed:
- Range of sockets from up to 21mm. Having both deep and shallow would be best.
- Wrenches from 16mm to 21mm.
- Torx wrenches or drivers. T30 is required on my car, others may be different.
- A ratchet wrench and a breaker bar (some bolts are "set" in their place) is minimum. An impact gun for some of the larger bolts would be awesome. Use the impact with care, don't over do it.
- A few extensions for your sockets. A couple of 3" to 18" wobble end is helpful especially if using the impact.
- Small prybar or old flathead screwdriver. A big chisel would be helpful.
- WD40 to lubricate/loosen some of the bolts that might have some corrosion. You'll also need it to penetrate and get the front struts out.
- Spring Compressor. I have two different types, but either will work for you. These are easily found as loaner tools at many Autoparts Stores.
- Way to raise and support the car. A floor jack or two and 4 jackstands as a minimum. I use my lift in the how-to. If you have access to or can rent time with a lift, it makes life far easier.
Lets get started.
First, get the car in the air and supported safely.
Next, mark the position of the strut bolts. I simply mark the upper bolt that is closest to the engine. I also marked another bolt "L" & "R" simply to know which strut went where when I reassembled. In the end I did one corner at a time and bolted it back in. However, if you are doing the pair together, mark them. Cannot hurt. Also, there is a locator stud on my struts. However, I don't know how those would be when I take everything apart. Marking the bolt is foolproof.

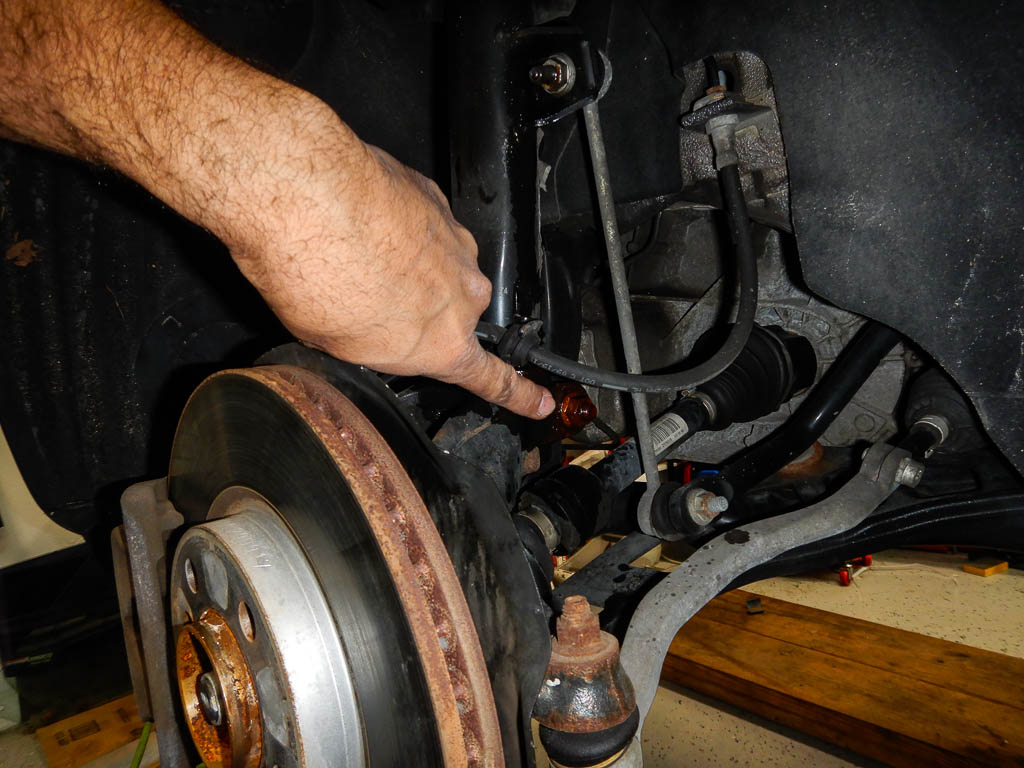
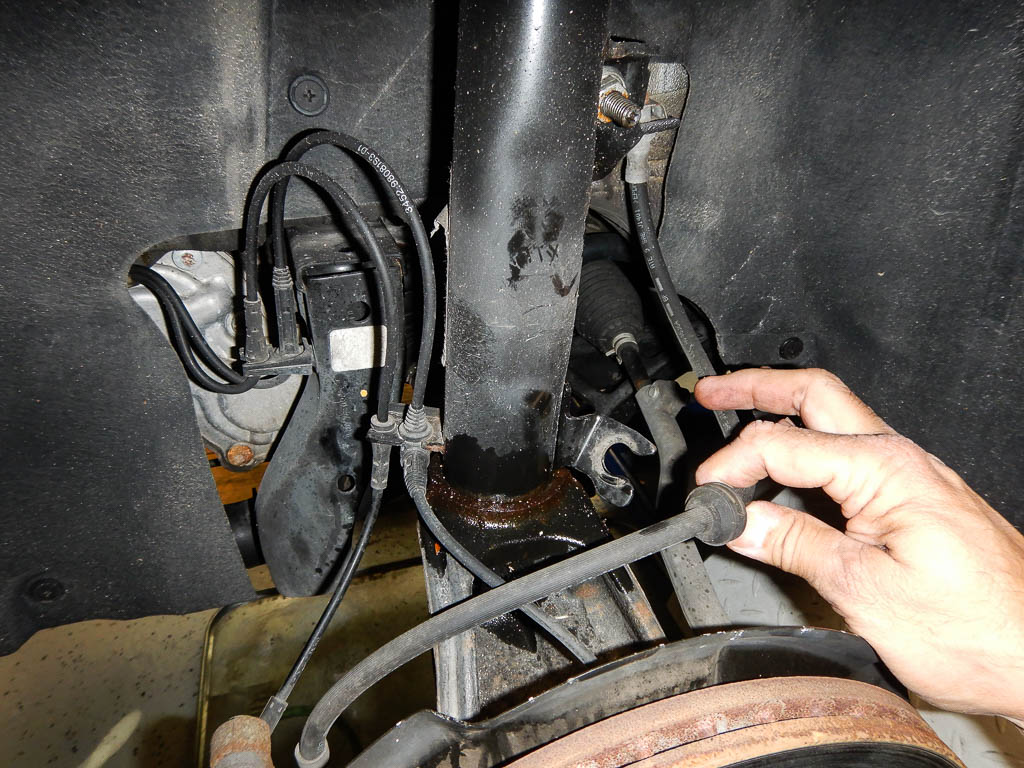
Remove the wheels and grab the WD40 and hit all the nuts you'll be removing (I'll show you those as we move on the front and rear) and, VERY IMPORTANT, hit the front strut bodies where they insert into the front knckles. These are in there and tight. Likely corroded to a certain extent and stuck in there. Letting that WD40 penetrate will be VERY HELPFUL.
The sway bar link bolt.

The strut collar bolt.

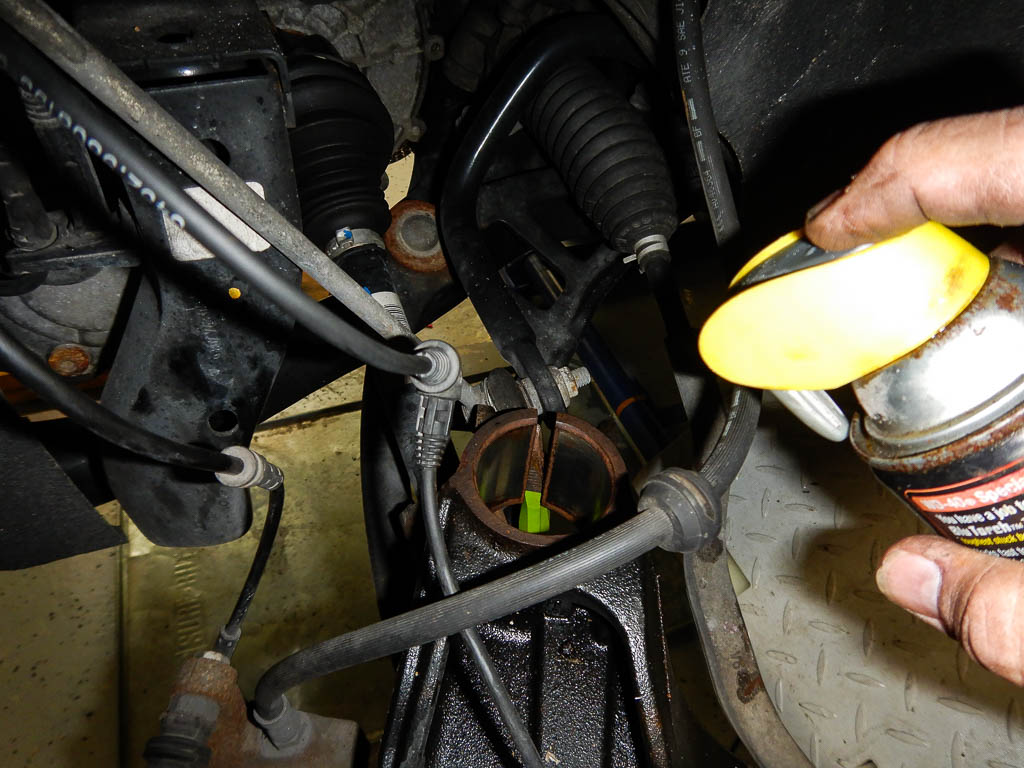
The WD40 spray of the strut.
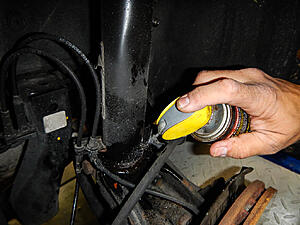
Now that you have sprayed everything. Go back and hit them all again. (TRUST ME). Then remove the lines and sensors attached to the struts up front. They are all very obvious and on rubber grommets simply pushed into place. Pull them out gently and move them aside a bit.


Spray the strut body again with WD40. (Yes...I've said it before but when you go to pull them you'll be glad I did)
Now lossen the top nuts (in the engine bay) on the strut. You want to leave the bolt on with only the threads to the top of the nut. Loose, but not on a single thread. The weight of the suspension will pull it down as you go. The idea is to be able to move the strut a bit but still have it attached.

Spray the strut body with WD40... yet again. :-)
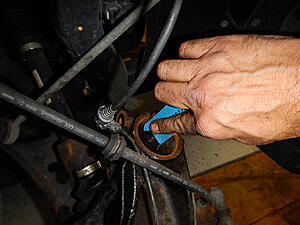
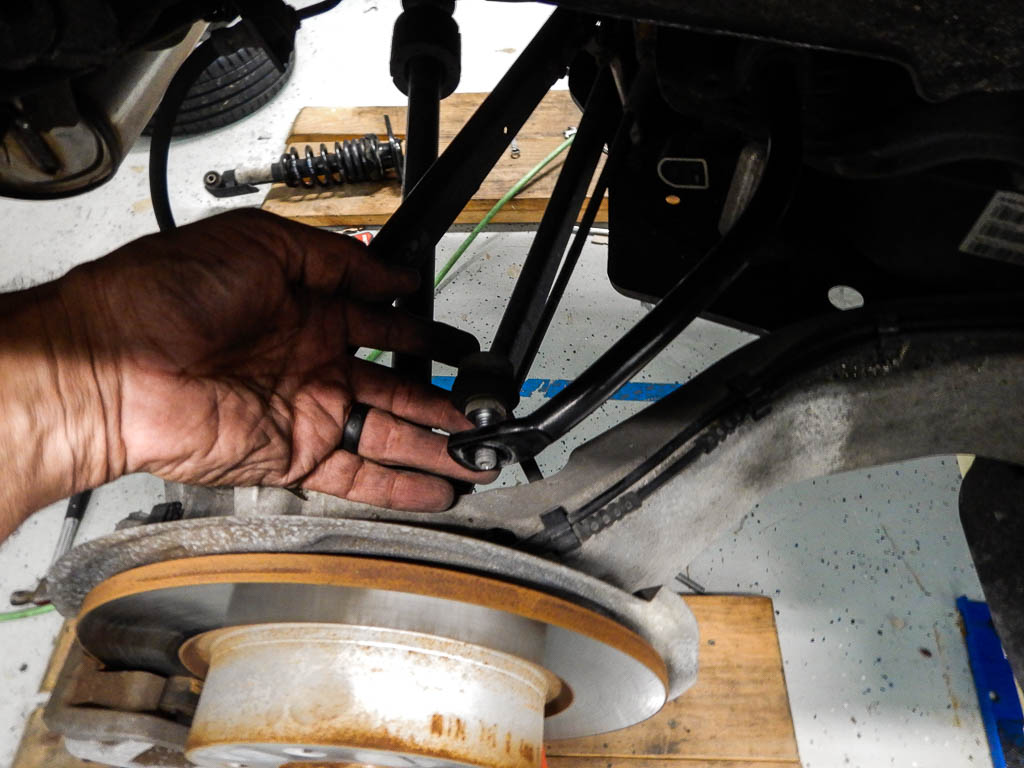
Now you take out the sway bar link. You will need the torx (T30) head in the bolt and a wrench on the nut. This stops the bolt from spinning as you loosen the nut. I have the hex ended Torx but a regular driver is fine. Whatever you have/can get. You can spin the bolt or nut. My only suggestion is do this by hand. Using a power driver of some sort can damage the ball end of the link if spun too fast.

Remove the strut collar bolt on the hub carrier/knuckle.
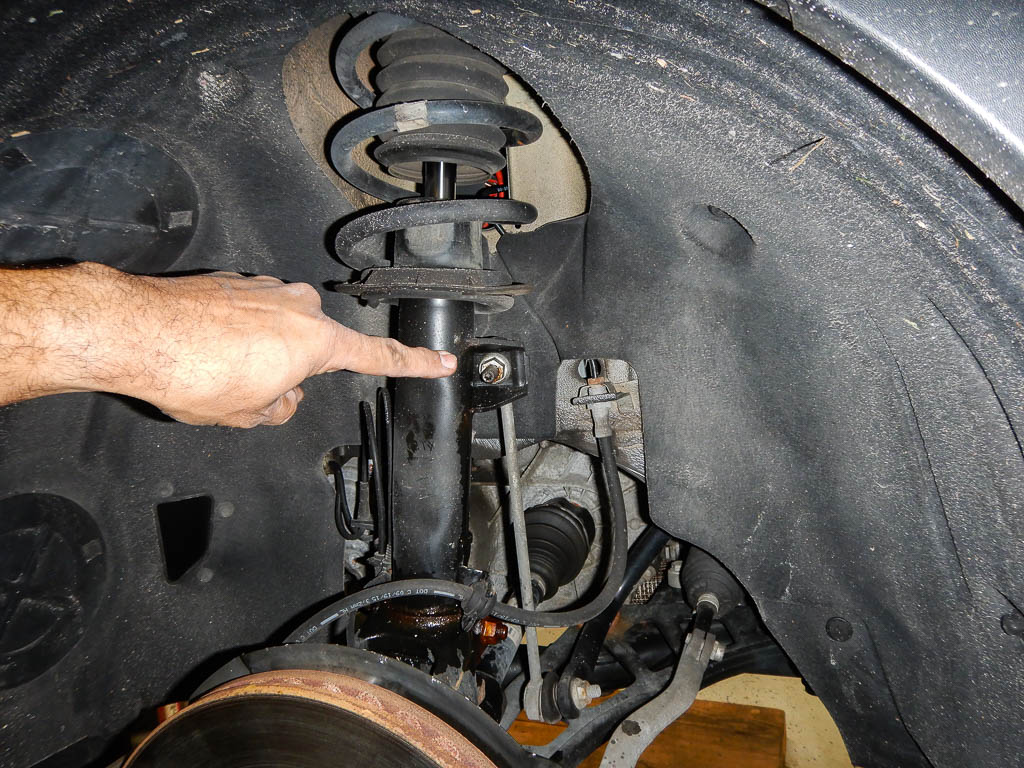
The struts up front are in a collar. The body of the strut has likely corroded a bit and fused to the collar a bit. Removing the strut is not easy and will require some "persuation". What I found to be easiest was to spread the collar a bit with something pushed between the tabs on the collar. I used a heavy chisel and tapped it in there. The the photo below.

You do not need to spread the tabs much. Just enough to free the collar a bit. On the passenger side I had to tap the knuckle a bit to break the strut free. In the photo you'll see the corrosion on the strut body about 2 inches above the collar I was tapping with the hammer. This is why I left the bolts on top loose. It allows me to tap the strut out while holding the upper end.

I will take some effort, twisting, tapping, pulling on the suspension arm ect. to get that strut out of there. It will eventually come loose. Once out of the collar, remove the upper bolts carefully and remove the strut from the car.
Once it's out, time to get the spring swapped. To do that, you will need to compress the spring to the point it is free from the upper and lower seats. You can use either 2 Pc MacPherson strut spring compressors or single arm compressors to compress the spring. The single arm is a bit clunky to use but works better in tighter wound springs. (coils closer to each other) I use both styles here and you'll see them in the photos.
The strut out of the car with the single arm spring compressor next to it.
I did not take pictures of the front struts compressed but it's pretty stright forward. Be careful when compressing springs. Make certain all the lokcing pins are in place and used. LEAVE NOTHING TO CHANCE HERE. You can really hurt yourself. Once the spring is compressed, remove the upper strut seat. Carefully make note of the order the pieces come out. Washers, bushings, travel limters, etc. You will reassemble them in the same way. I lay them out side by side on the bench, left to right as I remove them and then reverse it to re-install. ONce you have that upper seat out, remove the compressed spring from the strut.
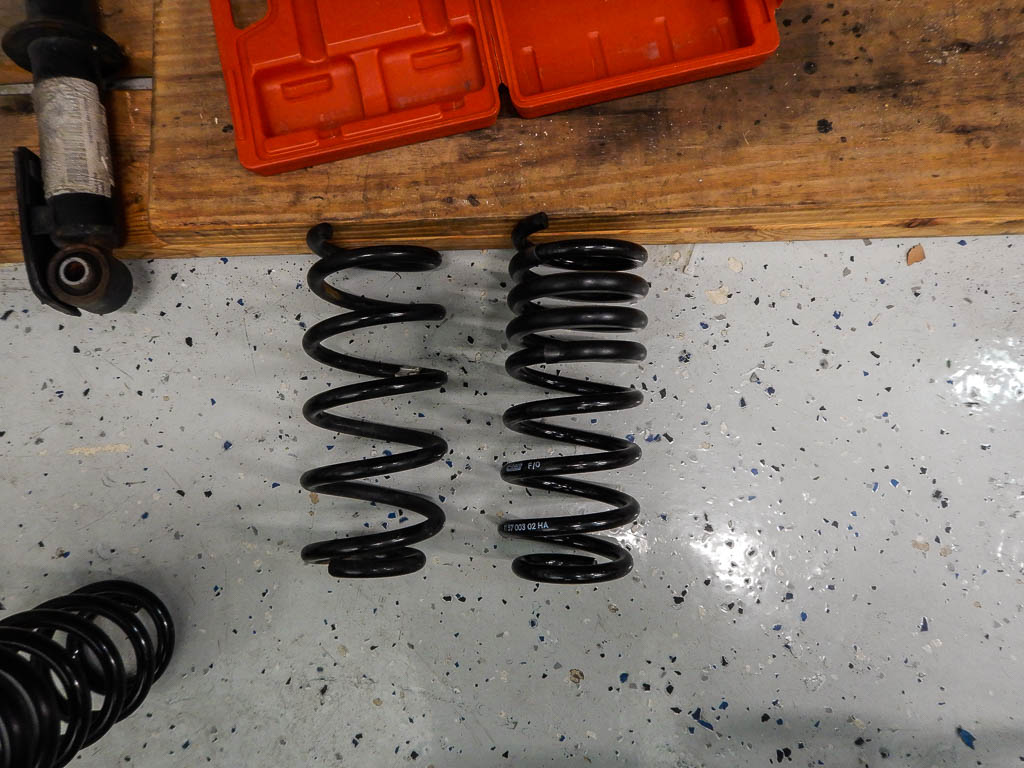
Remove the spring compressor slowly and balanced (if you have the 2-pc compressor). Release the tension slowly and you will be fine. Once out, these are the two springs side by side. The longer one is the stock OEM spring, the shorter with tighter coils on one end is the Eibach Pro.

Put the spring onto the strut. Make certain the lower rubber seat is in the right place. They have rubber "pegs" that keep it in the right place. Then make sure the end of the spring is tight against the stop on the seat. In the photo below, you can see the rubber peg under the seat of the spring where it comes through the base. You will also see how the spring seats in there against the stop.

Once that is right, place the top seat back in place. Remeber the order of the parts you pulled out. Make sure the rubber seat is in the right position again on top and bring it against the spring end.

I put the washer on top and bring the bolt onto the threads finger tight. Just enough so that the top plate does not fall off. Some people don't do this. It's just a habit of mine.
Transfer the spring compressor to the new spring and compress it. Same here. Slow, check all the safety pins, by hand. Once compressed, remove the nut you placed on top temporarily and reassemble the top of the strut with the parts in the same order as you removed them. You will tighten the top strut bolt to spec. For the bolt that holds the spinning upper camber plate, that is 100 Nm or about 74 ft-lbs. What I do if you don't have a torque wrench is count threads. If I had four threads exposed on it to start with, I leave four threads exposed when I reassemble. Up to you.... but those are the torque specs. Once you are done, release the spring tension. Again, slowly, balanced, be sure the spring is seated properly as you go both on top and bottom. Take your time.
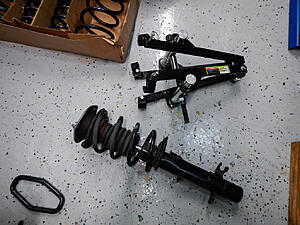
Once finished, you will have one strut done and it should look like this.

Before you put the strut back in, I suggest you "clean up" the strut collar. I took some emory cloth and cleaned it up a bit. Removed the built up oxidation that transferred from the strut body. Both on the top side in the inner part of the collar. This simply makes it easier to reinstall.
Once clean... take a guess.... spray it with more WD40 to make the strut easier to slide in.

Slide the strut assembly back up into the camber plate mounting. While it is still loose, get the strut started in the collar. Once there, lift the front suspension to bring the camber plate back to where it needs to be. Remember how you marked the top bolt? Make sure that it is in the right place and get the three nuts started but leave them loose.
Reinstalling the strut in the collar was easier than removing but still needed some rotating, tapping and some upward pressure with a floor jack. Being careful to make sure it's lined up right, bring it back into the collar. You may need to tap the chisel back into place to spread the collar open a bit. I had to on the passenger side but on the driver side, it went in easier. Make certain the tab on the back of the strut drops into the slot and bring it into the collar until the bolt clears the opening in the tab. The strut will not protrude from the bottom. In fact, the bottom on the strut is up into the collar about 1/2" on the sides.
Once there, the collar bolt should go in fairly easily and tighten it down. Spec I found was 60 ft-lb.
Go back up and tighten the three top mounting nuts. Those torque to 25 ft-lbs.
Reinstall the swaybar link up front. That bolt goes to 4- ft-lbs.
Reinstall the lines back into thier spots using the grommets.
That's one. Repeat for the other front strut.
Now, moving to the rear. These are MUCH easier.
This is what we have back there.

To get the rear coil over shocks out, you remove three bolts. Two on the top plate at the body. I am pointing to the rear top bolt, there is another up in front of the shock. I remove these two first. They are 13mm hex and you will need an 18" long extension here. Short socket and a wobble head is easiest.

Clear shot of the upper plate.

And the last bolt is the lower one where the shock attaches to the rear hub carrier. Make a note of the orientation of the shock protective plate. It faces forward towards the fron of the car. Also note the position of the top plate. There is a longer and shorter tab. Remove this bottom bolt last as you hold the shock so it does not simply drop.

With the shock out, attached your spring compressor of choice and compress the spring. I found the 2-pc MacPherson Strut compressor worked better here. Again, safely and slowly compress keeping the two pieces compressing evenly. In other words, don't tighten one side only. Tighten both by going back and forth to keep the spring as staright as you can.

Disassemble the shock so as to get the spring off.


Remove the spring and then slowly remove the compressor on the stock spring.
Here are the two springs compared for the rear side.

Now, transfer the compressor to the new spring and compress it to be able to reassemble the rear coil over. On the top nut torque spec. I could not locate that. So I went with my trusty counting of exposed threads. I simply tightened them to the same point. I would imaging it is not too tight but should be in the 30 ft-lb range.
Repeat the process for the other side of the car.
Once I had both done on the rear, I left them aside and did the rear sway bar since I already had all this apart. The instructions on the NM Engineering bar are quite good and give you the full detail including the torque specs on the process. Since that is good, I'll just give you the general process.
The process is, basically, as follows.
You remove the sway bar links at each suspension arm. In the rear they are not attached to the shock/strut but rather the suspension arm itself.

Once both sides are off, you remove the brackets with the bushings and remove the bushings (they are split and simply placed over the bar.

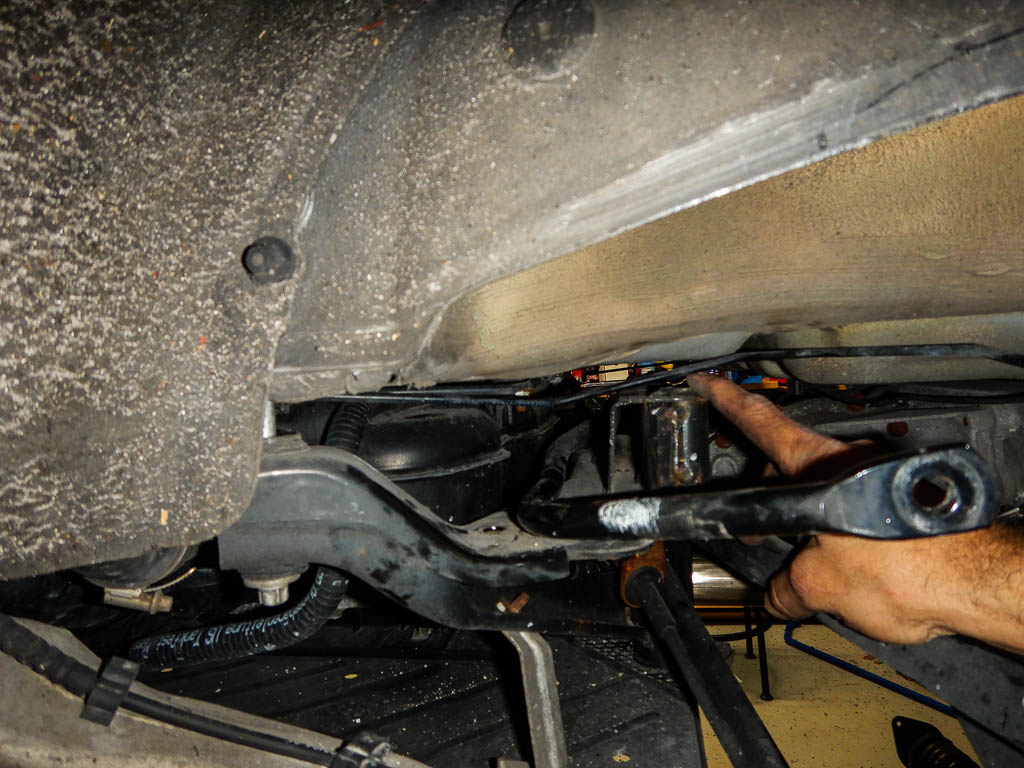
The bar will be sitting in the car freely now. In order to get it out you need to loosen the rear subframe on the car. This sounds scarier than it is. It is four bolts and they are 16mm. The front bolts are LOOSENED ONLY and brought out about 1". I simply removed one up front to see how long it was and then re threaded back in about 3/4". Then on the opposite side pulled it loose to about the same point. Once those are loose I slowly removed the two rear bolts on the subframe. (Again, the instructions are clear and tell you exactly which bolts). Once the sub frame is loose you get the gap I show in the photo so you can slide the sway bar out.

You then slide the old bar out.

Here are the two bars side by side so you can see the difference. It is HUGE.

If that photo is not enough, look at the bushing openings compared to one another.


The torsional rigidity difference will be huge with that big of a difference.
Once I was done gawking at the new bar, I slid the new one into place. I kept the plastic on it to protect it from scratches as it was installed.

Once in, take the plastic off and put in the bushings with the supplied grease in there. Tighten the new collar to spec.

Not going to lie, those mounts are real nice. The grease fittings are awesome to throw some grease in as time passes.
Once those are all tightened down, I reattach the rear sub-frame and tighten it all to spec.
The sway bar is adjustable. I simply put it into the middle setting by attaching the links in the designated holes/locations.
At this point, I reinstall the rear shocks and tighten everything down. The top 13mm bolts to 40 ft-lbs and the lower bolt to 110 ft-lbs. ( found two specs and one was 120 ft-lbs which is excessive on an aluminum carrier. I split the difference. Regardless, it's damn tight.
I went through and double checked every bolt I touched.
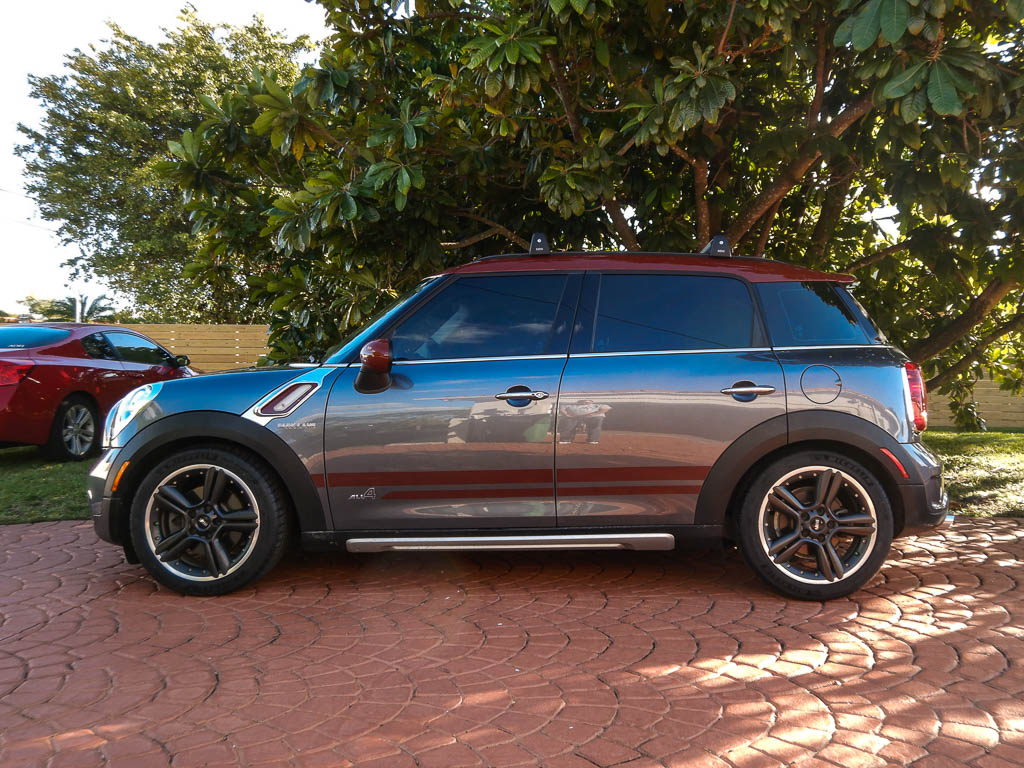
Once done, I mounted the wheels and took it out to snap some photos. These are right after install, so the car will still drop a bit as the springs settle a bit. But it is a good indicator of what it will finally look like.
Here you go.
Before & After


sway bar changes would have a similar process.
Went with the Eibach Pro because I have used Eibach springs on some of my other cars and I have always been very happy with the results. Both from the height lowered and the ride/handling they provide. They are variable rate springs in all the cars I have installed them on and the Mini is no different. I am very big on the handling of my cars. I am pretty picky. Once I was done with this one, the ride is excellent. Turn in improved and the ride is no harsher when cruising but definitely stiffer when driving with "spirit". Install was simple and I was able to complete it alone.
On the swaybar I went with the NM Engineering 22mm rear sway bar. I went that route because I liked the fact that it was a solid bar with forged ends. THe adjustability was a plus and the billet mounting brackets with the grease fittings closed the deal. A VERY nice swaybar.
A note before I get started. TO complete this install you need to get the car raised in the air to access springs and the underside of the car. You will also be loosening the rear suspension carrier. You need to make certain the car is stable. I will not go into detail on how to do that with a floor jack and jackstands. I use a lift to complete the work. Having said that, please search and read up on the proper procedure to lift your car and how to support it safely. This is very important and no joke. Please support the car well with good sturdy stands that are rated to support much more weight than what the Mini weighs. This is one of those cases where it is not wise to be cheap. Now that I have that disclaimer out of the way....
Tools needed:
- Range of sockets from up to 21mm. Having both deep and shallow would be best.
- Wrenches from 16mm to 21mm.
- Torx wrenches or drivers. T30 is required on my car, others may be different.
- A ratchet wrench and a breaker bar (some bolts are "set" in their place) is minimum. An impact gun for some of the larger bolts would be awesome. Use the impact with care, don't over do it.
- A few extensions for your sockets. A couple of 3" to 18" wobble end is helpful especially if using the impact.
- Small prybar or old flathead screwdriver. A big chisel would be helpful.
- WD40 to lubricate/loosen some of the bolts that might have some corrosion. You'll also need it to penetrate and get the front struts out.
- Spring Compressor. I have two different types, but either will work for you. These are easily found as loaner tools at many Autoparts Stores.
- Way to raise and support the car. A floor jack or two and 4 jackstands as a minimum. I use my lift in the how-to. If you have access to or can rent time with a lift, it makes life far easier.
Lets get started.
First, get the car in the air and supported safely.
Next, mark the position of the strut bolts. I simply mark the upper bolt that is closest to the engine. I also marked another bolt "L" & "R" simply to know which strut went where when I reassembled. In the end I did one corner at a time and bolted it back in. However, if you are doing the pair together, mark them. Cannot hurt. Also, there is a locator stud on my struts. However, I don't know how those would be when I take everything apart. Marking the bolt is foolproof.

Remove the wheels and grab the WD40 and hit all the nuts you'll be removing (I'll show you those as we move on the front and rear) and, VERY IMPORTANT, hit the front strut bodies where they insert into the front knckles. These are in there and tight. Likely corroded to a certain extent and stuck in there. Letting that WD40 penetrate will be VERY HELPFUL.
The sway bar link bolt.
The strut collar bolt.
The WD40 spray of the strut.

Now that you have sprayed everything. Go back and hit them all again. (TRUST ME). Then remove the lines and sensors attached to the struts up front. They are all very obvious and on rubber grommets simply pushed into place. Pull them out gently and move them aside a bit.

Spray the strut body again with WD40. (Yes...I've said it before but when you go to pull them you'll be glad I did)
Now lossen the top nuts (in the engine bay) on the strut. You want to leave the bolt on with only the threads to the top of the nut. Loose, but not on a single thread. The weight of the suspension will pull it down as you go. The idea is to be able to move the strut a bit but still have it attached.

Spray the strut body with WD40... yet again. :-)
Now you take out the sway bar link. You will need the torx (T30) head in the bolt and a wrench on the nut. This stops the bolt from spinning as you loosen the nut. I have the hex ended Torx but a regular driver is fine. Whatever you have/can get. You can spin the bolt or nut. My only suggestion is do this by hand. Using a power driver of some sort can damage the ball end of the link if spun too fast.

Remove the strut collar bolt on the hub carrier/knuckle.
The struts up front are in a collar. The body of the strut has likely corroded a bit and fused to the collar a bit. Removing the strut is not easy and will require some "persuation". What I found to be easiest was to spread the collar a bit with something pushed between the tabs on the collar. I used a heavy chisel and tapped it in there. The the photo below.

You do not need to spread the tabs much. Just enough to free the collar a bit. On the passenger side I had to tap the knuckle a bit to break the strut free. In the photo you'll see the corrosion on the strut body about 2 inches above the collar I was tapping with the hammer. This is why I left the bolts on top loose. It allows me to tap the strut out while holding the upper end.

I will take some effort, twisting, tapping, pulling on the suspension arm ect. to get that strut out of there. It will eventually come loose. Once out of the collar, remove the upper bolts carefully and remove the strut from the car.
Once it's out, time to get the spring swapped. To do that, you will need to compress the spring to the point it is free from the upper and lower seats. You can use either 2 Pc MacPherson strut spring compressors or single arm compressors to compress the spring. The single arm is a bit clunky to use but works better in tighter wound springs. (coils closer to each other) I use both styles here and you'll see them in the photos.
The strut out of the car with the single arm spring compressor next to it.

I did not take pictures of the front struts compressed but it's pretty stright forward. Be careful when compressing springs. Make certain all the lokcing pins are in place and used. LEAVE NOTHING TO CHANCE HERE. You can really hurt yourself. Once the spring is compressed, remove the upper strut seat. Carefully make note of the order the pieces come out. Washers, bushings, travel limters, etc. You will reassemble them in the same way. I lay them out side by side on the bench, left to right as I remove them and then reverse it to re-install. ONce you have that upper seat out, remove the compressed spring from the strut.
Remove the spring compressor slowly and balanced (if you have the 2-pc compressor). Release the tension slowly and you will be fine. Once out, these are the two springs side by side. The longer one is the stock OEM spring, the shorter with tighter coils on one end is the Eibach Pro.

Put the spring onto the strut. Make certain the lower rubber seat is in the right place. They have rubber "pegs" that keep it in the right place. Then make sure the end of the spring is tight against the stop on the seat. In the photo below, you can see the rubber peg under the seat of the spring where it comes through the base. You will also see how the spring seats in there against the stop.

Once that is right, place the top seat back in place. Remeber the order of the parts you pulled out. Make sure the rubber seat is in the right position again on top and bring it against the spring end.

I put the washer on top and bring the bolt onto the threads finger tight. Just enough so that the top plate does not fall off. Some people don't do this. It's just a habit of mine.
Transfer the spring compressor to the new spring and compress it. Same here. Slow, check all the safety pins, by hand. Once compressed, remove the nut you placed on top temporarily and reassemble the top of the strut with the parts in the same order as you removed them. You will tighten the top strut bolt to spec. For the bolt that holds the spinning upper camber plate, that is 100 Nm or about 74 ft-lbs. What I do if you don't have a torque wrench is count threads. If I had four threads exposed on it to start with, I leave four threads exposed when I reassemble. Up to you.... but those are the torque specs. Once you are done, release the spring tension. Again, slowly, balanced, be sure the spring is seated properly as you go both on top and bottom. Take your time.
Once finished, you will have one strut done and it should look like this.

Before you put the strut back in, I suggest you "clean up" the strut collar. I took some emory cloth and cleaned it up a bit. Removed the built up oxidation that transferred from the strut body. Both on the top side in the inner part of the collar. This simply makes it easier to reinstall.

Once clean... take a guess.... spray it with more WD40 to make the strut easier to slide in.
Slide the strut assembly back up into the camber plate mounting. While it is still loose, get the strut started in the collar. Once there, lift the front suspension to bring the camber plate back to where it needs to be. Remember how you marked the top bolt? Make sure that it is in the right place and get the three nuts started but leave them loose.
Reinstalling the strut in the collar was easier than removing but still needed some rotating, tapping and some upward pressure with a floor jack. Being careful to make sure it's lined up right, bring it back into the collar. You may need to tap the chisel back into place to spread the collar open a bit. I had to on the passenger side but on the driver side, it went in easier. Make certain the tab on the back of the strut drops into the slot and bring it into the collar until the bolt clears the opening in the tab. The strut will not protrude from the bottom. In fact, the bottom on the strut is up into the collar about 1/2" on the sides.
Once there, the collar bolt should go in fairly easily and tighten it down. Spec I found was 60 ft-lb.
Go back up and tighten the three top mounting nuts. Those torque to 25 ft-lbs.
Reinstall the swaybar link up front. That bolt goes to 4- ft-lbs.
Reinstall the lines back into thier spots using the grommets.
That's one. Repeat for the other front strut.
Now, moving to the rear. These are MUCH easier.
This is what we have back there.

To get the rear coil over shocks out, you remove three bolts. Two on the top plate at the body. I am pointing to the rear top bolt, there is another up in front of the shock. I remove these two first. They are 13mm hex and you will need an 18" long extension here. Short socket and a wobble head is easiest.

Clear shot of the upper plate.

And the last bolt is the lower one where the shock attaches to the rear hub carrier. Make a note of the orientation of the shock protective plate. It faces forward towards the fron of the car. Also note the position of the top plate. There is a longer and shorter tab. Remove this bottom bolt last as you hold the shock so it does not simply drop.

With the shock out, attached your spring compressor of choice and compress the spring. I found the 2-pc MacPherson Strut compressor worked better here. Again, safely and slowly compress keeping the two pieces compressing evenly. In other words, don't tighten one side only. Tighten both by going back and forth to keep the spring as staright as you can.

Disassemble the shock so as to get the spring off.


Remove the spring and then slowly remove the compressor on the stock spring.
Here are the two springs compared for the rear side.
Now, transfer the compressor to the new spring and compress it to be able to reassemble the rear coil over. On the top nut torque spec. I could not locate that. So I went with my trusty counting of exposed threads. I simply tightened them to the same point. I would imaging it is not too tight but should be in the 30 ft-lb range.
Repeat the process for the other side of the car.
Once I had both done on the rear, I left them aside and did the rear sway bar since I already had all this apart. The instructions on the NM Engineering bar are quite good and give you the full detail including the torque specs on the process. Since that is good, I'll just give you the general process.
The process is, basically, as follows.
You remove the sway bar links at each suspension arm. In the rear they are not attached to the shock/strut but rather the suspension arm itself.
Once both sides are off, you remove the brackets with the bushings and remove the bushings (they are split and simply placed over the bar.

The bar will be sitting in the car freely now. In order to get it out you need to loosen the rear subframe on the car. This sounds scarier than it is. It is four bolts and they are 16mm. The front bolts are LOOSENED ONLY and brought out about 1". I simply removed one up front to see how long it was and then re threaded back in about 3/4". Then on the opposite side pulled it loose to about the same point. Once those are loose I slowly removed the two rear bolts on the subframe. (Again, the instructions are clear and tell you exactly which bolts). Once the sub frame is loose you get the gap I show in the photo so you can slide the sway bar out.
You then slide the old bar out.

Here are the two bars side by side so you can see the difference. It is HUGE.

If that photo is not enough, look at the bushing openings compared to one another.


The torsional rigidity difference will be huge with that big of a difference.
Once I was done gawking at the new bar, I slid the new one into place. I kept the plastic on it to protect it from scratches as it was installed.

Once in, take the plastic off and put in the bushings with the supplied grease in there. Tighten the new collar to spec.
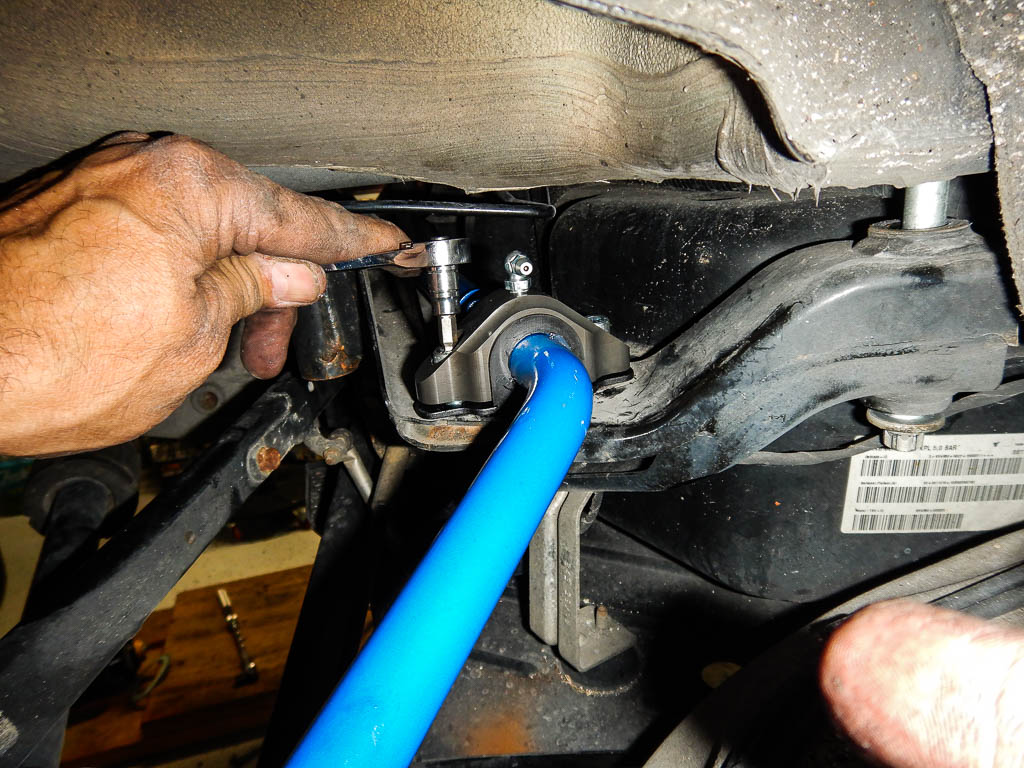
Not going to lie, those mounts are real nice. The grease fittings are awesome to throw some grease in as time passes.
Once those are all tightened down, I reattach the rear sub-frame and tighten it all to spec.
The sway bar is adjustable. I simply put it into the middle setting by attaching the links in the designated holes/locations.
At this point, I reinstall the rear shocks and tighten everything down. The top 13mm bolts to 40 ft-lbs and the lower bolt to 110 ft-lbs. ( found two specs and one was 120 ft-lbs which is excessive on an aluminum carrier. I split the difference. Regardless, it's damn tight.
I went through and double checked every bolt I touched.
Once done, I mounted the wheels and took it out to snap some photos. These are right after install, so the car will still drop a bit as the springs settle a bit. But it is a good indicator of what it will finally look like.
Here you go.
Before & After


Thread Starter
|
Neutral
Joined: Jan 2020
Posts: 9
Likes: 11
From: Miami, FL
No problem. Thanks. Hope this helps folks looking for this info.


Thread
Thread Starter
Forum
Replies
Last Post
silviahrc
R55 :: Clubman Talk (2008+)
2
Mar 31, 2017 06:41 AM
silviahrc
1st Gen Countryman (R60) Talk (2010-2015)
1
Mar 23, 2017 06:27 PM
Mini_Vinnie
Suspension
19
Aug 24, 2016 11:19 AM

