When you click on links to various merchants on this site and make a purchase, this can result in this site earning a commission. Affiliate programs and affiliations include, but are not limited to, the eBay Partner Network.
After some prompting from fellow NAM friends, I am starting the thread regarding my already underway engine rebuild for my daughter's 09 MCS that she calls StormCooper - see pics for the vinyl design that she created for the car.
The history is that she ran the car too low on oil one too many times and the timing chain gave out causing her engine to skip time.
So I purchased a donor car from Copart for a working engine. It was my first experience buying a salvaged car online and I made all the mistakes possible. I ended up with a possible flood car with an engine that needed to be rebuilt.
I have the engine stripped down to the short block and have finally found a machine shop that I like in Houston and I'm planning on taking it to them on Monday.
HOWEVER! I am having trouble removing the bedplate.
Can anyone provide some pro tips on how to remove the bedplate without any damage to the block?
I have a Bentley on order but it won't be here before Monday.
I'll fill in the rest of the story in later posts.
Thanks in advance for any help that you can provide!
I was able to separate the Bedplate from the block once I noticed that there were two bolt caps covering up the last two main bolts. Once I pried (and destroyed) the caps, I was able to remove the bedplate easily.
Now to find a part number for two new caps for the reassembly.
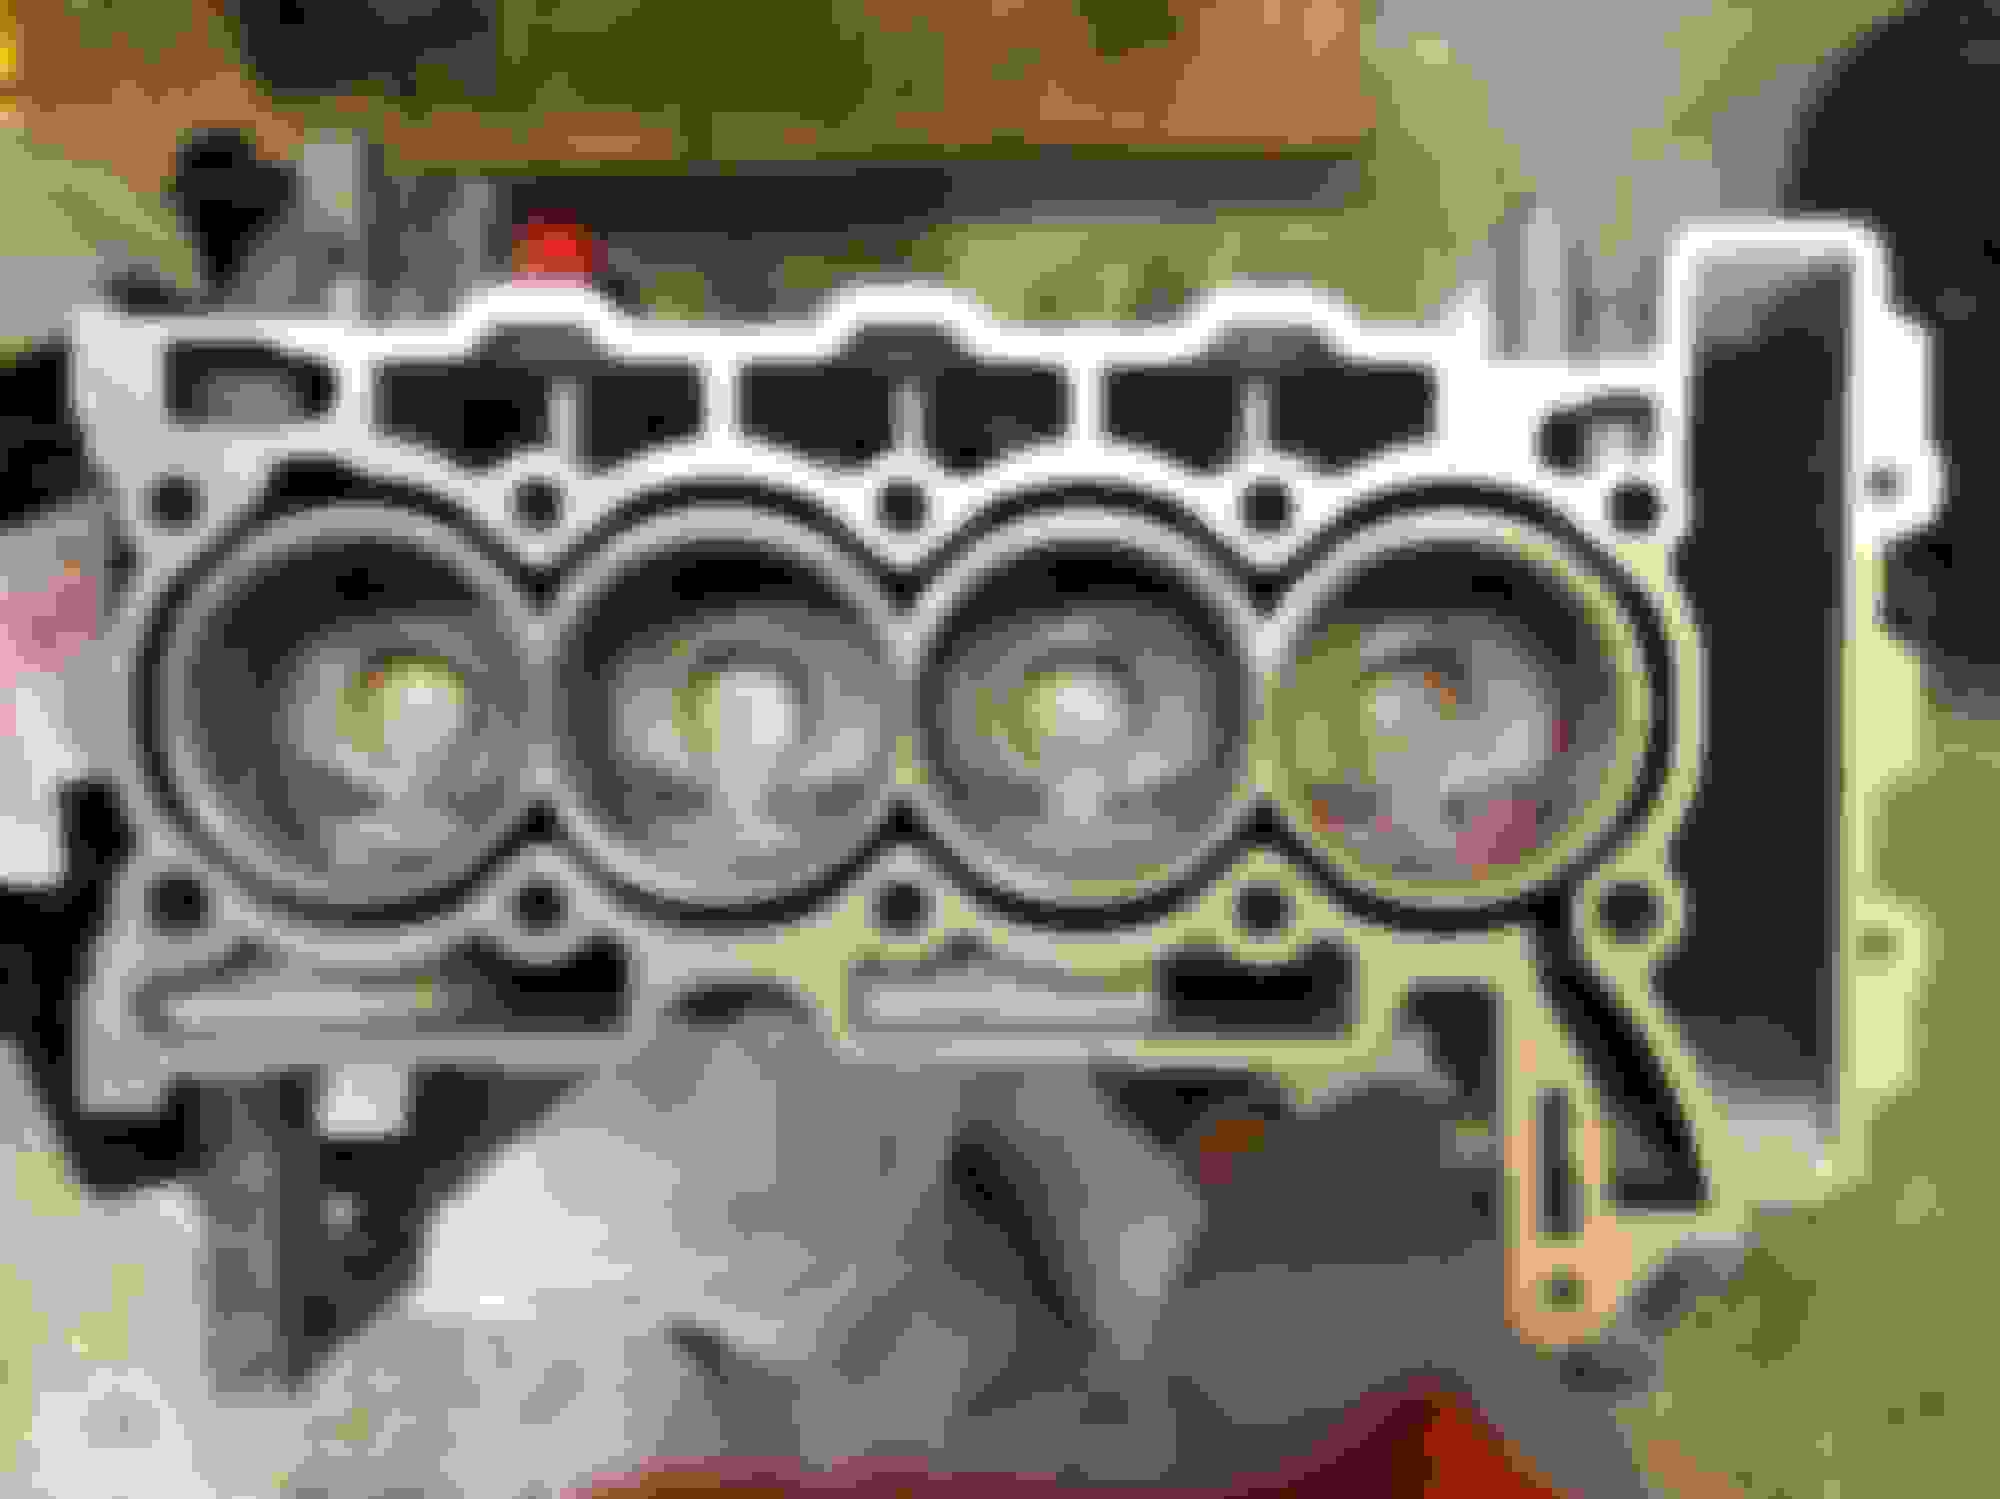
I found a place to machine the block and do the head work and I'm now ready to put in the piston rings. I'm trying to locate a source for reliable information regarding gap settings for each ring. Any help would be appreciated!
I finally put the pistons in. I'm' still waiting on my angle dial gauge that I can use to finish the torque requirements for all the internal torque to yield bolts. I ordered new connecting rod bolts from ECS but they require a 9mm 12 point socket - which I didn't have. The dial gauge and the sockets will be here later this week.
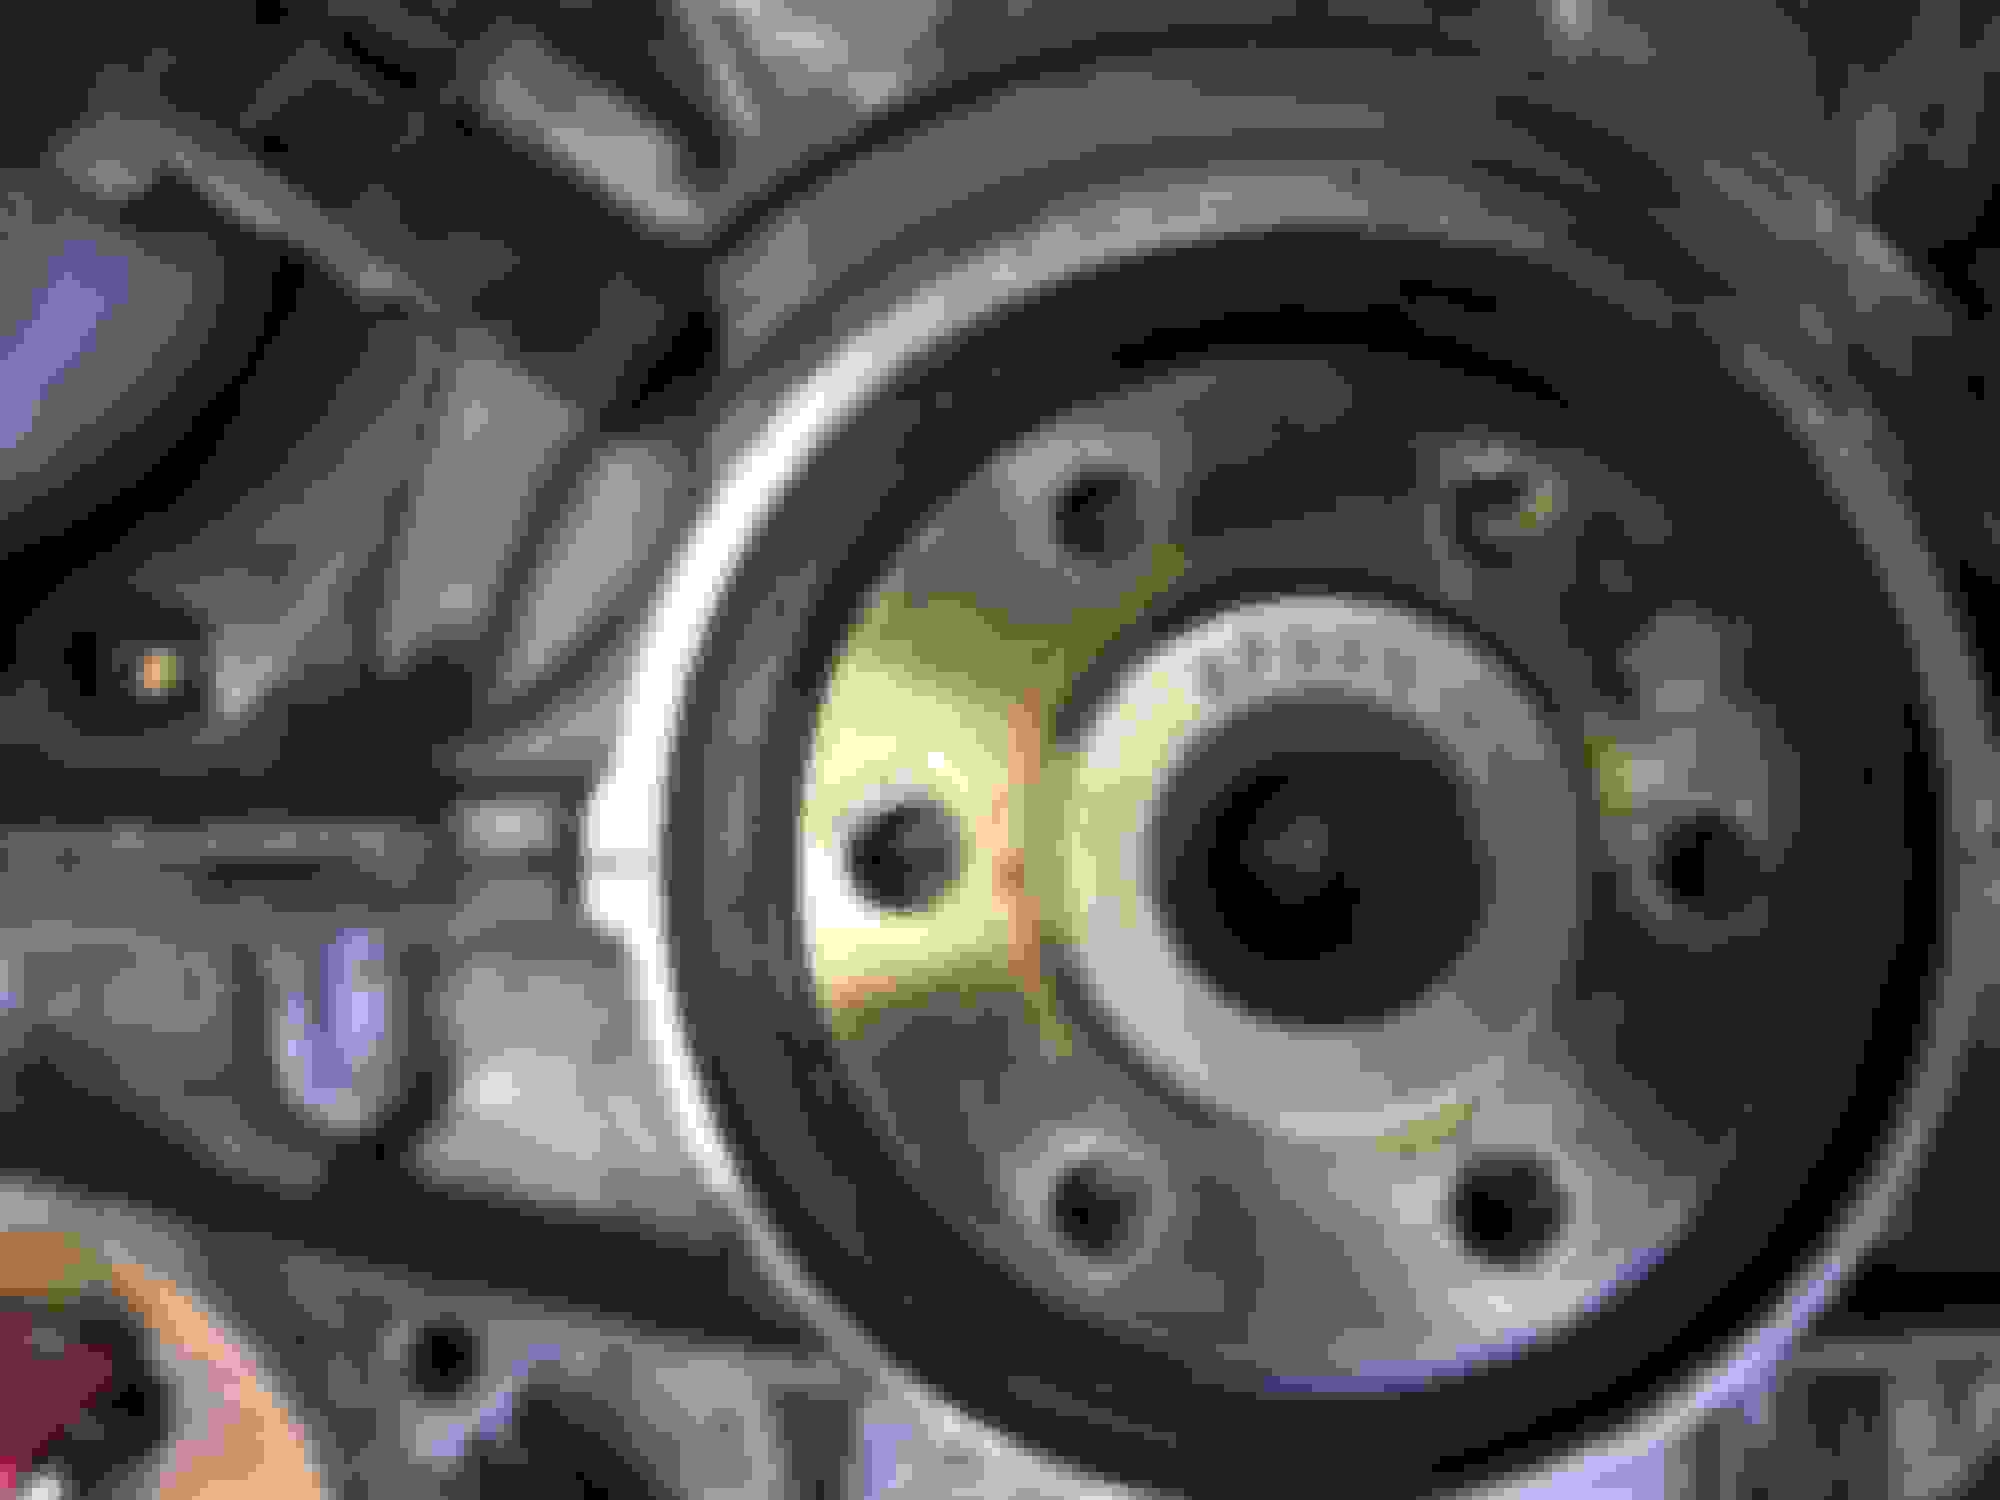
As I am preparing to put the bed plate back together and torque the crank down, it occurred to me that I can't remember if there was a gasket that was between the block and the bedplate. Seems like there should be! Can anyone offer some input on this, please?
Curious about opinions on who makes the best timing chain kit that includes the chain, plastic bits, tension bolt and retaining bolts.
Does something like this exist?
Dealer has one but don't know whether or not it's the "best". Part # can be found in RealOEM. There's also a gasket kit for all the head-mounted parts, except for the exhaust and actual head gasket. If you can't decide which size head gasket thickness to use, talk to the machinist's about how much material was removed. Try working with the various NAM vendors for kit pricing / availability --- there's quite a variety available.
Originally Posted by Bcoday
As I am preparing to put the bed plate back together and torque the crank down, it occurred to me that I can't remember if there was a gasket that was between the block and the bedplate. Seems like there should be! Can anyone offer some input on this, please?
There is no OEM gasket. I used the same sealant as on the pan (also no OEM gasket).
Curious about your pistons --- did you go oversize or just a clean-up bore and trust new rings to keep oil burn to a minimum? Oversize pistons and rings should have the ring gap dimensions included with the instructions.
Were you able to work out the main bearing color coding, or did you ignore the manual and go with only one color?
If you plan to do all the assembly, be prepared for lotsa special tools. I haven't heard of any substitute for the fuel injector seal tool, and if this is a one-time chore for you, maybe take the seals, injectors and head to a shop that has the tool. Labor costs should be comparable to tool costs. Or, get the tool, use it, then re-sell it after you're confidence level is high enough.
Check out youtube videos for guidance on cam timing --- forget anything you may have learned about other engine timing procedures --- TDC has little or no timing purpose, only useful when checking piston-to-valve clearance. If your head work included new valves, the machinist needs all the cams, lifters, rockers, etc to set valve preload --- ask him about it. Hopefully you and your machinist have some Mini experience and I'm wasting my time with all this basic stuff.
I used to swear by the Bentley manual, but then I found out there was a torque spec update on the crankshaft TTY center bolt --- the one used for timing. Newtis has the correct spec.
Eventually you'll need a code reader. I can't recommend one over the others 'cause I use an AccessPort. Be sure to get one with ECU reset capability.
And finally, have patience, you're gonna need it. Best of luck ---
Curious about your pistons --- did you go oversize or just a clean-up bore and trust new rings to keep oil burn to a minimum? Oversize pistons and rings should have the ring gap dimensions included with the instructions.
I did not go oversized but just had the cylinders honed and used new MAHLE rings. I purchased a ring grinder to make sure that I did a good job of measuring the gap for each ring. As you know, I had some trouble finding the correct gap size for each ring but I settled on this site and guide. https://www.newtis.info/tisv2/a/en/r...-pins/2SGSapgG
I measured the gap at 3 different locations within the cylinder to make sure the the measurements didn't change and that I had good spacing throughout the length of each cylinder.
Were you able to work out the main bearing color coding, or did you ignore the manual and go with only one color?
After extensive discussions with my favorite mechanic and the machine shop, I decided not to replace the crank bearings. I know that I'll get some negative comments about this but they showed no signs of wear and tolerances seemed fine. I am still on the fence about this and haven't torqued down the crank yet (or the connecting rods) until I'm more comfortable with this decision.
{Take a look at the spacing between the block and the bedplate. Doesn't it look like there's a gasket in there?}
Here are the pics of the bearing code on the side of my engine and on the crank. A little hard to read but I'm seeing:
Crankshaft: KPNNN
Engine block: KKIKK
Based on what I have found, that would mean that the bearing color would be as follows:
Bearing 1 Top half (K/K) = Green
Bearing 1 Bottom half (K/K) = Green
Bearing 2 Top half (P/K) = Green
Bearing 2 Bottom half (P/K)= Black
Bearing 3 Top half (N/I)= Green
Bearing 3 Bottom half (N/I) = Black
Bearing 4 Top half (N/K) = Green
Bearing 4 Bottom half (N/K) = Black
Bearing 5 Top half (N/K) = Green
Bearing 5 Bottom half (N/K) = Black
If you are so inclined, would you mind letting me know if this is trustworthy info? Like I said, I am still on the fence about the new bearings.
If you plan to do all the assembly, be prepared for lotsa special tools. I haven't heard of any substitute for the fuel injector seal tool, and if this is a one-time chore for you, maybe take the seals, injectors and head to a shop that has the tool. Labor costs should be comparable to tool costs. Or, get the tool, use it, then re-sell it after you're confidence level is high enough.
I'm purchasing and/or borrowing some special tools (like the camshaft timing tool) because I am doing another N14 right after this one. So this one is sort of a learner engine! I haven't considered getting a seat tool. I saw this video about replacing the injectors and thought that it would work fine. I am reusing the old injectors and I'm not sure if the teflon washer is included but the other rings and spacers are included. What are your thoughts about this guys method?
Check out youtube videos for guidance on cam timing --- forget anything you may have learned about other engine timing procedures --- TDC has little or no timing purpose, only useful when checking piston-to-valve clearance. If your head work included new valves, the machinist needs all the cams, lifters, rockers, etc to set valve preload --- ask him about it. Hopefully you and your machinist have some Mini experience and I'm wasting my time with all this basic stuff.
You're not wasting your time at all. Every comment is helpful and much appreciated. I've read your input for a long time on this site and you are one of 3-4 people that I trust for information.
I used to swear by the Bentley manual, but then I found out there was a torque spec update on the crankshaft TTY center bolt --- the one used for timing. Newtis has the correct spec.
I spent $100 on the Bentley manual only to find that - so far - it hasn't been all that helpful. I'm sure it will but the information that I really need right now are correct torque specs for the camshaft bolts! I find that most places say that 10nm is enough but that is not much at all! Plus, I'm afraid that my torque wrench (the 2nd one that I've purchased so far) only goes down to 13.5nm. I also can't find out if the cam hold down bolts are TTY and need to be replaced. They feel like TTY when I try to torque them down.
Incidentally, the first cheap torque wrench that I purchased also didn't go low enough for my connecting rod cap bolts and I've already snapped one of them trying to get them torqued properly. I've read that they need to be torqued to 24nm then another 150 degrees after that. Are you aware of the correct measurements for these bolts?
Eventually you'll need a code reader. I can't recommend one over the others 'cause I use an AccessPort. Be sure to get one with ECU reset capability.
When breaking in the rings, be sure to use non-synthetic oil --- that synthetic stuff prevents rings from seating properly and will cause excessive oil consumption. Save the synthetics for after break-in.
Regarding your block / bedplate gasket --- if RealOEM doesn't show one, there probably isn't one available. If one was originally installed, it probably was discontinued along with the oil pan gasket. Try working with a Mini parts dept to find out if one's available. I used a "gasket-in-a-tube" for both oil pan and bedplate / block.
For a DD, you should be OK without replacing main or rod bearings. Without looking up your codes in the newTIS tables, it looks like you have a good understanding of how it works. You might let the bearings cost be the deciding factor on whether or not you get them.
The video of injector seal replacement is misleading --- his teflon seals were already installed on his injectors, so there was no need to "compress" them. If you install your own, they gotta be stretched over the tip, slid into the groove, then compressed to the same outer dia as the injector shaft. They only stay compressed for a few minutes (OK, maybe up to a half hour) after installing them and they will expand enough to make injector insertion almost impossible without damaging the seal. The tool has five pieces for this seal --- a pliers-like device to cut off the old seal, one piece for installing a new seal onto the injector shaft, and three pieces used to compress the seal (install is done in three separate stages). These seals are included in the dealers head gasket kit --- don't know about kits from other sources.
Pretty sure newtis has all the torque specs you need. Again, I'm too lazy to look them up myself, knowing I gotta do it again in a few months. Also, note that there has been a torque spec change since Bentley was published. The crank center bolt has been tightened up --- newtis has the correct value. It might not affect a DD, but mine came loose and the resultant timing error blew all my exhaust valves --- possibly more damage too, I haven't done a complete teardown yet.
I have access to the old TIS and it says the cam bearing caps use M6 bolts tightened to 10Nm --- nothing about replacing them, so probably not TTY. I haven't compared this to the newtis or Bentley.
Finally, thanks for having faith in my input. Just be advised that I'm not always right and need to be double checked.
. I've been using this "beam" type for big stuff for most of my adult life. My small "clicker", about 50 years old, cost about $50 new. Over $300 now, but it was just repaired / calibrated and will read the 0.6Nm on the tensioner tool.
So, it's been a very long time since I last posted here and much has happened.
Here's the low down on the progress/setbacks between then and now:
The white Mini Cooper that is what has been pictured in this thread is my daughters car. While it was down, she was driving my wife's old sedan and we purchased a 2016 Nissan truck for my wife.
Not long after that, someone ran a red light and hit my daughter and totaled the sedan. The insurance payout was decent and we used that to buy a blue 2008 Mini Cooper S for my daughter. That made everyone happy and gave me some time to work on the car.
Without the time constraints, I decided to take my time and keep the white car for myself even though it's an automatic. However, without the pressure to get it finished, I became busy with other projects and Stormcooper was untouched for a few months.
While dropping a friend off at the airport, my daughter's blue mini Cooper experienced a seized vacuum pump that resulted in shearing the exhaust cam bolt which meant that the car wouldn't start. She called in a bit of a panic because TSA was threatening to tow her car if she didn't get it moved quickly. We were able to get it towed but the daughter was left her carless. I had it towed to my favorite local mechanic to have them replace the timing chain but they noticed some engine damage and said that the block was not useable (more on this later). This meant that I needed to swap out the damaged engine in the blue Cooper for the yet-to-be-finished-but-rebuilt N14 that I was preparing for the white Cooper.
The timing of all of this was terrible because I was scheduled for cancer surgery that same week. While I was having a tumor removed from my single remaining kidney (I already had one kidney removed years ago), my mechanic was swapping engines. When completed, the car ran pretty well and my daughter was again able to drive her Mini Cooper around town. For a while.
A few months into my recovery, the blue Mini started having some strange electrical problems which included random starting difficulties, taillights that would come on when she locked the car, and frantic clicking coming from the fuse box while she tried to start the car. We went through a range of attempts to fix it including replacing the battery, alternator and starter. These were all sort of needed but never fixed the problem. We finally figured out that it was the CAS module that was faulty and I had Bimmerscan clone an old spare CAS with info that he was able to copy from the original CAS module. Once that was replaced, the car ran - and remains running - very well. There are some CEL lights that I have yet to clear but that requires some recoding so I am now teaching myself how to use NCSExpert. (That's not going too well at the moment).
So here's the recap to the whole Mini Cooper saga, in case anyone is wondering:
1. My first Mini Cooper - 2009 Mellow Yellow MCS. My first Mini love. I enjoyed spending time and money on mods for this one but also had to replace timing chain, clutch, and HPFP.
2. 2013 JCS Coupe - I had to sell the yellow Mini for this one. Haven't had to do much to this one but it's treated really well.
3. 2008 white Mini Cooper - My daughter's first Mini. She loved it but someone ran a stop sign and it was totaled.
4. 2009 white Mini Cooper - daughter's 2nd Mini Cooper which she decided would be StormCooper. Replaced the thermostat housing and then she experience the timing chain issue which resulted in bent valves. This is the car trouble that started this thread.
5. 2009 Grey MCS - Salvage car purchased from Copart. I made every mistake possible with this purchase. It was supposed to be an engine donor but when the car arrived at my house, I discovered that it needed a new engine too! Major and costly mistake! The grey Cooper engine was the one that I began to rebuild for StormCooper but is now the 2nd engine for the blue MCS.
6. 2008 blue Mini Cooper - I originally bought this a great price BUT, it soon began having some issues. It's been the most costly Mini Cooper so far. It started off having annoying CEL's that required me to replace HPFP, MAF sensor, O2 sensors, etc. I had a couple of spares in my Mini Cooper garage so no real costs there. Then engine swap and all the rest as described above.
So now, I'm working on getting the 09 white Mini Cooper (Stormcooper) back on the road. I'm using the engine that came out of the blue MCS. It only had 65k miles but the mechanic said it was damaged. At the time, I was right out of surgery and wasn't able to inspect the engine. Now that I've recovered quite a bit, I have had time to take a close look at it and have some conversations with the mechanic. I like the guy but I don't think that the engine needed to be replaced. I'll attach a picture of the damage in my next post. I've had the cylinder head worked on at a great machine shop here in Houston. It's ready to go. I've prepped the engine block and am slowly putting the full engine together before I drop it into Stormcooper. That's the plan for now, anyway!
As I mentioned in the previous post, I'm prepping an old engine that only has 65k miles on it as a replacement for Stormcooper. The head has been redone with new valve, valve stem guides, seals, etc.
I've not done much to the block other than a good cleaning and inspection. Here's a picture of the damage that I noticed from the previous timing chain issues that happened.
I'm looking for responses from people that have worked on N14's before and have some experience with these pesky little engines.
Do you think that this damage is something that I should be concerned with or should I go ahead and put it all back together and put it in the car?
If the tube isn't bent, I'd try to clean it up --- remove sharp edges from chain damage, and maybe make it round again. You don't want any interference that might cause a dipstick to be a stuckstick. Maybe use a dremel tool to grind / shorten it? Just be sure to clean out any grinding / cutting dust.
I agree with OBW. That is caused by the chain coming loose and cutting into it. Dremel makes a flexible cable type adapter with pivoting head thats good for getting into tight spots. Or you might be able to get in there with a round jewelers file. Don't take off much material. You just want to smooth the area a bit to get of any stress risers that could lead to a crack down the road. Once the sharp edges are gone I's use a little sand paper to smooth the machining marks.
Same cams on the N14 whether S model or JCW. Look at the lobes and choose the cam with the least wear. Pay extra attention to the peak of the lobes for pitting or heavy wear. Load is highest at peak lift.
The engine swap slowly continues. I am gradually pulling parts off the original engine in StormCooper and am putting them on the donor engine prior to swap. I'd like to get a lot of the engine components in place before sliding the engine into place because getting to things (like the bottom 10mm bolt on the intake manifold) is sometimes difficult in the engine compartment.
Any thoughts or advice on this?
Most of my parts, gaskets, and specialty tools are in but I'm waiting on the crank hold down tool, cam sprocket bolts, crank bolt, and some gaskets. It dawned on me that I probably don't even need the crank holding tool since I'll be torquing the crank bolt with the engine on a stand. I can probably rig something up to the trans side of the crank to keep it from moving during the torque-down of the crank bolt.
Today, I was able to swap the oil pump and starter. I continue to find timing chain parts in the oil pump assembly. Taking it out and inspecting was a good move.
I will be getting some gasket silicone today to use on the oil pan so that the bottom part of the engine will be done. I've heard that some people use a gasket for the oil pan but every one that I've seen has a bead of silicone instead of a gasket so I'm going with that.
I have the new timing chain kit that will go on later today but the new crank bolt isn't here yet. I'll torque that down later ( I have a white board that I use to remind me of the important things that need to be done). I'll have some time to figure out the crank hold down solution. Cylinder head gasket came in today so the head has been torqued down. I will be putting the cams in place tonight as well. I've heard mixed reports on whether or not the cam hold down bolts are torque to yield. I don't have new ones so I'll have to research this again to make sure.
I realized that I don't have the gaskets that I need for the oil cooler, water pump and exhaust. They've been ordered.
I'll be just cleaning up for the rest of the day. I don't have an engine hoist but I borrow one from a neighbor when needed. I'll pick that up next weekend. Hopefully all will be ready.
Here's a question for the rebuild guys.
I removed the exhaust studs when I dissembled the cylinder head. Is there any reason that I shouldn't use locktite when I replace the studs?
The cam bearing cap bolts are not torque to yield. 10Nm if I recall correctly. The 10mm intake bolt they built the car around can be accessed easily behind the passenger wheel well felt liner. If you ever have an exhaust stud snap you'll have your answer on why not to use loctite. Ask me how I know