
How To Drivetrain R53 :: DIY cold-air intake


Thread Starter
|
3rd Gear
Joined: Aug 2011
Posts: 243
Likes: 4
From: Calgary
Drivetrain R53 :: DIY cold-air intake
For my first how-to thread, I'll document my homemade cold-air intake. I got inspired to do this by DaveF's filter, and decided to do it for several reasons: because I got tired of listening my K&N unit; because I couldn't see how my K&N unit was taking in actually cold air; and because I was bored. If you're bored with your current set up and interested in the personal touch, or don't feel like forking over a massive sum for a fancy lucite box, read on!
Please note: this procedure permanently modifies your stock airbox such that it cannot be reverted to stock. Don't do it if for some reason you want to preserve the option to switch back to your stock airbox and panel filter.
Also, as always, work slowly and carefully, smarter and not harder. Measure seventeen times and cut once. Cut small the first time and fudge your cuts larger. IF YOU SCREW IT UP, YOU'RE RESPONSIBLE - NOT ME, AND NOT NAM, etc.
Apologies in advance for the crappy pictures. I'm out at my shop in the country, and didn't have my camera charger, so I had to use my iPhone!
First steps: get your tools and ingredients. For tools, you'll need T25, T30, and T40 wrenches; 10 mm socket; a Phillips-head screwdriver; and appropriate holesaws for your flexible joint (see below). A bit of silicone sealant or glue is not a bad idea, but everything for me was friction-fit. (I still glued it where appropriate.)
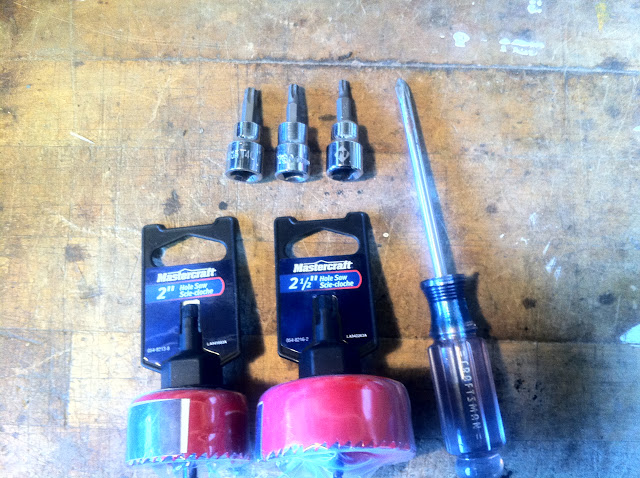
There are a number of different K&N Universal filters that will fit in a configuration like that outlined here. I ended up with a pretty fancy one, because it's what the local distributor had in stock. There are much simpler ones that will work. If you use the exact ABS plastic elbow bend that I have here, you need something with a 70 mm inlet flange diameter; less than 6" length; and no matter what you use, you need a filter with an outside diameter of less than 4.5". If you select a filter with a 10-20� angled flange, you should be able to fit a longer one - i.e., up to 7" (the longest Universal K&N sells with a 70 mm flange).

From Home Depot or someplace similar, you need a 2" 45� ABS elbow. If it's male-to-female, the male end will fit perfectly inside the stock airbox inlet pipe, and the OD of the female end will fit perfectly in your 70 mm K&N flange. You also need a flexible rubber 1 1/2"-2" joint. Mine is pictured with hoseclamps; these will be discarded, but it's best if your flexible joint includes lips for these clamps. In the case of mine, which I purchased from Home Depot and should be a standard item, the inner flanges of these lips have ODs if 2" and 2 1/2" - perfect for my cheap-o holesaws, and about as big as you can go with the real estate on the stock airbox top.

After you've gathered your bits and pieces, tear everything down: remove your stock airbox and ductwork (save for the throttle-body inlet; there's no need to pull this). This has been documented in multiple places, but I'll skim it here.
First, remove any obstructions.
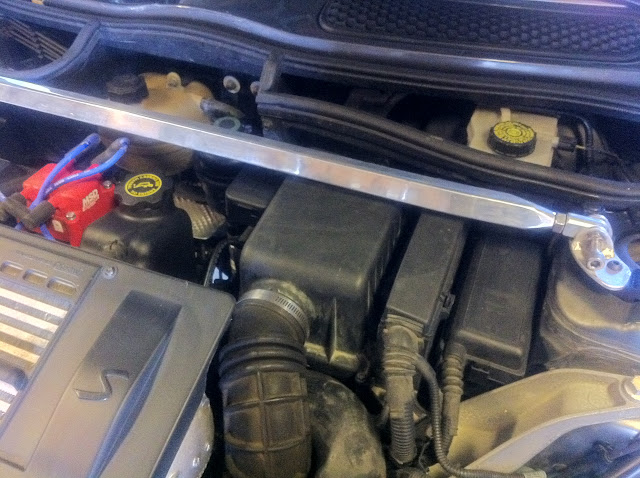
After removing the hoseclamp at the throttle-body inlet, undo the two T25 bolts at the front of your stock airbox, as if you were going to change your panel filter.

Remove your stock airbox top and panel filter; discard your panel filter, because it won't do you any good after this modification. Carefully remove your two ECU harnesses by pulling the T-shaped tabs front and back, and wiggling them up. (I also took this opportunity to clean by stock lower airbox; if you do this, remove your ECU completely from the airbox assembly by releasing the front and rear tabs that hold it in place. Put your ECU someplace SMART.) Before removing the airbox/ECU lower assembly, use a permanent marker to draw a line straight across its top on the firewall shroud.

Remove the 10mm bolt from the front of the airbox/ECU lower assembly, and push the wire loom aside. This bolt is about three feet long; use an air wrench if you feel so inclined.
Pull your airbox lower straight back off the rubber bushings at the firewall.
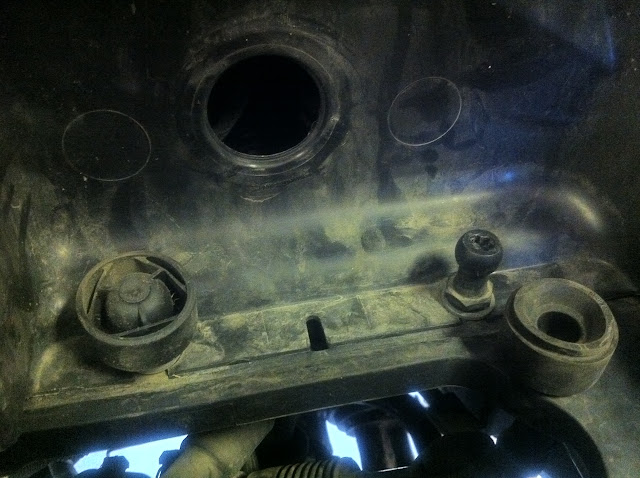
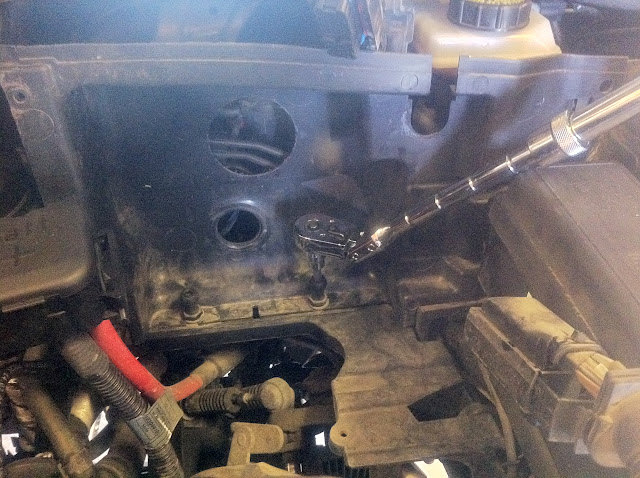
Pull the rubber bushings up to expose two plastic T40 bolts; remove these (left and right). Remove the two T30 screws (top and bottom) that hold the plastic shroud to the firewall. Remove the weatherstripping from the top of this shroud, as well as the ECU harness and plastic Phillips-head trim screw at the top right. You can now carefully remove your firewall shroud.
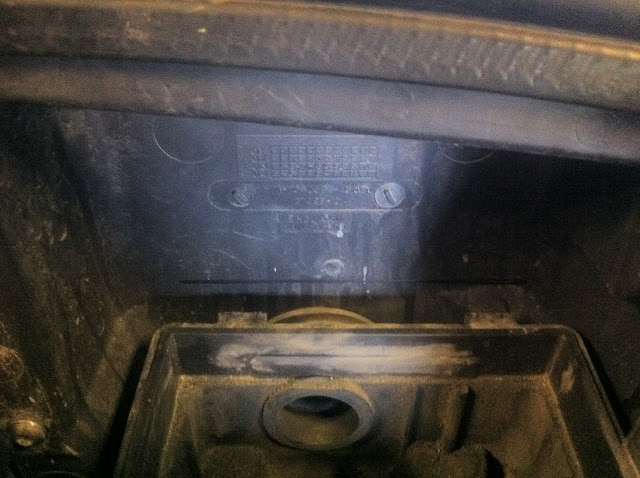
Here's a quick preview of why we're removing the firewall shroud before drilling a fat hole in it. Those tubes are your BRAKE LINES. (While I'm at it, I should add that there's no reason this mod shouldn't also assist in keeping your brake fluid a bit cooler!
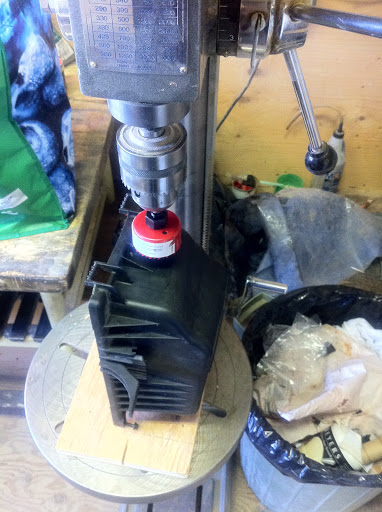
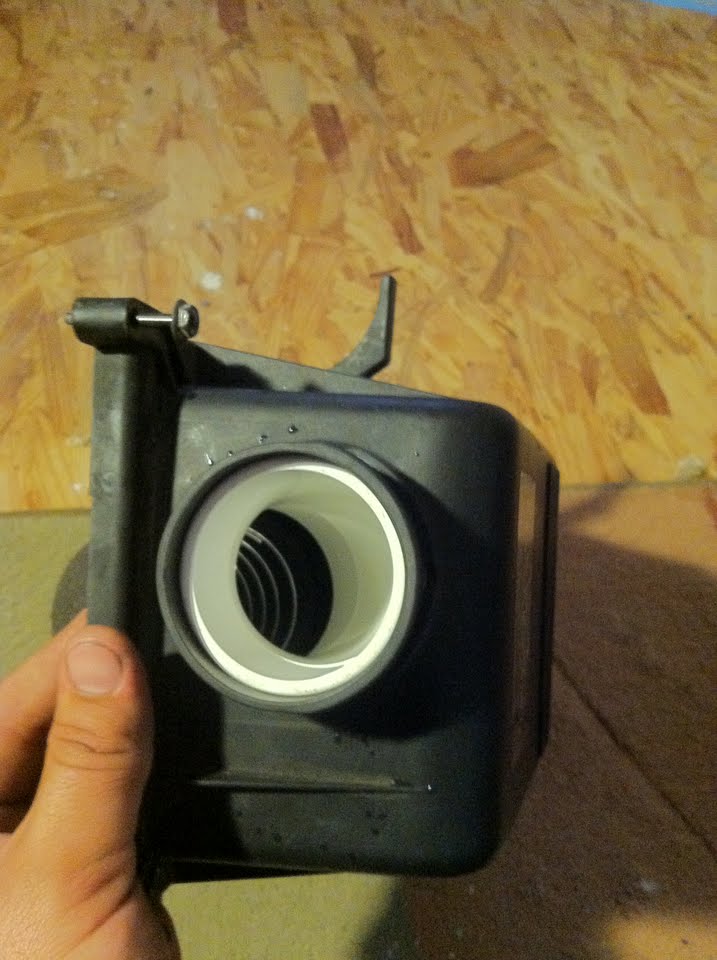
Moving back to the airbox top, drill a pilot hole roughly at the top of the center "fin" at its back. I cut mine back with a glue chisel to help make sure my holesaw didn't snag.

You'll use the smaller of your two holesaws here. I highly recommend a drill press, but there's no reason you couldn't use a hand drill.
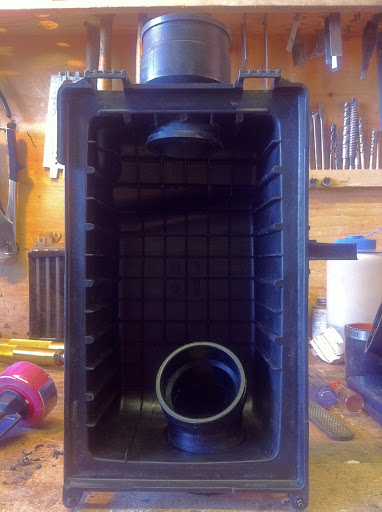
The result is a hole.

As noted above, my 45� elbow-inlet junction is friction fit. (In fact, it's so tight I had to clean up both surface with a bit of 80-grit sandpaper.) Here's both fittings in place, and my beautiful glue lines around the elbow. Notice that the elbow is angled a bit toward the inside of the stock airbox; depending on your filter, the angle required here may vary, and I highly recommend mocking yours up before gluing it together!

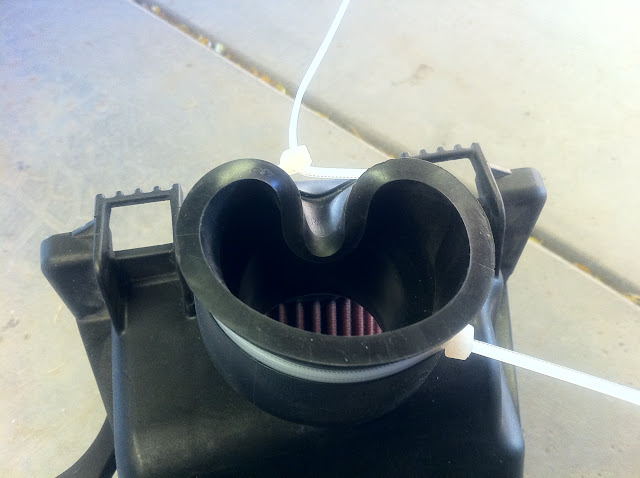
...and with the K&N filter installed. Your work on the airbox top is now done!

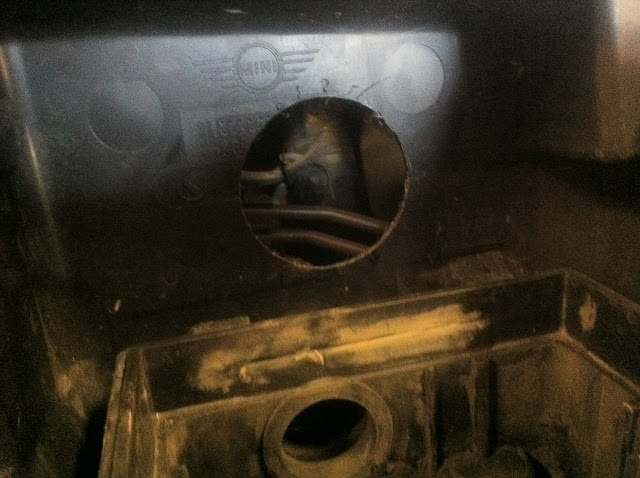
Moving on to the firewall shroud, use the factory intake hole as a reference point to find the center of your larger hole. It's hard for me to describe how this is done; I'm fairly geometrically inclined, so this sort of came naturally to me. If you've got all the supplies I outlined above, down to the last T, you should be able to use my measurements. Of course, your mileage may vary. In any case, this is the side that takes the flexible fitting, and a little variance is the point of it being flexible!
Looking down at the front side of the shroud, my 2 1/2" hole center was 18 mm to the right of the stock intake hole center, and 36 mm above the line we drew before removing the shroud. Big apologies if this doesn't make any sense, but please let me know if you have questions!

As above, drill a pilot hole, and then slowly run your holesaw through. This plastic is much softer than the other, but also more likely to melt if things get hot. (All that means is you'll have to clean it up a bit with a knife, sandpaper, or low-bite wood rasp. I would recommend doing this anyway.)

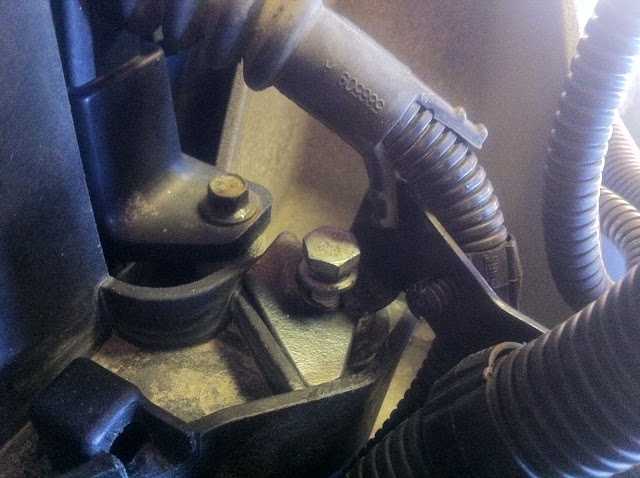
After this, start reassembly. Reinsert your shroud and pop all the requisite stock hardware back in, including the plastic T40 bolts for the rubber bushings; trim screw at the top right; T30 screws at the left; 10 mm bolt (with attached wire loom); ECU and ECU harnesses; and weatherstripping. Here's a cheesy photograph featuring a tool.
The bushings on your airbox lower came off on the car side, but they go back on on the airbox side. If you're as dumb as me, this will save you a minor headache. Do this first, and then just push them back onto the plastic T40 bolts.

Put a kink in your flexible joint and tie it up with a zip-tie. This step might really help you get things back together...
...but it didn't help me. My flexible fitting turned out to be just too long, so I simply cut the lip off and used it in a similar way to the stock bottom intake grommet. (This is the DIY part, I guess. If yours is not too long, push it back through your hole in the firewall shroud, cut off your zip tie, and allow the lip of the flexible fitting to take to the hole in the shroud.)

Force the stock airbox top back into place as if you were reinstalling a stock panel filter. (It just occurred to me that if you were to cut the stock filter out of its gasket, you could use this gasket to seal your new cold air intake. I didn't do this, but I might...) Reinstall the T25 screws at the front.

Add a K&N sticker to the top if you feel so inclined. Otherwise just enjoy your the 200-300 horsepower gain, and St. Paul's pipe-organ sound! (In all seriousness, I have no idea what the gains are for this. It feels a bit better than my K&N unit, for what it's worth, and it whines a little less.) I don't remember if this is a before or after pic; it's tough to tell the difference, and that's what I like!
If by this point you haven't had too much to drink, pat yourself on the back and go for a drive!
Please note: this procedure permanently modifies your stock airbox such that it cannot be reverted to stock. Don't do it if for some reason you want to preserve the option to switch back to your stock airbox and panel filter.
Also, as always, work slowly and carefully, smarter and not harder. Measure seventeen times and cut once. Cut small the first time and fudge your cuts larger. IF YOU SCREW IT UP, YOU'RE RESPONSIBLE - NOT ME, AND NOT NAM, etc.
Apologies in advance for the crappy pictures. I'm out at my shop in the country, and didn't have my camera charger, so I had to use my iPhone!
First steps: get your tools and ingredients. For tools, you'll need T25, T30, and T40 wrenches; 10 mm socket; a Phillips-head screwdriver; and appropriate holesaws for your flexible joint (see below). A bit of silicone sealant or glue is not a bad idea, but everything for me was friction-fit. (I still glued it where appropriate.)
There are a number of different K&N Universal filters that will fit in a configuration like that outlined here. I ended up with a pretty fancy one, because it's what the local distributor had in stock. There are much simpler ones that will work. If you use the exact ABS plastic elbow bend that I have here, you need something with a 70 mm inlet flange diameter; less than 6" length; and no matter what you use, you need a filter with an outside diameter of less than 4.5". If you select a filter with a 10-20� angled flange, you should be able to fit a longer one - i.e., up to 7" (the longest Universal K&N sells with a 70 mm flange).
From Home Depot or someplace similar, you need a 2" 45� ABS elbow. If it's male-to-female, the male end will fit perfectly inside the stock airbox inlet pipe, and the OD of the female end will fit perfectly in your 70 mm K&N flange. You also need a flexible rubber 1 1/2"-2" joint. Mine is pictured with hoseclamps; these will be discarded, but it's best if your flexible joint includes lips for these clamps. In the case of mine, which I purchased from Home Depot and should be a standard item, the inner flanges of these lips have ODs if 2" and 2 1/2" - perfect for my cheap-o holesaws, and about as big as you can go with the real estate on the stock airbox top.
After you've gathered your bits and pieces, tear everything down: remove your stock airbox and ductwork (save for the throttle-body inlet; there's no need to pull this). This has been documented in multiple places, but I'll skim it here.
First, remove any obstructions.
After removing the hoseclamp at the throttle-body inlet, undo the two T25 bolts at the front of your stock airbox, as if you were going to change your panel filter.
Remove your stock airbox top and panel filter; discard your panel filter, because it won't do you any good after this modification. Carefully remove your two ECU harnesses by pulling the T-shaped tabs front and back, and wiggling them up. (I also took this opportunity to clean by stock lower airbox; if you do this, remove your ECU completely from the airbox assembly by releasing the front and rear tabs that hold it in place. Put your ECU someplace SMART.) Before removing the airbox/ECU lower assembly, use a permanent marker to draw a line straight across its top on the firewall shroud.
Remove the 10mm bolt from the front of the airbox/ECU lower assembly, and push the wire loom aside. This bolt is about three feet long; use an air wrench if you feel so inclined.
Pull your airbox lower straight back off the rubber bushings at the firewall.
Pull the rubber bushings up to expose two plastic T40 bolts; remove these (left and right). Remove the two T30 screws (top and bottom) that hold the plastic shroud to the firewall. Remove the weatherstripping from the top of this shroud, as well as the ECU harness and plastic Phillips-head trim screw at the top right. You can now carefully remove your firewall shroud.
Here's a quick preview of why we're removing the firewall shroud before drilling a fat hole in it. Those tubes are your BRAKE LINES. (While I'm at it, I should add that there's no reason this mod shouldn't also assist in keeping your brake fluid a bit cooler!
Moving back to the airbox top, drill a pilot hole roughly at the top of the center "fin" at its back. I cut mine back with a glue chisel to help make sure my holesaw didn't snag.
You'll use the smaller of your two holesaws here. I highly recommend a drill press, but there's no reason you couldn't use a hand drill.
The result is a hole.
As noted above, my 45� elbow-inlet junction is friction fit. (In fact, it's so tight I had to clean up both surface with a bit of 80-grit sandpaper.) Here's both fittings in place, and my beautiful glue lines around the elbow. Notice that the elbow is angled a bit toward the inside of the stock airbox; depending on your filter, the angle required here may vary, and I highly recommend mocking yours up before gluing it together!
...and with the K&N filter installed. Your work on the airbox top is now done!
Moving on to the firewall shroud, use the factory intake hole as a reference point to find the center of your larger hole. It's hard for me to describe how this is done; I'm fairly geometrically inclined, so this sort of came naturally to me. If you've got all the supplies I outlined above, down to the last T, you should be able to use my measurements. Of course, your mileage may vary. In any case, this is the side that takes the flexible fitting, and a little variance is the point of it being flexible!
Looking down at the front side of the shroud, my 2 1/2" hole center was 18 mm to the right of the stock intake hole center, and 36 mm above the line we drew before removing the shroud. Big apologies if this doesn't make any sense, but please let me know if you have questions!
As above, drill a pilot hole, and then slowly run your holesaw through. This plastic is much softer than the other, but also more likely to melt if things get hot. (All that means is you'll have to clean it up a bit with a knife, sandpaper, or low-bite wood rasp. I would recommend doing this anyway.)
After this, start reassembly. Reinsert your shroud and pop all the requisite stock hardware back in, including the plastic T40 bolts for the rubber bushings; trim screw at the top right; T30 screws at the left; 10 mm bolt (with attached wire loom); ECU and ECU harnesses; and weatherstripping. Here's a cheesy photograph featuring a tool.
The bushings on your airbox lower came off on the car side, but they go back on on the airbox side. If you're as dumb as me, this will save you a minor headache. Do this first, and then just push them back onto the plastic T40 bolts.
Put a kink in your flexible joint and tie it up with a zip-tie. This step might really help you get things back together...
...but it didn't help me. My flexible fitting turned out to be just too long, so I simply cut the lip off and used it in a similar way to the stock bottom intake grommet. (This is the DIY part, I guess. If yours is not too long, push it back through your hole in the firewall shroud, cut off your zip tie, and allow the lip of the flexible fitting to take to the hole in the shroud.)
Force the stock airbox top back into place as if you were reinstalling a stock panel filter. (It just occurred to me that if you were to cut the stock filter out of its gasket, you could use this gasket to seal your new cold air intake. I didn't do this, but I might...) Reinstall the T25 screws at the front.
Add a K&N sticker to the top if you feel so inclined. Otherwise just enjoy your the 200-300 horsepower gain, and St. Paul's pipe-organ sound! (In all seriousness, I have no idea what the gains are for this. It feels a bit better than my K&N unit, for what it's worth, and it whines a little less.) I don't remember if this is a before or after pic; it's tough to tell the difference, and that's what I like!
If by this point you haven't had too much to drink, pat yourself on the back and go for a drive!
Last edited by Applesauce; Oct 17, 2011 at 10:38 AM. Reason: Fixing pictures. They're fixed now!

Thread Starter
|
3rd Gear
Joined: Aug 2011
Posts: 243
Likes: 4
From: Calgary
About $80, including $20 worth of holesaws and that very expensive K&N "X-Stream" filter. Selecting a different filter and already owning the holesaws would bring the cost down a lot; even so, for identical performance to you-name-it super-brand CAI, it's pretty damn cheap!
5th Gear


Joined: Nov 2009
Posts: 1,079
Likes: 108
From: Mount Doom, Mordor
There are a number of different K&N Universal filters that will fit in a configuration like that outlined here. I ended up with a pretty fancy one, because it's what the local distributor had in stock. There are much simpler ones that will work. If you use the exact ABS plastic elbow bend that I have here, you need something with a 70 mm inlet flange diameter; less than 6" length; and no matter what you use, you need a filter with an outside diameter of less than 4.5". If you select a filter with a 10-20� angled flange, you should be able to fit a longer one - i.e., up to 7" (the longest Universal K&N sells with a 70 mm flange).
From Home Depot or someplace similar, you need a 2" 45� ABS elbow. If it's male-to-female, the male end will fit perfectly inside the stock airbox inlet pipe, and the OD of the female end will fit perfectly in your 70 mm K&N flange. You also need a flexible rubber 1 1/2"-2" joint. Mine is pictured with hoseclamps; these will be discarded, but it's best if your flexible joint includes lips for these clamps. In the case of mine, which I purchased from Home Depot and should be a standard item, the inner flanges of these lips have ODs if 2" and 2 1/2" - perfect for my cheap-o holesaws, and about as big as you can go with the real estate on the stock airbox top.
As noted above, my 45� elbow-inlet junction is friction fit. (In fact, it's so tight I had to clean up both surface with a bit of 80-grit sandpaper.) Here's both fittings in place, and my beautiful glue lines around the elbow. Notice that the elbow is angled a bit toward the inside of the stock airbox; depending on your filter, the angle required here may vary, and I highly recommend mocking yours up before gluing it together!
...and with the K&N filter installed. Your work on the airbox top is now done!
Thanks for posting this how-to on your airbox mod!

I assume the OD of the female end of the 45* elbow is 70mm (2.75") if the 70mm filter fits on it well. Just wondering if you had measured the other end, since it's likely smaller, and it'd save me a trip to Home Depot if you already have the measurement handy.
I'm thinking of performing a mod similar to yours on my airbox. I've already modded the back of the bottom portion of the box so that it receives air from the cowl. Right now I'm in the "info gathering" phase of the mod design for the airbox top and filter swap.
I have a nice aluminum flange for a 3" air intake setup just sitting around (somewhere--I've moved *twice* since it was packed away) from my former car, a '92 Escort wagon, which I had upgraded to '94 MAF and ECU, and modded the intake for better sound and better access to cold air--the combination of which probably added nearly 10HP to an 88HP car that *desperately* needed the help. Off topic--I also upgraded the suspension to ZX2 S/R springs/struts and the wheels/tires to GT alloys and 205/50s, which made it handle nearly as good as my MINI!
Anyway, if the flange fits inside the airbox top, it would likely allow me to offset the factory airbox outlet hole in the 3" flange and center the filter a bit more in the airbox (as well as making the filter mod more-or-less reversible), which would prevent any additional restriction there. I'd really like not add any restriction to the stock airbox outlet if it can be avoided, since it's already a fairly small opening (IIRC) as-is from the factory. Hopefully I can find a 3" to 2.75" reducing elbow, a 2.75" female to female 45* elbow (provided it fits nicely inside the 3" flange opening and isn't too restrictive in the elbow portion), or a filter that has a 3" opening and a 3" to 3" elbow.
Thanks again for the info you already threw out here for us, and hopefully you remember the OD of the male end of that elbow and will post it here....
C ya,
Dutch
Thread Starter
|
3rd Gear
Joined: Aug 2011
Posts: 243
Likes: 4
From: Calgary
Applesauce--
Thanks for posting this how-to on your airbox mod!
I assume the OD of the female end of the 45* elbow is 70mm (2.75") if the 70mm filter fits on it well. Just wondering if you had measured the other end, since it's likely smaller, and it'd save me a trip to Home Depot if you already have the measurement handy. ...
Thanks again for the info you already threw out here for us, and hopefully you remember the OD of the male end of that elbow and will post it here....
C ya,
Dutch
The first filter I bought had a 3" ID, because I thought for sure that I'd be able to find an angled plumbing fitting that would go from the ID of the inlet tube (again, I think 2 3/8", but be sure to verify) to a 3" OD that would fit inside this big-mouthed filter. No dice, unfortunately: you're limited to the standard wall thicknesses of standard plumbing fittings (because this wall thickness dictates ODs - the only dimension, really that we're concerned with here). So I bought the most appropriate fitting I could find, and ordered a filter to fit.
I have the day off and probably have a few things I could do on the car, if you want me to measure the airbox inlet tube. Otherwise, good luck and happy DIY'ing!
5th Gear
Joined: Nov 2009
Posts: 1,079
Likes: 108
From: Mount Doom, Mordor
You assume correctly regarding the female end. As for the OD of the male end, I don't have it, unfortunately. I think it's 2 3/8", but it could be as much as 2 1/2". I do know that to measure it all you'll have to do is pull the intake tube: no need to disassemble the whole airbox, because the inlet (to the throttle body) is a constant diameter from the inside of the box to the flange that connects to the inlet tube. (Disassembling the airbox for me is a royal pain, because my ultra-high-street-cred stress bar needs to come off first.)

I've also been looking at the pics I can find of the original airbox mod (Dave.F?) that this seems to have been inspired by. Lots of measuring to do, I guess, and plenty of time to do it, as I have one panel filter left on the shelf....
Thanks for the info! I'll post pixs when I get it all done....
C ya,
Dutch
5th Gear
Joined: Nov 2009
Posts: 1,079
Likes: 108
From: Mount Doom, Mordor
I just put in the one remaining stock filter I had lying around, and took measurements while the thing was apart. The 3" flange fits between the interior buttress and the wall of the box over the outlet hole so well you'd think it was purpose-built for this application! The only niggle is the curve at the top of the box doesn't let it sit quite flat when positioned perfectly in front of the airbox lid's outlet.
So, I'm thinking I'll get one of the plastic 3" flanges Spectre makes next time I find myself at Autozone, since it'd be cake to hit the one edge with the heat-gun and press it into the curve to make a better fit and easy to seal. Then I can peruse the 3" elbows available in Spectre's "make your own intake" system and the available filters that will fit on a 3" pipe, and see what I can come up with. I used their pieces on the ZX2 I owned between the little '92 Escort wagon and the MINI, and I found that they have a fairly wide selection of elbows and pieces to work with. It's "chromed" plastic (probably ABS or similar), so it should be strong enough and fairly resistant to heat soak, and its ID is actually larger than the factory airbox top's outlet, so no added restriction should result....
I'll post pixs when I get it all sussed out.
Tanxs again for the info and inspiration!
C ya,
Dutch
Trending Topics
5th Gear
Joined: Nov 2009
Posts: 1,079
Likes: 108
From: Mount Doom, Mordor
Funds for this and a few other projects are being diverted to cover new lower control arm bushings, since at our club's "Tech Day" it was discovered that the originals are toast, so pics might be a while coming....
C ya,
Dutch
C ya,
Dutch

Couldnt get the piece you have in black at the local hardware store, so be it lol.
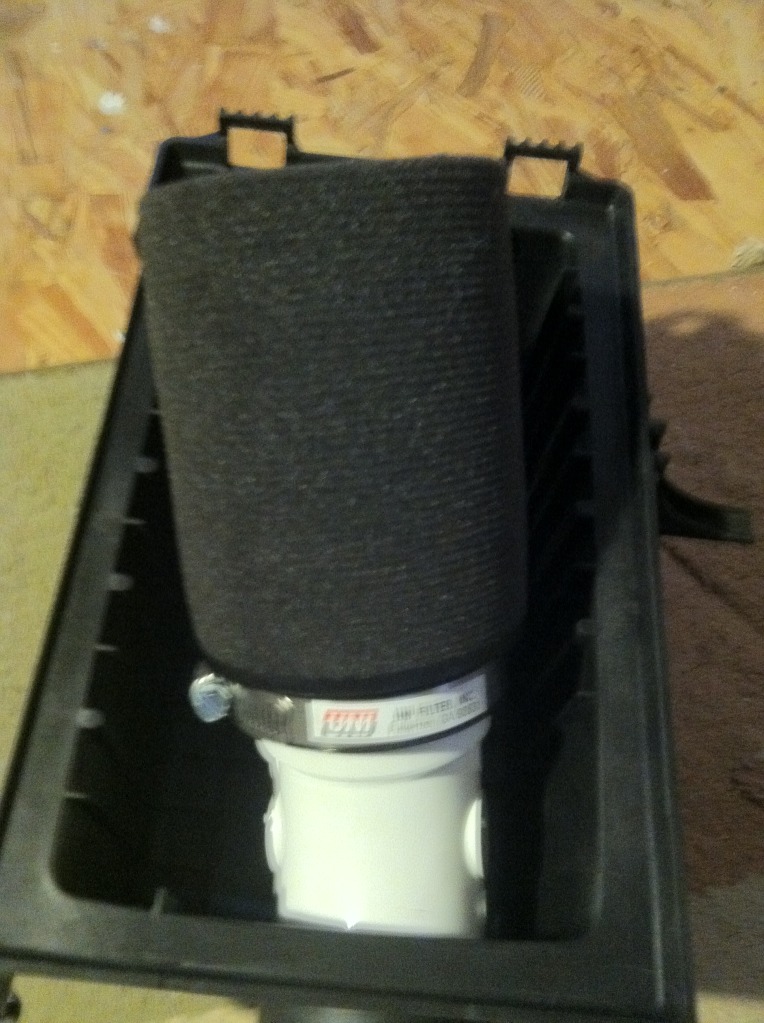
I ended up going with a UNI Foam Filter, same dimensions as your K&N roughly, but foam and about $19 shipped!
Good writeup though! I already had a big rectangular slot in the back of my air box, so I just took the pipe and pushed it into place and tapped it in solid with a plastic mallet.
Voila!
I ended up going with a UNI Foam Filter, same dimensions as your K&N roughly, but foam and about $19 shipped!
Good writeup though! I already had a big rectangular slot in the back of my air box, so I just took the pipe and pushed it into place and tapped it in solid with a plastic mallet.
Voila!

2nd Gear
Joined: Jun 2012
Posts: 102
Likes: 0
Just had this done
Ok so I Just had this awesome mod done while the car was in for a major overhaul.
Before doing it my mechanic said, "It's weird but I guess it works"
After doing it and (coupling that with many other things) he said "She Flies"
So I tought we should be coming up with a name for this Modified Air box, for bragging rights at least. Everyone else does in there Sig why not be Proud of this!!!!
So here's what we have right now;
It resemble the JCW box and the DINAN a lot, and his one of the only REAL CAI available for the R53 , Sure DINAN had a better air flow going in but it was expensive and they stopped making it, and honestly I'm not going to wait around to see one pop up in the marketplace. JCW is almost Identical but there's this flap that open and shuts, I didnt care to buy one just to tie that trap open 
Two points that both these air box have in common with this mod are the material it's made of plastic wich has one of the best heat exchange ratio for this purpose and the source of Air, Witch his NOT the engine bay (what almost every other CAI manufacturer thinks of as "a source of cold air" Duhh!!!!!
Sure they may sell Covers afterwards but, Hey OEM box his right there and at no extra charge so do the math... Just get 3 pennies worth of ABS and a good Filter, I ended up with K&N filter RU-3190, wich look likes the exact one that Dave's been using in his box from pic I've seen.
So for a name then...
- Modified OEM box (to the point but, less than cool name)
- Dave's style
(Just because the dude came up with a way of making money modifing oem air box doesnt entitle him to put his "brand" on every single modified box.
Don't get me wrong I am super grateful, but we dont even know if he was the first or if he just made money selling some, If he was the first then props to him it's great. )
And then DIY air box, Again stating the obvious but less than cool
I Know it useless and childish but I really think it's a SUPER COOL and cheap way of getting a great, if not the greatest (taking time and money into account here ) available Air box made for the Super charged Mini.
Super cool air box (refering to air temp as well as principle ) could be good or MMW (Mad Modders Works) air box
Ummm... "Mad modders Works" That could turn out into a branding after all
Cause after all "once you pop, the fun don't stop"
From the threads I read I know that most you guy (espacially JOE_BFSTPLK) are mad In a good way that is....
Inputs???
Before doing it my mechanic said, "It's weird but I guess it works"
After doing it and (coupling that with many other things) he said "She Flies"
So I tought we should be coming up with a name for this Modified Air box, for bragging rights at least. Everyone else does in there Sig why not be Proud of this!!!!
So here's what we have right now;
It resemble the JCW box and the DINAN a lot, and his one of the only REAL CAI
available for the R53 , Sure DINAN had a better air flow going in but it was expensive and they stopped making it, and honestly I'm not going to wait around to see one pop up in the marketplace. JCW is almost Identical but there's this flap that open and shuts, I didnt care to buy one just to tie that trap open Two points that both these air box have in common with this mod are the material it's made of plastic wich has one of the best heat exchange ratio for this purpose and the source of Air, Witch his NOT the engine bay (what almost every other CAI manufacturer thinks of as "a source of cold air" Duhh!!!!!
Sure they may sell Covers afterwards but, Hey OEM box his right there and at no extra charge so do the math... Just get 3 pennies worth of ABS and a good Filter, I ended up with K&N filter RU-3190, wich look likes the exact one that Dave's been using in his box from pic I've seen.
So for a name then...
- Modified OEM box (to the point but, less than cool name)
- Dave's style
(Just because the dude came up with a way of making money modifing oem air box doesnt entitle him to put his "brand" on every single modified box.
Don't get me wrong I am super grateful, but we dont even know if he was the first or if he just made money selling some, If he was the first then props to him it's great.
)And then DIY air box, Again stating the obvious but less than cool
I Know it useless and childish but I really think it's a SUPER COOL and cheap way of getting a great, if not the greatest (taking time and money into account here
) available Air box made for the Super charged Mini.Super cool air box (refering to air temp as well as principle
) could be good or MMW (Mad Modders Works) air boxUmmm... "Mad modders Works" That could turn out into a branding after all
Cause after all "once you pop, the fun don't stop"
From the threads I read I know that most you guy (espacially JOE_BFSTPLK) are mad
In a good way that is....Inputs???
Neutral
Joined: Nov 2012
Posts: 9
Likes: 0
From: texas
Just did this last night. Love the results. Might I add, a pvc 45 degree male to female works just fine with a little sanding to get it to fit. And after a quarter bottle of jack daniels and enough wrestleing with the intake box, i cut the abs connector like mentioned above, and it works plenty fine. wonderful mod.

Neutral
Joined: Jul 2011
Posts: 3
Likes: 0
Thanks for a write-up-- I just completed the mod on my 04. I had a little trouble aligning the hole in the firewall with the flexible fitting on the airbox. I can't seem to line it up just right so there is a slight kink. The air seems to flow fine though it probably isn't sealed completely.
Do you think this is a major issue or would rob the performance of the mod?
Do you think this is a major issue or would rob the performance of the mod?
Neutral
Joined: Nov 2012
Posts: 9
Likes: 0
From: texas
if you cut it back where its flush with the box but not stuffed into the whole it works great. Remember its a slight angle so not a straight cut. Wish I had pics of mine but alas. Anyways it should be connected to the firewall shroud not the box itself an good luck

2nd Gear
Joined: Apr 2013
Posts: 55
Likes: 0
From: Portland, Oregon
I just cut the whole through the shroud a little higher than the OP did as it turned out his measurements were slightly off in reality. I cut my opening about 1/4" higher and the rubber tubing fits perfectly through creating a completely sealed system that draws all air through the cowl now and there are no kinks.


Banned
Joined: Jan 2012
Posts: 470
Likes: 0
i have a scangauge2 and currently have the alta intake with a makeshift box top that i cut out of a clear side panel from an old desktop computer case.
i think im going to take a stab at this mod and relort back with any changes in the iat numbers.
i think im going to take a stab at this mod and relort back with any changes in the iat numbers.
Banned
Joined: Jan 2012
Posts: 470
Likes: 0
is there any reason a silicone hose could not be used, rather than the stock rubber? and also a foam filter?
i currently have an alta intake, and while expensive, and serving me well for the past 6k miles of its life, im starting to explore more custom mods such as this. i have all the stock parts left over, so, why not experiment right?
so what im thinking is following the basic setup youve got here, only keeping the alta silcone hose and foam filter on as well. would that work?
Last edited by RA082324; Mar 9, 2014 at 07:32 AM.


Neutral
Joined: May 2014
Posts: 2
Likes: 0
From: Europa
Great Idea!
Thanks for the great info! It inspired me to do the same to mine. I changed a few things though. I cut a rectangular hole in the backside of the lower half of the intake box (where the stock rubber grommet thing is) but left the plastic lip where the original filter sits so I can cut and reuse the filter seal as you originally mentioned. I than cut a large rectangular hole in the backside of the top half of the air box instead of drilling a hole like you did. I then mock fit it to the plastic firewall piece which I had removed and cut a large rectangular hole in that making sure that the edges of the hole lined up with the holes in the backside of the airbox. I just used a jigsaw and a speed square to pencil the outlines first. The air filter and how to attach it to the intake pipe was followed precisely as you mentioned. I deviated on the back half because after looking at several intake designs like the ddm, k&n, Alta etc. They all pretty much seem to be open in the back with the firewall hole. I figure since the stock airbox is pretty much intact except for the slots in the back and those are only about a 1/2" away from the plastic firewall piece its still keeping out most of the heat from the engine bay. Now its getting TONS of fresh air from the firewall hole though. I noticed a huge difference in throttle response and ability to pull when given throttle while cruising. I think the next thing I'll do to aid in getting fresh air will be to get a driver side scoop where the windshield vents are. Thanks again and Cheers!
Thanks sauce
I did this but also did a little different. There was another thread that suggested another K&N that had a 22.5 bend in it i think. So i found a 22.5 adapter for the inside of the box. the filter was about half and didnt think it would matter that much (you mentioned there were others). Also, i think i had to change the size of the adapter through the back of the box through firewall. It all worked out and i really appreciate the post. the cost savings is great and the wife loves that  . The SC whine is great with definitely more push!!! wouldnt have done it if you hadnt posted. Thanks.
. The SC whine is great with definitely more push!!! wouldnt have done it if you hadnt posted. Thanks.

