
How To Maintenance :: Thermostat Change


Neutral
Joined: Dec 2010
Posts: 2
Likes: 0
Has anyone out there done a 2008 Cooper Hatchback?
I am currently dead in the water on mine. Worried about breaking the little plastic zip ties and wiring channels attached to the top of the thermostat housing.
Suggestions anyone?
I am currently dead in the water on mine. Worried about breaking the little plastic zip ties and wiring channels attached to the top of the thermostat housing.
Suggestions anyone?

Neutral
Joined: Feb 2010
Posts: 1
Likes: 0
thanks @thebigf for the guide! I just did the procedure on my r53 and your guide saved me a ton of hassle (not to mention the $350 quoted by the mini dealership). also thanks to @fishbone for the tip about the ecu! I'm crossing my fingers that i'll be leak free from now on!

1st Gear
Joined: Sep 2010
Posts: 22
Likes: 0
I replaced mine over the weekend with this great guide. Thought I might add some pictures and my own tips.
1. Definitely just flip up the airbox.
2. For the love of God don't take off the throttle body intake hose: that bottom clamp is nigh impossible to reinstall. I had to go to the hardware store and buy a flathead screw hose clamp, which worked great.
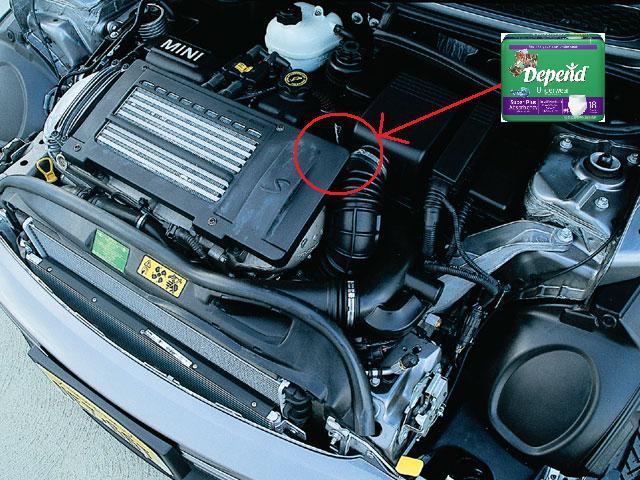
There aren't a lot of photos of where the thermostat is, so I'll add a photo here. This area of leaking I call the Depends Zone:
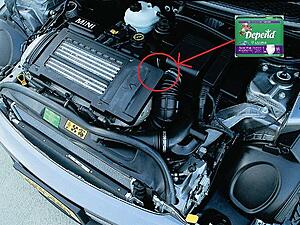
You can see it immediately to the back of the intercooler cover. If you need to take it off, the bolts are #30 Torx, btw.
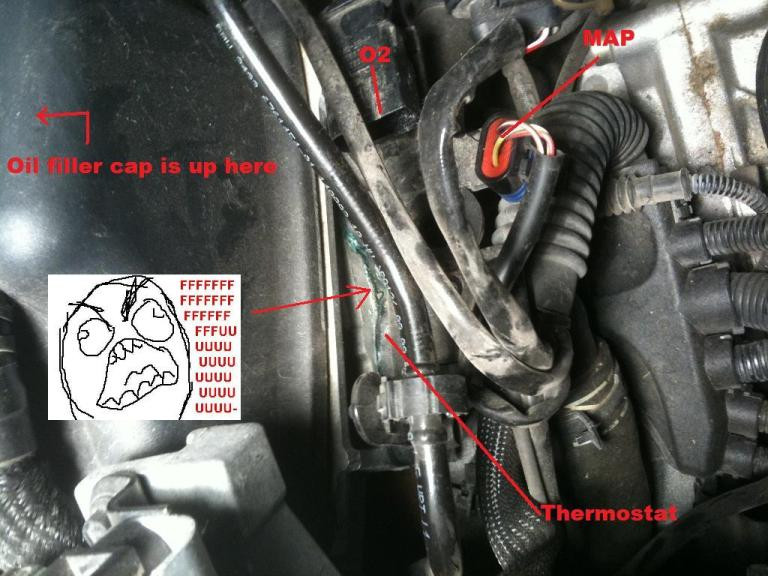
Once you're there, you might have the pleasure of seeing this, as I did:
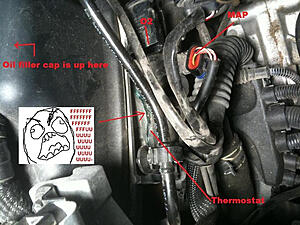
Sorry for not taking a picture from farther out.
So if you're losing coolant and your expansion tank is as dry as a bone, look to the rear of your intercooler; you can see the thermostat without removing all the pipes or intercooler cover.
I recommend Way Motor Works. Quick shipping. My thermostat (10/05 build) had the stupid white gasket. Now, like Pamela Anderson, it's all silicone in there.
If you don't see that crust, I diagnosed the leak by putting it up on ramps and sliding under. My car looked exactly like the picture on the first page: coolant dripping down the transmission.
1. Definitely just flip up the airbox.
2. For the love of God don't take off the throttle body intake hose: that bottom clamp is nigh impossible to reinstall. I had to go to the hardware store and buy a flathead screw hose clamp, which worked great.
There aren't a lot of photos of where the thermostat is, so I'll add a photo here. This area of leaking I call the Depends Zone:
You can see it immediately to the back of the intercooler cover. If you need to take it off, the bolts are #30 Torx, btw.
Once you're there, you might have the pleasure of seeing this, as I did:
Sorry for not taking a picture from farther out.
So if you're losing coolant and your expansion tank is as dry as a bone, look to the rear of your intercooler; you can see the thermostat without removing all the pipes or intercooler cover.
I recommend Way Motor Works. Quick shipping. My thermostat (10/05 build) had the stupid white gasket. Now, like Pamela Anderson, it's all silicone in there.
If you don't see that crust, I diagnosed the leak by putting it up on ramps and sliding under. My car looked exactly like the picture on the first page: coolant dripping down the transmission.
Last edited by kindofblue; Feb 13, 2011 at 10:22 AM.


Just did this job for a friend. Thanks for all the above info! It was very helpful. Seems weird that the thermostat cover is sandwiched underneath the bracket for the MAP sensor.


Ok I see many people complain about the stock clamps on the intake, it's not that hard. They can be snapped back together using simple pliers nothing special. Come see me at the next MINI event your at and we'll show anyone.

1st Gear
Joined: Sep 2010
Posts: 22
Likes: 0
The only clamp I thought was hard was the bottom one on the intake hose; I just couldnt get a good angle with the pliers I have. The rest were easy.
But then, I am the most amateur of shadetree mechanics .
.
A question: my car didn't have the bolt on the right front corner of the air box bottom; I'm the second owner and it must have gotten lost some time in the past. Should I replace it? If so, does a kind soul know the dimensions of the bolt?
But then, I am the most amateur of shadetree mechanics
. A question: my car didn't have the bolt on the right front corner of the air box bottom; I'm the second owner and it must have gotten lost some time in the past. Should I replace it? If so, does a kind soul know the dimensions of the bolt?
4th Gear
Joined: Apr 2004
Posts: 557
Likes: 0
From: San Francisco Bay Area
Thermostat Change
I think this is what you want:
6 MM Mounting screw Part#07149146435
From RealOEM.com
http://www.realoem.com/bmw/showparts...79&hg=13&fg=20
Hope this helps...
6 MM Mounting screw Part#07149146435
From RealOEM.com
http://www.realoem.com/bmw/showparts...79&hg=13&fg=20
Hope this helps...


1st Gear
Joined: Mar 2007
Posts: 11
Likes: 0
To answer my own question for anyone else's benefit. No and Yes. No it doesn't need to be MINI/BMW stuff but it does need to meet the requirements of that type. The Bentley Service manual lists it as "phosphate/nitrite free". So YES, it's probably easier to just buy the MINI/BMW brand.

Banned
Joined: Nov 2006
Posts: 4,862
Likes: 3
From: Fresno Ca.
I know this post is a month old, but that looks to be the old style. The new style gasket is clear and looks silicone based.
1st Gear
Joined: Mar 2007
Posts: 11
Likes: 0
I completed mine today. I got the thermostat and gasket from Way Motor Works. I didn't bother to remove the air hose to the throttle body, I just worked around it. I had a problem purging the air from the system. I don't think I got it all out yet. Maybe it's because it not quite 40F outside so letting it idle for 30 minutes or so and the fan never did kick on.
I also put the TSW motor mount on. It was much easier than the thermostat.
I also put the TSW motor mount on. It was much easier than the thermostat.

So do only the S models have a problem with the thermostat gasket or is it the Non-S too? I haven't bothered to look, but i assume the non-S thermostat is in the same place as the S?
5th Gear
Joined: Mar 2003
Posts: 917
Likes: 1
From: SF Bay Area
I had my thermostat replaced about 24K ago and 2 1/2 years and now I found a few spots on the driveway. Wiped clean and drove car pretty hard and checked no leak?? I am assuming its the thermostat again. Resovoir is proper level......just curious if the water pump went out what I be seeing?

2nd Gear
Joined: Jul 2011
Posts: 98
Likes: 0
From: Fort Worth, TX
Are there instructions for the just flipping up the airbox method? I need step by step or at least "start at 1 above and skip 2-6" etc. I would appreciate it immensely if anyone could help. I believe my thermostat is sticking as the temp will redline and then drop suddenly. I don't want to fry my engine. Thanks again. I dig this forum the most. 
Are there instructions for the just flipping up the airbox method? I need step by step or at least "start at 1 above and skip 2-6" etc. I would appreciate it immensely if anyone could help. I believe my thermostat is sticking as the temp will redline and then drop suddenly. I don't want to fry my engine. Thanks again. I dig this forum the most.
Replace with one step of removing airbox bottom, and rotating it out of the way as in fishbulb's picture in post #13 of this thread. It's all pretty obvious when you get in there.
Might also want to confirm that your fan is working to spec.
The OP replaced the housing, but I can't see doing so unless it is obviously damaged.