
How To Maintenance :: Girl's Guide to Replacing Coolant

Thread Starter
|
3rd Gear

Joined: Dec 2004
Posts: 241
Likes: 2
From: SF,CA
Maintenance :: Girl's Guide to Replacing Coolant
Here is the step-by-step guide I have put together for how to "flush out" the coolant and replace it, using some of the fantastic suggestions and ingenuity of several of the posters on the "Coolant Flush DIY" thread. This was done on my 2005 MCS Convertible, which has just over 50K in miles!
I am not claiming that it will remove all of the coolant (some is bound to remain in the engine block and radiator) - but it is one way to do it without having to jack up the car, remove the plastic protectors under the front of the car, and hunt for the lower radiator hose. It seemed to get a fair amount out, and was a very doable job.
I realize that there are more involved ways of emptying the coolant from the system - but I wanted to keep this simple, even if it's not perfect.
Having said that, I am open to suggestions/comments/corrections!
What you will need:
1) Shop Vac - I used a 2 HP one that I got at Target for $32.00.
2) Coolant/antifreeze (I used Zerex G 05 - got it at Kragen's for about $17)
mixed in a 50:50 proportion with distilled water. (I waited until I used
some of the distilled water in the steps below, and then saved a gallon
jug half-full, and added the antifreeze to make a rough 50:50 mix).
3) Catch basin (I used an oil catch basin that holds about 5 liters, and
has a nifty pouring spout to make emptying it easier.
4) Plastic funnel.
5) Pliers - regular type or channel locks (I think the latter are better)
6) Screwdriver with a slotted end (the usual type).
7) At least 4 gallons of distilled water (99 cents a gallon at Target).
8) Plenty of newspapers or a drop cloth to put under the front of the car.
9) Shop towels are handy - about $1.10 a roll at Target.
10) Your favorite after-the-job-is-done vice - mine is a Heineken Light.
BE SURE NO ANIMALS OR PETS ARE AROUND!!!!
STEP ONE:
When the engine is WARM (not hot!!), locate the coolant expansion tank at the rear of the bay.

STEP TWO:
Locate the upper radiator hoses. The upper radiator hoses are comprised of a short segment (on the left as you face the bay), and a longer segment (on the right). They are held together by spring clamps. The rubber bleeder valve (with a + cut into the cap) is located right between these two segments, and is unlabelled but is at the right of the photo:

STEP THREE:
Remove the cap on the coolant expansion tank and set it aside. Using the screwdriver, turn the rubber bleeder valve anti-clockwise, unscrew and remove it. Be careful not to drop it! I stuck a shop towel behind the area to catch it in case I got butterfingers...

STEP FOUR:
Stick the hose end of the Shop Vac into the coolant expansion tank, and turn on the vacuum. You will feel the Shop Vac hose pulse with each snort of fluid it sucks up. I had to periodically turn it off and empty the contents into the catch basin.
At this point, I used the funnel and emptied a gallon of distilled water into the coolant tank, let it sit for a minute, and sucked it back out.
STEP FIVE:
Leaving the cap off of the coolant tank still, undo the clamp just to the left of the bleeder valve. It is the upper clamp of the short segment of upper hose. The clamp is a spring-type, and will not be removed - only loosened.
To loosen the clamp, use the pliers (or even better, the channel lock pliers) to squeeze the two metal ends together. This takes a bit of grip. You will see the clamp open up. You can then slide the clamp down the hose about an inch and a half - just far enough so that you can pull the end of the hose off. I had to carefully use the screwdriver end to tease the end of the hose away from the plastic, and then was able to pull it off.
STEP SIX:
Again - with the coolant tank lid OFF - stick the end of the Shop Vac hose into the end of the radiator hose you just undid, and suck up more fluid.
You won't get nearly as much as in Step Four, but you will get some out.
Using the funnel, I poured a gallon of distilled water into the end of the hose, let it sit a minute, and sucked it back out. I re-used the empty gallon jugs and filled them with the fluid I sucked out.
Repeat filling the coolant tank with distilled water, and the hose with distilled water, until it comes out clearer. I did not actually buy enough of the distilled water to get the fluid as clear as I would have wished (I had to save a gallon to mix with the antifreeze). Next time, I'll probably buy 6 gallons...
STEP SEVEN:
Reconnect the radiator hose, trying to push it all the way back into position. Again, use the pliers to squeeze the ends of the spring clamp together (think strong!) and loosen the clamp - I used the screwdriver to carefully push the plastic lip into the hose, so that there would be no leaks. Move the clamp into position and release.
STEP EIGHT:
Replace the bleeder valve screw and tighten it. Fill the system at the coolant tank with the antifreeze/distilled water 50:50 mix, and replace the coolant tank cap.
STEP NINE:
Turn on the engine, put the heater on, and run the car for a minute or so. I didn't want to have things get too hot, so I only ran the car a minute. Then, use the screwdriver to LOOSEN (not remove) the bleeder valve - as you loosen it, you will hear the release of air. Then tighten it again.
Check the coolant tank and top off with the antifreeze mix.
Repeat the above steps until when you loosen the bleeder valve, no more air comes out - only coolant (be careful, it will be hot). When this happens, no need to top off the coolant tank - the system is full.
STEP TEN:
Congratulate yourself on a job well-done, and indulge in your favorite beverage/smoke/whatever...
Be sure and close up all the containers with the coolant inside and dispose of the used fluid properly - this does NOT mean pouring it down the drain or storm sewer - call your local garbage pickup and ask where you can safely dispose of it, or take it to an automotive store (if they accept used fluid)....
Again - be sure that NO animals can come into contact with the used or leftover fluid - it is sweet to them, but very deadly!
Last edited by Gerldoc; Apr 20, 2010 at 09:15 AM.


Thread Starter
|
3rd Gear
Joined: Dec 2004
Posts: 241
Likes: 2
From: SF,CA
Thanks! It was indeed an error - change made!
Thread Starter
|
3rd Gear
Joined: Dec 2004
Posts: 241
Likes: 2
From: SF,CA
Thank YOU for the excellent idea of using the Shop Vac!! Very ingenious, and it made the job doable. I actually did lift the front of the car on jacks and tried to find the lower hose clamp without removing all of the plastic front/underbody trim, and could not see how I could get to it. Someone on one of the posts stated that the lower clamp could be accessed (without removing the trim) - and I have smaller hands - but I still could not see how I could possibly do it. Those clamps are tight, and IMHO, one would need more room (i.e., remove the trim) to do it with any amount of ease.
While removing the trim is not a giant deal, it just makes the entire job that much more daunting for us maintenance noobies...
So - your Shop Vac idea was brilliant! The hose fits perfectly into the expansion tank, and also perfectly into the short upper hose end!
Not sure how much I actually removed, but I DO know that I used about 2 liters of coolant - mixed 50:50, that's equivalent to 4 liters total - to refill the system. My manual states that my model's coolant capacity is 6 liters, so that's not bad!! I have four full gallon jugs of it to dispose of.
About that disposal...I live in San Francisco, and called the company that does the trash pickup. They have a recycling center open Thursday-Saturday where you can bring household waste/chemicals. So I'll be bring them the used coolant, as well as the used brake fluid from my other job!
While removing the trim is not a giant deal, it just makes the entire job that much more daunting for us maintenance noobies...
So - your Shop Vac idea was brilliant!
The hose fits perfectly into the expansion tank, and also perfectly into the short upper hose end!Not sure how much I actually removed, but I DO know that I used about 2 liters of coolant - mixed 50:50, that's equivalent to 4 liters total - to refill the system. My manual states that my model's coolant capacity is 6 liters, so that's not bad!! I have four full gallon jugs of it to dispose of.
About that disposal...I live in San Francisco, and called the company that does the trash pickup. They have a recycling center open Thursday-Saturday where you can bring household waste/chemicals. So I'll be bring them the used coolant, as well as the used brake fluid from my other job!

4th Gear
Joined: Jul 2009
Posts: 385
Likes: 4
Yes and No....I removed the tank and cleaned it out. To my surprise, there was small amounts of brown debris inside the tank. Maybe next time I will add some kind of pressure to one end of the hose while the shop vac is attached to the other. The pressure might be able to dislodge any internal debris.
Trending Topics
Hello Gerldoc,
I thought I would let you know that I used your coolant removal idea
last weekend as I could not get to my lower hose clamp.
Maybe this is because I have a Auto transmission ? No way at all; no room !
Anyway, I thought I would share something I did that may speed up the whole process.
In step 3 you state to remove the air bleed plastic screw. Well I did that and instead of removing the hose clamp next to it, for additional coolant removal I just sucked the coolant through the air bleed opening and it worked just fine.
Maybe this will save some additional time in not having to remove that hose clamp as you are still removing coolant.
My shop vac was a 4 HP so I am not sure if that had anything to do with the coolant removal but I never removed one hose clamp !
Thanks again for sharing your idea with us all; it saved me from loosing
more brain cells while staring at that lower hose clamp ! ! !
MiniKar
Thread Starter
|
3rd Gear
Joined: Dec 2004
Posts: 241
Likes: 2
From: SF,CA
Hello Gerldoc,
I thought I would let you know that I used your coolant removal idea
last weekend as I could not get to my lower hose clamp.
Maybe this is because I have a Auto transmission ? No way at all; no room !
Anyway, I thought I would share something I did that may speed up the whole process.
In step 3 you state to remove the air bleed plastic screw. Well I did that and instead of removing the hose clamp next to it, for additional coolant removal I just sucked the coolant through the air bleed opening and it worked just fine.
Maybe this will save some additional time in not having to remove that hose clamp as you are still removing coolant.
My shop vac was a 4 HP so I am not sure if that had anything to do with the coolant removal but I never removed one hose clamp !
Thanks again for sharing your idea with us all; it saved me from loosing
more brain cells while staring at that lower hose clamp ! ! !
MiniKar
I thought I would let you know that I used your coolant removal idea
last weekend as I could not get to my lower hose clamp.
Maybe this is because I have a Auto transmission ? No way at all; no room !
Anyway, I thought I would share something I did that may speed up the whole process.
In step 3 you state to remove the air bleed plastic screw. Well I did that and instead of removing the hose clamp next to it, for additional coolant removal I just sucked the coolant through the air bleed opening and it worked just fine.
Maybe this will save some additional time in not having to remove that hose clamp as you are still removing coolant.
My shop vac was a 4 HP so I am not sure if that had anything to do with the coolant removal but I never removed one hose clamp !
Thanks again for sharing your idea with us all; it saved me from loosing
more brain cells while staring at that lower hose clamp ! ! !
MiniKar
That's a great idea! I never thought of that...I wonder if my smaller Shop Vac would have enough power, though...

1st Gear
Joined: Feb 2010
Posts: 31
Likes: 0
Hello, I am wondering if more coolant can be sucked out if hose clamp was disconnected, but suck out the coolant through the expansion tank with a towel wrapped around the shopvac hose to create vacuum pressure. If the towel is wet, I think there could be enough vacuum created to suck out almost every bit of coolant. What do you think?

6th Gear
Joined: Jan 2006
Posts: 1,705
Likes: 3
From: Chattanooga, TN
The first time I started following the directions, vac the tank, pull the bleed screw. Then I thought 'what will happen if I vac at the bleed screw?'.
So I tired it and it pulled coolant from the tank and the system.
In all I was able to pull about 1 gallon from the bleed screw.
I added distilled water and ran the car to start the flush process.
With the bleed screw method I can suck out a gallon easy and replace the water several times to get close to a flush.
All in all it took about 15 minutes.
Much better than pulling any hoses off.
Thanks still go out to Gerldoc for the original idea.
Last edited by thulchatt; Aug 2, 2010 at 10:16 AM. Reason: mistype
3rd Gear
Joined: Mar 2011
Posts: 206
Likes: 1
From: Nashville, TN
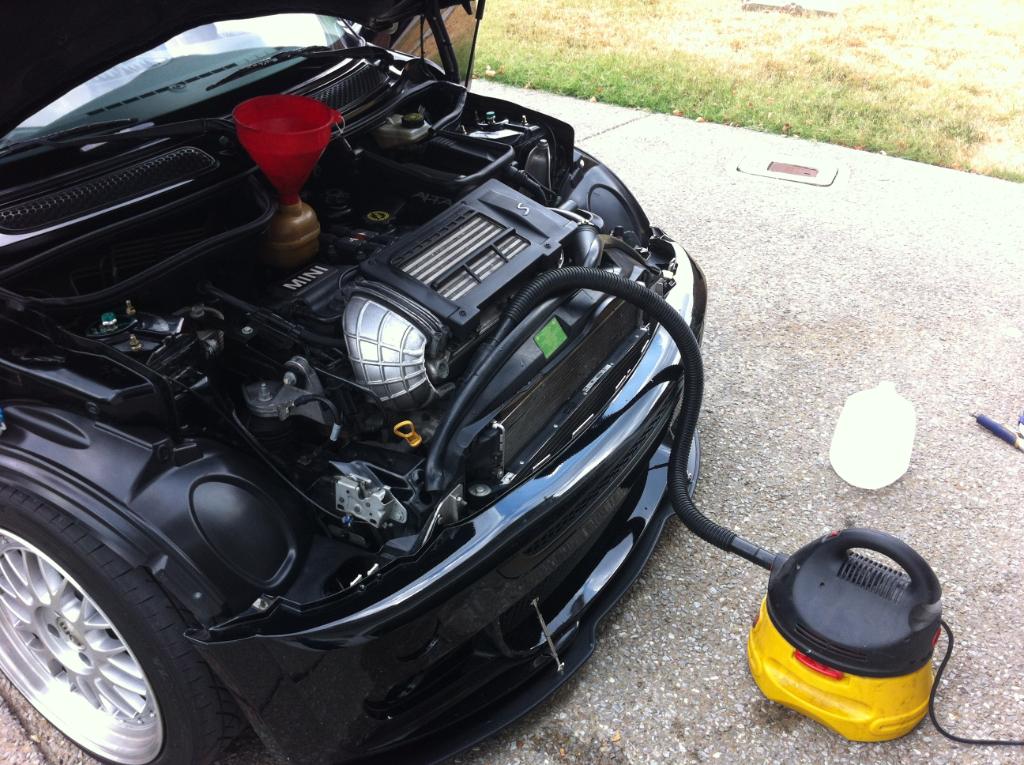
This process worked well for me and was very fast to complete. Here are a few more pictures during my flush that may help a few people.
A few things I did differently:
1) Did not pour water into the upper radiator hose, simply just left the funnel in the coolant expansion tank and added water into the funnel as I sucked it our the radiator hose with the shop vac.
2) Opened the bleeder valve with the car running to get the air out, seemed alot faster than starting and stopping to get the air out.
Wide shot showing the vacuum in the top radiator hose and funnel in coolant tank
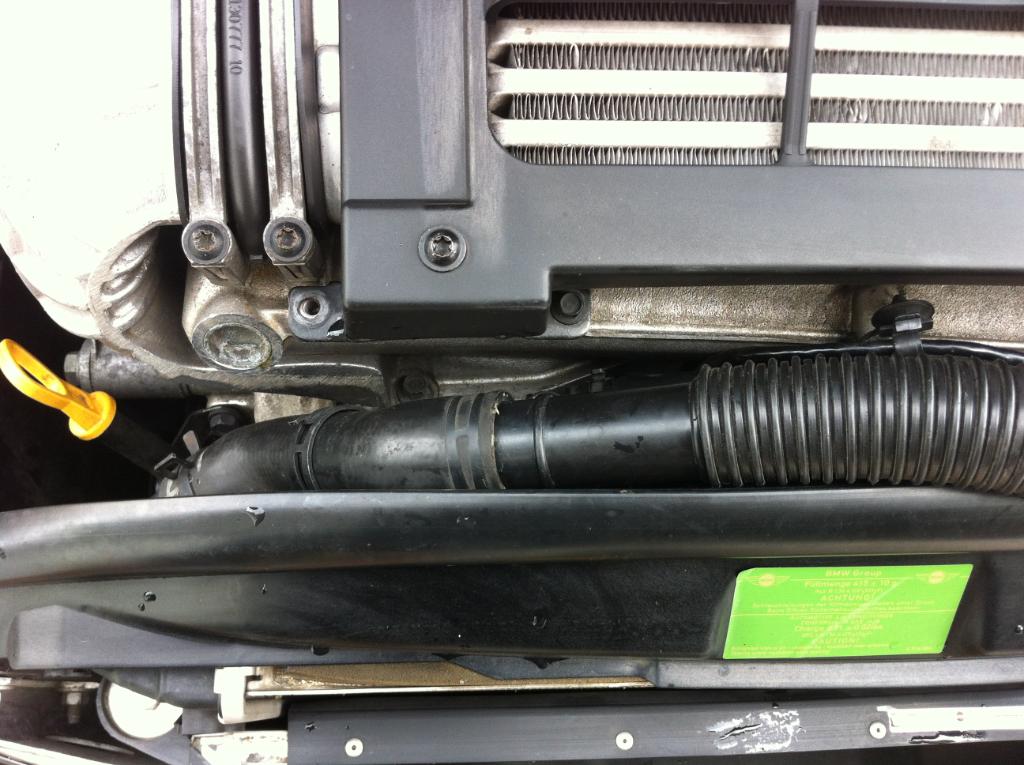
Vacuum in radiator hose
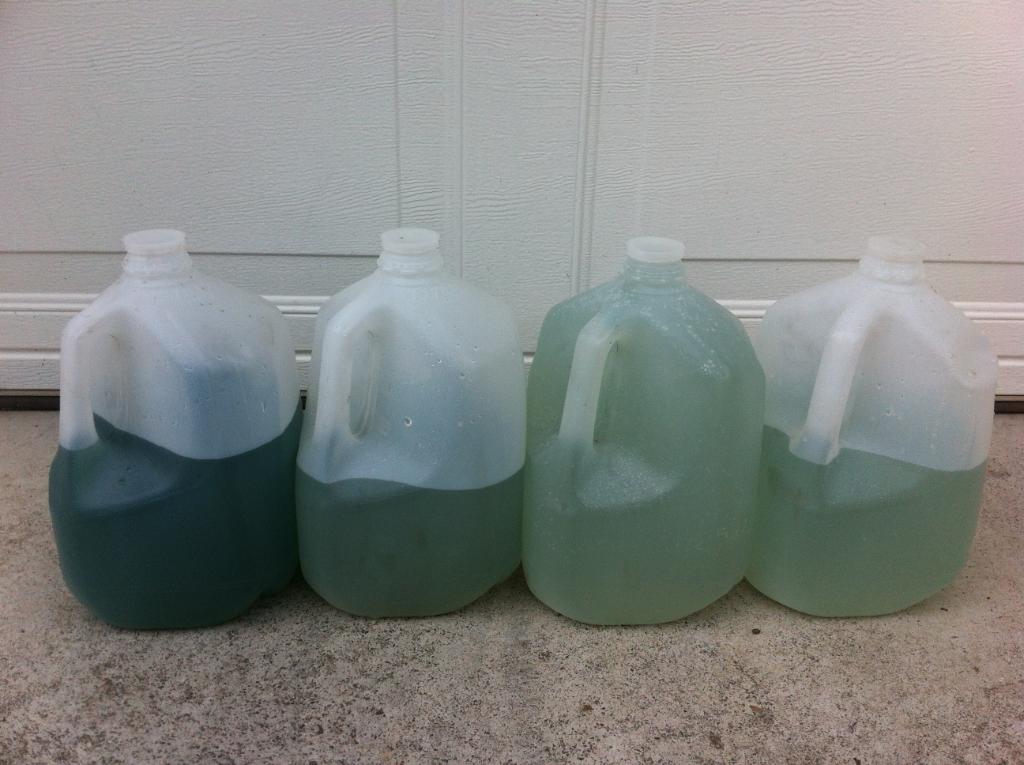
2nd, 3rd, 4th and final flush. (left to right)
A few things I did differently:
1) Did not pour water into the upper radiator hose, simply just left the funnel in the coolant expansion tank and added water into the funnel as I sucked it our the radiator hose with the shop vac.
2) Opened the bleeder valve with the car running to get the air out, seemed alot faster than starting and stopping to get the air out.
Wide shot showing the vacuum in the top radiator hose and funnel in coolant tank
Vacuum in radiator hose
2nd, 3rd, 4th and final flush. (left to right)

Thread
Thread Starter
Forum
Replies
Last Post
Kimolaoha
R56 :: Hatch Talk (2007+)
70
Jul 5, 2023 01:04 PM
PelicanParts.com
Vendor Announcements
0
Aug 14, 2015 11:07 AM