
How To Electrical :: HID Projector Retrofit... the right way.

Joined: Jul 2007
Posts: 1,840
Likes: 69
From: Chicago/NE Iowa
The real difference is in the way they function, not the way they look. They're twice as bright, and have tons of color at the cutoff. Blues... purples... even reds and yellows... You really have to see they in person.
Old pics, but look at the color!!


Last edited by burley; Dec 4, 2007 at 07:53 PM.

I wish that the S2000 Projectors were easier to retrofit into other vehicles, I used to drive one, and man, those were the best projector Xenons that I have ever used. They had a beautiful cutoff as well, and when coming towards the car the projectors took on an aqua hue.
-Chase
-Chase
Joined: Jul 2007
Posts: 1,840
Likes: 69
From: Chicago/NE Iowa
Finished the retrofit...
TSX in 05 OEM xenon headlights. Just put on yellow Laminex on the fogs as well ... Pain in the ***, so dont ask for a detailed write up (not talking about the fogs). If anyone wants to try it, just call my cell... (805)901-0206. WAY too long to type in a PM...
Total cost... $325 for '03 xenon headlights, $140 for TSX projectors, and I sold my halogens (partsman... almost ready to sell) for $100. Sooo, Im out $365, and a few weekends. 20 hours of work total. Now that I know what Im doing... I could do it again in 8-10 hours. I'll post comparison shots, but they are about 50-60% brighter than the Cooper projectors. I think it looks OEM. Comments welcome.
Last edited by burley; Dec 11, 2007 at 08:57 AM.


5th Gear
Joined: Mar 2007
Posts: 678
Likes: 5
Nice Job
Fit looks good, you could have fooled me.
I personally am not a fan of the yellow fogs, find it distracting.
That's just my opinion, if anything I would like to get a HID conversion kit for the fogs so I can have them running the same temp as my XENON's
Good retro fit work though...I must say.
Fit looks good, you could have fooled me.
I personally am not a fan of the yellow fogs, find it distracting.
That's just my opinion, if anything I would like to get a HID conversion kit for the fogs so I can have them running the same temp as my XENON's
Good retro fit work though...I must say.
Last edited by MidniteCoop; Dec 11, 2007 at 08:22 AM.

Joined: Jul 2007
Posts: 1,840
Likes: 69
From: Chicago/NE Iowa
Yeah, it wont fit there. On the OEM xenon headlights, the ballasts rest on the bottom of the high beams, if that makes sense. There's really not much room behind, but def some room below. If I were doing it, I'd just stick them along the underside of the hood somewhere, maybe tucked under the firewall cloth.
Joined: Jul 2007
Posts: 1,840
Likes: 69
From: Chicago/NE Iowa
HID Projector Retrofit... the right way.
I had this in electrical, but its gotten buried. Now it will live on in the "How To" section.
Basically, how to install OEM HID projectors into a MC headlight (halogen or 1st gen Xenon).
https://www.northamericanmotoring.co...-retrofit.html
Basically, how to install OEM HID projectors into a MC headlight (halogen or 1st gen Xenon).
https://www.northamericanmotoring.co...-retrofit.html


3rd Gear
Joined: Mar 2010
Posts: 177
Likes: 1
From: NY
I just finished up a retrofit of my non hid mcs to oem hid assemblies. I bought oem hid assemblies from datauto.com and all that has to be done is cut the wires that feed the stock ballast and swing them up to the low beam area so they can be spliced to the after market hid bulb. Works out great

I just finished up a retrofit of my non hid mcs to oem hid assemblies. I bought oem hid assemblies from datauto.com and all that has to be done is cut the wires that feed the stock ballast and swing them up to the low beam area so they can be spliced to the after market hid bulb. Works out great

5th Gear
Joined: Aug 2008
Posts: 1,100
Likes: 13
From: Inman, SC
I know im digging up an old thread, but id just liek everyone to know that i hope to do something similar to this in the next month or so, but instead ill be using the ebay headlights. i figured, if they look good, and are cheap, but have poor light output, why not buy some and upgrade the projectors to xenon projectors? (as they come with halogen projector and must already have mounting points...)
now, TSX, or hella
and single beam or should i go crazy and attempt bi-xenon's?
now, TSX, or hella
and single beam or should i go crazy and attempt bi-xenon's?
Joined: Jul 2007
Posts: 1,840
Likes: 69
From: Chicago/NE Iowa
I know im digging up an old thread, but id just liek everyone to know that i hope to do something similar to this in the next month or so, but instead ill be using the ebay headlights. i figured, if they look good, and are cheap, but have poor light output, why not buy some and upgrade the projectors to xenon projectors? (as they come with halogen projector and must already have mounting points...)
now, TSX, or hella
and single beam or should i go crazy and attempt bi-xenon's?
now, TSX, or hella
and single beam or should i go crazy and attempt bi-xenon's?
Let me know how this turns out... with pics. Make sure you do a little research on the projector size before you buy them so they're the same and an easy swap.
I'm guessing you'll need to use a TSX, Mini/VW bosch, maybe s2000. I'm pretty sure most bixenons will be way too big to fit in the headlights. Maybe check out R56 projectors, they're the smallest bixenon I've ever seen.
Good luck!
Joined: Jul 2007
Posts: 1,840
Likes: 69
From: Chicago/NE Iowa
Just to give you a better idea of what's involved, here's the writeup from my other HID retrofit. I used a Bixenon set from an Acura TL with ZKW lenses (uber clear). Kinda long, but there's more photos of each step than I shot during my mini retrofit.
------------------
This has been in the works (in my head) for several months. I finally decided to tackle this over a 2 day weekend. I suggest you wait until the weather is nice and you have 3-4 days off, just incase you screw up. Its also less nerve-racking if you have an extra set of OEM headlights incase you need to use your car at night during the retrofit. I didn't buy a separate set, I just took my chances.
The Gear
Acura TL HID Bi-xenon Projectors $200

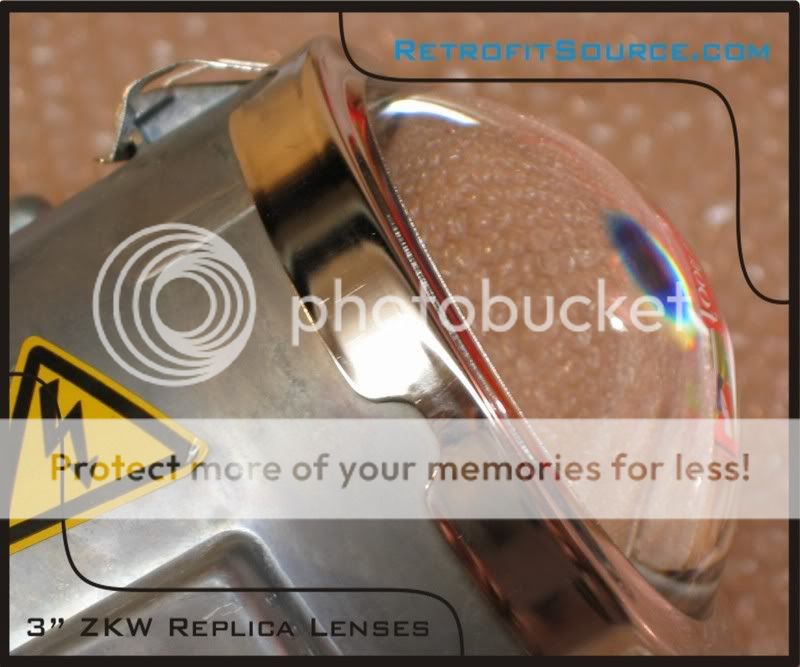
ZKW Replica Clear Lenses from http://www.theretrofitsource.com $80
35w HID Kit w/ D2S 4300k bulbs. H4 Bi-xenon version from http://www.izntrbl.com $160

Bi-xenon harness w/ 2 fuses, relay, and a diode for use of high beams w/out lows turning off from http://www.izntrbl.com $35

My Total Cost
$475 (keep in mind that when Acura offered this as an option on the TL, it was around $1200)
STEP 1. // Remove your Headlights from Tucson
This is done by just 2 bolts that are visible in plain sight. There is also a clip which will require more gentle force (can be a pain in the ***) but it will not break so give it a steady tug w/ even pressure.
STEP 2 // Remove Headlight Lenses

Set your oven to 200-225 F. Remove ALL bulbs and the ***** they're attached to (should be 2 turn, 1 city, 1 H4 per housing. Line oven w/ tin foil and stick 1 housing at a time in the oven for 8-10 minutes.

Make sure the housing is not touching the walls of the oven. When the timer goes off, use 2-3 flathead screwdrivers and GENTLY and evenly force the lens away from the housing making sure not to bust any tabs. Also, DO NOT molest the black plastic housing around the lens. This will break the seal when trying to re-seal them up later. You should slowly go around the perimeter of the housing and slowly and evenly make progress. The longer it is out of the oven, the harder the glue gets, and the more difficult it is to pry. It may take a 2nd trip to the oven. ONLY DO 1 HOUSING AT A TIME.
STEP 3 // Remove the Reflector
Here's what you're dealing with. The top and right round holes are where the factor screws go into the reflector, and control the aim. The bottom left square thing is just where a clip goes to anchor the reflector down to the housing.

Screw the aiming screws so that they allow you to have better access to the square anchor. With a flathead screwdriver or knife, pop the square anchor off first. This is done by going around the back and forcing the clip away from the reflector (GENTLY). If you have difficulty, mess with the aiming screws so that the reflector is pulled closer to the housing. Here's another look at what you're up against. The cream colored flat thing is the anchor. Its just a clip that attaches itself to the reflector.

By now, you should be thinking... "This is going GREAT!!"

STEP 4 // Drink a Beer or 3...

STEP 5// Measure Twice.. Cut Once

Measure... look.. measure... make sure... remeasure...
Using a dremmel, cut around the outline to where the projector will go. Make sure and wear thick leather gloves (so you dont slice the hell out of your hands like I did). Wear a mask and eye protection. That dust is TOXIC!!
When you're all done cutting and placing the projector in the hole (and you're SURE it fits), use 2" 10-32 screws and nuts. Drill holes in the reflector where the holes in the projectors align (making sure the drill bit is less than the size of your screws). Measure by sticking a fine tipped sharpie through.
Put the screws through the holes in the projector, attach a nut/washer on the back of the projectors, before the reflector, and again after the reflectors. This will ensure that there is no slack for stuff to move around. Just tighten with your fingers for now.. not super tight. The way I did mine, I had to dremmel off the tips of the top 2 screws (from each headlight) because it restricted the movement of my aiming.
STEP 6 // Cut the Back of your Housing
I really didn't want to, but I had to. In order to keep the range of movement in your factory screws, I had to cut the top of the rear housing. This is just the measurement I made for a TL projector. Other projectors may need no cutting.

I also had to ditch the rear cap that used to cover the H4 bulb.
STEP 7 // Reattach to your Headlights Tucson
 Working in bad weather SUCKS!!! You will have no lenses on. You basically just want to make sure that the alignment if close enough to be adjusted by your factory housing.

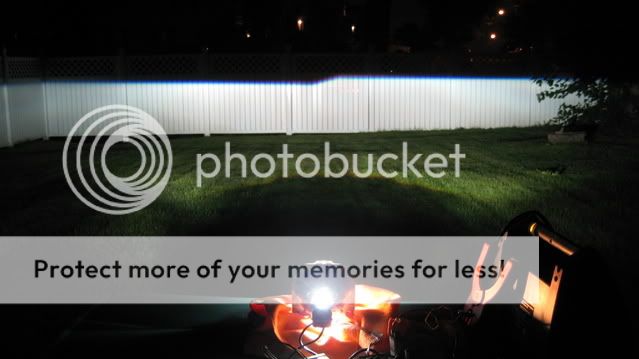
If you have the room to maneuver and adjust with JUST the factor screws on the back, then you're in good shape. From 50', your beam should look like this... more or less. Make sure there is only ONE step, not 2. They should overlap a bit, but not completely..

When you're moved back like 100-150' from the wall, they should overlap and make a single dip pattern like so...

STEP 7.5 // JB WELD EVERYTHING
Forgot a step... Once you feel that your aim is within adjustment of the factory screws, JB Qwik (takes 20 minutes to bond) or JB Weld (takes 24 hours, but much stronger). I used Qwik, but I used a ton. Make sure and hand tighten all the screws so they're tight, then smear JB on ALL the nuts / washers. Every point of contact between you screws and projectors / screws and reflectors need JB. Make sure not to get any on the lens, any chrome (it KILLS chrome instantly) or anywhere visible.
STEP 8 // Pick a Shroud
I got these from http://www.HIDplanet.com from another member for $60... add that to the cost, I forgot it. Its not really necessary, just makes it look better. It's off an Audi A4, and snapped on perfectly. I also held it down with JB Qwik.

Without

With

STEP 9 // Reseal your Lenses
Back in the oven... Same process. Make sure and wipe down all the fingerprints off your chrome / projector lens. Put the lens in place as much as possible and try to close it as much as you can before you stick it in the oven. Make sure all the tabs snap together.
STEP 10 // Put Back on your Tucson
Since I cut the back of the housing and ditched the cover, I needed to waterproof it somehow. I used several layers of underwater tape which is waterproof $8 at Wal-mart. It sound really ghetto, but it looks fine and it completely waterproof (most important thing). I need to get pics up on how it looks... I'll do that soon.

WHY RETROFIT?
This, my friends, is a DIY on how to get the most out of your HID kits.
These 2 pics are using the same bulbs / ballasts.... Its the projector that gives the extra light, not the bulb. The lens acts as a magnifier, to amplify the light.
HID KIT in Tucson

Acura TL HID Projector
There are a few advantages of using HID projectors over just sticking an HID kit in your Tucson. With projectors, you will have:
-brighter output
-wider beam of light
-sharper cutoff (so not to blind other drivers)
-further down the road vision (the sharper the cutoff, the higher you can aim your headlights without blinding oncoming traffic, and the further you can see down the road.)
-more even light distribution (no hotspots like you get with an HID kit)
SOME PICS OF THE RESULTS


I took off the driving light's defuser lens and put in some orange quad LEDs.


Comments are welcomed... Im sure I forgot a step or 2, so feel free to ask. Remember, this is a DIY for specific projectors. Each projector is a different size. Soundwav can chime in on how he did his... I think he used an Infinity FX projector.
Need more help? Read up at http://www.hidplanet.com // Read up in the university section before asking any newbie type questions on HIDP...
------------------
This has been in the works (in my head) for several months. I finally decided to tackle this over a 2 day weekend. I suggest you wait until the weather is nice and you have 3-4 days off, just incase you screw up. Its also less nerve-racking if you have an extra set of OEM headlights incase you need to use your car at night during the retrofit. I didn't buy a separate set, I just took my chances.
The Gear
Acura TL HID Bi-xenon Projectors $200
ZKW Replica Clear Lenses from http://www.theretrofitsource.com $80
35w HID Kit w/ D2S 4300k bulbs. H4 Bi-xenon version from http://www.izntrbl.com $160
Bi-xenon harness w/ 2 fuses, relay, and a diode for use of high beams w/out lows turning off from http://www.izntrbl.com $35
My Total Cost
$475 (keep in mind that when Acura offered this as an option on the TL, it was around $1200)
STEP 1. // Remove your Headlights from Tucson
This is done by just 2 bolts that are visible in plain sight. There is also a clip which will require more gentle force (can be a pain in the ***) but it will not break so give it a steady tug w/ even pressure.
STEP 2 // Remove Headlight Lenses
Set your oven to 200-225 F. Remove ALL bulbs and the ***** they're attached to (should be 2 turn, 1 city, 1 H4 per housing. Line oven w/ tin foil and stick 1 housing at a time in the oven for 8-10 minutes.
Make sure the housing is not touching the walls of the oven. When the timer goes off, use 2-3 flathead screwdrivers and GENTLY and evenly force the lens away from the housing making sure not to bust any tabs. Also, DO NOT molest the black plastic housing around the lens. This will break the seal when trying to re-seal them up later. You should slowly go around the perimeter of the housing and slowly and evenly make progress. The longer it is out of the oven, the harder the glue gets, and the more difficult it is to pry. It may take a 2nd trip to the oven. ONLY DO 1 HOUSING AT A TIME.
STEP 3 // Remove the Reflector
Here's what you're dealing with. The top and right round holes are where the factor screws go into the reflector, and control the aim. The bottom left square thing is just where a clip goes to anchor the reflector down to the housing.
Screw the aiming screws so that they allow you to have better access to the square anchor. With a flathead screwdriver or knife, pop the square anchor off first. This is done by going around the back and forcing the clip away from the reflector (GENTLY). If you have difficulty, mess with the aiming screws so that the reflector is pulled closer to the housing. Here's another look at what you're up against. The cream colored flat thing is the anchor. Its just a clip that attaches itself to the reflector.
By now, you should be thinking... "This is going GREAT!!"
STEP 4 // Drink a Beer or 3...
STEP 5// Measure Twice.. Cut Once
Measure... look.. measure... make sure... remeasure...
Using a dremmel, cut around the outline to where the projector will go. Make sure and wear thick leather gloves (so you dont slice the hell out of your hands like I did). Wear a mask and eye protection. That dust is TOXIC!!
When you're all done cutting and placing the projector in the hole (and you're SURE it fits), use 2" 10-32 screws and nuts. Drill holes in the reflector where the holes in the projectors align (making sure the drill bit is less than the size of your screws). Measure by sticking a fine tipped sharpie through.
Put the screws through the holes in the projector, attach a nut/washer on the back of the projectors, before the reflector, and again after the reflectors. This will ensure that there is no slack for stuff to move around. Just tighten with your fingers for now.. not super tight. The way I did mine, I had to dremmel off the tips of the top 2 screws (from each headlight) because it restricted the movement of my aiming.
STEP 6 // Cut the Back of your Housing
I really didn't want to, but I had to. In order to keep the range of movement in your factory screws, I had to cut the top of the rear housing. This is just the measurement I made for a TL projector. Other projectors may need no cutting.
I also had to ditch the rear cap that used to cover the H4 bulb.
STEP 7 // Reattach to your Headlights Tucson
Working in bad weather SUCKS!!! You will have no lenses on. You basically just want to make sure that the alignment if close enough to be adjusted by your factory housing.If you have the room to maneuver and adjust with JUST the factor screws on the back, then you're in good shape. From 50', your beam should look like this... more or less. Make sure there is only ONE step, not 2. They should overlap a bit, but not completely..
When you're moved back like 100-150' from the wall, they should overlap and make a single dip pattern like so...
STEP 7.5 // JB WELD EVERYTHING
Forgot a step... Once you feel that your aim is within adjustment of the factory screws, JB Qwik (takes 20 minutes to bond) or JB Weld (takes 24 hours, but much stronger). I used Qwik, but I used a ton. Make sure and hand tighten all the screws so they're tight, then smear JB on ALL the nuts / washers. Every point of contact between you screws and projectors / screws and reflectors need JB. Make sure not to get any on the lens, any chrome (it KILLS chrome instantly) or anywhere visible.
STEP 8 // Pick a Shroud
I got these from http://www.HIDplanet.com from another member for $60... add that to the cost, I forgot it. Its not really necessary, just makes it look better. It's off an Audi A4, and snapped on perfectly. I also held it down with JB Qwik.
Without
With
STEP 9 // Reseal your Lenses
Back in the oven... Same process. Make sure and wipe down all the fingerprints off your chrome / projector lens. Put the lens in place as much as possible and try to close it as much as you can before you stick it in the oven. Make sure all the tabs snap together.
STEP 10 // Put Back on your Tucson
Since I cut the back of the housing and ditched the cover, I needed to waterproof it somehow. I used several layers of underwater tape which is waterproof $8 at Wal-mart. It sound really ghetto, but it looks fine and it completely waterproof (most important thing). I need to get pics up on how it looks... I'll do that soon.
WHY RETROFIT?
This, my friends, is a DIY on how to get the most out of your HID kits.
These 2 pics are using the same bulbs / ballasts.... Its the projector that gives the extra light, not the bulb. The lens acts as a magnifier, to amplify the light.
HID KIT in Tucson
Acura TL HID Projector
There are a few advantages of using HID projectors over just sticking an HID kit in your Tucson. With projectors, you will have:
-brighter output
-wider beam of light
-sharper cutoff (so not to blind other drivers)
-further down the road vision (the sharper the cutoff, the higher you can aim your headlights without blinding oncoming traffic, and the further you can see down the road.)
-more even light distribution (no hotspots like you get with an HID kit)
SOME PICS OF THE RESULTS
I took off the driving light's defuser lens and put in some orange quad LEDs.
Comments are welcomed... Im sure I forgot a step or 2, so feel free to ask. Remember, this is a DIY for specific projectors. Each projector is a different size. Soundwav can chime in on how he did his... I think he used an Infinity FX projector.
Need more help? Read up at http://www.hidplanet.com // Read up in the university section before asking any newbie type questions on HIDP...

Neutral
Joined: Sep 2010
Posts: 4
Likes: 0
Hey burley, new member here and I must say you do great write-ups. Here's the skinny on why I'm here. I use to own a civic hatch but last winter some high school smacked into the front end. Before the accident I had retrofitted TL projectors and loved them. Now I find myself the owner of one of my favorites cars, but I'm missing the TL projectors.
Everything about the kit survived the crash minus the shroud and Philips bulbs. I gotta say those projectors are built solid, one projector was knocked out as the headlights was completely smashed, only damage was a nick in the center of the lens.
So the question for you sir is... I know it would be difficult but, would you think it is at all possible to fit TL projectors into my 2002 mini cooper headlights. Also how was spacing like in the back of the housing, did you have to cut much?