When you click on links to various merchants on this site and make a purchase, this can result in this site earning a commission. Affiliate programs and affiliations include, but are not limited to, the eBay Partner Network.
Just a quick update from my end of things. I have completed the repair, thanks to @cjv2 . I would say that everything went as well as I could have hoped for. I was able to use this thread to diagnose the coolant leak correctly, (it was a huge relief and accomplishment when I pulled the oil filter housing off and it was indeed broken). This is my first day back on the road, watching for leaks as well as the engine temp. I will also note that my oil filter housing was broken in the exact same fashion, and I believe even the same exact location, as @cjv2 's. It is definitely a weak spot. I will also second the fact that the Bremmen part seems very sturdy, @cjv2 obviously has more authority on the question, as he has several thousand miles on the part, but I just wanted to give confidence to anyone looking for the part. It is less than 1/7 the cost of the Mahle (original) part, at least at the time of writing this, which may scare some people off, but it seems to be of OEM quality.
Again, this thread was a great resource. If anyone is questioning their ability to do this repair, you can do it! It cost me $90 for the part and like $20 for replacement coolant. I don't know how much this would cost at a shop, I didn't even bother to ask, I'm sure it is hundreds if not north of a thousand dollars. I spent a few afternoons dismantling things as I figured out how I was going to attack (mostly while I was waiting for my part to come in the mail). Once I had the part, it was just a matter of replacing the part, putting things back the way I found them, and following coolant bleeding procedures (I did not use the vacuum equipment that many tutorials show).
Good luck to everyone and thank you to those who contribute!
A few folks have reached out to me for an end-to-end howto, or for filling in of a howto, for replacing the oil cooler/oil filter housing. Getting specific instructions as well as watching the Haynes video are critical -- beyond that I have not written up a DIY. Info from TIS and from the Haynes vid were my guides.
I largely just had to figure out what things (parts, fluids) to remove to get everything out of the way, how to properly remove the old assembly, how to clean up the engine valley/etc mess left by the original failure (a shop vac and maybe even some engine degreaser applied by hand (not sprayed everywhere!) are your friends), and then reversing the process -- including replacing the coolant properly (screw that up and you can make your engine really unhappy really fast).
Even though I don't have a full howto, here is my quick rundown, based on the F56S. Happy to answer questions about any particulars. Note you'll want to disconnect electrical up front and reconnect at the end, observing appropriate steps and sequence for dealing with the IBS sensor attached to same.
- Remove:
airbox (top half)
engine air filter
cross-support that sits atop the radiator fan
insulation strip atop radiator fan
radiator fan
air pipe going to throttle body/intake manifold
intake manifold & things attached to it (plugs, cables, hoses, pipes, whatever) as needed to get it out of there, undoing coolant hoses and draining coolant from all of the above where applicable.
You do NOT have to detach the throttle body from the intake manifold. You do NOT have to take out the alternator. From under the car, unclip any cables that are being held in places that decrease your flexibility when working from above.
auxiliary coolant pump (you have one if your car is an S or JCW). Note you can't get to it until the intake manifold is off.
anything else "in the way" of you getting to the oil filter housing, at your discretion and best judgment. DON'T remove anything you don't really HAVE to because you never know what weird reassembly requirements you may end up with (needing to replace seals or fasteners or retorque things you didn't think of, for example)
- Drain engine oil (meaning do first half of an oil & filter change, do not reuse the oil or filter or drain plug crush washer)
- Remove+drain coolant hoses from oil filter housing
- Unclip cables in retaining clips holding them to oil filter housing
- Remove oil filter housing from crankcase -- note there is a bolt loosening sequence in BMW TIS that should be followed. Find it or ask someone to get it to you. It may vary by which B-series engine you have. Be ready for coolant and possibly engine oil to come running out of the thing. Be careful not to bop and hurt your radiator fins while removing the housing, it's easy to do by mistake due to proximity
- Clean the mating surface where the oil filter housing meets the crankcase and DO NOT mix oil and coolant for pretty duh obvious reasons 'ello
- Inspect the engine valley (meaning that exterior part of the crankcase you can't get to when the intake manifold is installed) and clean as much as you can so you can tell if things get coolant fouled/leaky again. Shop vac is your friend.
- If new oil filter housing does not have retaining clips for cables, swap them over from old oil filter housing
- Replace intake manifold gaskets (count depends on # of cylinders, 1 per cylinder) if your MINI is anything above 70K (maybe less) miles -- TIS says do this if you pull the intake manifold and if the gaskets are above 70K old they're right, you'll see the thickness difference so just do it
- Attach new oil filter housing to crankcase -- note there is a bolt tightening sequence in BMW TIS that should be followed AND torque specs should be observed unless you want to mess up the new plastic doodad worse than the old . Be careful not to bop and hurt your radiator fins while removing the housing, it's easy to do by mistake due to proximity
- Complete oil change procedure (meaning replace filter and drain plug, and refill oil)
- Reassemble all the rest in reverse order of how you took it apart, refilling the coolant BEFORE you restrict your physical access to the major upper coolant hose. For refill how-to, use that Haynes video about coolant service (MINI One 2014-2018) if you don't have the fancy-dancy vacuum fill tools that BMW says you should use, to get as much as you can into the system before buttoning things up. You're going to have to squeeze the upper hose by hand to get air out of it, that's why you need physical access to it.
- Once you've done that refill, replace/reassemble all other parts previously removed. Be sure for all of this to torque fasteners to spec, especially if the fasteners are going into plastic.
- Run the coolant bleeding processes (if you have a non-base -- like an S or JCW -- there are **two** processes, with the second process being mandatory because it is for the auxiliary coolant pump). You should run BOTH processes vs one or the other if you have an aux coolant pump, and either way you will probably have to run the processes more than once (I had to do it 3x, and did it a 4th for good measure). Note both processes involve top-up and checking the level, which means letting the car cool down ** completely ** between them. "fun" but necessary
In my mind, anyone handy can definitely take on this job successfully. Hope this is useful.
Last edited by cjv2; Mar 31, 2024 at 08:35 AM.
Reason: Added link to thread about priming engine oil before startup after certain repairs
Just want to chime in because my 2015 Cooper S with 100k miles seemed to have coolant disappearing. It wasn't at an alarming rate but after reading some bad situation stories, I did this job as preventative maintenance with the all-metal part posted above. Definitely do not need to use the fancy vacuum pump to purge all of the air out of the system. The mentioned mentioned in the Haynes video regarding coolant flush of squeezing the coolant tube up front worked wonders to get most of the bubbles out. There are some interesting quirks along the way that I found that I think might be helpful to someone in the future doing this job:
The Haynes video mentions the 2.0L models have an auxiliary coolant flush process that is activated by some steps done as the video mentions. It didn't work immediately for me but after poking around I figured out pressing the gas 10 times and holding (in addition to the other steps) after seemed to do the trick to get the auxiliary pump running. This wasn't something pulled out of TIS- this was just a total guess so just another thing to try if this isn't working for anyone else.
The new all-metal comes with replacement bolts but recognize that one of the bolts is shorter than the rest. They are very close in length but not equal. The order of the bolts loosening/tightening is mentioned in the TIS, however this is left out and I sheared a bolt when I did not realize this. The diagram below from one of the BMW OEM parts websites helped me realize my mistake.
Shop around for the intake manifold gaskets. I found the cheapest price was actually a Mini dealership that was far away and they shipped them to me. (The local one was >2x the price?? no thanks)
As much as I hate paying $32 as of today for a single day access to the BMW TIS to get access to the docs it was very helpful to get everything done in exactly the right order.
I think I have this now. No heat this AM (9F/-13C). Short trip thankfully. Came home to find coolant tank empty and a puddle under the car and drips down the driveway. Filled coolant and it immediately started to leak out. Appears from oil filter hosing area.
Ordered genuine housing and intake gaskets. Can�t wait until April for Bremmen metal to get in stock.
Will report back later with pictures of the carnage�
I think I have this now. No heat this AM (9F/-13C). Short trip thankfully. Came home to find coolant tank empty and a puddle under the car and drips down the driveway. Filled coolant and it immediately started to leak out. Appears from oil filter hosing area.
Ordered genuine housing and intake gaskets. Can’t wait until April for Bremmen metal to get in stock.
Will report back later with pictures of the carnage…
Sorry to hear you've run into this. Not surprised, but def sorry to hear.
Just for grins, if you can scan your car for codes, curious to know if you have a 20A50A quietly tucked away (see first post in thread).
I now have over 18K miles on the plastic Bremmen housing currently selling at ECS for $98.99 (the metal version was out of stock when I had to deal with my repair, too). No signs of trouble yet. Big savings, too, as compared to the still-not-redesigned Genuine MINI part selling at $723.99 (and always above $700 when I eyeball it at other vendors, too).
Interestingly, I had a talk with a local independent BMW/MINI shop owner this past weekend. They said exactly the same thing I have observed about the original part -- doesn't just generically fail, it cracks in exactly the same place in exactly the same way most of the time. The Genuine MINI part strikes me, in that context, as a gamble. The Bremmen plastic version, well, guess we'll see how I'm doing when it gets near 100k+ on it
Hello, I just scanned with my Foxwell NT530 and I have zero codes. I actually scanned first, before I saw the coolant leak. This last fall I had no blower fan on just one drive. It never happened again, but I was curious if my No Heat today was related.
Found a genuine MINI one for $580. Better than $700, but still a nasty price 👎👎. I found a lot of Uro/Bremmen/Hamburg plastic ones are hard to find in stock right now too. Prefer not to resort fully to unbranded plastic eBay/Amazon ones. Must be a lot of these failing - high demand=low stock?
Although, I am pondering buying a generic metal one with free returns, just to check it out.
Originally Posted by cjv2
Sorry to hear you've run into this. Not surprised, but def sorry to hear.
Just for grins, if you can scan your car for codes, curious to know if you have a 20A50A quietly tucked away (see first post in thread).
I now have over 18K miles on the plastic Bremmen housing currently selling at ECS for $98.99 (the metal version was out of stock when I had to deal with my repair, too). No signs of trouble yet. Big savings, too, as compared to the still-not-redesigned Genuine MINI part selling at $723.99 (and always above $700 when I eyeball it at other vendors, too).
Interestingly, I had a talk with a local independent BMW/MINI shop owner this past weekend. They said exactly the same thing I have observed about the original part -- doesn't just generically fail, it cracks in exactly the same place in exactly the same way most of the time. The Genuine MINI part strikes me, in that context, as a gamble. The Bremmen plastic version, well, guess we'll see how I'm doing when it gets near 100k+ on it
Last edited by AutoCoarsen; Mar 20, 2024 at 05:02 PM.
Hello, I just scanned with my Foxwell NT530 and I have zero codes. I actually scanned first, before I saw the coolant leak. This last fall I had no blower fan on just one drive. It never happened again, but I was curious if my No Heat today was related.
Found a genuine MINI one for $580. Better than $700, but still a nasty price 👎👎. I found a lot of Uro/Bremmen/Hamburg plastic ones are hard to find in stock right now too. Prefer not to resort fully to unbranded plastic eBay/Amazon ones. Must be a lot of these failing - high demand=low stock?
Although, I am pondering buying a generic metal one with free returns, just to check it out.
Glad you have zero codes. Very glad.
Yeah these things (the original BMW/MINI part) have a high failure rate -- and not just the particular version that is on the B46 in the MINI. Apparently it's a thing with the B series engines, period, whether installed on a BMW-branded or MINI-branded vehicle. I don't quite get the ebb and flow in the supply chain, but it's certainly discernible. Fully agreed on nonbranded plastic eBay/Amazon ones.
I'm *very* curious to hear from folks who have installed the all-metal Bremmen.
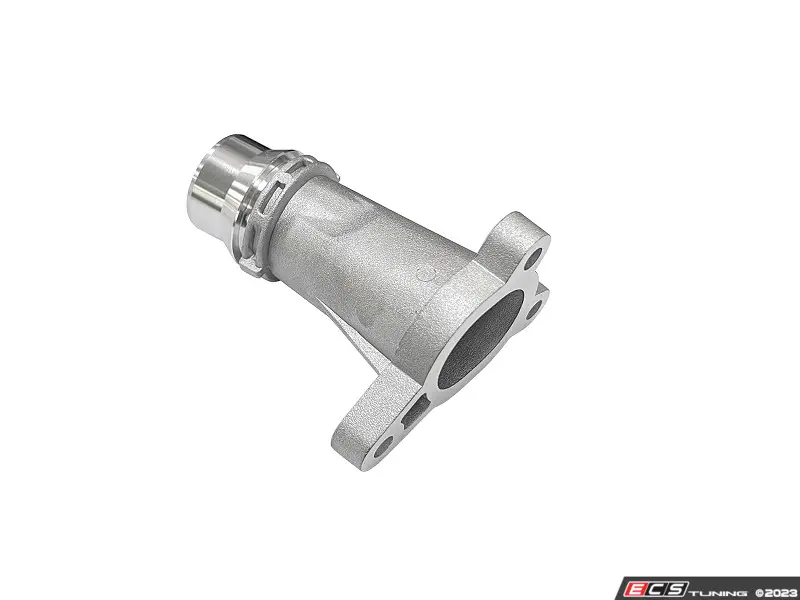
If you�re gonna do this, might as well grab this block connector, part 11118511205. Another plastic part that�s easily accessible once everything is taken apart. Genuine BMW/MINI part is only about $35.
If you�re gonna do this, might as well grab this block connector, part 11118511205. Another plastic part that�s easily accessible once everything is taken apart. Genuine BMW/MINI part is only about $35.
Funny, I thought about that when I did mine, but I didn't understand... that particular cooling gotcha at the time. Grrrrrr.
I wonder whether there is a metal (aftermarket) replacement out there for that part? I know the plastic one is a watch spot on the B series engines in BMW-branded vehicles (regardless of the MINI).
Looks like there are aftermarket metal versions for 11118511205. Although I noticed they don�t have the integrated gasket channel where they attach to the block, like the factory plastic piece uses. Have to use RTV silicone.
Looks like there are aftermarket metal versions for 11118511205. Although I noticed they don�t have the integrated gasket channel where they attach to the block, like the factory plastic piece uses. Have to use RTV silicone.
Interesting. Yeah, I'll stick with the factory part come replacement time. I'll let someone else experiment with the hose attachment approach on *their* Cooper
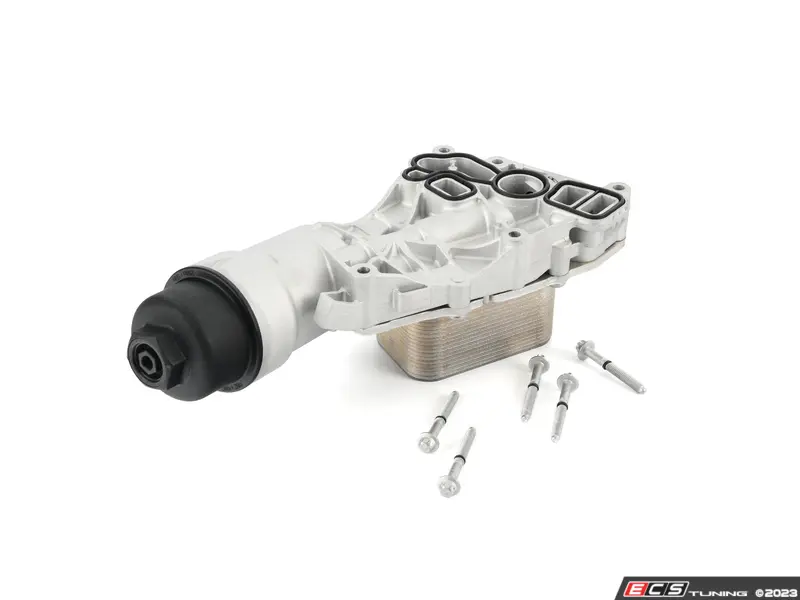
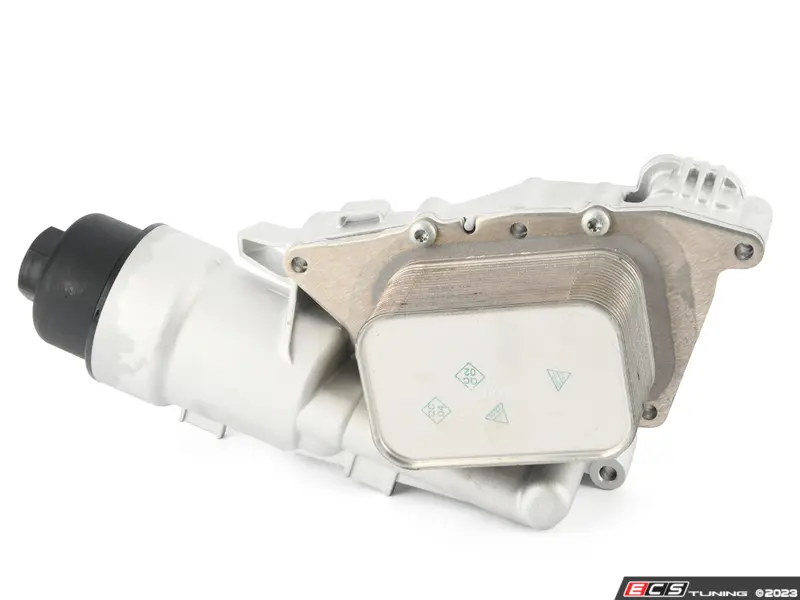
Grabbed a cheap, generic aluminum housing. From the photos on the ECS Tuning website, these do NOT appear to be the same item as the metal Bremmen one. Very close though. This is compared to my old, genuine BMW/MINI/Mahle one.
Honestly, it looks quite good 🤷🏼♂️. The oil filter cap drain plug is the only thing that looks significantly different. That comes new with a new filter anyway.
One big issue though� No check valve inside the filter housing! Watch for this if you buy one! Maybe it can be swapped over? I haven�t tried to take the old one out yet.
Last edited by AutoCoarsen; Mar 26, 2024 at 04:03 PM.
Also, here�s the inside of 11118511205, that block connector. You can see the plastic basically flaking apart 🤮. Man, I�ve been dealing with garbage BMW plastic cooling parts for 20 years. Same old, same old 👎
Also, here’s the inside of 11118511205, that block connector. You can see the plastic basically flaking apart 🤮. Man, I’ve been dealing with garbage BMW plastic cooling parts for 20 years. Same old, same old 👎
Yeah I recognize that look. You just convinced me to stick with my plan to eventually swap that out for a metal component. I planned to yank a bunch of "BMW coolant plastic" on principle so this will be part of the deal. Not sure whether I want to do the yank at 120K or 150K miles... leaning towards 150K... but open to input. Other than the oil filter housing, it hasn't blown up just yet as I near 120K.
Here�s the tightening sequence and torque values for the oil filter housing. I did them very gently in sequence many times until they started to snug, then switched
to the torque wrench.
Yep those little short pipes are starting to fail also. We are seeing oil leak down on those front housings and then it makes the belly pan saggy and oily. We had a F56 in our shop and it had that issue.
Hey @AutoCoarsen , I'm trying to help someone in Hawaii get their oil filter housing square, the usual major leak -- where did you find that all-metal housing (since ECS not shipping their all-metal one until at least April 11 according to their website)? And do you trust the one you got?
Hey @AutoCoarsen , I'm trying to help someone in Hawaii get their oil filter housing square, the usual major leak -- where did you find that all-metal housing (since ECS not shipping their all-metal one until at least April 11 according to their website)? And do you trust the one you got?
My bleed routine. I�ve had luck doing this initial process on many BMWs. It sounds crazy, but it works. Fill expansion tank, loosen bleed screw and blow hard into the expansion tank. Put your lips inside the opening (wipe it clean first) and make a seal. You�ll blow a bunch of air out of the bleed screw before a steady stream of coolant comes out. You can blow probably a solid liter of coolant into the system from the expansion tank. Hold a towel around
the bleed screw to absorb coolant from the bleed screw.
Then run the bleed routine for the aux coolant pump. My 2017 Clubman S ALL4 will NOT do the bleed routine without starting the engine (as described elsewhere). I tried many times with a battery charger hooked up. Had to follow the TIS saying to start the engine. I�m pretty sure my F25 X3 will do it with the engine off.
Quote from TIS:
��Exceed filling level in the coolant expansion tank up to the upper edge of the coolant expansion tank.
�Close sealing cap on coolant expansion tank.
�Close the engine compartment lid.
�Engage the parking brake.
�Make sure that the wheels touch the ground.
�With automatic transmission: Engage selector lever position P (Park).
�For manual gearbox: Do not engage in gear (idle position).
�Switch on the ignition and make sure that the ignition remains switched on.
�Make sure the driving experience switch is not in the ECO PRO switch position.
�Set the heating to the maximum temperature and the blower to the lowest setting.
�Hold the accelerator pedal down to the floor for at least 10 s and do no operate the brake pedal. (Release accelerator pedal)
�Start engine.
�The cooling system bleeding routine will start.�
You�ll know the routine has started because it�ll idle at about 1,300 RPM for about 10 minutes then drop to a normal ~800 RPM.
Last edited by AutoCoarsen; Mar 29, 2024 at 01:50 AM.