When you click on links to various merchants on this site and make a purchase, this can result in this site earning a commission. Affiliate programs and affiliations include, but are not limited to, the eBay Partner Network.
For old time sake I thought I would write this post about the audio system that I installed in 2005 after taking delivery of the Mini back in the summer of 2004. I wanted a Minidisc system the the Mini - how cool is that. I had planned this even before putting down the deposit for pre-order of the Mini from Classic Mini in Ohio, sight unseen, and to be shipped to me via enclosed carrier to the PNW.
I was really into Minidisc at the time. I prefer it over CD especially for used in automobile. It is virtually shock proof and easier to handle as the medium is protected by the disc's housing. More over it is like cassette tape that you can record and erase and without the wear and tear problem of the tape. Most important, the discs are miniature - hence the name Minidisc.
I order my Mini with the factory CD head unit.
the base factory head unit with CD player - it was a step above the cassette one
in order to maintain the functions of the multi-function steering wheel's audio control I purchase an adapter from UK for a premium price
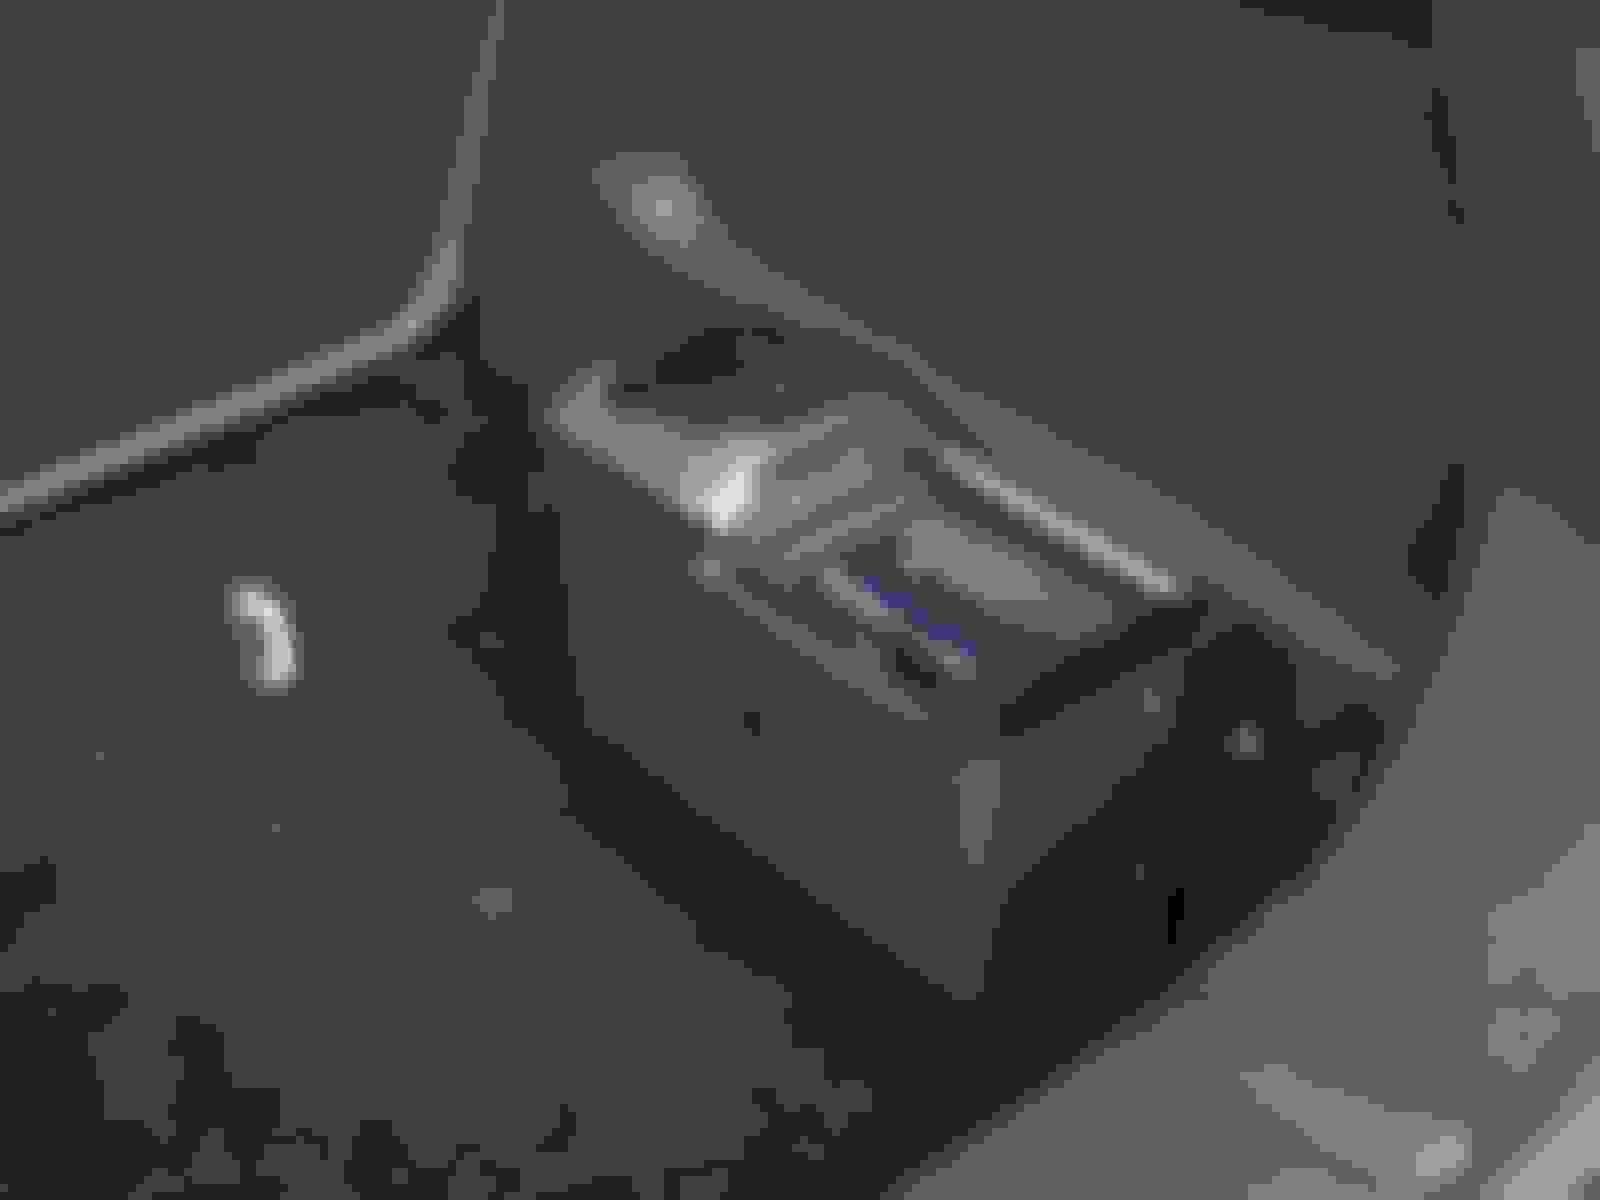
the thing in the black heatshrink is the multi-function steering wheel audio control adapter for Sony head unit
the Sony head unit
in the boot is this 6 disc Sony Minidisc changer - it is much smaller than a 6 disc CD changer as well as less prone to skipping from shock and vibration
the head unit installation all done and buttoned up; Minidisc has much more advanced text support than CD
the head unit also has Minidisc support; so there are 7 discs all together
the changer's door is most interesting; it has two panels due to the diminutive size of the changer
loading and unloading of the Minidiscs is much easier than CDs as they are very well protected by design
I recently removed this Minidisc system, and it is still in pristine condition. I replaced it with an Alpine head unit because I want the smartphone support. Alas, this was a brief period that Sony was making tasteful automotive audio products. If I have not mistaken, they were built in Japan. I still have the entire system including the MFSW from UK if anyone is interested.
The PNW has long enter into the rain season. We have two distinct seasons - rain, and no rain.
It has been a very wet November, and only yesterday and today, we are getting a bit of reprieve from H2O. I will be swapping out the summer wheels and grudgingly putting on the winter wheels which is x-lite and a set of all season performance tires. It is a sad day indeed.
I have been investigating a mild case of rattle since the Milltek catback was installed. I notice the rear bumper cover is a bit loose around the center. I thought the fastener in the middle might have fallen off when Mini was having too much fun at the track. Today I crawled under and looked. Sure enough the 10mm bolt was gone. Not just that, I also discovered the driver side muffler of the Milltek is hung a tiny bit high, and at time rubbing up against the aluminum heat shield. I am not too keen on dealing with it as it likely will require I improvising a spacer behind the factory hangers to lower it a bit.
10mm bolt (15) has fallen off
I scrounge around the house and luckily I found a 10mm metric automotive bolt from either the old BMW 320i or 2002, among thousands of things on the Garage bench. I can find anything in my "organized" chaos. Within a few minutes it is fixed.
Other than these, Mini is all peachy and purrs like a kitten.
It has been a great weekend in the progress of taking care of a few loose ends on the Mini. One of these is the oil pressure gauge adapter which to my horror was leaking oil. I have since decommissioned the oil pressure gauge until I have time to investigate, arrives at a satisfactory solution and recommission it.
The reason I decommissioned the oil filter gauge was while there was a small leak from the NPT threads I was reluctant to give it one more turn afraid that I might strip the softer threads on aluminum filter housing. This weekend I decided to get to the bottom of this. To install the t-adapter is easier said than done due to the extreme space constraints of the Mini's engine packaging. A heat shield for the muffler must first be removed before you can even see the stock oil pressure switch.
the stock oil pressure switch removed
in late summer when I decommissioned the oil pressure gauge I taped up the compression fitting and the nylon line with a piece of duct tape to protect it
With a lot of care I incrementally torque down the t-adapter until the side port is at the exact angle. I didn't want to over rotate the adapter and having to back it out slightly. Once I am happy with the t-adapter angle - checking it a few times, I proceeded to install the oil pressure switch onto the end. This time I was able to orientate the oil pressure switch such that the locking and release mechanism of the connector faces downwards - hence out of the harmful radiant heat of the feeder pipes of the exhaust header.
the orientation of the side port on the t-adapter has to be in an exact angle for the nylon line to access it
I cut a strip of fiberglass cloth to wrap around the oil pressure switch connector to protect it from the red hot exhaust pipes
I wanted to secure the fiberglass cloth with a loop of steel wire but it was just to difficult to work in the tight confine with both hands. I ended up just use two cable ties.
this is the photo taken before the heat shield of the exhaust header is re-installed
you cannot see this with your eyes unless your head is the size of the iPhone ; the smartphone camera make the capturing of the image from this perspective possible
here you can see why the orientation of the oil pressure pickup port for the oil pressure gauge is so important; only this specific angle works
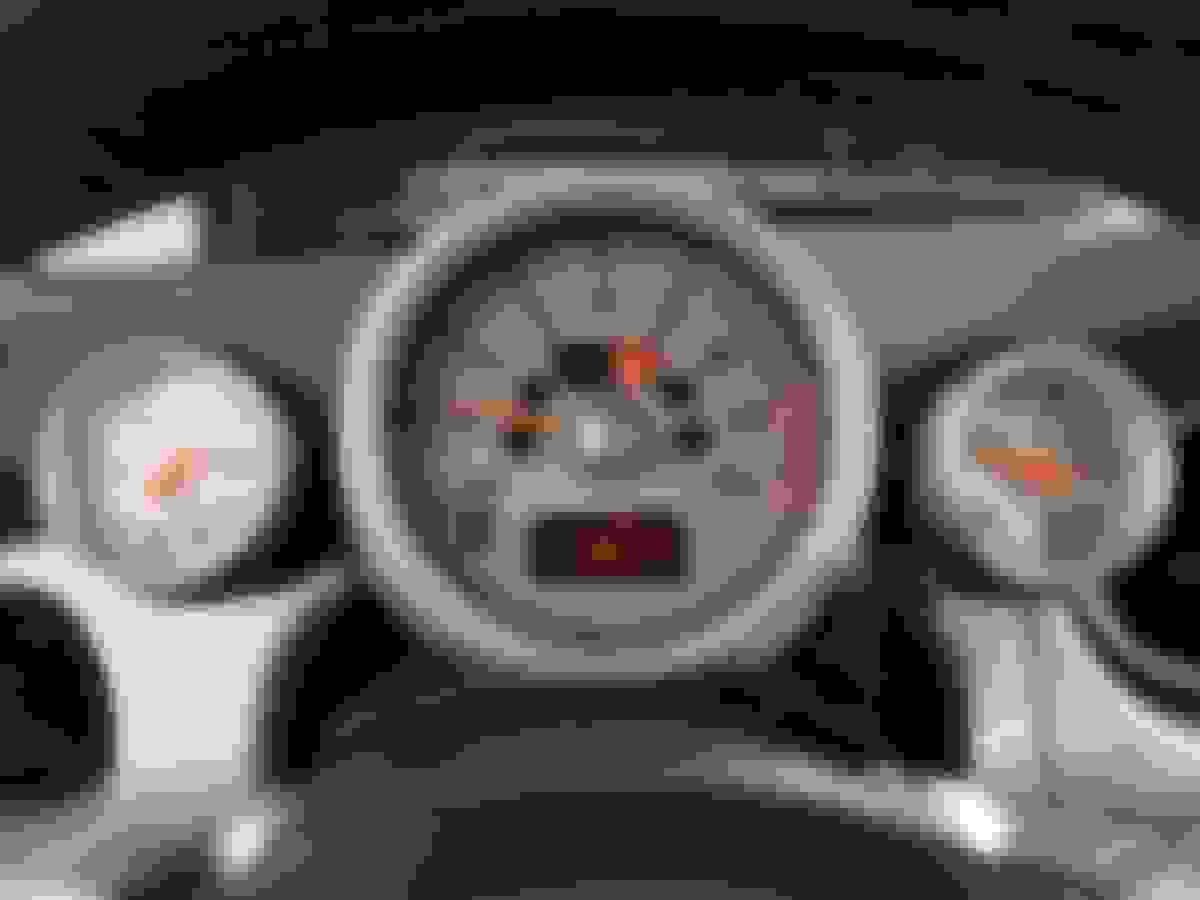
the oil pressure gauge is functioning again (photo taken with hot engine in the summer)
With a cold engine at 50F ambient the Mini's oil pressure reads over 60 PSI at idle. This is with 5W30 Mobil 1.
sorting out rubbing issue of the Milltek catback exhaust
have been bothered by a mild case of rattles ever since the installation of the Milltek exhaust. I took advantage of the dry day this weekend to investigate.
After the installation of the Milltek exhaust I was very surprised with the increase of vibration, while also surprised with how tame the exhaust sound is with the more aggressive catback without a resonator that I purchased over the one with resonator. As I put more mileage on the Mini, I begin to suspect there is minor rubber something. I thought most likely the catback muffler system must be touching something somewhere.
Jacking up the Mini and put it onto jackstands, this time I tap and wiggle the exhaust harder trying to find areas where the exhaust either come into contact with the Mini body or heat shield. It did not take long and I found that the passenger side muffler is actually pressing against the aluminum heat shield above it. Examining the design of the Milltek exhaust a bit, it became crystal clear that Milltek mufflers are hung too high despite they are much smaller than the stock counterpart. On the other muffler that is not rubbing against the heat shield the tightest spot has only about 3/8" clearance.
I thought I may need to fabricate a spacer for the inner muffler hanger in order to lower it enough to increase the clearance. I wanted to make it out of phenolic for its high temperature resistance property, as I know I have a scarp piece somewhere. Searching the house and I could not locate it. I found a piece of Delrin instead. It should work since being the spacer for the hangers, it is not exposed to direct radiant heat of the muffler (on the track).
I was preparing to make a 1/4" spacer out of this piece of Delrin for the muffler hanger
As there are two hangers on each muffler I first try to determine which is the hanger that pull the muffler the hardest up against the underbelly of the Mini. This can only be determined by loosening the nuts of the two hanger brackets.
the area marked in red is where the passenger side muffler comes into contact with the aluminum heat shield
Interestingly of the two hangers (inner and outer), it is the outer hanger that exerts most force to pull the muffler up against the underbelly. Once the outer hanger nuts are remove I can pull the muffler lower enough to gain sufficient clearance. Since the hanger has a steel bar I can bend the bar to lower the engaging point of the silicone rubber hanger, instead of going through the trouble of making a spacer for the bracket. Good!
the outside hanger on the passenger side muffler
the inner hanger is fine despite it is closest to the area of interference; the only way to lower the inner hanging height is with a piece of spacer
I clamped the outer hanger into the vice - had to think carefully which direction to bend in order to lower the hanger
checked twice (actually three times) and bended once; I estimated the ballpark amount of bend needed; I used this crescent wrench to bend the hanger arm
I just eyeballed how much to bend, and my first try was perfect! After tightening all the fasteners I shook the catback exhaust hard and even pound on it against the underbelly and I could not get the exhaust to touch anything. Time to go for a test drive to be sure.
WTF, it seems the problem is now worst. Something does not make sense. I pulled onto the driveway and shake the tail pipes hard and I could not get the exhaust to contact the body of the car. Yet even on a relatively smooth road surface I am getting very troublesome knocks.
Up onto the jack stands the Mini for the 3th time this weekend, and I was determine to get to the bottom of this before the rain comes at 4 PM. Crawled under the Mini and repeated the examination that I have done before. This time I am absolutely sure the knock was not due to the exhaust. It just happened that the Milltek exhaust rubbing problem is masking this new knocking sound that is likely due to something in the rear suspension. I have two problems and one was fixed. More on the next post...
While I was 100% sure that I got to the bottom of the rattle caused by the Milltek catback exhaust in the previous post, a test drive gave me pause. Back up onto the jack stands the Mini went for the third time this weekend. The rain was scheduled to arrive at 4 PM on Sunday, so a failure not to identify and fix this knock is not an option. There is nothing in the Mini's boot that accounts for this knock. I suspected it is something in the rear suspension, but what could that be?
I would not get into all the things that I was able to quickly eliminate as suspects, with the help of a rubber mallet. My biggest fear is the top mounting nut of the Koni damper has came loose, or worst the delicate spring clip has popped off the seat. Next I used a piece of 2x4 as lever, I compressed the left and right side of the rear suspensions by tugging up at the trailing arms. I can hear the noise only on the driver side. Good. I begun to home in to the problem. Now I needed a helper to tug on the 2x4 while I listen and feel the suspension. My neighbor was gracious to come and help.
the piece of 2x4 used to compress the suspension
It did not take long for me to locate the source of the knocking sound. Of course tugging on the trailing arm the sound does not sound like the knocks I hear while driving, but I knew what to look for. I ended up using my hand to feel where the slight click came from. It was the upper joint of the drop link for the rear sway bar. The nut had worked slight loose. Turning it with a wrench confirm it has loosen by about a turn. We cheered for our teamwork in so rapidly locating the problem. I was so confident that was the cause that I immediately put the wheels back on, lower the Mini off the jack stands and went for a test drive. No more knocking and no more rattles from the muffler. This is a problem I would not want to leave it unattended to right away. I am very please that the rubbing issue of the Milltek muffler is resolved. In retrospect much of the increase in vibration was due to the passenger side muffler pressing tightly against the heat shield.
I think the size of the rear sway bar has a lot to do with the nut came loose. The 22mm bar that I installed over the factory 16mm bar put much more stress on the drop links. If it come loose again I would add a dab of red Loctite.
Mini now has the winter wheels and all season performance tires. The handling is not as bad as I dreaded. It is actually very good with these Brigestone tires and 16-inch X-lite wheels.
Mini purrs like a kitten, but roars like a tiger. Now there is just the Milltek baritone singing love duet with the supercharger soprano.
Last edited by pnwR53S; Nov 21, 2017 at 06:01 PM.
Reason: spelling
Wow man what a thread bud, and so nice you still the first owner and upgrading and enjoying the car more than day one. Good on you. Have really enjoyed reading your thorough well written thread, awesome stuff.
I have this GoPro Hero 5 Black camera a few weeks now. As I purchase it for using in the Mini on the tracks I have not really put it to use, except perform a suite of checks to make sure the camera functions as I expected. Overall I am quite pleased with it, though there are some shot comings. It is supposed to be a keeper.
the camera was bought to prepare for next season using on the track
However I notice the camera will hang with a blank screen of death under a use case. It will freeze up when I press the Shutter button to start a video recording while the camera is in sleep (off). If you are not familiar with this camera. Normally a user will first switch on the camera (wake it up from sleep) by first pressing the Mode button. Once the screens are on, then press the Shutter button to initiate a video recording.
With the quick record method that I use, once it starts to record a video, you can press the Shutter again to end the recording. Doing so the camera will save the recording and return to sleep. The camera will hang 1/3 to 1/5 times, so it is intermittent. I set the video to 720p/60 when I encounter this problem. As there are so many permutations I did not have a chance to try others. Initially I thought it happens infrequently, but as I performed more test, the failure rate is very consistent.
Once it freezes with the blank screen (no image shown but the legends are on the screen), the only way to get out of this is by pressing the mode button for like 10 seconds. I realize from experiment that sometime it will drain a fully charged battery to 0% very rapidly. That is when I realize my window (30 days) for returning the camera back to Amazon is rapidly closing.
blank screen of death
Time is of the essence. I immediately requested for a return from Amazon. There was only 3 days left before the return window closes.
I am really bummed as I really like the camera. It has been so much work that I put into the research and testing. I did some search on the web and apparently other owners are encounter hangs. I will get another one, and I hope this is not a very common problem. What I fear the most is when it freezes when I set up the camera for time lap photo or video and fail because of this kind of hanging.
Costco did not have Hero 5 Black when I bought mine from Amazon. Costco at the time was only selling a bundled Hero 5, which has no screen. Costco just begin selling a bundled Hero 5 Black but the extra pieces are not that attractive as a whole.
Costco's Hero 5 Black bundle - the 16GB SD card, battery charger, and the head strap are not that attractive so I am going to get another camera only from Amazon
I purchased a 1.3 meter USB-C extension cable despite my reservation. I want the cable so the external microphone module does not have to be hung off the camera.
In the photo the external microphone module hangs off the side of the camera with the analog mic cable connected. On the track a USB-C cable will also be connected and I want a tidier arrangement, hence the extension cable. My reservation with extension cable is I infer they are not compliant to the USB-C spec. Extension cables have always been deem illegal by the USB IF even starting with USB version 1.1 spec, as user can daisy-chain extension cables. Each addition of extension cable degrades the electrical signal and will cause the communication to fail. Additionally when the cable gets long enough the propagation time exceeds the timeout by the host or the device and that also break the communication. I even went and downloaded the USB-C cable spec and try to get to the bottom if it is indeed illegal (per spec that is).
So when the 1 meter extension cable arrives, I eagerly set out to test it out. It was not as easy as it seems as the GoPro camera's UI is very clumsy and I have to make sure it is not the internal mic when it works. Each time I used the extension cable with the microphone adapter dongle, the video recorded has no video. Just in case the dongle requires power from outside, I supply it with power with another USB-C cable.
My test conclude this extension cable, for whatever reason, cannot be use for data communication in my use case. It does deliver power and it is all this $9 cable is good for. Back to Amazon it will go.
1 meter USB-C extension cable
I went to Costco and bought a GoPro Hero 5 Black bundle kit for $399.99 in a panic. I have yet to open it as I don't think I want the extra pieces in the bundle. I am likely to return it unopened. While Costco has generous return policy, I hate to turn it into an opened box item if I can help it.
Another Amazon Warehouse Deal camera should arrive today and I have my finger crossed.
Have you tried seeing if there is a firmware update for the go pro when connected to the Internet? There might be a fix for the issues.
I updated to the latest FW. The brand new Costco bundle will go back unopened unless the second opened box is also bad. I suspect it is a problem with a production date range. You just never know.
Well. The second Hero 5 black arrived. It came in the retail box just like the first. The carton has molds and still damp to the touch, but it is unopened the best I can tell.
I charged it up right away despite I have some reservations of it being water damaged. The camera is dry and it is designed to withstand a certain depth, so the damp carton should not affect it. The price is right if this one does not fail like the first. I quickly set it up for 720p/60 to see if it will fail with the same video setting. I enabled the QuickCapture - which is the mode that failed intermittently with the first one.
Guess what? My hunch is right. This one fails so readily too, but more readily at about 1 out of 2 times.
It is going back to Amazon. This is obviously a bug or widespread hardware problem. There is a thread on GoPro's forum but I see that the moderator is very quick to close the thread (as resolved) without the OP posting that the problem was resolved.
I am going to open the more expensive Costco bundle and check that one out.
I can't stand it when manufacturers push out a product without proper testing... Wtf!!!
Betaware
From my limited experience with this company, every aspect suggests they are not at all forthcoming. They first trick you to enroll for $5/month service. The many threads of this problem on their forum are not addressed to and summarily closed as "resolved" by the moderator which is an employee. When I call for help, it make me waste a lot of time and only to be answered by "tech support" that is in Philippines in which the lady's English is far from intelligible on top of very bad voice call quality.
I resisted opening the Costco GoPro bundle. I am an ethical consumer, and I won't create an open box if I have no intension of keeping it. I drove to Costco just to return the package intact. At the return counter I told the lady there is nothing wrong and I did not open the package - still have the Costco plastic bag seal on. But she and her manager want to open and make sure I am not scamming them. When they saw the box was unopened they believed me.
I come to accept the blemished QuickCapture function of the Hero 5 Black. It is not a function I must have. It appears plague every unit according one guy that tried 5 cameras. I just need to avoid using, or just work around it. In the camera is indeed excellent, especially for the price.
Now with the suspension knocking gremlin chased away and the Milltek exhaust rubbing exorcised Mini drives like a dream and sound amazing. There is not a hint of rattle and the car just feel really tight and well sorted.
Bytetronik Full Access Tuning kit with 550cc injectors
I am getting a bit ahead of myself on this tuning kit. My well laid plan was to first install a wideband air/fuel exhaust gauge to check for potential lean combustion at WOT on the track. I am actually quite content with how well the Mini runs without a tune, both on street and on track. I want to proceed with care one small step at a time. Additionally, there is a lot of room for the Mini to improve the lap time, by tightening the loose nut behind the wheel.
I took this photo of the oil pressure at idle right after starting the engine at 46F ambient. 70 PSI @1250 RPM, but as the engine warmed the pressure drops. Eventually it settles to about 25 PSI at 850 RPM idle. The oil is 5W30 Mobil 1.
It has been a dry day, so Mini got to stretch his legs.
avoid getting door dings like a plague
We went downtown, and there are potholes everywhere. We were constantly dodging them and you simply cannot let your guards down. Never follow too close and drive with undivided attention. I am very grateful the Swift spring's moderate drops as well as the spring rates are just perfect. I would not want anymore or less.
I've skimmed through this entire thread, and I am loving everything that I see here. It makes me excited this winter when I tackle some much needed surgery for Egan. Fantastic thread, dude!
A few more parts show up. Some of these would not be installed until spring. They are a part of planning ahead taking advantage of the black friday sales. The Cabrio cross braces were bought when I sensed the supply may be drying up so I grabbed a pair.
some Superpro bushings
these took 2 weeks; the delay must due to supply channel issues
top motor mount poly pad - I call it poor man's Vibra-Technics
these are VW/Audi/Porsche M6x14 Torx bolts that is 1/4 the price of the MINI ones
When you installing your mtx-l kit and starting the Crm process? What's the plan
I ordered the MTX-L gauge and it will arrive soon. My plan is not to immediately install any tune. I want to find out the A/F ratio driving on track as a baseline. I bought the Bytetronik FA35 to take advantage of the discount, as well as the capability to log parameters. The first useful function is to increase the RPM cutout.
While I had resigned to having to use the MTX-L narrow band emulation for the upstream O2 sensor, I still have some reservation. I will try hard to find a place for an additional bung on the stock header. This may not be feasible without compromise on the orientation of the bung.
My plan is to start the custom tune in May after one HPDE session.
I wanted to try out this Superpro spacer for the stock engine mount. I was very impressed with the idea of the product as it works to augment the stock motor mount. It cost a mere $12.75 so I thought why not give it a try. I dubbed it poorman's Vibra-Technics motor mount. When my stock motor mount failed, I decided to replace it with the same as I do not want excessive vibration in the cabin that is induced from the drivetrain.
this is a spacer to augment the factory engine mount which is hydraulic
it is from Australia
this is what it looks like - the rectangle recess fits onto the support pad of the engine mount
the stock engine mount closeup
The reason that I bought this support pad is it is reasonably priced at just $12.75. While I am concern it may significantly increase drivetrain vibration I wanted to give it a try as it is quite easily removed should I find it unlivable. Since it augments the hydraulic engine mount I reason that it should prolong the life of the engine mount. Additionally, should the hydraulic fluid chamber breaks the engine will still be well supported by this polyurethane spacer.
here is the stock engine mount without the added support pad
here is what the engine mount with the support pad added; you can see it bears much of the weight of the engine
It took all about 30 minutes to install, once I remember that I need to loosen the cast aluminum bracket of the engine.
I immediately started the engine to find out if there is any increase of vibration. Yes, it has pronounce vibration in the cabin at about 1500 - 2500 RPM. It just crosses the threshold that some interior plastic trims like the glovebox vibrates audibly. It is not too annoying. The Mini sure feel more raw throughout the RPM range in a good way. I want to leave it on and see what it would be like in the next few weeks.
While writing this post and examine the photos I realized I may have installed the support pad upside down. As it was a bit of a struggle to slide the pad into the engine mount, I didn't have the luxury to visually see which is the right orientation - right side up vs up side down. Now I am quite sure I have it installed upside down.
looking at this photo closely I realized I had install the polyurethane pad upside down
I am now quite sure this is the side that should face up
For now I will live with my Vibrate-Technics motor mount. I will correct the orientation tomorrow.
Cool, my advise to you regarding adding the mtx-l a/f sensor to the stock exhaust header is place it further downstream than the header possibly even post cat as that sensor is very sensitive and can burn out, it won't last long in the heat close to the header, and they are expensive!
Cool, my advise to you regarding adding the mtx-l a/f sensor to the stock exhaust header is place it further downstream than the header possibly even post cat as that sensor is very sensitive and can burn out, it won't last long in the heat close to the header, and they are expensive!
I appreciate the advise. While I was installing the Milltek exhaust with the Mini up on jack stands, I made a point to survey the potential location of an additional bung. It looked next to impossible as the stock header and the Mini's exhaust pipe tunnel leaves almost no feasible location. However my survey is all just eyeballing and without the benefit of the actual WB sensor nor the bung to gauge.
I have read many report of dead WB sensor on Amazon's MTX-L buyers' comments. I suspect that many are just plain user stupidity as always. I am aware that it is imperative to orientate the bung in the specific angular range Bosch specified to avoid liquid accumulate onto the sensor during coldstart (and short trips). My thought is if I can shoehorn at where the factory pre-cat O2 that would be the most optimum location. I will have to take a closer look to see if adding a second bung is at all possible there while maintaining a circa 10 to 2 o'clock angle.
I believe you meant locating if after the pre-cat but pre main cat. My immediate thought is that at that location the WB will report leaner number than what the engine sees. By how much is the $64k question. When my pre-cat weld failed I did consider gutting it so to mount a new bung at the bend before it. Only I didn't have the heart to kill a pre-cat.
Did your WB sensor die because of high temperature? I would appreciate if yo can share more specifics.


 I had planned this even before putting down the deposit for pre-order of the Mini from Classic Mini in Ohio, sight unseen, and to be shipped to me via enclosed carrier to the PNW.


 Not just that, I also discovered the driver side muffler of the Milltek is hung a tiny bit high, and at time rubbing up against the aluminum heat shield. I am not too keen on dealing with it as it likely will require I improvising a spacer behind the factory hangers to lower it a bit.


 -Technics motor mount. I will correct the orientation tomorrow.


