
Drivetrain Alta exhaust installed!


Thread Starter
|
1st Gear
Joined: Oct 2013
Posts: 45
Likes: 0
From: Vancouver Canada
Alta exhaust installed!
I finally decided to do the exhaust install myself instead of paying someone $100-200 to do it. At least when I do it, I know everything is adjusted to my liking and all details are looked after. Especially having to bend and cut the battery shield to fit around the new exhaust.
Before this project I had invested in some serious floor jack and jack stands. They sure made the job much safer and easier.
Next upgrade is the rear sway bar
Before this project I had invested in some serious floor jack and jack stands. They sure made the job much safer and easier.
Next upgrade is the rear sway bar
Last edited by Kdub; Nov 22, 2013 at 11:35 PM.
Thread Starter
|
1st Gear
Joined: Oct 2013
Posts: 45
Likes: 0
From: Vancouver Canada
The exhaust is louder than I expected. It will take a little getting use to. But then again I had my rear seats folded down on my way home after the install. Tomorrow I will drive with the seats up and see how it sounds.
Thread Starter
|
1st Gear
Joined: Oct 2013
Posts: 45
Likes: 0
From: Vancouver Canada
Hello,
I am able to center the tip by shifting the tip from left to right. The tips on the Alta exhaust is not fixed, and can be adjusted.
You can see in my photo what I am talking about. The twin tip section is clamped onto the pipe after the muffer
I am able to center the tip by shifting the tip from left to right. The tips on the Alta exhaust is not fixed, and can be adjusted.
You can see in my photo what I am talking about. The twin tip section is clamped onto the pipe after the muffer
Thread Starter
|
1st Gear
Joined: Oct 2013
Posts: 45
Likes: 0
From: Vancouver Canada
I'll try to record a video shortly.
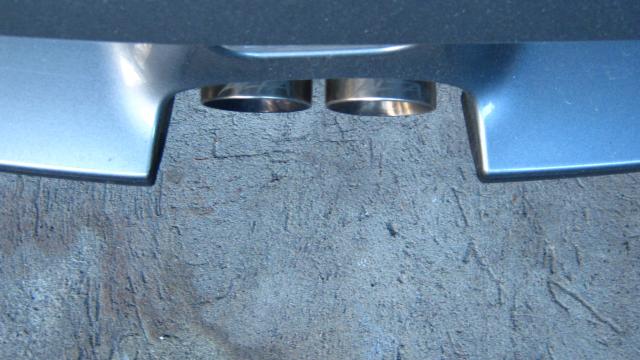
I noticed an interesting natural fitment change in the exhaust. If you look at the photo above that shows the exhaust installed on the underside of the car, you'll notice the tips sit behind the edge of the black bumper valance. I was a little bummed at the fact that the tips couldn't sit further out; at least flush with the valance. I couldn't even see the laser edged "ALTA" logo on the tips when I stand behind it. There wasn't anything else I could possibly do to position the exhaust further back because everything is bolted down and limited to what can be back or forth. Also even if I could shift the exhaust back an inch, the muffler would run into the battery box. So I figured this exhaust must have been made a little under spec.
Now that I have driven the car a couple days since the install and have completely burnt off all the new exhaust smell, I was surprised to find out (just minutes ago), that the exhaust tips have moved back and out the valance edge on their own! This is amazing and I'm baffled as to how this is possible. I guess the stainless tubing have expanded a little after it has heated up? The tips have moved a good 1" back to what is now a perfect position! I am pleasantly pleased. I will have to check later to see how the rest of the exhaust changed or shifted from the original position.

5th Gear
Joined: Aug 2012
Posts: 1,021
Likes: 1
From: CT
Trending Topics
Thread Starter
|
1st Gear
Joined: Oct 2013
Posts: 45
Likes: 0
From: Vancouver Canada
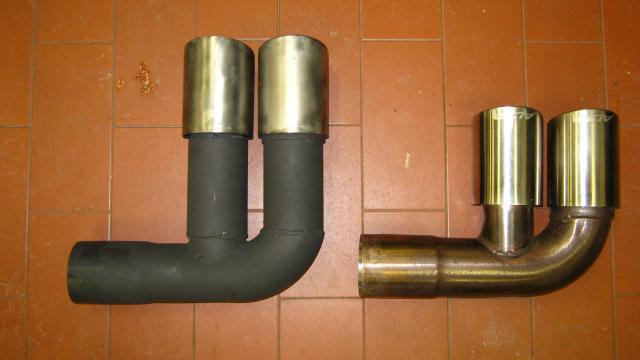
Here are some pics of the exhaust to show what I am talking about.
The first two pics show the exhaust heated up after an hour drive , and the tips extends out. You can clearly see the Alta logo.
The next two pics show the exhaust tips retracted back a good half inch after it cooled down for two hours
The first two pics show the exhaust heated up after an hour drive , and the tips extends out. You can clearly see the Alta logo.
The next two pics show the exhaust tips retracted back a good half inch after it cooled down for two hours

A quick calculation shows that for 12 feet of 304 stainless and a temperature difference of 800 F it will expand about 1.1 inches.
Guys installed this system in my 03' few months back. With the mods I have on the MINI, this is by far the best sounding exhaust yet...aggressive sounding, better flow with the 2.5" and no drone.


I also took issue with the lack of tip exposure. At first I was told it was my fault as to how it was installed. But I am running a stock header, and this system uses V-band clamping at every separation point of the system so it cannot be adjusted fore and aft....
I am going to see if the end piece which these tips are welded to can be modified/extended somehow...it's a solid piece of craftsmanship with really nice welds so while hopeful I am not optimistic....
Last edited by -=gRaY rAvEn=-; Nov 24, 2013 at 06:27 AM.
5th Gear
Joined: Aug 2012
Posts: 1,021
Likes: 1
From: CT
maybe your EGT's will be that high near the cat even though cats cant do more than like 900. at the ports of the head the temps are pretty high but they dissipate pretty quick.
i would like to see your "quick" calculation as well.
fortunately the the entire exhaust system is NOT 800*F not even the header will not get that hot under normal driving maybe a few laps on a track it will start to get near 600 maybe.
maybe your EGT's will be that high near the cat even though cats cant do more than like 900. at the ports of the head the temps are pretty high but they dissipate pretty quick.
i would like to see your "quick" calculation as well.
maybe your EGT's will be that high near the cat even though cats cant do more than like 900. at the ports of the head the temps are pretty high but they dissipate pretty quick.
i would like to see your "quick" calculation as well.
1.) mesh expansion joint of the exhaust and due to the way it is constructed the amount may be exaggerated.
2.) the bends in the pipe may also exaggerate the expansion.
Here's a link for the general formula:
http://www.engineeringtoolbox.com/li...l#.UpI8Z5Erdg0
linear expansion coefficient for stainless 304 is ~10E-6. Again this was a quick "back of the envelope" calculation.
5th Gear
Joined: Aug 2012
Posts: 1,021
Likes: 1
From: CT
ah, ok, i see you where just making a generalization... but the temp of the exhaust pipe does change from front to back so expansion will not be the same through out. but i understand what you were trying to get at.

5th Gear
Joined: Aug 2008
Posts: 1,100
Likes: 13
From: Inman, SC
Go to a good FABRICATION (NOT EXHAUST!) shop or a good machine shop.
They will have a TIG welder (should) and have some experience.
MAKE SURE you specify you want TIG with an inert back-purge. (they can use flux or purge gas)
And then mark the exhaust just after the muffler so that when you cut it almost flush that you know how the two parts align.
Put in a 1-2" piece of 304 stainless tubing (not pipe! they are sized differently!) . you will want 2.5" x .065" ornamental (seamless) tubing. Also known as ornamental. (not drawn and welded!)
weld the 1-2" piece in place making sure the old lines line back up and your tips will stick out further.
If for some reason the shop you can find does not have the type and size of stainless spec'd above you can get it from metal supermarkets.
I say this because typically when a shop orders metal they will have to order a 20' stick from their supplier.
Instead just use metal supermarkets. They have good prices when you buy in quantity as the price brakes are based off of weight, but for this small amount it will be ridiculous for what you are getting, but cheaper than buying it from anywhere else that makes you get a 6' length.
go to
https://ecommerce.metalsupermarkets....TUBE_ROUND/304
click on 2.5" OD x .065 ornamental (is what they used. Not drawn and welded. Ornamental is the industry way of saying seamless)
This company specializes in doing any cut length needed. Even short.
You should be able to order just 2 inches.
My quote came out to $12 for a 2 inch piece. + shipping.
You pay for a little.
respectively you can get a 5' section for $72
regardless, you can get whatever you need from them and have it shipped to you if needed.
idk how much welding will cost (as I have a TIG welder in the garage at home). Shop rate should be ~ $40-100 / hr depending on the shop and I would not expect it to take more than 30 minutes if bring the muffler section in off-car.
It is quite easy really.
Go to a good FABRICATION (NOT EXHAUST!) shop or a good machine shop.
They will have a TIG welder (should) and have some experience.
MAKE SURE you specify you want TIG with an inert back-purge. (they can use flux or purge gas)
And then mark the exhaust just after the muffler so that when you cut it almost flush that you know how the two parts align.
Put in a 1-2" piece of 304 stainless tubing (not pipe! they are sized differently!) . you will want 2.5" x .065" ornamental (seamless) tubing. Also known as ornamental. (not drawn and welded!)
weld the 1-2" piece in place making sure the old lines line back up and your tips will stick out further.
If for some reason the shop you can find does not have the type and size of stainless spec'd above you can get it from metal supermarkets.
I say this because typically when a shop orders metal they will have to order a 20' stick from their supplier.
Instead just use metal supermarkets. They have good prices when you buy in quantity as the price brakes are based off of weight, but for this small amount it will be ridiculous for what you are getting, but cheaper than buying it from anywhere else that makes you get a 6' length.
go to
https://ecommerce.metalsupermarkets....TUBE_ROUND/304
click on 2.5" OD x .065 ornamental (is what they used. Not drawn and welded. Ornamental is the industry way of saying seamless)
This company specializes in doing any cut length needed. Even short.
You should be able to order just 2 inches.
My quote came out to $12 for a 2 inch piece. + shipping.
You pay for a little.
respectively you can get a 5' section for $72
regardless, you can get whatever you need from them and have it shipped to you if needed.
idk how much welding will cost (as I have a TIG welder in the garage at home). Shop rate should be ~ $40-100 / hr depending on the shop and I would not expect it to take more than 30 minutes if bring the muffler section in off-car.
 You that man !! I know of a shop in RI. They do custom pipes for Harley's ect. Owner has a MINI and is looking for some custom exhaust work. I'll give him a call.
Many thanks!


Solved the ALTA Tip Length Issue
After Pic was taken, used a Scotch Bright Pad and brought back the original brushed appearance before installing....
And while I have not brought the MINI out onto the open road, I noticed the tone is bit deeper and maybe a tad louder at higher RPM.
BEFORE

AFTER


d075e0aa-caaa-449c-9e5b-bde490257ebe.jpg?t=1391386323
And while I have not brought the MINI out onto the open road, I noticed the tone is bit deeper and maybe a tad louder at higher RPM.
BEFORE
AFTER
d075e0aa-caaa-449c-9e5b-bde490257ebe.jpg?t=1391386323

Thread
Thread Starter
Forum
Replies
Last Post
squawSkiBum
MINI Parts for Sale
15
Oct 2, 2015 09:21 AM