
Drivetrain Powerflex Upper Engine Support

Powerflex Upper Engine Support
I have looked around and can not find instructions on how to install the Uppers on a Nov 2003 MCS. Anyone?
Is it as simple as unbolting the mount and inserting the new poly's into the top and bottom? Should I use the supplied grease with it, or not? Also I have the small upper bushing, it looks straight forward too, but...
Is it as simple as unbolting the mount and inserting the new poly's into the top and bottom? Should I use the supplied grease with it, or not? Also I have the small upper bushing, it looks straight forward too, but...
Last edited by BLU-BY-U; Oct 5, 2009 at 10:19 AM.


4th Gear
Joined: Jul 2008
Posts: 522
Likes: 0
Those plates are a PITA to get in with the old OEM bracket. Expect a lot more vibration, but the feel is more direct!
Trending Topics


You got it right, no jack needed. Just remove the braket insert the Powerflex bushings and reinstall the bracket. It's not hard, just don't overthink it.

Make sure it comes with two large washers. The bushing is useless without them. It will slowly work its way out and start to cut into the bushing.
I got a set from Outmotoring without the washers. (The only reason I know about them is I had a set on my old S in 2006 and it had washers) The difference between the bushings with and without the washers is night and day.
I got a set from Outmotoring without the washers. (The only reason I know about them is I had a set on my old S in 2006 and it had washers) The difference between the bushings with and without the washers is night and day.
In the kit what I got was the small upper kit (two small purple poly bushings & one metal sleeve), the large upper kit (two large yellow poly bushings & two large metal washers) and a pack of copper silicone grease. Here is a picture:

Last edited by BLU-BY-U; Oct 9, 2009 at 01:55 PM.


MINI-Madness wrote this install guilde for the lowers, but I can't tell from it if they have the washer, but looking at the install pictures it looks like part of the frame looks like it holds it in.
http://www.mini-madness.com/pdf_file...structions.pdf
http://www.mini-madness.com/pdf_file...structions.pdf
Ok, I decided to do this on my lunch break today. I would say it would take less than 30 minutes to do if you aren't trying to get the perfect picture, me it took an hour.
Step 1.
Remove the bolt holding down the bracket arm holding the cables and vacuum lines to the brace

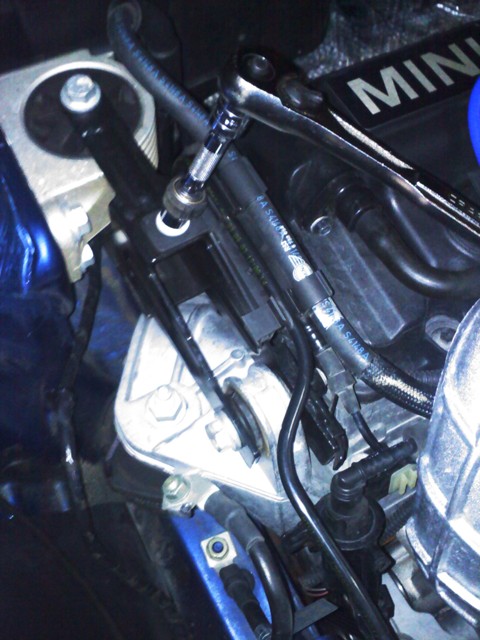
Step 2.
Roll up the bracket up and over as far as you can without forcing it too hard
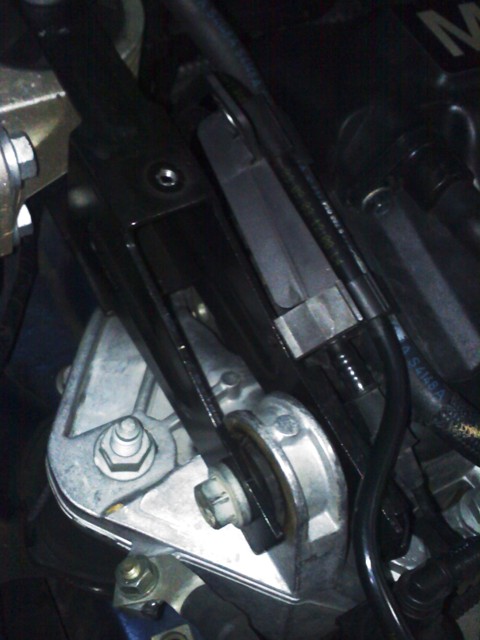
Step 3.
Remove small bushing bolt (16mm)

Step 4.
Remove Large Bushing Bolt (16mm)

Step 5.
Fish the brace out pulling the small bushing part up and over to the left and than sliding it out

Step 6.
Remove the Rubber Nipple from the upper bushing, use plyers or a util knife

but only the raised Nipple see sample with and without

There should be nothing to remove on the bottom bushing (there is a raised rubber key that both of the yellow bushing will fit into on the bottom (interchangeable)

Step 7.
Lube up old small bushing and push out

Fish old bushing out from backside (easiest to push instead of pulling it out)

(Clean up and off lube used to removal old small bushing making it clean)
Apply new Copper grease to one of the new small bushings and slide into backside

Grease other small bushing and insert, then grease sleeve and insert

Step 8.
Grease large bushing

Smear grease around completely

Insert top and bottom Large bushing into the factory rubber bushings

Spread brace arm to allow for extra room for new bushings and washers
(this is the best thing to do otherwise you mess with it forever)
Reinstall brace the opposite from removal
Slide washers into place on the top and bottom
(a long flat head screw driver will help position the lower washer)
Insert long 16mm bolt back in and start monkeying with the lower washer to get the bolt started, once the bolt is start tighten down

The lower washer will be flush with the New large bushing

Step 10.
Insert short 16 mm bolt into small bushing and tighten down

Step 11.
Reattach the bracket to the brace and tighten down (make sure the slot down from the bolt is threaded onto the brace)
(see picture above)
That's it. Now go motor through some twisties and let the bushings work their way in and revisit to check bolts for factory torque, which I will put in if anyone knows.
I will update with anything anyone has a problem with.
Step 1.
Remove the bolt holding down the bracket arm holding the cables and vacuum lines to the brace
Step 2.
Roll up the bracket up and over as far as you can without forcing it too hard
Step 3.
Remove small bushing bolt (16mm)
Step 4.
Remove Large Bushing Bolt (16mm)
Step 5.
Fish the brace out pulling the small bushing part up and over to the left and than sliding it out
Step 6.
Remove the Rubber Nipple from the upper bushing, use plyers or a util knife
but only the raised Nipple see sample with and without
There should be nothing to remove on the bottom bushing (there is a raised rubber key that both of the yellow bushing will fit into on the bottom (interchangeable)
Step 7.
Lube up old small bushing and push out
Fish old bushing out from backside (easiest to push instead of pulling it out)
(Clean up and off lube used to removal old small bushing making it clean)
Apply new Copper grease to one of the new small bushings and slide into backside
Grease other small bushing and insert, then grease sleeve and insert
Step 8.
Grease large bushing
Smear grease around completely
Insert top and bottom Large bushing into the factory rubber bushings
Spread brace arm to allow for extra room for new bushings and washers
(this is the best thing to do otherwise you mess with it forever)
Reinstall brace the opposite from removal
Slide washers into place on the top and bottom
(a long flat head screw driver will help position the lower washer)
Insert long 16mm bolt back in and start monkeying with the lower washer to get the bolt started, once the bolt is start tighten down
The lower washer will be flush with the New large bushing
Step 10.
Insert short 16 mm bolt into small bushing and tighten down
Step 11.
Reattach the bracket to the brace and tighten down (make sure the slot down from the bolt is threaded onto the brace)
(see picture above)
That's it. Now go motor through some twisties and let the bushings work their way in and revisit to check bolts for factory torque, which I will put in if anyone knows.
I will update with anything anyone has a problem with.
Last edited by BLU-BY-U; Oct 9, 2009 at 11:54 PM. Reason: fixed photo links


Put the lowers in. 
You really should do them at the same time. The motor still bucks pretty bad till the lower ones are in. The tranny mount help some as well.
You really should do them at the same time. The motor still bucks pretty bad till the lower ones are in. The tranny mount help some as well.

Thread
Thread Starter
Forum
Replies
Last Post
R50/53 Guidance on selling a 2005 S
Toolman
R50/R53 :: Hatch Talk (2002-2006)
8
Jan 20, 2016 06:50 AM
silence2-38554
R50/R53 :: Hatch Talk (2002-2006)
3
Nov 12, 2015 09:39 AM
Mini Mania
Drivetrain Products
1
Sep 17, 2015 09:27 AM
PelicanParts.com
Vendor Announcements
0
Aug 4, 2015 02:45 PM