
MINIclo's Wanda Gets Extreme Make Over...


MINIclo's Wanda Gets Extreme Make Over...
Ok folks, I'm reallly tired. I just spent 13 hours on this makeover, and the last 20 minutes downloading and processing pix from my camera. The full writeup will come later--have another long detail day tomorrow, so here's a teaser.
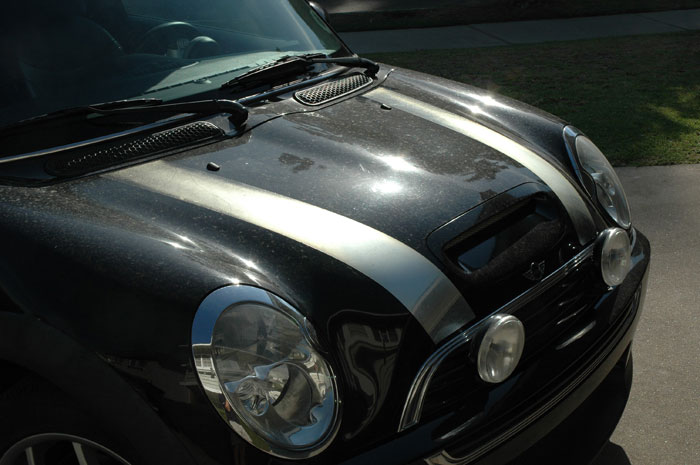
Before
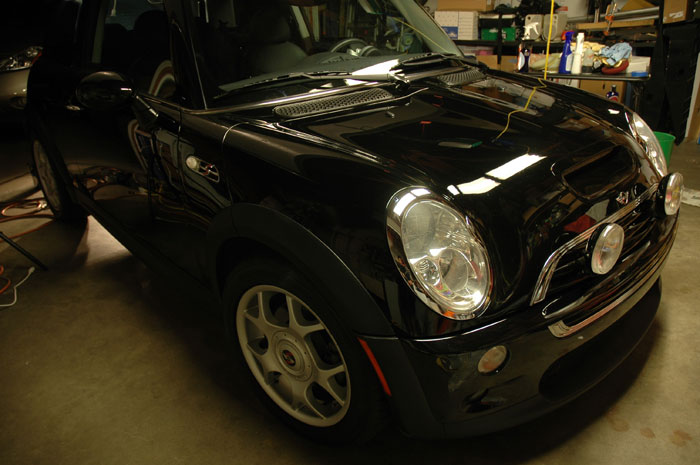
After
This super detail involved painstaking vinyl removal, rotary buffer polishing and waxing. I used Meguiar's M80 Speed Glaze for polish. Epic for the LSP, and Nero for the trim. Clarity for the glass, and Meguiar's Interior Quik Detailer for the interior. More coming later.....
Before
After
This super detail involved painstaking vinyl removal, rotary buffer polishing and waxing. I used Meguiar's M80 Speed Glaze for polish. Epic for the LSP, and Nero for the trim. Clarity for the glass, and Meguiar's Interior Quik Detailer for the interior. More coming later.....

OVERDRIVE - Racing Champion

Joined: Feb 2003
Posts: 15,262
Likes: 72
From: Mililani, Hawaii
Hey what's this!
What's OctaneGuy doing being intimate with Wanda?

That's not the same car!
The before picture looks almost like a counterfeit MINI
The after looks like a magician took over and presto.
El magnifico.


Excellent job.
I'll be sending my MINI over to you for another extreme makeover.
Don't forget the engine compartment.
You've earned your well deserved rest.
How much do you charge anyway????
What's OctaneGuy doing being intimate with Wanda?
That's not the same car!
The before picture looks almost like a counterfeit MINI
The after looks like a magician took over and presto.
El magnifico.
Excellent job.
I'll be sending my MINI over to you for another extreme makeover.
Don't forget the engine compartment.
You've earned your well deserved rest.
How much do you charge anyway????


Trending Topics
OVERDRIVE
Joined: Aug 2006
Posts: 12,326
Likes: 6
From: PA
W EEEEEEEEEEEE !! Look at that shine !
That's a good looking MINI you have there, Clo !! But what happened to Wanda's bonnet stripes ?? Going to put something else on the bonnet or are leaving her naked ?
Didn't look so hot when you started, Richard... very nice work !!
EEEEEEEEEEEE !! Look at that shine ! That's a good looking MINI you have there, Clo !!
But what happened to Wanda's bonnet stripes ?? Going to put something else on the bonnet or are leaving her naked ? Didn't look so hot when you started, Richard... very nice work !!


Thanks everyone. Clover actually hasn't seen the car in person yet. I finished very late last night, so she will be seeing it for the first time today.
I would highly recommend her against installing anymore vinyl. I spent 4 hours removing the freaking bonnet stripes because the mirrored stripes were so badly deteriorated there was no more chrome in 50% of the stripe itself, just a film that softened and tore very easily when wet, or shredded and split when heated up and scraped off.
A lot of that time was making sure that the paint wasn't damaged during the removal. Then there was the dried adhesive mess that had hardened. Lots of Goo Gone, made it doable--pretty much had to squirt it on, and let it sit for a minute before it softened up enough to be removed even with lots of rubbing pressure.
The vinyl on the glass was easy to remove. I still haven't removed her severely deteriorated Union Jack decals on the sunroof. These look horrid, and there just wasn't any time to deal with them this time around.
Her bonnet stripes after heating up with a hair dryer and using a plastic scraper. Granted the second stripe only took about an hour once I discovered the best process, but still, it wasn't fun work! This picture doesn't show the hundreds of little fragments that ended up on my driveway that never made it inside the can.

6th Gear
Joined: Dec 2005
Posts: 1,755
Likes: 0
From: Somewhere west
cant wait to see the rest of the write up. I wiush it was warmer here...makes me want to see what I can do to the jeep. 2 years of ownership and only one wash...nothing else. Its a Jeep thing, I don't understand.
Its a Jeep thing, I don't understand.

OVERDRIVE - Racing Champion
Joined: Feb 2003
Posts: 15,262
Likes: 72
From: Mililani, Hawaii
OctaneGuy-
You da man.
4 hours to remove the bonnet stripes! Yikes!
I'm glad I have resisted the "striped" look. Maybe painting the stripes is more workable.
You have to post more pictures. Wanda is too beautiful now to keep her from the public.
Any details on how you did it would be appreciated. It's a really good thing that MINIs are NOT jumbo sized like MINIvans or SUVs. I usually get started cleaning then in not so long I've reached the other end of the car. I guess that is what happens when your other MINI is a MINIvan.


Thanks all. Bonnet stripes are ok as long as they haven't deteriorated yet. I've removed vinyl that's a couple years old without problems. But once it starts to look ragged--actually physically degraded, and not just cosmetically, then that's where the problem is.

6th Gear
Joined: Oct 2005
Posts: 3,637
Likes: 0
From: Clarks Summit, PA
Richard, are you coming east anytime soon?!? Prudence could use some attention!
Slightly off topic, removing the rear wing (in order to replace the 3rd brake light LED unit) requires a similar procedure and patience in case anyone ever has to tackle that job.
Slightly off topic, removing the rear wing (in order to replace the 3rd brake light LED unit) requires a similar procedure and patience in case anyone ever has to tackle that job.
Here's the full writeup. Enjoy!! I gotta run now.
************************************
So here is Wicked Wanda, the 2003 black MCS owned by MINIclo. Due to living outside and recent rains, the finish looked pretty horrid.

Can you believe the bonnet stripe is supposed to be chrome/mirror????? Hmm it's torn, and look at the swirls in the paint! Woohoooo!


The trim was all faded and mottled.

The wheels are in pretty good shape!

The plastic trim around the roof needed some help. All the vinyl was stripped on the paint and glass.


Wow you expect the boot to look the worst, but this was baaaaad. :D


The Union Jacks flag is all beat up and deterioriated as well.


The interior wasn't bad--just needed some dusting and vacuuming.


The tires needed cleaning and dressing.


The engine bay needed some attention as well.

So I started out with my 5 ounces of Meguiar's Gold Class Car Wash soap. I'm almost out of Mystique so I didn't use it this time.

Got my 2 buckets with grit guards ready. And my Lambswool wash mitt.

Laid out the chemicals I would be using.

After a quick rinse off, I decided to see if the moisture would help in the removal of the vinyl---it didn't.

You can see how thin the material was---absent of the mylar/reflective material.

I thought maybe starting on the other end would be easier.

Had to pull out my big gun! The hair dryer.

Hmmm, 1 hour has passed.

Look at all that residue!

Hmmm, this isn't coming off too nicely. Another hour passed.


Woohoo in the final stretch! I found out that I had to really heat up a larger area and pull at the same time. I put on a thick leather glove so I wouldn't burn my self, and chiseled away. The second bonnet stripe tool 1/3rd the time to remove. :D


The bonnet stripe as it appears in my trash can. Lots of tiny little pieces drifted in to the air or on my driveway instead of landing in the can, so we only see the big pieces.

Reside cleaned off, and ready to tackle the second bonnet---total time passed 3 hours.

Another hour and I'm done with this as well.

By this time, it's already getting dark, so I finish my wash, and then clay using Prima's Clay Bar. I'm still not crazy about this clay, though I found that my finger muscles got stronger from the kneading of this stiff clay, lol.

I set up my light system to see the true condition of the paint.

My test spot showed that the rotary buffer with a W8006 polishing pad and Meguiar's M80 Speed Glaze would remove the defects nicely. Polished side on right.

Wanda is all taped off and protected.

You can see the swirls and scratches in the paint lit by my halogen lights.

This shot shows the improvement of Prima's Nero on the trim. I left the center portion on dressed....naked!!! Woohoo.

I dressed the engine with Meguiar's Hyperdressing. Hard to see but it looks much better. :D


Ok an after shot 13 hours total! 9 hours of polishing.

Look at that reflection!!


I cleaned off the side markers with a mini squeegee--the same tool I used to remove the vinyl. I wrapped it with a MF towel and sprayed some QD to clean them.

Tires were dressed with Meguiar's Endurance High Gloss Gel.

The next day ready for delivery!


And there you have it. Wicked Wanda fully made over. Time to go to my next detail!
Wax: Prima Car Care Epic
Polish: Meguiar's M80 Speed Glaze
Trim: Prima Car Care Nero
QD: Prima Car Care Slick and Hydro
Tires: Meguiar's Endurance High Gloss
Tire Cleaner: Meguiar's NXT tire foam
Clay: Prima Car Care Clay
Clay Lube: Meguiar's Last Touch
Chrome: NXT All Metal Polysh
Glass: Prima Car Care Clarity with MF towel
Towels: Prima Car Care Monster Fluffy (4) + Meguiar's Supreme Shine MF
Washing: Meguiar's Gold Class Car Wash Soap and Prima Car Care Waffle Weave drying towel
Tools: Makita Rotary Buffer & Porter Cable Dual Action Polisher
Merry Christmas and Happy Holidays!!!!
Richard
************************************
So here is Wicked Wanda, the 2003 black MCS owned by MINIclo. Due to living outside and recent rains, the finish looked pretty horrid.
Can you believe the bonnet stripe is supposed to be chrome/mirror????? Hmm it's torn, and look at the swirls in the paint! Woohoooo!
The trim was all faded and mottled.
The wheels are in pretty good shape!
The plastic trim around the roof needed some help. All the vinyl was stripped on the paint and glass.
Wow you expect the boot to look the worst, but this was baaaaad. :D
The Union Jacks flag is all beat up and deterioriated as well.
The interior wasn't bad--just needed some dusting and vacuuming.
The tires needed cleaning and dressing.
The engine bay needed some attention as well.
So I started out with my 5 ounces of Meguiar's Gold Class Car Wash soap. I'm almost out of Mystique so I didn't use it this time.
Got my 2 buckets with grit guards ready. And my Lambswool wash mitt.
Laid out the chemicals I would be using.
After a quick rinse off, I decided to see if the moisture would help in the removal of the vinyl---it didn't.
You can see how thin the material was---absent of the mylar/reflective material.
I thought maybe starting on the other end would be easier.
Had to pull out my big gun! The hair dryer.
Hmmm, 1 hour has passed.
Look at all that residue!
Hmmm, this isn't coming off too nicely. Another hour passed.
Woohoo in the final stretch! I found out that I had to really heat up a larger area and pull at the same time. I put on a thick leather glove so I wouldn't burn my self, and chiseled away. The second bonnet stripe tool 1/3rd the time to remove. :D
The bonnet stripe as it appears in my trash can. Lots of tiny little pieces drifted in to the air or on my driveway instead of landing in the can, so we only see the big pieces.
Reside cleaned off, and ready to tackle the second bonnet---total time passed 3 hours.
Another hour and I'm done with this as well.
By this time, it's already getting dark, so I finish my wash, and then clay using Prima's Clay Bar. I'm still not crazy about this clay, though I found that my finger muscles got stronger from the kneading of this stiff clay, lol.
I set up my light system to see the true condition of the paint.
My test spot showed that the rotary buffer with a W8006 polishing pad and Meguiar's M80 Speed Glaze would remove the defects nicely. Polished side on right.
Wanda is all taped off and protected.
You can see the swirls and scratches in the paint lit by my halogen lights.
This shot shows the improvement of Prima's Nero on the trim. I left the center portion on dressed....naked!!! Woohoo.
I dressed the engine with Meguiar's Hyperdressing. Hard to see but it looks much better. :D
Ok an after shot 13 hours total! 9 hours of polishing.
Look at that reflection!!
I cleaned off the side markers with a mini squeegee--the same tool I used to remove the vinyl. I wrapped it with a MF towel and sprayed some QD to clean them.
Tires were dressed with Meguiar's Endurance High Gloss Gel.
The next day ready for delivery!
And there you have it. Wicked Wanda fully made over. Time to go to my next detail!
Wax: Prima Car Care Epic
Polish: Meguiar's M80 Speed Glaze
Trim: Prima Car Care Nero
QD: Prima Car Care Slick and Hydro
Tires: Meguiar's Endurance High Gloss
Tire Cleaner: Meguiar's NXT tire foam
Clay: Prima Car Care Clay
Clay Lube: Meguiar's Last Touch
Chrome: NXT All Metal Polysh
Glass: Prima Car Care Clarity with MF towel
Towels: Prima Car Care Monster Fluffy (4) + Meguiar's Supreme Shine MF
Washing: Meguiar's Gold Class Car Wash Soap and Prima Car Care Waffle Weave drying towel
Tools: Makita Rotary Buffer & Porter Cable Dual Action Polisher
Merry Christmas and Happy Holidays!!!!
Richard

Wow...I've never seen stripes in such bad shape! No doubt because it is more of a chrome foil than a standard vinyl. How much time and miles did it take to make them that way?
Great makeover as always.
Great makeover as always.
7th Gear Gal
Joined: Jul 2002
Posts: 36,087
Likes: 3
From: Weeblegabber West (aka WLA)
The first metallic sunroof flag lasted exactly 4 months. I had the second one installed a little over a year ago, in early December 2005. It started to rot after 6 months, but due to my travel schedule, health and family issues, I wasn't able to address Wanda's needs until this week.


Richard and I are going to remove the sunroof flag after next week's holiday. He did a fantastic job of restoring Wanda to her former glory! In fact, she never looked this good even when she was brand-new. She has some paint chips and a few little problems, but she has almost 62K cross-country miles on her, so they are badges of honor.


I am so pleased with Richard's work...and so lucky! He lives 10 minutes from me!

5th Gear
Joined: Aug 2006
Posts: 1,001
Likes: 0
From: New York, NY
I am so pleased with Richard's work...and so lucky! He lives 10 minutes from me!