
My Restoration Project - A Pictorial


Thread Starter
|
3rd Gear
Joined: Sep 2002
Posts: 256
Likes: 0
From: Aurora, IL
Welcome to part 2 of my narative detailing the resto-mod I am doing to my 1974 Austin Mini. Read on and enjoy, feel free to leave comments or ask questions!
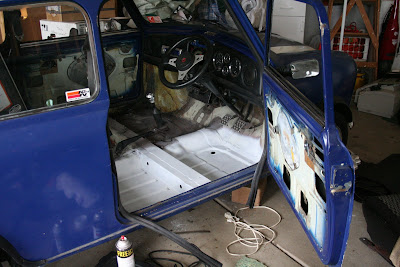
Unfortunately I don't have any good pictures of the floor before I started cleaning it. Basically just surface rust as the floor is pretty solid, some minor patchwork in the front foot wells mainly closer towards the sills, but overall nothing serious. There was/is a leak somewhere related to the doors/windows so there was some surface rust on the floors but nothing a wire wheel and some paint couldn't fix. So I spent some time over a few weekends and broke up some of the rust and tried to get closer towards bare metal. This was easy in some spots and not so easy in others. Not to worry though, with some Rustoleum metal primer spray I just broke up any loose chips and ground down the rust a bit.

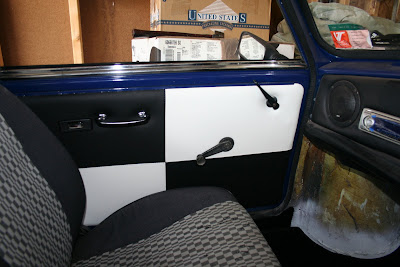
Took the door cards off awhile ago so that I could replace them with something a little more custom and not warped. The bottom of the front cards was pretty warped and therefore unusable so it was time to search out replacements. I attempted to make replacements but soon realized that the material I was using was too thick and would make it too difficult to install. I tried finding a set of used cards, but didn't have too much luck until a fellow M.I.N.I. (Minis in Northern Illinois) member came to the rescue and provided me with a set of door cards from his garage.
I contemplated removing the heater box but realized that it acts as a second radiator on those hot Chicago summer days and decided to leave it in.
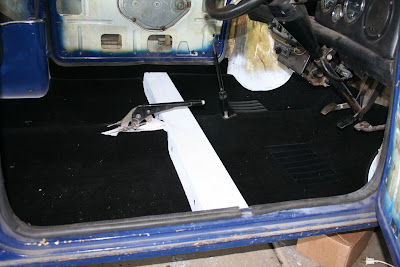
After a quick wipe down and a few coats of primer it was time to lay down some paint.
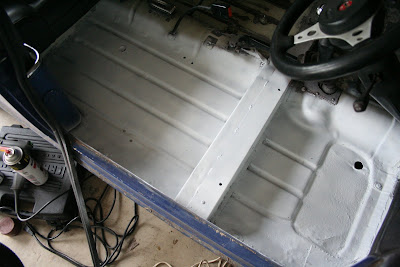
Whole floor painted and ready to be watched as it dried. Overall I'm pretty pleased with the results, certainly looks a lot better than when I started and it should help keep any further rust production to a minimum until I get Lucy painted next year.
In hindsight I should've masked off the rear storage compartments next to the rear seat, but no worries, going to have her repainted next year maybe so it's not a big deal.
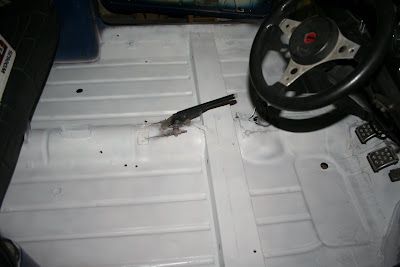
Bought some new pedal pads to replace the ones that were hot glued onto the pedals, yes hot glue. There are some small metal tabs/bars that help to secure the old pedal cover to the pedal, but in this case someone decided to also use copious amounts of hot glue to secure the pedals. Took like 10 minutes to pry/cut them off.
Bought a red and a blue one for brake/clutch. It's not shown in the picture, but it says MINI across the middle. Bought the standard pad for the gas pedal which I still need to install.

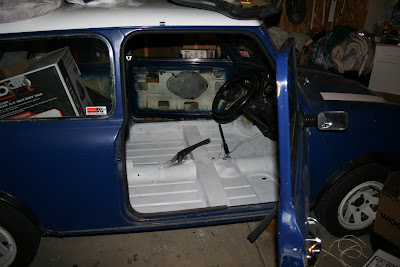
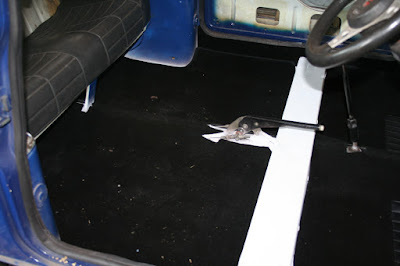
Carpet in! It went in relatively painlessly and the fit was pretty good. Going to have to modify the front carpet to get it to fit over the hump in the middle; there seems to be about 1 inch of extra carpet that I'm going to have to cut out and then glue the carpet back down. Still need to get some spray adhesive to attach the carpet on the wheel wells. There's also the piece that presumably goes up under the dash on the firewall - that one is going to be fun to put in.
As far as sound deadening goes I used some scrap pieces my dad had from the Chevelle he sold a couple months ago. It's a thick (1/8") rubber that I laid in the foot wells and rear foot area.
View of rear carpet area, you can see the overspray of white onto blue here, whoopsie, but not a big deal.
Unfortunately I don't have any good pictures of the floor before I started cleaning it. Basically just surface rust as the floor is pretty solid, some minor patchwork in the front foot wells mainly closer towards the sills, but overall nothing serious. There was/is a leak somewhere related to the doors/windows so there was some surface rust on the floors but nothing a wire wheel and some paint couldn't fix. So I spent some time over a few weekends and broke up some of the rust and tried to get closer towards bare metal. This was easy in some spots and not so easy in others. Not to worry though, with some Rustoleum metal primer spray I just broke up any loose chips and ground down the rust a bit.
Took the door cards off awhile ago so that I could replace them with something a little more custom and not warped. The bottom of the front cards was pretty warped and therefore unusable so it was time to search out replacements. I attempted to make replacements but soon realized that the material I was using was too thick and would make it too difficult to install. I tried finding a set of used cards, but didn't have too much luck until a fellow M.I.N.I. (Minis in Northern Illinois) member came to the rescue and provided me with a set of door cards from his garage.
I contemplated removing the heater box but realized that it acts as a second radiator on those hot Chicago summer days and decided to leave it in.
After a quick wipe down and a few coats of primer it was time to lay down some paint.
Whole floor painted and ready to be watched as it dried. Overall I'm pretty pleased with the results, certainly looks a lot better than when I started and it should help keep any further rust production to a minimum until I get Lucy painted next year.
In hindsight I should've masked off the rear storage compartments next to the rear seat, but no worries, going to have her repainted next year maybe so it's not a big deal.
Bought some new pedal pads to replace the ones that were hot glued onto the pedals, yes hot glue. There are some small metal tabs/bars that help to secure the old pedal cover to the pedal, but in this case someone decided to also use copious amounts of hot glue to secure the pedals. Took like 10 minutes to pry/cut them off.
Bought a red and a blue one for brake/clutch. It's not shown in the picture, but it says MINI across the middle. Bought the standard pad for the gas pedal which I still need to install.
Carpet in! It went in relatively painlessly and the fit was pretty good. Going to have to modify the front carpet to get it to fit over the hump in the middle; there seems to be about 1 inch of extra carpet that I'm going to have to cut out and then glue the carpet back down. Still need to get some spray adhesive to attach the carpet on the wheel wells. There's also the piece that presumably goes up under the dash on the firewall - that one is going to be fun to put in.
As far as sound deadening goes I used some scrap pieces my dad had from the Chevelle he sold a couple months ago. It's a thick (1/8") rubber that I laid in the foot wells and rear foot area.
View of rear carpet area, you can see the overspray of white onto blue here, whoopsie, but not a big deal.
Last edited by qskapunk; Jun 7, 2007 at 08:51 PM.
Thread Starter
|
3rd Gear
Joined: Sep 2002
Posts: 256
Likes: 0
From: Aurora, IL
Well, it�s been a long time coming, but here is Part 3 of my restoration. I�ve been a little busy lately with work, work on the Mini and various other endeavors.
So here we go�
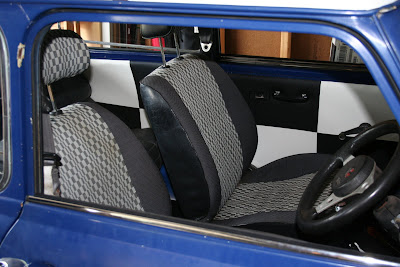
After finally getting the floor painted and carpet most of the way installed it was time to put back in the seats and refit the door cards. I obtained new front door cards from one of the members of the Mini club I belong to, Minis in Northern Illinois. My previous door cards had become pretty substantially warped along the bottom due to some leakage that came in over the years. The rear cards simply needed to be reupholstered as the cards were in good shape.
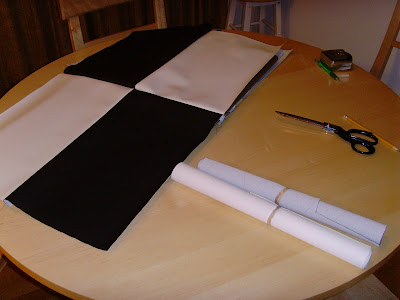
After roughing together the material the cards were taken to Luis at Aurora Upholstery to be padded, finish stitched and applied to the cards. I must say he did a fantastic job and the new cards really give the interior an awesome look. I couldn�t be more pleased.
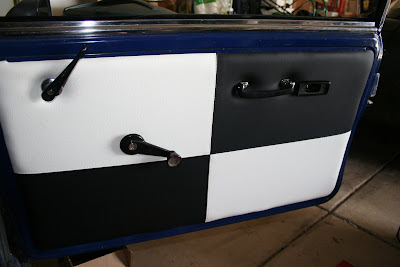
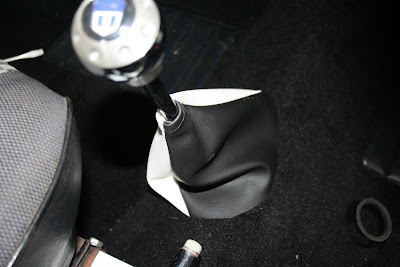
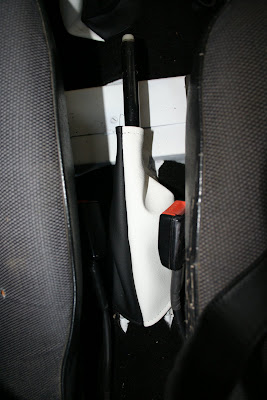
He even created some custom boots for the shifter and parking brake.
There were a few other minor things that needed to get done before I could get Lucy back on the road.
I ordered a carb service kit from Heritage Garage which worked wonderfully. One of the things in that kit which proved to be extremely useful is the new needle valve and seat. After taking apart my carb I noticed the metal tip of my needle valve had become worn, and since you never know how long it had been in there, I replaced it. Also changed out the various seals, gaskets etc that are in the kit.
And then disaster�
As I was reassembling the choke assembly I was tightening down the nut on the choke spindle the threads stripped away to nothingness. Boy did that suck.
Luckily Joe Curto was able to save the day and after a little while I had a new spindle.
I also rewired the air horns I had installed previously to accommodate the relay socket I had bought. This makes for a much cleaner install.
My new gas tank came in from Mad House Minis which I cleaned out, painted and installed. With a new braided fuel hose from Heritage Garage I was ready to go! The old tank had a small hole that had been patched with a boiler plug and was slowly leaking and filling my boot (trunk) with gas vapors. When I took the tank to get it patched the metal had deteriorated so much that it was a lost cause. So I decided to pitch the tank and get a new one.
After getting everything back together and firing her up for the first time I noticed some irregularities in the idle and overall performance. So I changed the spark plugs from platinum plugs to regular ones. I'd heard from several sources on the MiniMania forums that platinum plugs have historically given more problems than better performance.
Turns out that the gap on the platinum plugs was wayyyy too small which could have accounted for some of the idle issues I was having.
It also turns out that the carb's rich/lean adjustment was waayyyyy on the lean side, which explains why when I would try to accelerate the car would sputter a little bit which could be fixed slightly by pulling out the choke.
I used the old get the car idling at operating temperature and then lift the piston inside the carb ever so slightly and if it sputters you are too lean. So after what seemed like a few turns of the adjuster screw I was running smooth again.
Now I can accelerate much more like a 1275cc should and I like it.
Look for more updates as I complete further work on Lucy!
Things to come:
Installation of 4 Wipac driving lights
New seats (hopefully someday soon - anyone have extras???)
New wheels - Sometime after we close on the house
New bumpers
New fender flares
New dash
and much much more...
So here we go�
After finally getting the floor painted and carpet most of the way installed it was time to put back in the seats and refit the door cards. I obtained new front door cards from one of the members of the Mini club I belong to, Minis in Northern Illinois. My previous door cards had become pretty substantially warped along the bottom due to some leakage that came in over the years. The rear cards simply needed to be reupholstered as the cards were in good shape.
After roughing together the material the cards were taken to Luis at Aurora Upholstery to be padded, finish stitched and applied to the cards. I must say he did a fantastic job and the new cards really give the interior an awesome look. I couldn�t be more pleased.
He even created some custom boots for the shifter and parking brake.
There were a few other minor things that needed to get done before I could get Lucy back on the road.
I ordered a carb service kit from Heritage Garage which worked wonderfully. One of the things in that kit which proved to be extremely useful is the new needle valve and seat. After taking apart my carb I noticed the metal tip of my needle valve had become worn, and since you never know how long it had been in there, I replaced it. Also changed out the various seals, gaskets etc that are in the kit.
And then disaster�
As I was reassembling the choke assembly I was tightening down the nut on the choke spindle the threads stripped away to nothingness. Boy did that suck.
Luckily Joe Curto was able to save the day and after a little while I had a new spindle.
I also rewired the air horns I had installed previously to accommodate the relay socket I had bought. This makes for a much cleaner install.
My new gas tank came in from Mad House Minis which I cleaned out, painted and installed. With a new braided fuel hose from Heritage Garage I was ready to go! The old tank had a small hole that had been patched with a boiler plug and was slowly leaking and filling my boot (trunk) with gas vapors. When I took the tank to get it patched the metal had deteriorated so much that it was a lost cause. So I decided to pitch the tank and get a new one.
After getting everything back together and firing her up for the first time I noticed some irregularities in the idle and overall performance. So I changed the spark plugs from platinum plugs to regular ones. I'd heard from several sources on the MiniMania forums that platinum plugs have historically given more problems than better performance.
Turns out that the gap on the platinum plugs was wayyyy too small which could have accounted for some of the idle issues I was having.
It also turns out that the carb's rich/lean adjustment was waayyyyy on the lean side, which explains why when I would try to accelerate the car would sputter a little bit which could be fixed slightly by pulling out the choke.
I used the old get the car idling at operating temperature and then lift the piston inside the carb ever so slightly and if it sputters you are too lean. So after what seemed like a few turns of the adjuster screw I was running smooth again.
Now I can accelerate much more like a 1275cc should and I like it.
Look for more updates as I complete further work on Lucy!
Things to come:
Installation of 4 Wipac driving lights
New seats (hopefully someday soon - anyone have extras???)
New wheels - Sometime after we close on the house
New bumpers
New fender flares
New dash
and much much more...
Thread Starter
|
3rd Gear
Joined: Sep 2002
Posts: 256
Likes: 0
From: Aurora, IL
I got it from Mini Mania but you can also get it from pretty much anyone who sells Mini parts.
You don't have to remove any part of the rear seat. You just need to cut a slit to go around the support for the rear seat that attaches to the tunnel in the center of the car. Pretty much just drops in.
You don't have to remove any part of the rear seat. You just need to cut a slit to go around the support for the rear seat that attaches to the tunnel in the center of the car. Pretty much just drops in.

6th Gear
Joined: Jun 2006
Posts: 5,692
Likes: 2
Love the interior work you had done. Any chance of hooking us up with your contact? I'd love to have new cards and shift/ebrake boots made for Fiona! 
Of course, with that ultra-clean door card material, you really need polished alloy door furniture now, to complete the look.
Of course, with that ultra-clean door card material, you really need polished alloy door furniture now, to complete the look.
I got it from Mini Mania but you can also get it from pretty much anyone who sells Mini parts.
You don't have to remove any part of the rear seat. You just need to cut a slit to go around the support for the rear seat that attaches to the tunnel in the center of the car. Pretty much just drops in.
You don't have to remove any part of the rear seat. You just need to cut a slit to go around the support for the rear seat that attaches to the tunnel in the center of the car. Pretty much just drops in.
6th Gear
Joined: Jun 2006
Posts: 5,692
Likes: 2
Did you get the cheaper stuff (runs about $90) or the more expensive Heritage stuff (about twice that)? My carpet is dirty and pilled, and pulls up/shifts/gaps every time I sit in the car, and I'm wondering if it will look "pants" if I go for the less expensive kind. The more expensive stuff comes with a carpet peice to cover the seat beam and has the padding material pre-installed on the back I believe, and I think they advise gluing it down with spray adhesive... The cheaper stuff... who knows?
Did you get the cheaper stuff (runs about $90) or the more expensive Heritage stuff (about twice that)? My carpet is dirty and pilled, and pulls up/shifts/gaps every time I sit in the car, and I'm wondering if it will look "pants" if I go for the less expensive kind. The more expensive stuff comes with a carpet peice to cover the seat beam and has the padding material pre-installed on the back I believe, and I think they advise gluing it down with spray adhesive... The cheaper stuff... who knows?
6th Gear
Joined: Jun 2006
Posts: 5,692
Likes: 2
Please do... I was wondering how those clips work, and a setof those is definitely cheaper than the more expensive carpet... But I don't want to spend the money only to end up with something that shifts and gaps as bad as what I replaced, either....
Thread Starter
|
3rd Gear
Joined: Sep 2002
Posts: 256
Likes: 0
From: Aurora, IL
Love the interior work you had done. Any chance of hooking us up with your contact? I'd love to have new cards and shift/ebrake boots made for Fiona!
Of course, with that ultra-clean door card material, you really need polished alloy door furniture now, to complete the look.
Of course, with that ultra-clean door card material, you really need polished alloy door furniture now, to complete the look.
I would look for a "Mom and Pop" type upholstery operation in your area. Thats probably the easiest way to go. I gave the guy an old ratty ebrake boot and he basically duplicated it with some extra material I had from the door cards. The shift boot is basically just a cone.
I prefer the standard black ***** and handles, I've got new ones that I ordered that are a lot nicer looking than my old faded ones. The alloy handles would clash too much with everything else.
 in the upper right corner to really zoom in!
Thread Starter
|
3rd Gear
Joined: Sep 2002
Posts: 256
Likes: 0
From: Aurora, IL
He used an old skool Singer sewing machine too, so that's pretty cool.
Overall I'm extremely pleased with the work. I figure you get what you pay for and had I done them myself, the results probably would have been disasterous.
Last edited by qskapunk; Jul 25, 2007 at 12:25 PM.

4th Gear
Joined: Dec 2004
Posts: 337
Likes: 0
From: Pelham AL
This is sort of OT, but where did you get your Classic Mini Owners Club badge in you sig? I got one some time ago from somewhere and just recently noticed that its for a Traveller - I have a Saloon.
Thread Starter
|
3rd Gear
Joined: Sep 2002
Posts: 256
Likes: 0
From: Aurora, IL
Theres a post somewhere here on NAM that has all kinds of badges etc, even the cartoon car pictures (not too many classics tho).
I looked at the carpet today and it looks like there is grip tape or bed liner type texture on the bottom to keep it from sliding around. I think I'll take some picture of the install to help out a little. The Mini Restoration Manual has a section about the carpet install also.

Thread Starter
|
3rd Gear
Joined: Sep 2002
Posts: 256
Likes: 0
From: Aurora, IL
I also have a set of the clips, but I dont think I am going to use it, the carpet doesnt really move around all the much - the back is textured. From what I understand the clips are basically just snaps that attach to the carpet and then snap into the floor. There are several places along the edge of the floor by the doors where the snaps can be riveted in.
Too much work if you ask me. Plus I've got some rubber sound deadening material under the carpet which helps keep things in place. Just get some double sided carpet tape if you're worried about it moving around.
6th Gear
Joined: Jun 2006
Posts: 5,692
Likes: 2
Mine definietly slides around, but it's not backed and it's quite cheap - I don't think it weas even "molded" into the shapes I see ccurrently-available carpet is.
I'm thinking about trying THIS STUFF - less than $60 (although it needs to be shipped from the UK - I've mailed them for a shipping quote). If it has no textured backing, however, I might opt to pay a bit more for quality, molded carpets. Did you order replacement rugs or reuse what was already in there, Qska?
I'm thinking about trying THIS STUFF - less than $60 (although it needs to be shipped from the UK - I've mailed them for a shipping quote). If it has no textured backing, however, I might opt to pay a bit more for quality, molded carpets. Did you order replacement rugs or reuse what was already in there, Qska?
Thread Starter
|
3rd Gear
Joined: Sep 2002
Posts: 256
Likes: 0
From: Aurora, IL
Mine definietly slides around, but it's not backed and it's quite cheap - I don't think it weas even "molded" into the shapes I see ccurrently-available carpet is.
I'm thinking about trying THIS STUFF - less than $60 (although it needs to be shipped from the UK - I've mailed them for a shipping quote). If it has no textured backing, however, I might opt to pay a bit more for quality, molded carpets. Did you order replacement rugs or reuse what was already in there, Qska?
I'm thinking about trying THIS STUFF - less than $60 (although it needs to be shipped from the UK - I've mailed them for a shipping quote). If it has no textured backing, however, I might opt to pay a bit more for quality, molded carpets. Did you order replacement rugs or reuse what was already in there, Qska?
The stuff that as in my Mini was basically low quality carpet you'd put in a house - pad and all. I kid you not. It was pretty atrocious. IMHO the molded stuff is a little too expensive for what it is. The unmolded stuff (which I got) works pretty good and is a good price at about $100.
I got THIS STUFF except in black, which oddly enough I don't see on their site anymore. Chances are that stuff from the UK is going to be really expensive to ship, but you never know.
The stuff that as in my Mini was basically low quality carpet you'd put in a house - pad and all. I kid you not. It was pretty atrocious. IMHO the molded stuff is a little too expensive for what it is. The unmolded stuff (which I got) works pretty good and is a good price at about $100.
The stuff that as in my Mini was basically low quality carpet you'd put in a house - pad and all. I kid you not. It was pretty atrocious. IMHO the molded stuff is a little too expensive for what it is. The unmolded stuff (which I got) works pretty good and is a good price at about $100.
6th Gear
Joined: Jun 2006
Posts: 5,692
Likes: 2
Would either of you guys shoot a pic of just the installed carpet for me the next time you have your camera out please? I've been eyeing that $90 stuff but had no idea if it would be the same gappy, crappy stuff I already have...