
The Dragon is coming fast! Whats your MINIs status?

6th Gear
Joined: Apr 2007
Posts: 1,533
Likes: 0
From: Fernandina Beach, FL
What did you use to get it so clean?
Or is there no Georgia/South Carolina clay where you live?
I have tried Gunk before but that just kind of semi-cleans the engine compartment.


Or is there no Georgia/South Carolina clay where you live?
I have tried Gunk before but that just kind of semi-cleans the engine compartment.

6th Gear
Joined: Jul 2004
Posts: 3,054
Likes: 10
I've had mechanics thank me after bringing my car to them for service. They love working on a clean motor and they can do a better job of it.

Thread Starter
|
5th Gear
Joined: Nov 2004
Posts: 1,027
Likes: 0
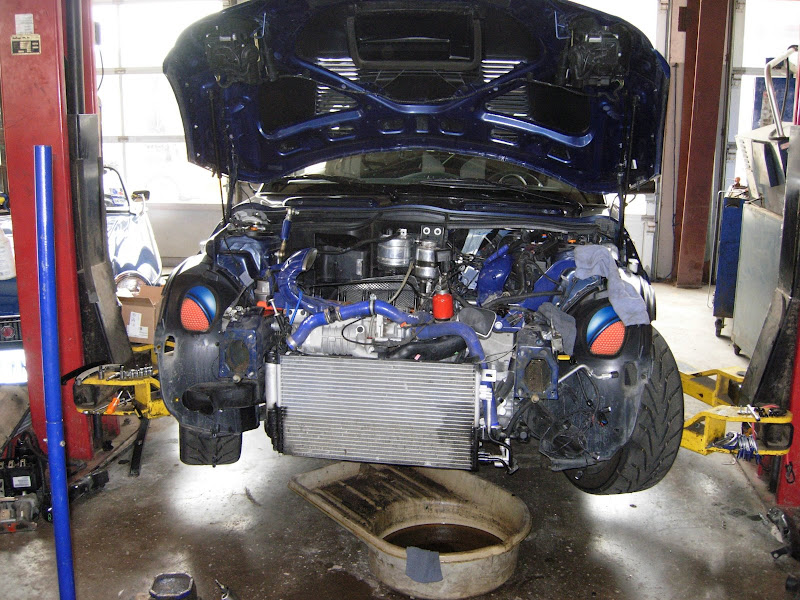
Finally a good night out in the garage. My helper wasn't sick so I was able to get the extra pair of hands I needed. I wasn't coming inside until the bumper was back on and the brakes were bled, at least. We spent the first 30 minutes trying to get the bumper on, but it just wouldn't go in. Then I remembered that I hadn't modified the bumper carrier yet, so I had to grind down the shaded area:

It took 20 minutes, on each side, with my dremel. but after that the bumper went on!

It's still not quite aligned correctly. That will be a easy 10 minute fix. I had a hard time remembering what I needed to do (forgot to put the splash guard on the first time ), so it took two attempts. I didn't pull it back far enough before I tightened so that's why its not on right. I still have that enormous gap on one side of the turn signals...
After that I put the wheel wells back in and we bled the brakes! I didn't flush the whole system... just enough to get the air out from replacing the rear lines

It's starting to look like a mini again . And meaner like the eyes suggest, which was my goal.
The other night I decided to get organized because alot of parts were coming off, but not alot was going on...

Man, was I glad I did this. I've never had this much of the car apart at once, so I was worried I would lose track of fasteners and bolts. I had neat piles where everything went at first, but then I realized that one mis-swing of the leg and it was over!
Friday I'll get the bumper aligned right, remove the M7 USS, check all my torques for what I've changed thus far, put the wheels on, and drop it down! I'll take it for a quick test drive to make sure it's good, then back inside to cut the grill for the light brackets, adjust the ride height if needed, and then back on blocks in the front . I need to take the front coilovers back off to move a screw on the camper plates and then (probably) cut the front strut tower so I can have the camber adjusted. Sunday I'll finish what didn't get done and put the side skirts on.
Lots to do still, but tonight was a good step forward.
It took 20 minutes, on each side, with my dremel. but after that the bumper went on!
It's still not quite aligned correctly. That will be a easy 10 minute fix. I had a hard time remembering what I needed to do (forgot to put the splash guard on the first time
), so it took two attempts. I didn't pull it back far enough before I tightened so that's why its not on right. I still have that enormous gap on one side of the turn signals... After that I put the wheel wells back in and we bled the brakes! I didn't flush the whole system... just enough to get the air out from replacing the rear lines
It's starting to look like a mini again
. And meaner like the eyes suggest, which was my goal.The other night I decided to get organized because alot of parts were coming off, but not alot was going on...
Man, was I glad I did this. I've never had this much of the car apart at once, so I was worried I would lose track of fasteners and bolts. I had neat piles where everything went at first, but then I realized that one mis-swing of the leg and it was over!
Friday I'll get the bumper aligned right, remove the M7 USS, check all my torques for what I've changed thus far, put the wheels on, and drop it down! I'll take it for a quick test drive to make sure it's good, then back inside to cut the grill for the light brackets, adjust the ride height if needed, and then back on blocks in the front
. I need to take the front coilovers back off to move a screw on the camper plates and then (probably) cut the front strut tower so I can have the camber adjusted. Sunday I'll finish what didn't get done and put the side skirts on.Lots to do still, but tonight was a good step forward.

3rd Gear
Joined: Jul 2005
Posts: 293
Likes: 0
From: second star to the right and straight on 'til morning
Just finished chatting with the mechanics doing a "quick check up" of Tink to make sure she's ready. Well- checking the short list it looks like the heater core has a leak and something is causing her to run rich. The hope is things will get deciphered and worked out before the Dragon. I guess I should be glad I have a stand by MINI in case my Mini isn't ready...
3rd Gear
Joined: Jul 2005
Posts: 293
Likes: 0
From: second star to the right and straight on 'til morning
Just got the call... My classic will be ready! No heater (bah! heat is a luxury item, not really needed in May) until a new core comes in, but everything else is back working 

Thread Starter
|
5th Gear
Joined: Nov 2004
Posts: 1,027
Likes: 0
Tonight was the night that I would finally put my Mini back on the ground. I started the night by trying to align the front bumper (again). It's still not right, but the shop will have to take it off anyway to wire the driving lights. I'll leave it up to them to get it right, and I'll just complain when it isn't. Next I put the bracket on the rear bumper that wasn't included in the kit. It was a pain to get on with the bumper on the car, but i got it there. Then I checked my torques for all the suspension pieces, put the wheels on (rotated them too) and put it down!

It was so great to see it on the ground again after all this... I'm really digging the new ride height. I can go a bit lower in the front, and more in the back, but I'll rock this for a bit and then adjust it later.

I'm really loving the new front look! Later this summer I'll get the headlight rings painted after I black out / carbon fiber the rest of the chrome.
Now it was time to take a test drive around the subdivision to find out how the suspension feels and if the brakes feel better after the suspension failure killed my s/s lines.
Fired up the car and the ABS light and DSC light were still on . Either I didn't put the new sensor in right (not likely; I'm not that stupid) or the one on the other side of the car got killed when the car feel down when the Hsport spring snapped. No matter, still ok for a test drive... but then I saw the OIL LIGHT WAS ON! WTF! I changed the oil while I was working on it, but the light wasn't on before I started my work... cut it off. Not leaking underneath, not leaking at the filter, and the level is perfect...
I figure just because it's been sitting it's becuase the oil hasn't circulated. Start it up again. Still on. Blip the throttle; it goes off! then comes back on at idle. Repeat; same thing. Cut it off and recheck everything... still ok.
Forget it, I'm not going far... we'll see what happens when I drive it for a minute. Once I start down the road it goes out! Then the ABS light and DCS light go out! The sensors have fixed themselves! It's all good! Wait... whats that rubbing noise... oh, no the tire is rubbing the coilovers Turn it around and go home... I didn't even make it 50 yards. The oil light is still coming on at idle rpm, but not under load.
Back in the garage I left it running to see if the oil light would correct itself. Now that the engine is warm the light is off. While I check for leaks the light came back on, so I shut it off for the night . I figure now I'll check for the rubbing noise I heard and squeezed my camera in there to take a snap (this is the side that was rubbing)

Yep, rubbing. I thought the noise sounded on/off, so I jacked it up and spun the wheel and remembered that we determined that I bent a wheel after killing it in a pot hole. It only rubs at a cetain spot, so I'm convinced that is it. I'll rotate them back and see if it goes away. The other side cleared and wasn't rubbing so I might be able to get away without spacers. Time to pack it up for the night and figure out this oil light problem

I must say it was great to see them on the ground side by side again...
Tomorrow I have to detail a car all day. Sunday I need to work on the Mini that is definitly going to the dragon. Maybe I'll get a bit done on mine Sunday as well. I want to get the aero skirts on and make the finishing touches on the kit. Still waiting for my flexible adjusters so I can put the rear interior back in. Not looking good to make it
It was so great to see it on the ground again after all this... I'm really digging the new ride height. I can go a bit lower in the front, and more in the back, but I'll rock this for a bit and then adjust it later.
I'm really loving the new front look! Later this summer I'll get the headlight rings painted after I black out / carbon fiber the rest of the chrome.
Now it was time to take a test drive around the subdivision to find out how the suspension feels and if the brakes feel better after the suspension failure killed my s/s lines.
Fired up the car and the ABS light and DSC light were still on
. Either I didn't put the new sensor in right (not likely; I'm not that stupid) or the one on the other side of the car got killed when the car feel down when the Hsport spring snapped. No matter, still ok for a test drive... but then I saw the OIL LIGHT WAS ON! WTF! I changed the oil while I was working on it, but the light wasn't on before I started my work... cut it off. Not leaking underneath, not leaking at the filter, and the level is perfect... I figure just because it's been sitting it's becuase the oil hasn't circulated. Start it up again. Still on. Blip the throttle; it goes off! then comes back on at idle. Repeat; same thing. Cut it off and recheck everything... still ok.
Forget it, I'm not going far... we'll see what happens when I drive it for a minute. Once I start down the road it goes out! Then the ABS light and DCS light go out! The sensors have fixed themselves! It's all good! Wait... whats that rubbing noise... oh, no the tire is rubbing the coilovers
Turn it around and go home... I didn't even make it 50 yards. The oil light is still coming on at idle rpm, but not under load.Back in the garage I left it running to see if the oil light would correct itself. Now that the engine is warm the light is off. While I check for leaks the light came back on, so I shut it off for the night
. I figure now I'll check for the rubbing noise I heard and squeezed my camera in there to take a snap (this is the side that was rubbing)Yep, rubbing. I thought the noise sounded on/off, so I jacked it up and spun the wheel and remembered that we determined that I bent a wheel after killing it in a pot hole. It only rubs at a cetain spot, so I'm convinced that is it. I'll rotate them back and see if it goes away. The other side cleared and wasn't rubbing so I might be able to get away without spacers. Time to pack it up for the night and figure out this oil light problem
I must say it was great to see them on the ground side by side again...
Tomorrow I have to detail a car all day. Sunday I need to work on the Mini that is definitly going to the dragon. Maybe I'll get a bit done on mine Sunday as well. I want to get the aero skirts on and make the finishing touches on the kit. Still waiting for my flexible adjusters so I can put the rear interior back in. Not looking good to make it


5th Gear
Joined: Jan 2006
Posts: 1,069
Likes: 0
From: Midland, Ontario, Canada
My tranny is out of the car, input shaft bearing... HOPE to be ready by the Dragon.. but, it's on fire???
Dragon on Fire
Dragon on Fire
 ; Naw, I used a special bug-inhibitor wax on all forward surfaces. They just slide off.
6th Gear
Joined: Jul 2004
Posts: 3,054
Likes: 10
Finished:
1. clay bar'd
2. glass polished
3. paint polished
4. first coat of Zaino applied
5. foam air filter cleaned
Need to finish:
1. 2 more coats of Zaino
2. New front brake rotors and pads (parts on order)
3. Clean/Lube rear brass brake bushings
4. Lube rear swaybar & control arm bushings
5. Clean interior
6. Check fluids / lug nuts / air pressure in tires
6th Gear
Joined: Jul 2004
Posts: 3,054
Likes: 10
It was a good morning for my preparations! Man, I love the feel of a freshly polished and Zaino'd MINI!
1. 2 more coats of Zaino -- DONE
2. Clean/Lube rear brass brake bushings -- DONE
3. Lube rear swaybar & control arm bushings -- DONE
4. Clean interior
5. Check fluids / lug nuts / air pressure in tires (last minute check next weekend)
6. New front brake rotors and pads (parts on order)
1. 2 more coats of Zaino -- DONE
2. Clean/Lube rear brass brake bushings -- DONE
3. Lube rear swaybar & control arm bushings -- DONE
4. Clean interior
5. Check fluids / lug nuts / air pressure in tires (last minute check next weekend)
6. New front brake rotors and pads (parts on order)
Thread Starter
|
5th Gear
Joined: Nov 2004
Posts: 1,027
Likes: 0
Finally a nice day in the garage. I started by working on the car that IS definitly going to the dragon by changing the oil, rotating the tires, cleaning the engine bay, and then a quick bath.

Next Sunday Pepe will get a full out 12 hour detail.
Then I installed my new side skirts, rotated my tires in hope that it will not rub the front BC coilover (bent wheel) and gave it a quick bath to get all the dust from the construction next door off of it. Plus it was outside yesterday in the rain while I detailed a car so I didn't want to risk water spots

The side skirts really compelted the look.

really like the side skirts. They made the car look so much lower and sleeker

I like the look now. I may lower the front a tiny bit more and the rear to level it out. Have to wait till I get the rear interior back in and the dead weight (spare tire) to make sure its right. All that might set the height to where I want it.
Things left to do:
1. Figure out what the hell this oil light is all about. I may just do the oil change again and see if it corrects itself
2. Reinstall parcel shelf (need to move the control module for the R56 shift light) and install MCS pedals (easy... right?)
3. Modify front shock towers by bending or cutting so the camber can be adjusted. Also, check the rear BCs because I think a spring is binding (need to fix the oil thing to take a test to do that)
4. Mount driving lights by cutting the grill so they are ready to be wired
5. Reinstall rear interior when the adjustment extenders arrive. I will just install the rear interior if neccessary and just set the BCs somewhere and hope for the best if the adjusters don't arrive
6. Take it to my mechanic to have the coolant flushed
7. Take it to Tire Barn to have an alignment (corner balancing will have to wait till later)
8. Take it to my friends body shop to have the aero wing installed and driving lights wire. Also complain that they didn't align the bumper right (my bad) and make them do it right, then align the hood (abra didn't do it right when they repainted it years ago)
9. 14 hour detail...
... I think that's it... I hope
Next Sunday Pepe will get a full out 12 hour detail.
Then I installed my new side skirts, rotated my tires in hope that it will not rub the front BC coilover (bent wheel) and gave it a quick bath to get all the dust from the construction next door off of it. Plus it was outside yesterday in the rain while I detailed a car so I didn't want to risk water spots
The side skirts really compelted the look.
really like the side skirts. They made the car look so much lower and sleeker
I like the look now. I may lower the front a tiny bit more and the rear to level it out. Have to wait till I get the rear interior back in and the dead weight (spare tire) to make sure its right. All that might set the height to where I want it.
Things left to do:
1. Figure out what the hell this oil light is all about. I may just do the oil change again and see if it corrects itself
2. Reinstall parcel shelf (need to move the control module for the R56 shift light) and install MCS pedals (easy... right?)
3. Modify front shock towers by bending or cutting so the camber can be adjusted. Also, check the rear BCs because I think a spring is binding (need to fix the oil thing to take a test to do that)
4. Mount driving lights by cutting the grill so they are ready to be wired
5. Reinstall rear interior when the adjustment extenders arrive. I will just install the rear interior if neccessary and just set the BCs somewhere and hope for the best if the adjusters don't arrive
6. Take it to my mechanic to have the coolant flushed
7. Take it to Tire Barn to have an alignment (corner balancing will have to wait till later)
8. Take it to my friends body shop to have the aero wing installed and driving lights wire. Also complain that they didn't align the bumper right (my bad) and make them do it right, then align the hood (abra didn't do it right when they repainted it years ago)
9. 14 hour detail...
... I think that's it... I hope
Last edited by Darkness; Apr 20, 2008 at 06:33 PM.
5th Gear
Joined: Jan 2006
Posts: 1,069
Likes: 0
From: Midland, Ontario, Canada
Well here is Betty in her current state.. drive to the dealership tomorrow to pick up the tranny parts.. Input shaft bearing, that thank the great MINI in the sky.. someone a month ago, ordered and then cancelled cause they got tired of waiting... so they had them on the shelf.. other wise would have either missed the dragon, or had to buy a whole new tranny... :P


5th Gear
Joined: May 2005
Posts: 833
Likes: 0
From: Memphis
Original plan:
1. M7 STB
2. Paint calipers red
3. oil change
4. get her all shiny
New plan as of last night (courtesy of brake sensor):
1. new brake pads (Haven't looked to see if all pads need to be replaced or if that includes rotors. I can't imagine I have been that rough on the rotors being that it took 40,000 to wear out the original brake pads...who knows?)
2. M7 STB
3. oil change
4. get her all shiny
5. Paint calipers red (if I have time left!!)
Unfortunately the brake pads and oil change can only be done on Sunday. Hubby has to work extra hours this week to make up for being away next week. I could probably manage the oil change myself, but I am pretty sure I am not up to a brake job being my first attempt at auto maintenance! Maybe I will luck out and find someone who can knock out the brakes at a reasonable price. Fingers crossed.
1. M7 STB
2. Paint calipers red
3. oil change
4. get her all shiny
New plan as of last night (courtesy of brake sensor):
1.
new brake pads (Haven't looked to see if all pads need to be replaced or if that includes rotors. I can't imagine I have been that rough on the rotors being that it took 40,000 to wear out the original brake pads...who knows?)2. M7 STB
3. oil change
4. get her all shiny
5. Paint calipers red (if I have time left!!)
Unfortunately the brake pads and oil change can only be done on Sunday. Hubby has to work extra hours this week to make up for being away next week. I could probably manage the oil change myself, but I am pretty sure I am not up to a brake job being my first attempt at auto maintenance! Maybe I will luck out and find someone who can knock out the brakes at a reasonable price. Fingers crossed.
We just had a garage day at my house, 7 Minis, did a pulley, a bunch of belts and belt tensioner safety cables, an oil change... we've got PittStopMINI pretty much squared away!
Vargas and Xiek and all - good luck with your projects. If it helps, I'm not detailing much before I go since the trip will pretty much undo a bunch of that careful detailing work...
Vargas and Xiek and all - good luck with your projects. If it helps, I'm not detailing much before I go since the trip will pretty much undo a bunch of that careful detailing work...
Last edited by DixonL2; Apr 21, 2008 at 02:45 PM.
Thread Starter
|
5th Gear
Joined: Nov 2004
Posts: 1,027
Likes: 0
Unfortunately the brake pads and oil change can only be done on Sunday. Hubby has to work extra hours this week to make up for being away next week. I could probably manage the oil change myself, but I am pretty sure I am not up to a brake job being my first attempt at auto maintenance! Maybe I will luck out and find someone who can knock out the brakes at a reasonable price. Fingers crossed.
Thread Starter
|
5th Gear
Joined: Nov 2004
Posts: 1,027
Likes: 0
Another night done and a few things accomplished. Started off by installing the new mcs pedals and refitting my parcel shelf. Spent 30 minutes trying to find a spot for the JCW shift light control box, but I think it will work where it is.

I always like these better than the black mc pedals. Then I lifted it back up to work on the oil issue and modify the towers for the BCs...

This is a familiar sight
I suspected something was wrong with the filter end so I drained all the oil out and pulled the filter. When I did that I heard a squeaky noise so either the Oring wasn't seated right or I over torqued it (hard to belive since I removed it pretty much by hand and roadshow has cranked on it so hard that it took a breaker bar, a cheater bar, and help from a friend to loosen it). Once it was out I checked for cross threading just incase and there was none. I tossed the Oring and replaced it with another, put the filter back on and filled it up with oil. By this time I had lost my mojo and was running out of light so I put it down to take a test drive. The BCs will have to wait for another day.
Fired it up and the light was out! I guess there was something wrong with the Oring. No leaks after the test drive but I did discover the tire seems to still be rubbing on the BCs and the brakes don't feel as crisp. I'll have to order spacers for the wheels now and rebleed those rear lines to see if that corrects the problem. I'm almost there.
I always like these better than the black mc pedals. Then I lifted it back up to work on the oil issue and modify the towers for the BCs...
This is a familiar sight
I suspected something was wrong with the filter end so I drained all the oil out and pulled the filter. When I did that I heard a squeaky noise so either the Oring wasn't seated right or I over torqued it (hard to belive since I removed it pretty much by hand and roadshow has cranked on it so hard that it took a breaker bar, a cheater bar, and help from a friend to loosen it). Once it was out I checked for cross threading just incase and there was none. I tossed the Oring and replaced it with another, put the filter back on and filled it up with oil. By this time I had lost my mojo and was running out of light so I put it down to take a test drive. The BCs will have to wait for another day.
Fired it up and the light was out! I guess there was something wrong with the Oring. No leaks after the test drive but I did discover the tire seems to still be rubbing on the BCs and the brakes don't feel as crisp. I'll have to order spacers for the wheels now and rebleed those rear lines to see if that corrects the problem. I'm almost there.

I'm pullin' for you buddy. Thinking positive thoughts. You ARE going to be there. It's a Karma thing.
Well here is Betty in her current state.. drive to the dealership tomorrow to pick up the tranny parts.. Input shaft bearing, that thank the great MINI in the sky.. someone a month ago, ordered and then cancelled cause they got tired of waiting... so they had them on the shelf.. other wise would have either missed the dragon, or had to buy a whole new tranny... :P
6th Gear
Joined: Aug 2002
Posts: 6,555
Likes: 0
yikes you guys...I hope you get all those parts back together in time.
Of course, I leave this Friday, so my time line is a bit different. Even so, it's like not much more than a week or so..
good luck..see you down there..
Of course, I leave this Friday, so my time line is a bit different. Even so, it's like not much more than a week or so..
good luck..see you down there..
5th Gear
Joined: Jan 2006
Posts: 1,069
Likes: 0
From: Midland, Ontario, Canada
thanks
I have some PURE maple syrup for you.. and some PURE maple sugar cookies too...
get me some GOOD HOT SAUCE