
R60 What did you do to your Countryman TODAY?

Yea, I know and they the set up is great.  Especially for pot holes and junk on the road that like like to damage wheels. Those were a euro part that we were able to get. Not many of those wheels around here.
Especially for pot holes and junk on the road that like like to damage wheels. Those were a euro part that we were able to get. Not many of those wheels around here.
__________________

MINI Guru/ MINI Owner Since 2004 | NEW Lifetime Part Replacement | Local Pickup
Milltek | Genuine MINI | Forge Motorsport | NM Engineering | ECS Performance | M7 Speed
Customer Service Hours: 8am-8pm EST|Sales Team Hours: 8am-11pm | SAT 10am-7pm 800.924.5172
MINI Guru/ MINI Owner Since 2004 | NEW Lifetime Part Replacement | Local Pickup
Milltek | Genuine MINI | Forge Motorsport | NM Engineering | ECS Performance | M7 Speed
Customer Service Hours: 8am-8pm EST|Sales Team Hours: 8am-11pm | SAT 10am-7pm 800.924.5172


4th Gear
Joined: Nov 2009
Posts: 512
Likes: 1
From: Fort Myers, FL
Looks great!! The wheels look cool...did you powder coat them?


1st Gear
Joined: May 2011
Posts: 26
Likes: 0
From: Albuquerque
edit - I just looked and they do not ship internationally though. It could help ensure you get the right stuff from ebay or other sources though.

5th Gear
Joined: Jan 2008
Posts: 680
Likes: 1
From: Brisbane, Australia
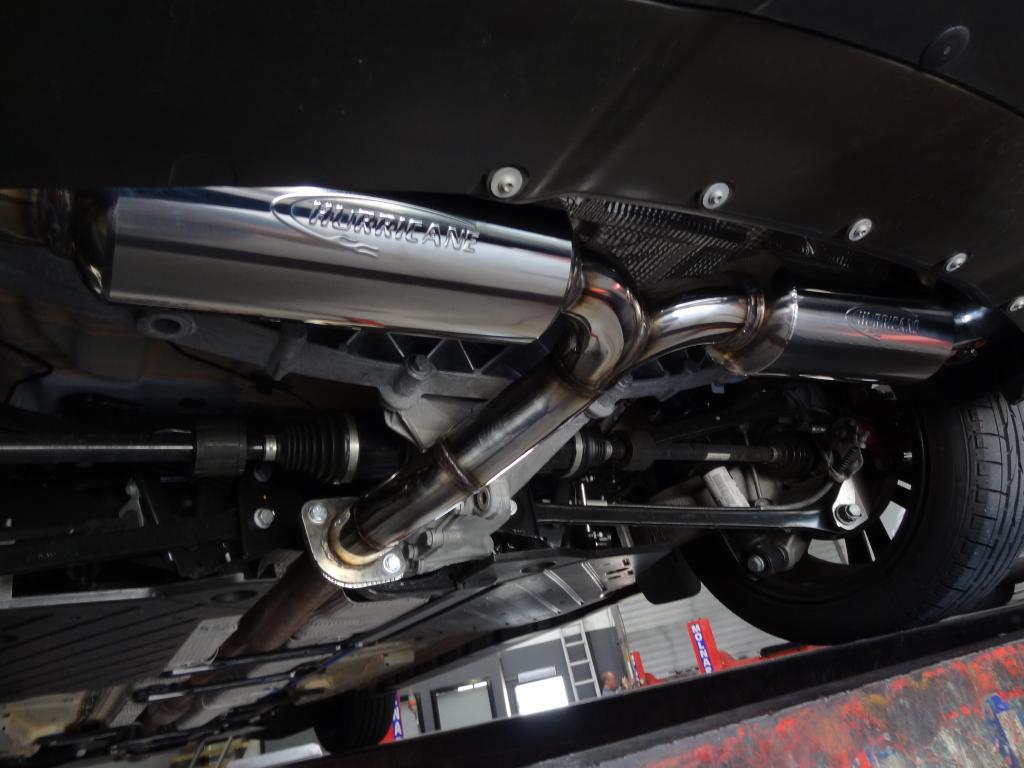
I had a custom exhaust made for my R60 JCW.
Before:
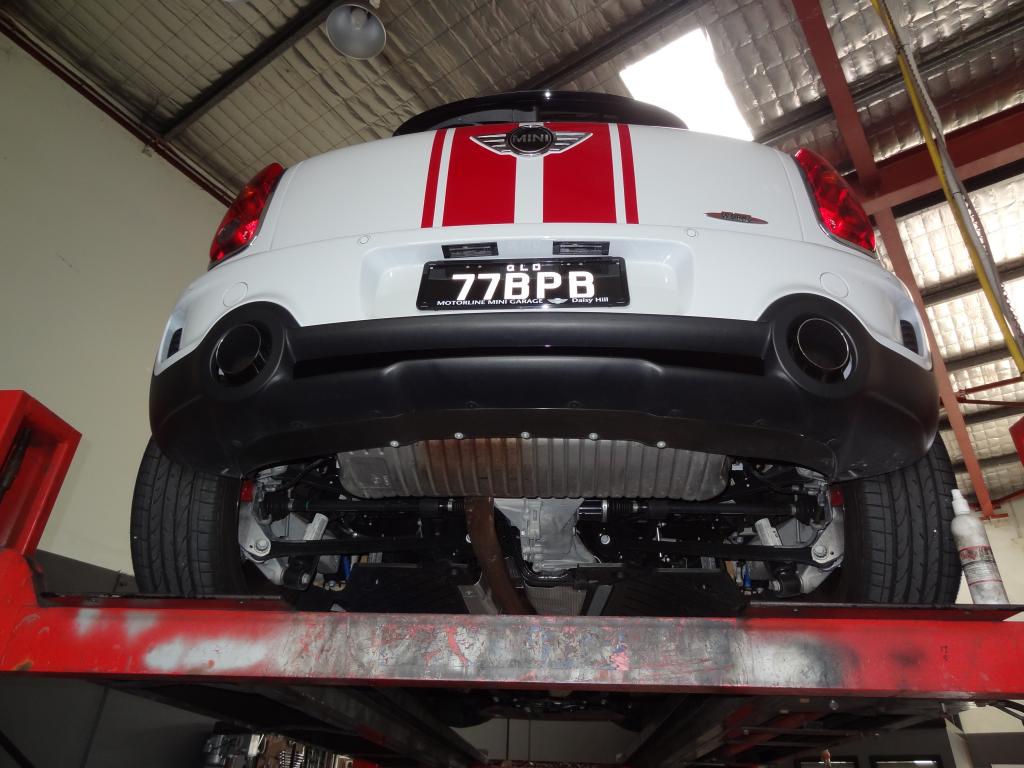
After:

On a side note, I was originally planning on having the second cat and resonator cut out like everyone else does. Strangely enough though, my Countryman does not have a second cat... just a resonator. Fun fact. Must be something to do with emission requirements not being as stringent as in the USA. My stock rear muffler also seems to be a different shape.
Before:
After:
On a side note, I was originally planning on having the second cat and resonator cut out like everyone else does. Strangely enough though, my Countryman does not have a second cat... just a resonator. Fun fact. Must be something to do with emission requirements not being as stringent as in the USA. My stock rear muffler also seems to be a different shape.


1st Gear
Joined: Sep 2011
Posts: 26
Likes: 0
I installed the official MINI Garmin GPS mount. The part number is 65902218328. I bought the mount from outmotoring.com for $170. I really have been going back and forth about buying and installing the mount. It is obviously more expensive than the craven mount, but it fits with the dash perfectly. It included the mount, usb cable for the gps, wire connectors. I didn't need to buy anything else to install.
The install was way easier than I imagined. I stopped in at MINI of Louisville to get a price to install and was quoted 6.5 hours of labor. I wasn't paying that for sure. That's almost the cost of the built in factory GPS. It took me less than 2 hours to install and that included searching the internet for instructions and help and removing a panel or two that I didn't need too. I could easily do it again in 30 minutes.
The mount attaches to the back of the tach with included bracket and screws. The cable is routed behind the dash beside the steering wheel and down towards the OBDII port. This is under the dash on the left side. It connects to two wires coming from the OBDII port for power.
Here is the result. I am using my current Garmin which is 4.3". The design calls for the 3.5" Garmin. So part of the left top is cut off by the steering wheel. It's not bad at all.
The install was way easier than I imagined. I stopped in at MINI of Louisville to get a price to install and was quoted 6.5 hours of labor. I wasn't paying that for sure. That's almost the cost of the built in factory GPS. It took me less than 2 hours to install and that included searching the internet for instructions and help and removing a panel or two that I didn't need too.
I could easily do it again in 30 minutes.The mount attaches to the back of the tach with included bracket and screws. The cable is routed behind the dash beside the steering wheel and down towards the OBDII port. This is under the dash on the left side. It connects to two wires coming from the OBDII port for power.
Here is the result. I am using my current Garmin which is 4.3". The design calls for the 3.5" Garmin. So part of the left top is cut off by the steering wheel. It's not bad at all.
I installed the official MINI Garmin GPS mount. The part number is 65902218328. I bought the mount from outmotoring.com for $170. I really have been going back and forth about buying and installing the mount. It is obviously more expensive than the craven mount, but it fits with the dash perfectly. It included the mount, usb cable for the gps, wire connectors. I didn't need to buy anything else to install. The install was way easier than I imagined. I stopped in at MINI of Louisville to get a price to install and was quoted 6.5 hours of labor. I wasn't paying that for sure. That's almost the cost of the built in factory GPS. It took me less than 2 hours to install and that included searching the internet for instructions and help and removing a panel or two that I didn't need too. I could easily do it again in 30 minutes. The mount attaches to the back of the tach with included bracket and screws. The cable is routed behind the dash beside the steering wheel and down towards the OBDII port. This is under the dash on the left side. It connects to two wires coming from the OBDII port for power. Here is the result. I am using my current Garmin which is 4.3". The design calls for the 3.5" Garmin. So part of the left top is cut off by the steering wheel. It's not bad at all.
I could easily do it again in 30 minutes. The mount attaches to the back of the tach with included bracket and screws. The cable is routed behind the dash beside the steering wheel and down towards the OBDII port. This is under the dash on the left side. It connects to two wires coming from the OBDII port for power. Here is the result. I am using my current Garmin which is 4.3". The design calls for the 3.5" Garmin. So part of the left top is cut off by the steering wheel. It's not bad at all.
4th Gear
Joined: Jun 2013
Posts: 519
Likes: 13
From: Charlottesville, VA
I had a custom exhaust made for my R60 JCW.
Before:

After:


On a side note, I was originally planning on having the second cat and resonator cut out like everyone else does. Strangely enough though, my Countryman does not have a second cat... just a resonator. Fun fact. Must be something to do with emission requirements not being as stringent as in the USA. My stock rear muffler also seems to be a different shape.

Before:
After:
On a side note, I was originally planning on having the second cat and resonator cut out like everyone else does. Strangely enough though, my Countryman does not have a second cat... just a resonator. Fun fact. Must be something to do with emission requirements not being as stringent as in the USA. My stock rear muffler also seems to be a different shape.

2nd Gear
Joined: May 2012
Posts: 104
Likes: 0
From: Walnut Creek, CA
Painted the mouse flat black. Didn't really like that they made the new black ones look like two pieces, and also didn't like that the all black ones are $50 more than the chrome line. Also installed new bigger cup holders...what a difference! The biggest surprise in this is that cups sit down farther and provide better access to the window switches.

5th Gear


Joined: Sep 2013
Posts: 914
Likes: 54
Installed Union Jack mirror covers inside & out and my winter wheels (Michelin X-Ice on BMW rims) with Union Jack wheel caps. Also installed the larger front cup holders along with front & rear aftermarket armrests which are more usable that the stock ones. Now all i have to do is wash it.... 
Last edited by mikey_t; Dec 3, 2013 at 02:13 PM.
4th Gear
Joined: Jan 2012
Posts: 341
Likes: 4
From: rancho
Painted the mouse flat black. Didn't really like that they made the new black ones look like two pieces, and also didn't like that the all black ones are $50 more than the chrome line. Also installed new bigger cup holders...what a difference! The biggest surprise in this is that cups sit down farther and provide better access to the window switches.
5th Gear
Joined: Jan 2008
Posts: 680
Likes: 1
From: Brisbane, Australia
Thats how they all come. A single pipe to the rear muffler.
The exhaust is pretty good for the most part, however there is an unpleasant drone around the 2250 rpm mark. Going to have it tweaked / redesigned so stay tuned.

1st Gear
Joined: Jul 2012
Posts: 33
Likes: 0
added front and rear mud flaps and a nm high air flow filter, wow what a difference in throttle response. and later this afternoon new 16 in rims and snow tires on my cms fwd I have no idea how these tires will handle ( winter claw exteme grip ) they had good reviews in canada but none of them where on a mini.

4th Gear
Joined: Jan 2013
Posts: 460
Likes: 1
Want to come over and (help) install mine? I picked some up earlier this week and need to get them on tonight / tomorrow before the crazy weather hits the east cost this week.
4th Gear
Joined: Jan 2013
Posts: 460
Likes: 1
Any tricks with the rear wheels? Looks very tight back there. I don't want to take off the rear wheels because I don't have any tools to get them off or back on.
1st Gear
Joined: Jul 2012
Posts: 33
Likes: 0
Not yet...I'm pretty hesitant to pick up the drill and put any holes in the car...afraid to screw something up.
Any tricks with the rear wheels? Looks very tight back there. I don't want to take off the rear wheels because I don't have any tools to get them off or back on.
Any tricks with the rear wheels? Looks very tight back there. I don't want to take off the rear wheels because I don't have any tools to get them off or back on.