R55 Curt hitch install for those with convenience package
#1
 09-20-2014, 02:09 PM

Curt hitch install for those with convenience package
Well I guess because most people don't have the convenience package this really hasn't come up(or at least I couldn't find any posts about it), but for those who do and are planning on installing a hitch here is an addendum to the tutorials and instructions you will find elsewhere.
Please note do this at your own risk, I am not responsible for anyone attempting to do this and screwing up their car. Take your time and use common sense.
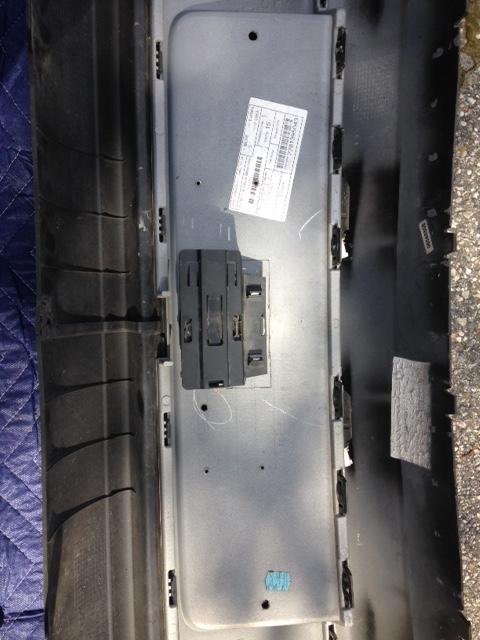
Ok so the hitch install is very straight forward, I did not remove the tires and if it wasn't for what I am about to show you here the install would have been maybe an hour's worth of time. This tutorial starts once the bumper is off and you find this little guy sitting right where you will be cutting your 2.5" hole.
After a littler research and some VERY rusty German language skills I determined this guy was the proximity sensor for the convenience package and safe to relocate. I knew there is a fascia that covers this are of the bumper for the outside plate mount, so I decided to save this bracket and relocate it to another area as opposed to just trying to attach the sensor in some other manner. I made my measurement for where the hitch hole would go and then determined how much area I would take out with the bracket. MEASURE TWICE, CUT ONCE!!! No going back after this one.
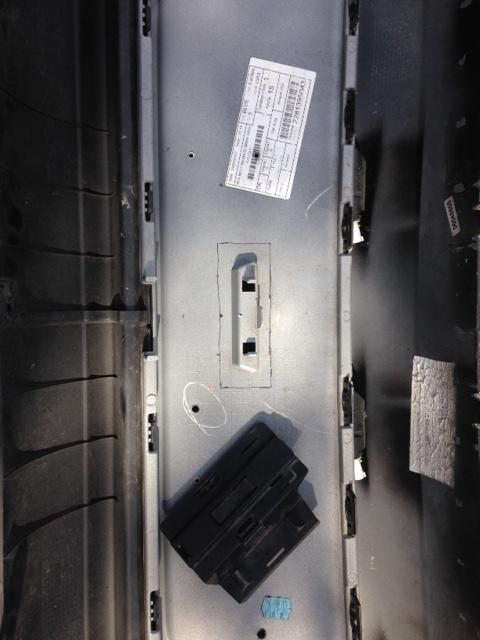
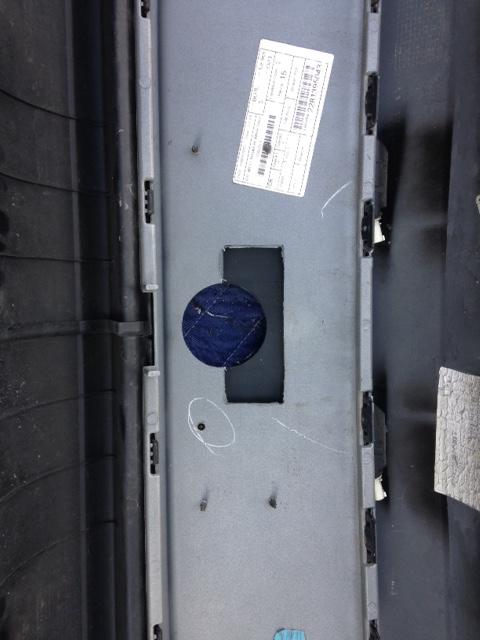
I drilled pilot holes in the four corners of where i would cut from the inside out in order to get the area on the opposite side of the bumper to cut. Using a plastic cutting wheel on my dremel tool I cut from hole to hole and ended up with a nice bracket with some surface area to reattach with(note I drilled the 2.5" hole for hitch AFTER I cut this out, just forgot to take pic at that point).
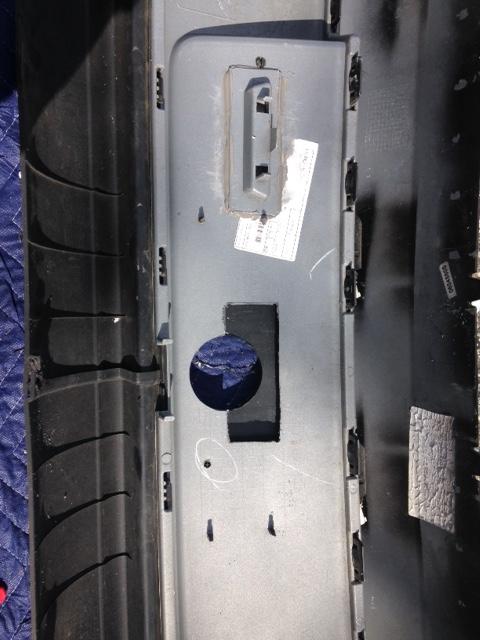
Scuff up your bracket and the inside of your bumper, the push pin tab and the screws for the outside fascia make a nice guide to help lineup the bracket left to right, eyeball it height wise to line up where it was originally cut from, and finally go to the left (when looking down on the inside of the bumper) of where you cut it in order to ensure the plug lines up and has ample length to reconnect. Mix up your JB Weld or epoxy of choice, give a nice thick coat on the bracket peice you cut around all four edges and push into place. Give a good amount of pressure here and wiggle the bracket around a little to seat into the JB Weld, take a Popsicle stick or something similar and go around the edges with more JB Weld to create a nice edge seal. Give it some time to cure and viola you have the factory bracket in a new location and your bumper ready to reinstall.
Good luck!
Please note do this at your own risk, I am not responsible for anyone attempting to do this and screwing up their car. Take your time and use common sense.
Ok so the hitch install is very straight forward, I did not remove the tires and if it wasn't for what I am about to show you here the install would have been maybe an hour's worth of time. This tutorial starts once the bumper is off and you find this little guy sitting right where you will be cutting your 2.5" hole.
After a littler research and some VERY rusty German language skills I determined this guy was the proximity sensor for the convenience package and safe to relocate. I knew there is a fascia that covers this are of the bumper for the outside plate mount, so I decided to save this bracket and relocate it to another area as opposed to just trying to attach the sensor in some other manner. I made my measurement for where the hitch hole would go and then determined how much area I would take out with the bracket. MEASURE TWICE, CUT ONCE!!! No going back after this one.
I drilled pilot holes in the four corners of where i would cut from the inside out in order to get the area on the opposite side of the bumper to cut. Using a plastic cutting wheel on my dremel tool I cut from hole to hole and ended up with a nice bracket with some surface area to reattach with(note I drilled the 2.5" hole for hitch AFTER I cut this out, just forgot to take pic at that point).
Scuff up your bracket and the inside of your bumper, the push pin tab and the screws for the outside fascia make a nice guide to help lineup the bracket left to right, eyeball it height wise to line up where it was originally cut from, and finally go to the left (when looking down on the inside of the bumper) of where you cut it in order to ensure the plug lines up and has ample length to reconnect. Mix up your JB Weld or epoxy of choice, give a nice thick coat on the bracket peice you cut around all four edges and push into place. Give a good amount of pressure here and wiggle the bracket around a little to seat into the JB Weld, take a Popsicle stick or something similar and go around the edges with more JB Weld to create a nice edge seal. Give it some time to cure and viola you have the factory bracket in a new location and your bumper ready to reinstall.
Good luck!


Thread
Thread Starter
Forum
Replies
Last Post
minicoclub
MINIs & Minis for Sale
8
11-11-2015 07:25 AM
squawSkiBum
MINI Parts for Sale
15
10-02-2015 09:21 AM