R52 HELP! Top won't open
#51
 07-14-2009, 06:30 PM


1st Gear
Join Date: Jul 2009
Location: Arcata, CA
Posts: 13
Likes: 0
Received 0 Likes
on
0 Posts


#53
07-27-2009, 07:00 AM
1st Gear
Join Date: Jul 2009
Location: Arcata, CA
Posts: 13
Likes: 0
Received 0 Likes
on
0 Posts
#54
08-02-2009, 12:02 PM

I've been able to get the cable replaced on my 2005 convertible and can get the top to open to the sunroof position properly. Lot of work and many reassemblies were involved to get things aligned and all. THose who have done this probably had the same experience. Thanks much to Not4no1 and others who have blazed the way.
HOWEVER, when I try to lower the top fully, only the front latches release and nothing else happens, other that a blinking red led on the raising top button. I've checked the three trunk microswitches and believe all are closed. Is this an alignment problem of some sort or something completely different? Any thoughts?
Also, someone sent me a private message, but I wasn't able to access it. Could you send the message again please? Thanks.
#55
08-02-2009, 09:02 PM
1st Gear
Join Date: Jul 2009
Location: Arcata, CA
Posts: 13
Likes: 0
Received 0 Likes
on
0 Posts
Treeguy...are you a logger? My husband is....I don't have any thoughts or your problem....as a matter of fact, we are "newbies" and think we have all of the obvious kinks worked out at this point...knock on wood! At least your lights are blinking ....nothing was happening with ours...other than it kept blowing fuses...problem solved....and we are now able to run around topless!
#56
06-05-2010, 04:30 PM

I will be using this post to edit & organize my instructions untill I get them finalized. Then I will keep a copy on this post & start a new post in the propper repair section of NAM. That way I don't get a bunch of PMs from others who find this post & no instructions...not that I mind 
I am using any pictures I can find, these are not all my car (most are).
check out TXNemo's Link for more pictures & breif explanations.
http://community.webshots.com/album/...host=community
If anyone wants their picture removed. I will do so.
I appreciate any help I can get too.
Also, if anyone notices errors, I take criticism well.
This may be choppy, I am doing this from memory & on my work breaks.
I don't have any pictures of the roof rails attached, I will try to.
I first removed the trim pieces on both sides of the roof structure.
You will open the door & look up into the rail & you will see some screws. Remove those & one of the panels comes off. That should reveal more screws that will release the other side of the rail panel. You might have to wiggle them loose, but there are not clips holding them on.
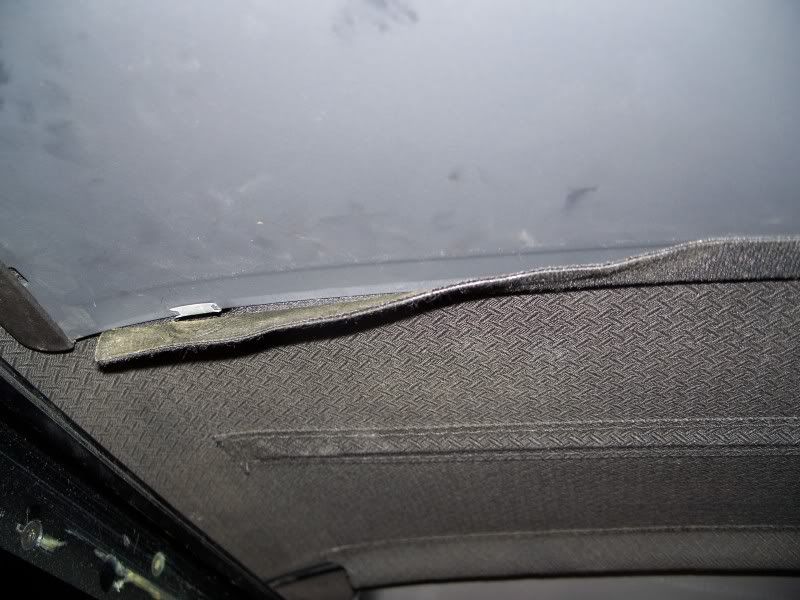
When you are sitting in the front seat, top closed, look straight above you. There is a plastic piece that runs along the whole edge of the interior metal piece that the front of the top is attached to�I will try to take a picture later. That is what needs to be removed. It just pulls off.
Under the plastic is a fabric strip that is glued (double sided tape) all the way across & a couple of metal clips that were holding on the plastic strip (caution the clips are sharp�cut my wrist, so you might want to cover with tape or be more careful). Wash your hands before you start removing the fabric (so you can reuse the tape) Start on one side & peel away. Take your time. A heat gun may help, it was pretty warm on the day I did this so that wasn�t necessary. This will release the slack you will need to get to the screws that attach the front of the top.
Now you will need to open the motor door in the middle of the top/interior. This door is held on by 2 loose fabric straps. It will probably fall off while you are working on your top. Mine did & so did someone else�s whom I talked to, but it snaps right back on. You just have to remember next time that if you open that motor door again, it might drop down & hit you.
Now you have to lift up your back seat up & remove the hand crank under there (check your user�s manual)
Slowly crank back the top. Just crank enough to get to the screws. Only one side will move (or these aren�t the instructions for you) This will allow some slack so you can get to some screws that are holding the front panel of the top to the sliding mechanism. I had to pull the plastic edging back along the edge to reach the screws. Opening the boot's reverse hinge will give you slightly more slack in the front.
The working side is very easy to access the screws & remove the top. The broken side will take some pulling to get enough fabric to allow a screwdriver access. If you have a right angle screwdriver, it will make the job much easier.
Once the top panel is removed, you can lift the front of the top up and fold it back over the car so you have a clear view of the side rails.
Now compare the broken/locked side with the working side & you will see how to unhook & slide the broken piece back.
Once you slide that cassette back, you will be able to access the screws that release the front of the rails.
Remove the 2 allen(sp) screws on the front most piece. Now wiggle/lift the rail to slide the front most piece off that you just unscrewed. Now you can access the broken cable that should be running along the bottom edge of the rail. Before you pull the cable & mechanism out, you have to access the mid-roof motor.
Open the mid-roof motor door (if you closed it) and disconnect the power from the motor (just a small plug) Now unscrew the motor (3 screws) Hold the motor in place, it is heavy & will fall down once the last screw is removed. Place aside.
Now that the motor is out, you should be able to slide the cable & mechanism out of the rail. If you can�t reach the cable, look where the mid-roof motor was & you should see where the motor connects with the cables. Use a flat head screwdriver to slowly push the broken cable down the rail & you will be able to grab the end poking out of the roof rail.
Once the cable & mechanism is out, the new one slides in exactly the same as the one you just removed. If you forget between the steps, look at the working side. The trickiest part for me was lining up the new cassette mechanism with the old working one. It took a bit of trial & error, I also ended up taking the motor in & out several times until everything was parallel.
I am using any pictures I can find, these are not all my car (most are).
check out TXNemo's Link for more pictures & breif explanations.
http://community.webshots.com/album/...host=community
If anyone wants their picture removed. I will do so.
I appreciate any help I can get too.
Also, if anyone notices errors, I take criticism well.
This may be choppy, I am doing this from memory & on my work breaks.
Hopefully Helpfull Instructions
I don't have any pictures of the roof rails attached, I will try to.
I first removed the trim pieces on both sides of the roof structure.
You will open the door & look up into the rail & you will see some screws. Remove those & one of the panels comes off. That should reveal more screws that will release the other side of the rail panel. You might have to wiggle them loose, but there are not clips holding them on.
When you are sitting in the front seat, top closed, look straight above you. There is a plastic piece that runs along the whole edge of the interior metal piece that the front of the top is attached to�I will try to take a picture later. That is what needs to be removed. It just pulls off.
Under the plastic is a fabric strip that is glued (double sided tape) all the way across & a couple of metal clips that were holding on the plastic strip (caution the clips are sharp�cut my wrist, so you might want to cover with tape or be more careful). Wash your hands before you start removing the fabric (so you can reuse the tape) Start on one side & peel away. Take your time. A heat gun may help, it was pretty warm on the day I did this so that wasn�t necessary. This will release the slack you will need to get to the screws that attach the front of the top.
Now you will need to open the motor door in the middle of the top/interior. This door is held on by 2 loose fabric straps. It will probably fall off while you are working on your top. Mine did & so did someone else�s whom I talked to, but it snaps right back on. You just have to remember next time that if you open that motor door again, it might drop down & hit you.
Now you have to lift up your back seat up & remove the hand crank under there (check your user�s manual)
Slowly crank back the top. Just crank enough to get to the screws. Only one side will move (or these aren�t the instructions for you) This will allow some slack so you can get to some screws that are holding the front panel of the top to the sliding mechanism. I had to pull the plastic edging back along the edge to reach the screws. Opening the boot's reverse hinge will give you slightly more slack in the front.
The working side is very easy to access the screws & remove the top. The broken side will take some pulling to get enough fabric to allow a screwdriver access. If you have a right angle screwdriver, it will make the job much easier.
Once the top panel is removed, you can lift the front of the top up and fold it back over the car so you have a clear view of the side rails.
Now compare the broken/locked side with the working side & you will see how to unhook & slide the broken piece back.
Once you slide that cassette back, you will be able to access the screws that release the front of the rails.
Remove the 2 allen(sp) screws on the front most piece. Now wiggle/lift the rail to slide the front most piece off that you just unscrewed. Now you can access the broken cable that should be running along the bottom edge of the rail. Before you pull the cable & mechanism out, you have to access the mid-roof motor.
Open the mid-roof motor door (if you closed it) and disconnect the power from the motor (just a small plug) Now unscrew the motor (3 screws) Hold the motor in place, it is heavy & will fall down once the last screw is removed. Place aside.
Now that the motor is out, you should be able to slide the cable & mechanism out of the rail. If you can�t reach the cable, look where the mid-roof motor was & you should see where the motor connects with the cables. Use a flat head screwdriver to slowly push the broken cable down the rail & you will be able to grab the end poking out of the roof rail.
Once the cable & mechanism is out, the new one slides in exactly the same as the one you just removed. If you forget between the steps, look at the working side. The trickiest part for me was lining up the new cassette mechanism with the old working one. It took a bit of trial & error, I also ended up taking the motor in & out several times until everything was parallel.
 . I had the same thing happen to the driver's side of my top and I ordered the replacement from MiniMania for $359 (http://new.minimania.com/web/Item/NMX8616/InvDetail.cfm). It was a special order so it took about 2 weeks to get in. On a side note, it seems that this part is getting more and more expensive. MiniMania has increased their price to $459 and ECS has theirs at $432.83 (both of which are higher than what was posted above).
 Also, the parts I got from MiniMania only included the cassettes with cables (left and right sides) and did not include the front-most piece of the rails (labeled as "broke during removal" in this picture http://good-times.webshots.com/photo/2042365960099759627YqQXqt).
Your guide helped out a ton, but this was still not a fun task and is something I hope I don't have to do again.
The hardest part I ran into was getting the top loose enough to get the non-working end of the main sliding mechanism (part #2 in the diagram) unscrewed. I ended up unhooking the fabric from the sliding piece completely - there are a bunch of plastic tabs that you have to press up on to get it to release, the trick is that you have to get the tension just right on the fabric in order for it to work. Once you have the corner exposed on the working side, you should be able to see the location of the first tab which will give you an idea of what you need to press on. I ended up using a combination of a very small screwdriver and a right-angle pick which was less than ideal (they worked, but it wasn't easy).
Thanks again - I've got a working top again!
#57
06-06-2010, 05:22 PM
1st Gear
Join Date: Jul 2009
Location: Arcata, CA
Posts: 13
Likes: 0
Received 0 Likes
on
0 Posts

#59
06-11-2010, 09:30 PM

My hot orange toy broke the other day, this was the first place I stopped for help. You guys (particularly Not4no1) have been a savior to me, the instructions and diagrams have allowed me to hopefully save myself and others a ton of money. I haven’t completed my repairs, but I’m ready to help others get their tops apart.
Hats of to the engineers, this mechanism is a work of art.
Getting that front top piece out of the way. I took all the screws out, only to find out that the outer two screws are all that matter. I took the hard way of getting the top off first, then getting the mechanism moved back. Releasing the rail mechanism took me days to finally figure out. What you have to do, is work the latch down from the outside of the rail. Once that catch is moved all the way down, the you should be able to work the top back without breaking anything.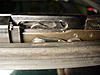
Remove the top motor.
Slide the top back so that the rail clamps release from the front windshield frame.
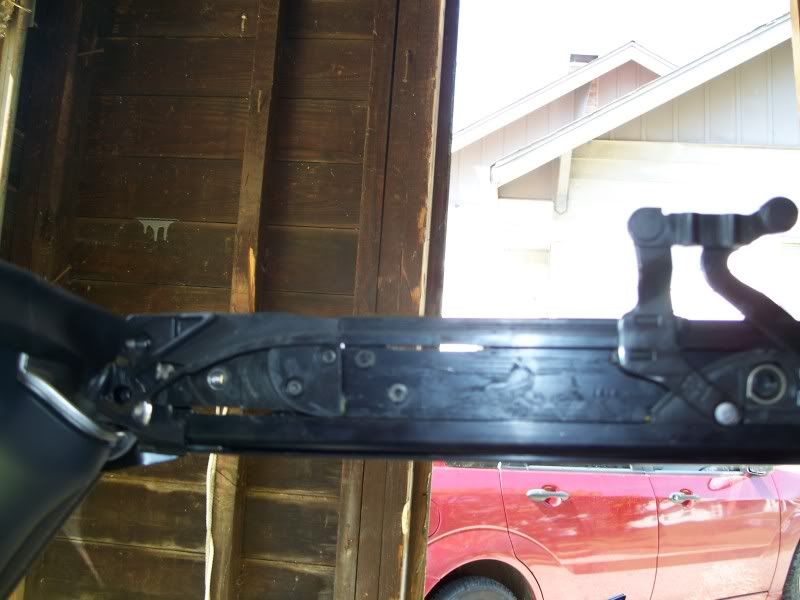
I had to remove four screws to get the front rail piece off. Three from the side of the frame, and one on the front end that you can't access with the frame attached to the front windshield frame.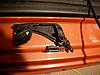 You can see this screw once the frame is released and you pull the frame up and look straight on at the rail assembly.
Once that font piece is off, the assembly slides off the rail and you can push the cable out of the rail.
Hats of to the engineers, this mechanism is a work of art.
Getting that front top piece out of the way. I took all the screws out, only to find out that the outer two screws are all that matter. I took the hard way of getting the top off first, then getting the mechanism moved back. Releasing the rail mechanism took me days to finally figure out. What you have to do, is work the latch down from the outside of the rail. Once that catch is moved all the way down, the you should be able to work the top back without breaking anything.
Remove the top motor.
Slide the top back so that the rail clamps release from the front windshield frame.
I had to remove four screws to get the front rail piece off. Three from the side of the frame, and one on the front end that you can't access with the frame attached to the front windshield frame.
 You can see this screw once the frame is released and you pull the frame up and look straight on at the rail assembly.
Once that font piece is off, the assembly slides off the rail and you can push the cable out of the rail.
Last edited by Runemtight; 06-11-2010 at 09:35 PM.
#60
06-11-2010, 09:53 PM
Broken cable discovery
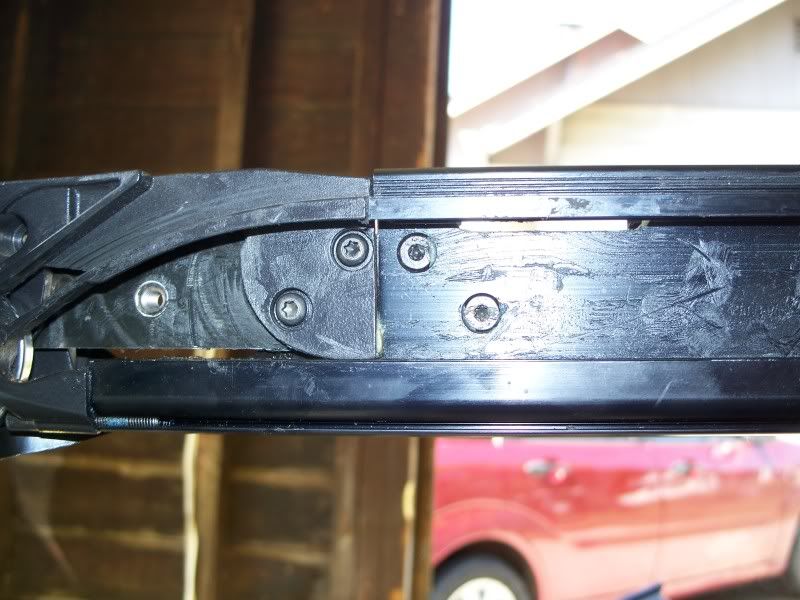
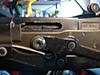
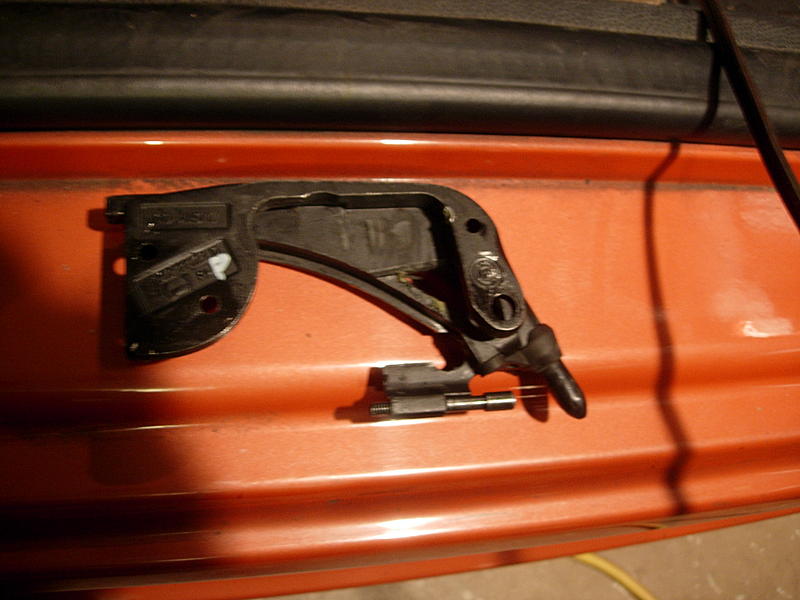
Once I cable got my cable out and giving it a good hard look, I made a discovery. Nothing was technically broken.
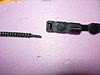
On the first picture, I have a detached cable and complete carriage assembly. The cable would not just slide into the assembly, so when you examine it closely in the second picture, you can see machine marks where Mini used compression to hold the parts together. So I'm off the the machine shop to get some help.
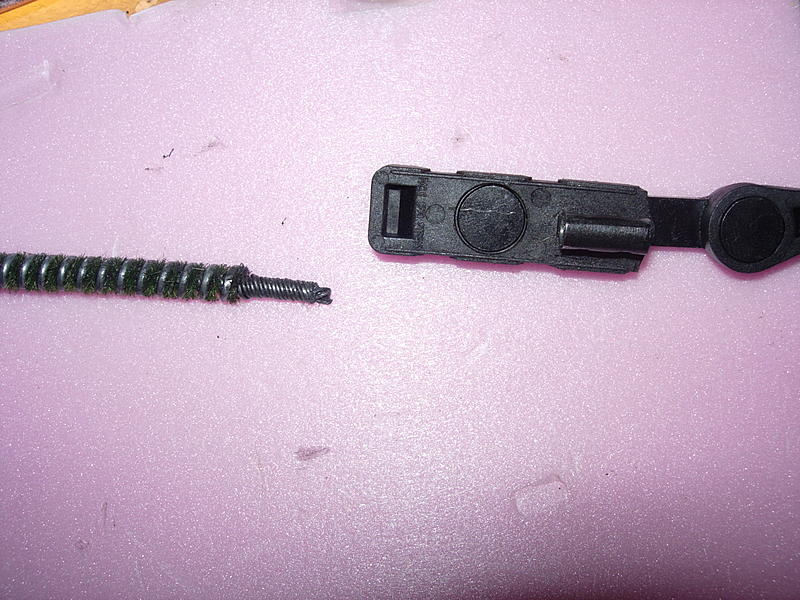

On the first picture, I have a detached cable and complete carriage assembly. The cable would not just slide into the assembly, so when you examine it closely in the second picture, you can see machine marks where Mini used compression to hold the parts together. So I'm off the the machine shop to get some help.
#61
07-01-2010, 07:31 PM

Help Top Won't Open
We have the same problem now on our 2005 Mini Cooper S Convertible with only 9,000 Miles. Car is at the dealer and we are hoping for a goodwill case based on our low mileage but it does not look promising. After speaking with the service manager today I was told they order the entire front half of the top to replace instead of just the mechanism noted on this thread. They advised me against just replacing the cable as the sunroof section is typically bent as a result of only one side unlatching.
Has anyone who has repaired this on their own experienced trouble with alignment from a bent sunroof section, or is this just their way to try anf get us to pay the high cost for the dealer repair?
Thanks!
Has anyone who has repaired this on their own experienced trouble with alignment from a bent sunroof section, or is this just their way to try anf get us to pay the high cost for the dealer repair?
Thanks!
#62
07-01-2010, 07:53 PM
mupaso
I now refer to my mini dealership as the "stealership".
In my opinion, the only way to damage the front section of the top, would be to continue to try to open the top way after it became apparent that it wasn't working right. I also believe that you would see bending or breaking of the mechanism prior to bending of any of the rails.
I managed to disassemble my top without any damage and fix the cable and mechanism without buying any new parts. Nothing appeared damaged from a top retraction just like you see in the pictures.
#63
07-01-2010, 08:19 PM
HELP! Top won't open
Thanks Runemtight!
I tried to explain to the dealer that I thought the stop on the end of the cable had come off and that my cable was not actually broke but they did not agree. I did not fully take it apart but noticed the following...
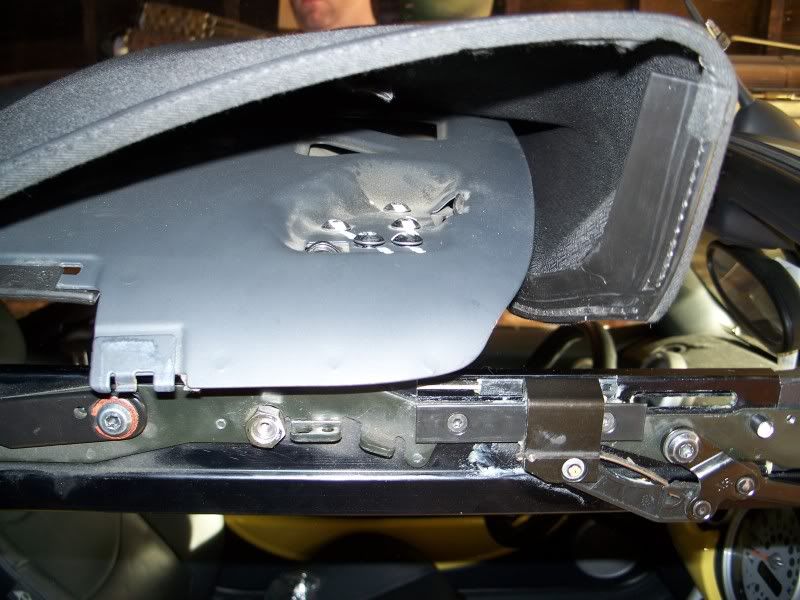
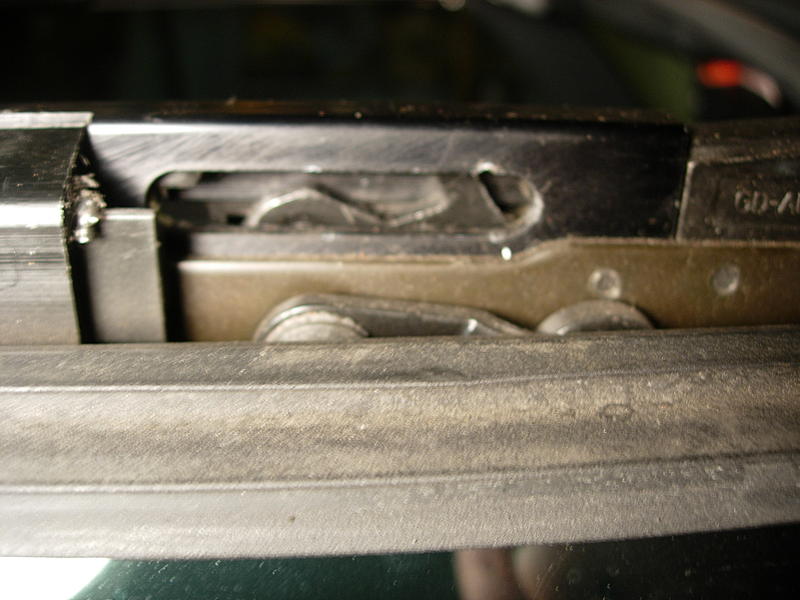
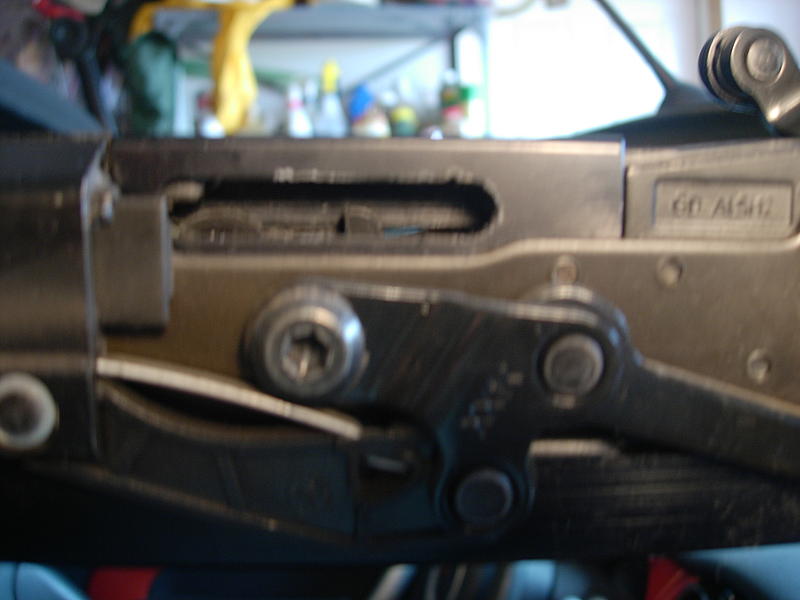
After removing the interior plastic trim panels I would start the opening of the top to see the movement within the latch mechanism and noticed on the lower side a "tab" (near the arrow in the attached photo) that moved as soon as I pushed the opening button - first up and then back and into the latch mechanism. On the failing side the piece also moves but does not retract - it actually can be moved back and forth with my finger as it is not connected to anything (unlike the working side that disappears into the latch) When I press the close top button the tab on the failing side moves and then becomes tight as if something is pushing on it (I assume the cable but cannot see it). Based on the issue you had with your cable, does this situation sound similar to yours?
What was involved in the repair and can you offer any advice or suggestions we should keep in mind when we visit a machine shop?
Regards
I tried to explain to the dealer that I thought the stop on the end of the cable had come off and that my cable was not actually broke but they did not agree. I did not fully take it apart but noticed the following...
After removing the interior plastic trim panels I would start the opening of the top to see the movement within the latch mechanism and noticed on the lower side a "tab" (near the arrow in the attached photo) that moved as soon as I pushed the opening button - first up and then back and into the latch mechanism. On the failing side the piece also moves but does not retract - it actually can be moved back and forth with my finger as it is not connected to anything (unlike the working side that disappears into the latch) When I press the close top button the tab on the failing side moves and then becomes tight as if something is pushing on it (I assume the cable but cannot see it). Based on the issue you had with your cable, does this situation sound similar to yours?
What was involved in the repair and can you offer any advice or suggestions we should keep in mind when we visit a machine shop?
Regards
#64
07-01-2010, 09:46 PM
Is your top closed?
Once my top got closed, the mechanism wouldn't release until I could get to the locking mechanism from the outside (in my pictures of the rail and mechanism). To get to the mechanism when the top is closed, the header piece of the top needs to be removed so that the outer trim screw in the front can be accessed. The mechanism unlocks by the pulling motion of the cable, so you gently work the latch down on the outside, and also work from the top to work the mechanism back.
The mechanism has to pulled by the motor (be careful not to go too far), or pushed by hand backwards to the point that the rail unlatches from the windshield frame.
Remove the motor in the middle of the top. 3 screws. The tubes carry the cable, you can move them forward and back with a screwdriver blade.
Now you can remove the front end piece of the rail (3 screws from the inside, and one at the end of the rail (lift the end of the rail clear of the windshield, at the bottom is an 1 or so screws. (all are star keyed)
Once the front piece is off, you can remove the mechanism and push the cable out with the screwdriver at the motor exposure.
I didn't have any luck with my local machine shops when I called them. I did a home repair. My cable fit right to the end of the female receptacle. The receptacle for the cable was too tight to slide the cable back into. I stretched it out slightly with a couple of ascending size allen wrenches until the cable could be pushed back in. The cable will probably be a little worse for the wear of pushing the mechanism, so I turned the cable end in pliers to reshape it (similar to preparing thread for a needle).
I reconnected the pieces and compressed it in my vise. It looked good, but didn't hold. (completely assembled to learn that)
Next time, I discovered that the cable length is long enough that taking a couple of links of the coiled steel from the wire (grinder or dremel) wouldn't affect the workings of the top, and give me some more cable coming out the end of the fitting.
I compressed the fitting harder this time and buggered up the end of the cable, then sweat some silver solder onto it. Works good now.
I think the hardest part of all this, is getting the front header off the mechanism when it is closed. There is very little working room for those screws on the closed side of the top. Got a short star bit and a ratchet box end wrench to drive it with.
If I didn't cover something here or in the directions earlier and from others, let me know.
#65
07-16-2010, 08:41 AM

Help! Top Won't Open
Unfortunately, we have been declined a second time for Goodwill based on not having a relationship with the dealer. Has anyone had any success around this?
Also, we started to order the part to perform the repair ourself and were told there was a design change and all cars manufactured prior to April 2005 required 2 additional parts when changing the sunroof latching mechanism. Has anyone else experienced this? The parts we were told to order are noted below:
54347163652 - Fastening Set - needed for cars manufactured before 04/2005
54347174762 - Gate - needed for cars manufactured before 04/2005
54347174761 - Sunroof Mechanism - Part noted in above posting that everyone uses
Wondering if anyone else has experienced this? Our car was manufactured on 12/2004
Regards!
#66
07-23-2010, 02:24 PM

#67
08-09-2010, 04:46 PM
1st Gear
Join Date: May 2010
Location: Long Island, NY
Posts: 19
Likes: 0
Received 0 Likes
on
0 Posts
Hi All,
Well, add my Mini to the list of broken convertible top cables :(
My 05 MCS top broke today - I was opening it at usual, convertible top opened fine, then only the right side latch disengaged. I closed it all the way, but then I tried to open the sunroof and all I hear is the roof motor spinning, and the sunroof wont open at all. I dont remember hearing anything popping or snapping.
When I tried to open the sunroof part, I can see, on the right side, a black plastic tab that moves forward/backward on the track by the the locking mechanism when I press the top down button, however nothing happens. The left side does not move at all. The roof motor makes its usual spinning sounds and nothing is grinding.
I can replace the latches and cables myself, but without the sunroof part opening (at least partly), how do I remove the canvas top? I unlatched the front hooks and the mid roof hooks and pulled the top back. I followed the manual and released the latches in the trunk and unscrewed that thingy in the trunk.
Even with all that, I still cannot pull enough slack to get at the front latch screws. I even removed the tabs from the front of the top, but there's too much tension on the edges and I do not want to force anything off (and wind up breaking the top more).
Does anyone have any suggestions? Thanks!
#68
08-09-2010, 07:25 PM

#69
08-09-2010, 09:28 PM
By crimping and sweating, my top is working so far this summer. I cut away some of the spiral steel and was able to extend some cable out the end of the mechanism, a little tack weld here might prove to be an even better fix than crimping and sweating.
Getting to those screws is a mighty challenge with the top closed. I worked from inside the car and use a softball pushed between the fabric and front cross panel. I got a short star bit and a ratchet end wrench to work the screw out.
Are both sides of the top not moving, or just one?
Getting to those screws is a mighty challenge with the top closed. I worked from inside the car and use a softball pushed between the fabric and front cross panel. I got a short star bit and a ratchet end wrench to work the screw out.
Are both sides of the top not moving, or just one?
#70
08-10-2010, 10:06 AM
1st Gear
Join Date: May 2010
Location: Long Island, NY
Posts: 19
Likes: 0
Received 0 Likes
on
0 Posts
Both sides of the top are not moving 
I'm going to look at the locking mechanism tonight that TXNemo commented about in his photo: http://good-times.webshots.com/photo/2807104490099759627pLMagk. Maybe I can get to it and manually disengage it.
But how do you remove the door sill frame from the rail? I don't see the screws holding it in.
#71
08-10-2010, 11:15 AM
Tullid
The inner panel has a star screw up by the windshield frame, then it should snap out. The outer cover has a star screw on top of the rail covered by the top when it is closed.
If both side of the top don't move, then I suspect that both cables have come undone. (Been there) You can confirm that by removing the motor and manually move the cable with a flat blade screwdriver.
The mechanism moves easily when pulled by the cable, I don't know of anyway to work the mechanism without the top and outside cover out of the way. The cable and attachment area travel inside a concealed tube, and pulling that mechanism is the key. Otherwise you work it from the outside part of the rail until it unlocks. The key is getting that front cross panel off.
#72
08-11-2010, 03:39 PM
1st Gear
Join Date: May 2010
Location: Long Island, NY
Posts: 19
Likes: 0
Received 0 Likes
on
0 Posts
Here's the short of how I got my top fixed:
1. Disengage the trunk release latches, per manual (need to verify if necessary)
2. Turn the gold screw on the left side of the trunk on the reservoir looking thing 1 1/2 turns counter-clockwise, per manual (need to verify if necessary)
3. Manually unlock the front latches, then unlock the mid rail latches.
4. Place front locks back in closed position when top is partially open
5. In the front of both rails, there is a black plastic tab, you need to push this down and back so it slides in place

6. with a flathead screwdriver, place screwdriver between the front latch (which should be closed so the tab can move back/forth) and the black plastic tab. Push screwdriver handle towards the rear of the car until tab pushes in and releases the sunroof mechanism lock.

7. hold the rail with one hand and the top of the hood with the other. push back until it opens. make sure you have your hand holding the rail far back so you dont pinch your fingers (which I did).

Once you have enough slack, you can remove the canvas from the front cross-member by unhooking the tabs in the front, then sliding the canvas forward then up. There are wire hooks attached on both sides of the cross-member that need to be unhooked.
Also, once I removed the latches, I noticed that they weren't broken, just that the cables pulled out from the latches. All I did to re-secure them was clean/tighten the threads from the cable, screw them back in, crimp the tube that the cables slide into, and (almost) good as new.
I'll let everyone know how they hold up, but I tested it about 20 times and they're still good. ~$450 saved and about 4 hours of time.
Just fyi - anyone in the Long Island, NY area that needs help with their top, I wouldn't mind lending a hand to fix yours for some beer in return

Thank you to everyone that contributed information in this thread / board!!!! You guys (and gals) saved me ~$2,500 in repairs.
1. Disengage the trunk release latches, per manual (need to verify if necessary)
2. Turn the gold screw on the left side of the trunk on the reservoir looking thing 1 1/2 turns counter-clockwise, per manual (need to verify if necessary)
3. Manually unlock the front latches, then unlock the mid rail latches.
4. Place front locks back in closed position when top is partially open
5. In the front of both rails, there is a black plastic tab, you need to push this down and back so it slides in place
6. with a flathead screwdriver, place screwdriver between the front latch (which should be closed so the tab can move back/forth) and the black plastic tab. Push screwdriver handle towards the rear of the car until tab pushes in and releases the sunroof mechanism lock.
7. hold the rail with one hand and the top of the hood with the other. push back until it opens. make sure you have your hand holding the rail far back so you dont pinch your fingers (which I did).
Once you have enough slack, you can remove the canvas from the front cross-member by unhooking the tabs in the front, then sliding the canvas forward then up. There are wire hooks attached on both sides of the cross-member that need to be unhooked.
Also, once I removed the latches, I noticed that they weren't broken, just that the cables pulled out from the latches. All I did to re-secure them was clean/tighten the threads from the cable, screw them back in, crimp the tube that the cables slide into, and (almost) good as new.
I'll let everyone know how they hold up, but I tested it about 20 times and they're still good. ~$450 saved and about 4 hours of time.
Just fyi - anyone in the Long Island, NY area that needs help with their top, I wouldn't mind lending a hand to fix yours for some beer in return
Thank you to everyone that contributed information in this thread / board!!!! You guys (and gals) saved me ~$2,500 in repairs.
Last edited by tullid; 08-12-2010 at 11:25 AM.
#73
08-14-2010, 07:55 AM
Help! Top Won't Open
Tullid - Congratulations on fixing your top! I have a few questions and if you could help explain you may be able to save me several hours of work if this happens again to our Mini.
We had a similar problem a month ago and our passenger side was not unlatching or moving back - result of the cable pulling out of the crimped portion on the tab. We followed the instructions here and had a ton of help from those on this thread but it still took us almost 12 hours to complete as there was too little space under the canvas to try and remove the screws. In reading your review it looks like you found an alternative way to unlatch the top at the windshield and mid section and I am not sure how you did this in the description you posted. Can you provide some additional details on the method you used? It would surely save us a ton of time and cut up hands if we can avoid removing the screws under the canvas when everything is pulled so tightly.
We did step 1 in your list, but not step 2 (I guess we missed that in the listing posted earlier) How did you complete step 3?
Thanks!
#74
08-14-2010, 03:22 PM
1st Gear
Join Date: May 2010
Location: Long Island, NY
Posts: 19
Likes: 0
Received 0 Likes
on
0 Posts
Video to show manual latch relase
Hey MPS,
here's a quick youtube video I just did to shouw how to disengage the locking mechanism:
http://www.youtube.com/watch?v=rxMRB0EX4K4
Sry for the short email but i'm typing this on my phone
Let me know if you need any other video help.
-Dan
here's a quick youtube video I just did to shouw how to disengage the locking mechanism:
http://www.youtube.com/watch?v=rxMRB0EX4K4
Sry for the short email but i'm typing this on my phone
Let me know if you need any other video help.
-Dan
Last edited by tullid; 08-14-2010 at 04:03 PM.
#75
08-31-2010, 01:10 PM

THANK YOU for posting this great information!!! My 2005 MCS's top wouldn't close last night - after about a dozen attempts I was able to get the top closed. I am concerned that if I DO open it up - that will be the last time! I am out of warranty so...
Again - thank you for taking the time and care to post this information to help the rest of the community of MCS-ers out!
Geoff GeoffC@igneous.com
Again - thank you for taking the time and care to post this information to help the rest of the community of MCS-ers out!
Geoff GeoffC@igneous.com