R50/53 Some upgrades on my R53
#1
 06-22-2015, 05:56 AM


Some upgrades on my R53
Hello everyone,
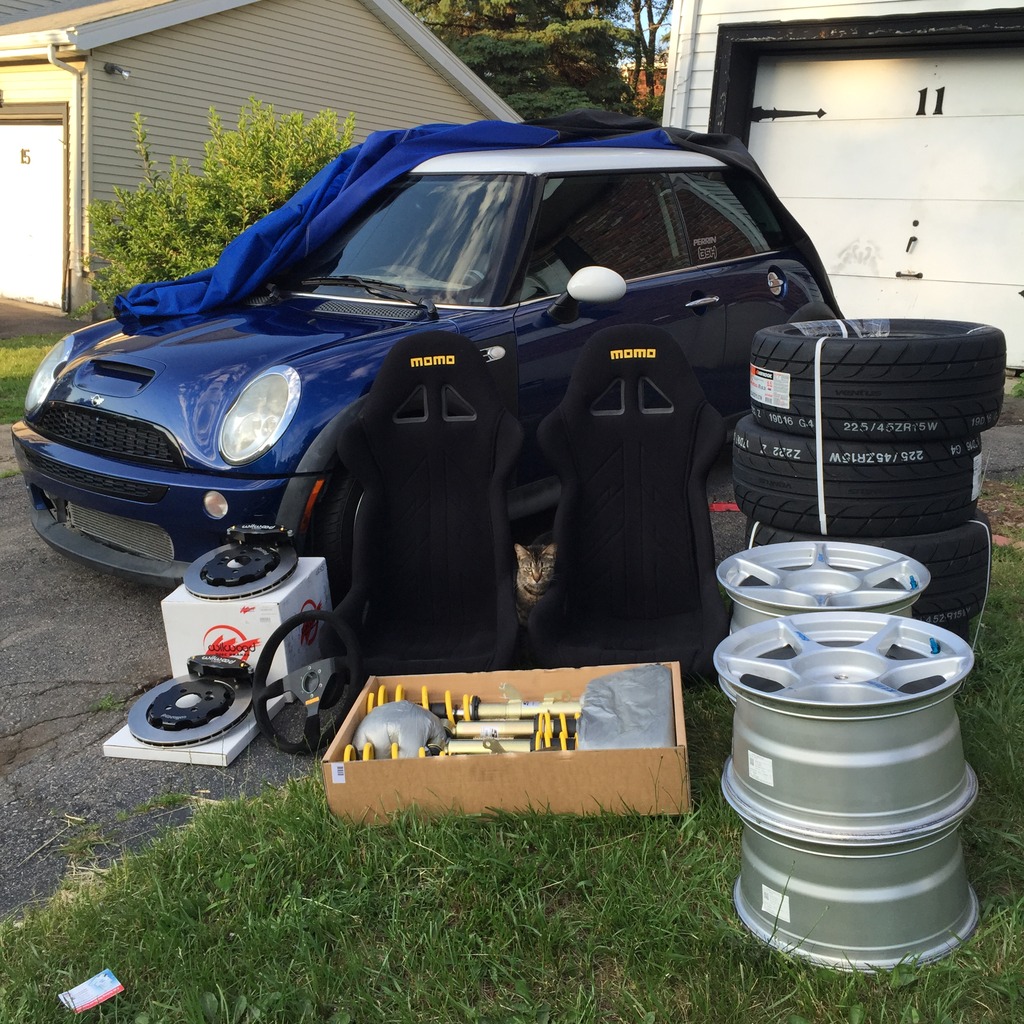
After a few years of driving my 04 R53 nearly stock I decided to give it a few upgrades..
So here is some of the stuff that I picked up over the course of last month.
- Momo 350mm suede steering wheel
- Momo wheel hub adapter
- Momo bucket seats
- Wilwood 4 piston 11.75" front BBK
- ST coilovers (no camber plates)
- 15x8 et35 Kosei K1's
- 225/45/15 Hankook RS3's
- 2 year old kitten
along with some replacement parts.. wheel bearings, wheel speed sensor, oil cooler gaskets, etc...
Installing all of the stuff at once was turning into a project, so as of now I've only bolted the suspension, brakes and wheels and steering wheel.. I've pulled the driver side seat off and decided I'd design my own seat brackets and 3d print a few prototypes.. I dint really want to go with the fixed rails as I would like to retain the stock sliders.
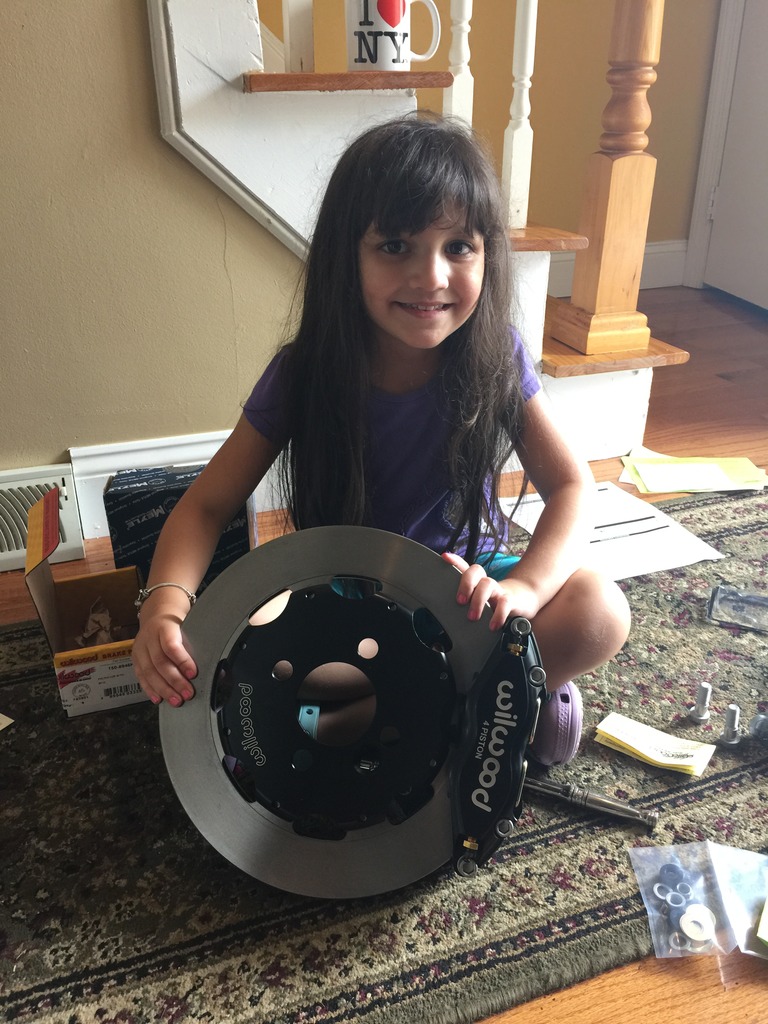
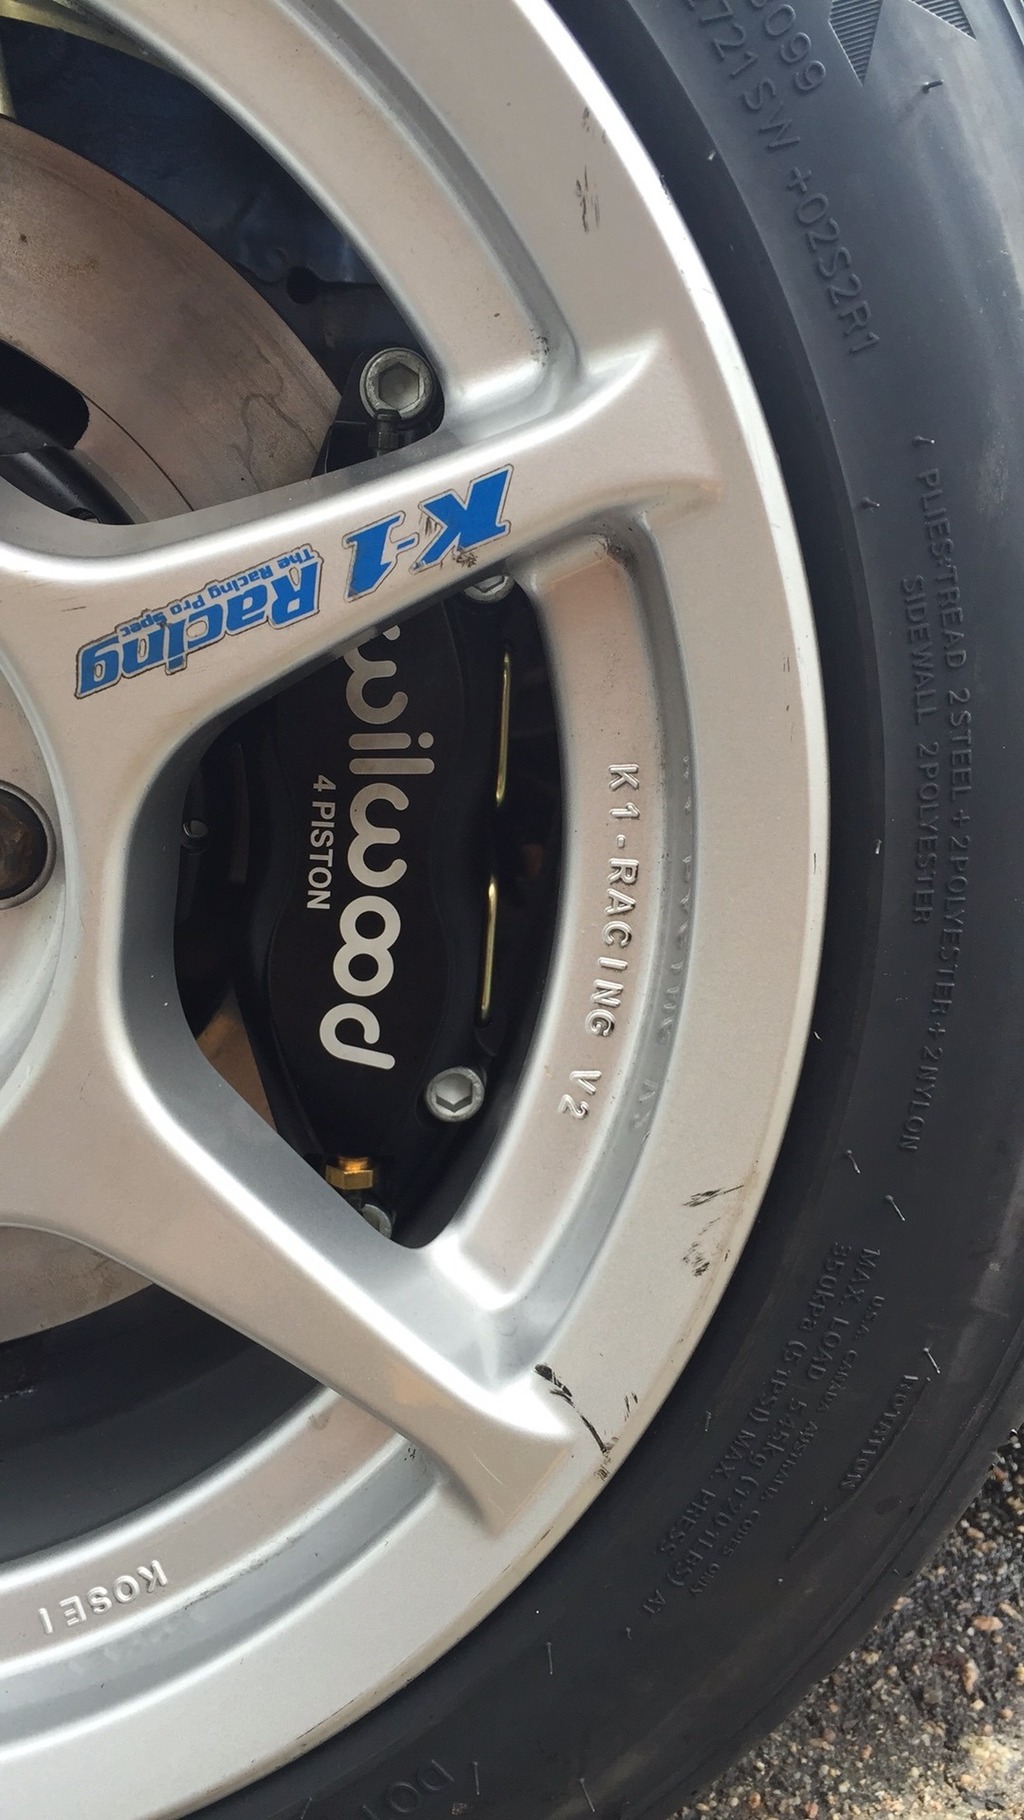
Todd from TCE was very helpful in putting my kit together. I was originally intending to go with the 12.5" wilwood kit, but those werent going to fit in my tiny Koseis, so I went with the 11.75".
using my 5 yr old niece for size comparison
Suspension and brakes bolted up...
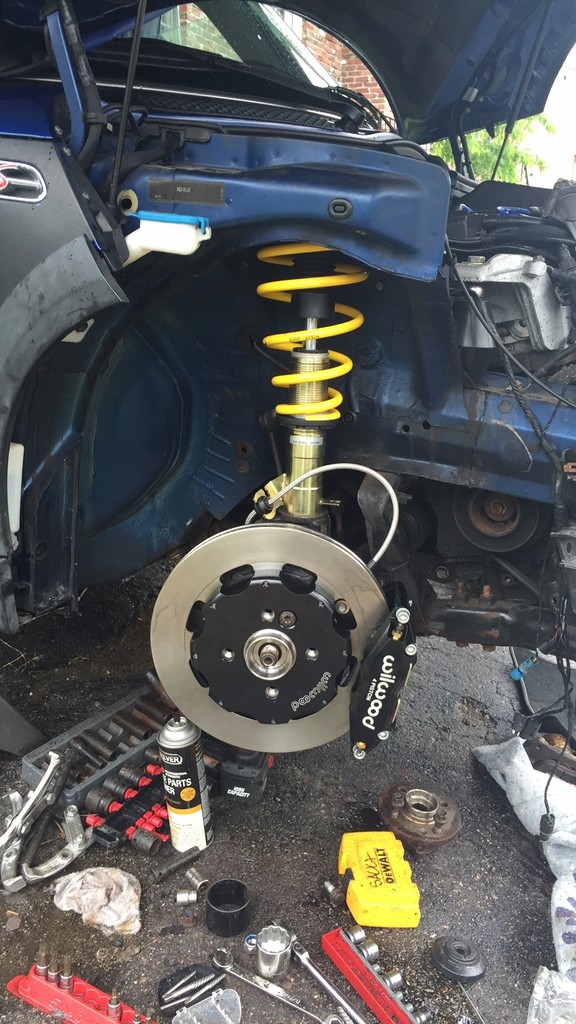
Disaster struct when I moved the steering knuckle too far out to pull the oem strut out...
Was actually looking for some input on which route to go with.. I was thinking of just replacing the axle boot for now and maybe replace the entire axle when I take her off the road for winter.. I will be replacing the clutch and adding a LSD at around that time as I intend on getting her back on the road for the spring with around 240whp.. Still working on the mod list for the winter leg..
But anyway, here it is.....

I'd love to just replace the entire axle now, but at $650 per side I'm a bit discouraged and cant really trust the aftermarket $100 ones that I'm seeing out there..
At the end of the day, I just lowered her back down on the new stuff and covered her back up. Right now I'm trying to figure out on what route to go with for the axle issue.. I only have the weekends to work on her, so I was hoping to have this all figured out by next sat and fix the issue.. If anyone with some experience with these axles would like to chime in, please do!
Sorry for the short post, I'll add more onto it later.
After a few years of driving my 04 R53 nearly stock I decided to give it a few upgrades..
So here is some of the stuff that I picked up over the course of last month.
- Momo 350mm suede steering wheel
- Momo wheel hub adapter
- Momo bucket seats
- Wilwood 4 piston 11.75" front BBK
- ST coilovers (no camber plates)
- 15x8 et35 Kosei K1's
- 225/45/15 Hankook RS3's
- 2 year old kitten
along with some replacement parts.. wheel bearings, wheel speed sensor, oil cooler gaskets, etc...

Installing all of the stuff at once was turning into a project, so as of now I've only bolted the suspension, brakes and wheels and steering wheel.. I've pulled the driver side seat off and decided I'd design my own seat brackets and 3d print a few prototypes.. I dint really want to go with the fixed rails as I would like to retain the stock sliders.
Todd from TCE was very helpful in putting my kit together. I was originally intending to go with the 12.5" wilwood kit, but those werent going to fit in my tiny Koseis, so I went with the 11.75".
using my 5 yr old niece for size comparison

Suspension and brakes bolted up...

Disaster struct when I moved the steering knuckle too far out to pull the oem strut out...
Was actually looking for some input on which route to go with.. I was thinking of just replacing the axle boot for now and maybe replace the entire axle when I take her off the road for winter.. I will be replacing the clutch and adding a LSD at around that time as I intend on getting her back on the road for the spring with around 240whp.. Still working on the mod list for the winter leg..
But anyway, here it is.....

I'd love to just replace the entire axle now, but at $650 per side I'm a bit discouraged and cant really trust the aftermarket $100 ones that I'm seeing out there..
At the end of the day, I just lowered her back down on the new stuff and covered her back up. Right now I'm trying to figure out on what route to go with for the axle issue.. I only have the weekends to work on her, so I was hoping to have this all figured out by next sat and fix the issue.. If anyone with some experience with these axles would like to chime in, please do!

Sorry for the short post, I'll add more onto it later.
#2
06-22-2015, 07:11 AM

3rd Gear
MeBoosta car looks 
As for the axle issue, I had the exact same thing happen on one side for mine lol I just left it as is for now though, I thought that was just a cv boot and its grease, car has been driving fine *knock on wood* but I did order a replacement...just haven't gotten around to it yet
As for the axle issue, I had the exact same thing happen on one side for mine
lol I just left it as is for now though, I thought that was just a cv boot and its grease, car has been driving fine *knock on wood* but I did order a replacement...just haven't gotten around to it yet
#3
06-22-2015, 10:59 AM
Vendor
Really great project! Loving what you have so far. If you do need any help with the DIY be sure to check out our tech articles here. Do you plan on tracking it ever?
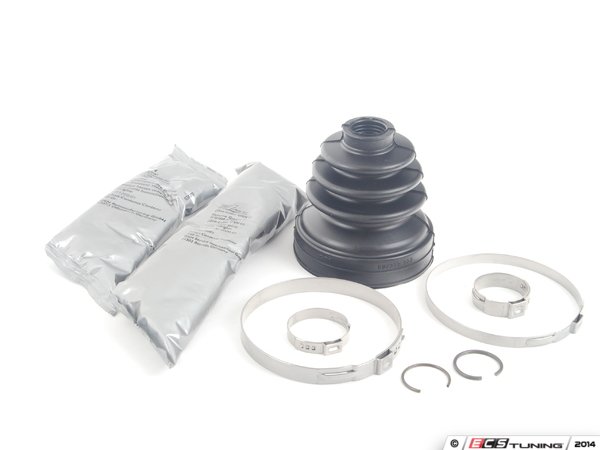
If the axle is fine and isn't clicking you should be able to just replace the boot. Have some boot kits here if needed.
-Luccia
If the axle is fine and isn't clicking you should be able to just replace the boot. Have some boot kits here if needed.
-Luccia
__________________
Your Trusted Source For DIY and Parts
FREE SHIPPING over $99 click here
MINI Parts | DIY Help | Facebook | Twitter | Instagram | YouTube | Promos
888.280.7799 | 6am - 5pm PST

FREE SHIPPING over $99 click here
MINI Parts | DIY Help | Facebook | Twitter | Instagram | YouTube | Promos
888.280.7799 | 6am - 5pm PST

#5
06-22-2015, 02:12 PM
Platinum Sponsor
This is a great project. Nice !
You can do the boot, its a bit of a job. You will have to pull the axle out and then do that inside boot and grease not you will need the inner boot. And there is a Manual and auto option.
http://www.ecstuning.com/Mini-2004-Cooper-R53-S-Coupe-L4_1.6L_W11B16A/Drivetrain/Axles/2
Good luck.
You can do the boot, its a bit of a job. You will have to pull the axle out and then do that inside boot and grease not you will need the inner boot. And there is a Manual and auto option.
http://www.ecstuning.com/Mini-2004-Cooper-R53-S-Coupe-L4_1.6L_W11B16A/Drivetrain/Axles/2
Good luck.
__________________

MINI Guru/ MINI Owner Since 2004 | NEW Lifetime Part Replacement | Local Pickup
Milltek | Genuine MINI | Forge Motorsport | NM Engineering | ECS Performance | M7 Speed
Customer Service Hours: 8am-8pm EST|Sales Team Hours: 8am-11pm | SAT 10am-7pm 800.924.5172
MINI Guru/ MINI Owner Since 2004 | NEW Lifetime Part Replacement | Local Pickup
Milltek | Genuine MINI | Forge Motorsport | NM Engineering | ECS Performance | M7 Speed
Customer Service Hours: 8am-8pm EST|Sales Team Hours: 8am-11pm | SAT 10am-7pm 800.924.5172

#7
06-23-2015, 04:57 AM
Thanks for the support guys,
I do plan on taking it to my local courses and autoX when they come up.
I'm actually missing one on the 27th because of the broken boot..
Here are a couple of pics of how it currently sits. My driveway is terribly uneven, I need to bring it down to the street on flat ground to adjust the ride height.

Almost tucking tire lol

The fitment of the brakes is pretty nuts, couldn't fit a penny in between the caliper and wheel.
This is how the drivers side of the interior currently looks like..
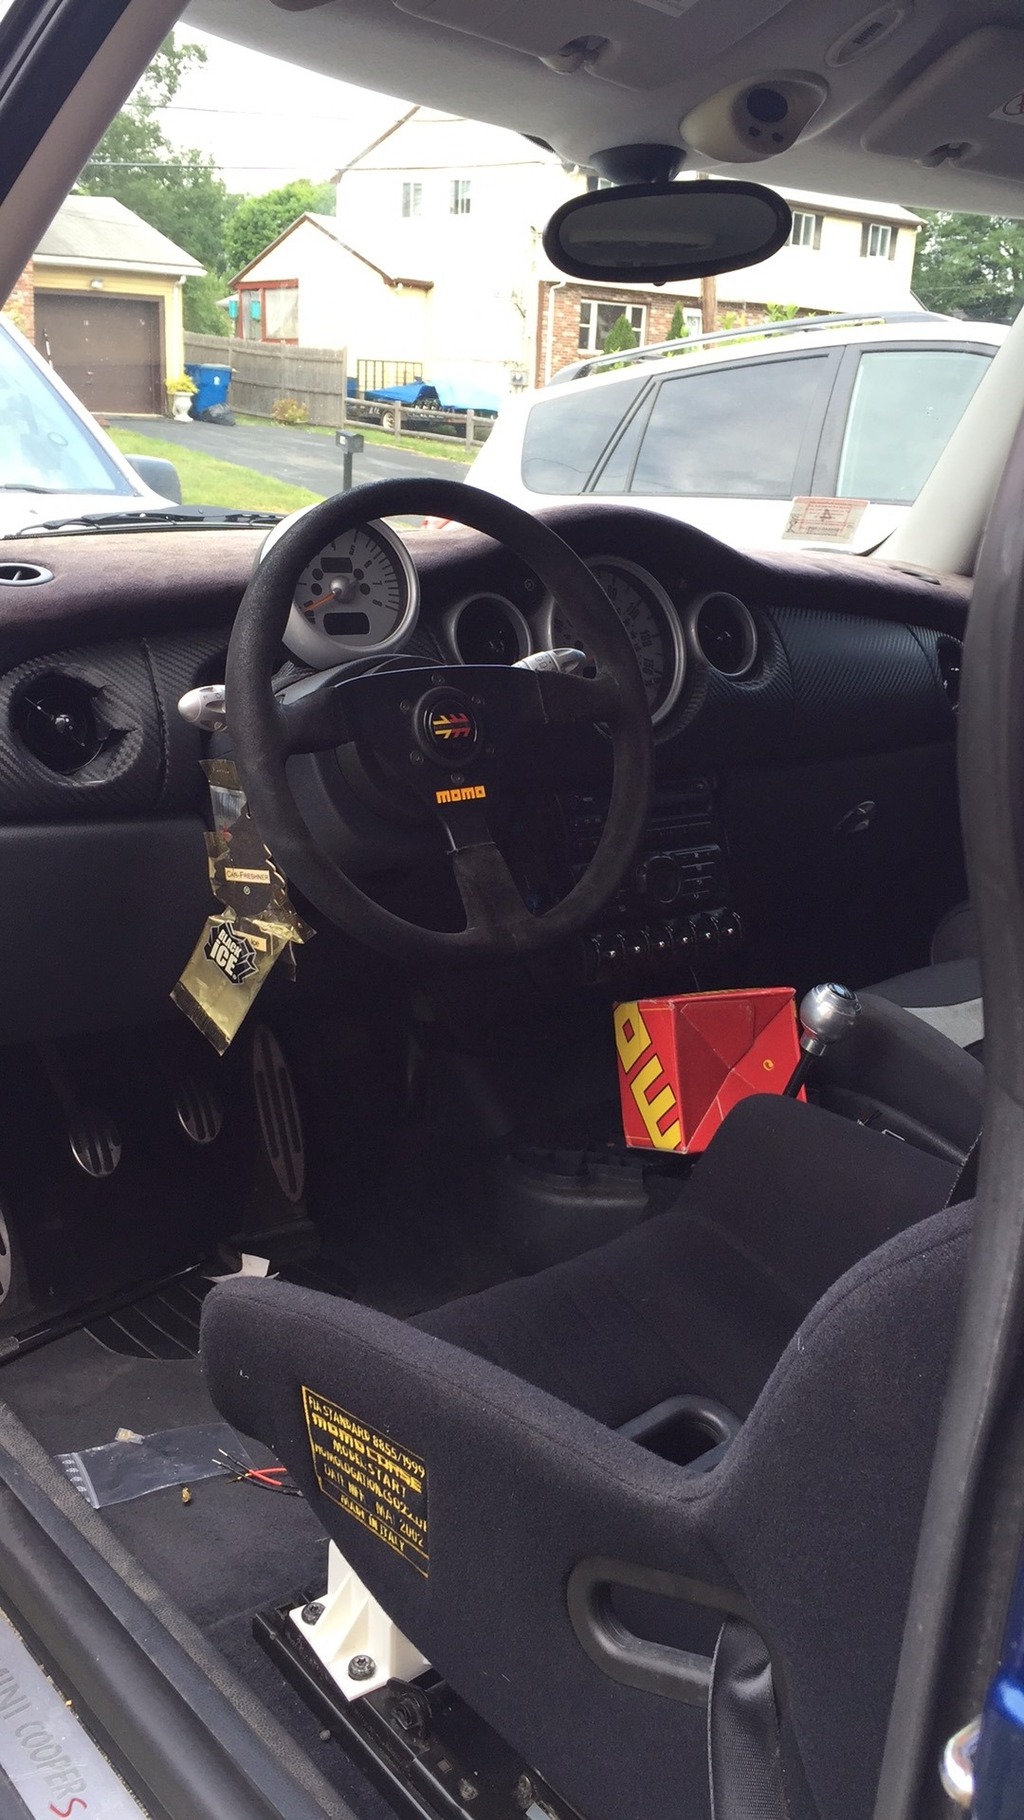
I 3d printed a set of brackets to allow me to bolt the momo seat directly to the oem sliders.. This is just a prototype. I have a friend that's a big steel guy, he's got all of the tools to bend a brackets similar to what is available out there for a fixed seat, will be talking to him about taking these dimensions and making a steel bracket... I don't expect these to hold up in case of an accident..

I do plan on taking it to my local courses and autoX when they come up.
I'm actually missing one on the 27th because of the broken boot..
Here are a couple of pics of how it currently sits. My driveway is terribly uneven, I need to bring it down to the street on flat ground to adjust the ride height.

Almost tucking tire lol

The fitment of the brakes is pretty nuts, couldn't fit a penny in between the caliper and wheel.

This is how the drivers side of the interior currently looks like..

I 3d printed a set of brackets to allow me to bolt the momo seat directly to the oem sliders.. This is just a prototype. I have a friend that's a big steel guy, he's got all of the tools to bend a brackets similar to what is available out there for a fixed seat, will be talking to him about taking these dimensions and making a steel bracket... I don't expect these to hold up in case of an accident..

Trending Topics
#8
06-23-2015, 05:30 AM
Platinum Sponsor
Track ready.  Good luck on the auto X those can be some really fun days.
Looks like you have some Nightspokes from the MINI sidewalk that came off of it. Someone will pick those up if you sell them.
Good luck on the auto X those can be some really fun days. Looks like you have some Nightspokes from the MINI sidewalk that came off of it. Someone will pick those up if you sell them.
__________________
MINI Guru/ MINI Owner Since 2004 | NEW Lifetime Part Replacement | Local Pickup
Milltek | Genuine MINI | Forge Motorsport | NM Engineering | ECS Performance | M7 Speed
Customer Service Hours: 8am-8pm EST|Sales Team Hours: 8am-11pm | SAT 10am-7pm 800.924.5172
MINI Guru/ MINI Owner Since 2004 | NEW Lifetime Part Replacement | Local Pickup
Milltek | Genuine MINI | Forge Motorsport | NM Engineering | ECS Performance | M7 Speed
Customer Service Hours: 8am-8pm EST|Sales Team Hours: 8am-11pm | SAT 10am-7pm 800.924.5172
#9
06-23-2015, 06:02 AM

Former Vendor
Great job on a few fronts: first, awesome 3d prototype. That's first class. Second I love how you went with a meatier tire/smaller wheel. I'm soooo over the big-wheels-with-rubberbands look. Oh, and lastly, be sure to treat those rotors with care, specifically don't wash them or soak them after spirited use: they're susceptible to warping with sudden temperature change.

#11
06-23-2015, 08:11 AM
Vendor
-Luccia
__________________
Your Trusted Source For DIY and Parts
FREE SHIPPING over $99 click here
MINI Parts | DIY Help | Facebook | Twitter | Instagram | YouTube | Promos
888.280.7799 | 6am - 5pm PST
FREE SHIPPING over $99 click here
MINI Parts | DIY Help | Facebook | Twitter | Instagram | YouTube | Promos
888.280.7799 | 6am - 5pm PST

#14
06-24-2015, 11:01 AM

#15
06-24-2015, 07:16 PM

1st Gear
Join Date: Aug 2014
Location: North Dakota
Posts: 17
Likes: 0
Received 0 Likes
on
0 Posts
Beautiful build.
As for the axel... as others have suggested replace the boot...
I did the same thing..(Passenger side is the difficult side)..Boom pulled to hard and yup ripped...
Replaced, no problems.
I like those rims they are very simple straight forward design superb work on having those brakes fit though wow super tight.
Excited to see if you do any video of track days and such..Keep it coming.

#17
06-26-2015, 06:46 AM
That is a pretty nice fitment! As for the brakes, thought about doing wheel spacers?.. I run 5mm all around on my car because my race wheels slightly touch my rear coils. Might give you more poke with the wheels and cause it to rub a bit, but still might be better than having the caliper almost touching the wheel.
-Luccia
-Luccia
Hi Luccia ,
Thanks for your feedback. when I first slid the wheels back in, there was some interference with the coils bottomed out. I had to raise them a bit to get some clearance, but I do plan on snagging a set of spacers as thinking that It'll change under use.
#18
06-26-2015, 12:04 PM

Also...kind of a side note question.....but if you ever were in an accident and got injured, could an insurance company refuse to pay your medical bills if you pulled the airbag out of your car?

#19
06-27-2015, 06:23 PM
#20
06-27-2015, 06:31 PM
Any info on the Mono wheel and adapter? How difficult was it to get the stock steering wheel/airbag off?
Also...kind of a side note question.....but if you ever were in an accident and got injured, could an insurance company refuse to pay your medical bills if you pulled the airbag out of your car?
Also...kind of a side note question.....but if you ever were in an accident and got injured, could an insurance company refuse to pay your medical bills if you pulled the airbag out of your car?
The momo adapter seems to be pretty common, heres a better pic of it.

Regarding insurance.. It may, but I hardly ever drive this car. I'm in no better place in my supercharged Jeep Wrangler nor the motorcycle that I ride everyday to work..
#21
06-27-2015, 08:16 PM
Great job on a few fronts: first, awesome 3d prototype. That's first class. Second I love how you went with a meatier tire/smaller wheel. I'm soooo over the big-wheels-with-rubberbands look. Oh, and lastly, be sure to treat those rotors with care, specifically don't wash them or soak them after spirited use: they're susceptible to warping with sudden temperature change.
Completely agree with the wheel/tire comment. Not to mention, our cars ride and handle so much better with a setup like this. I just picked up my JCW this week but can't wait to order up smaller wheels and a nice tire, even for street use.
OP, very nice job! You're also making me want to yank the stock steering wheel as well!


#24
06-28-2015, 10:23 PM

A little hint on the airbag. Pull the air bag controller out. It is under the carpet by the e brake. You won't get the airbag light and it won't register a code. When and if you go back to stock it will all be cleared and fine. It is also easier to sell if it hasn't thrown a code. The car runs just fine without the airbag controller in the car.
#25
06-29-2015, 04:52 AM
Here is pic of the Jeep without the tub. I think that this was the day that I dropped the drivetrain on the new frame/suspension and was test fitting some new hardware. The blower is an M90 unit retrieved from a 90's GM vehicle. It's routed directly to the throttle body, no intercooler.
I Recently parked it and began sourcing parts for a Ford 8.8 rear axle swap, which comes with a factory LSD and disc brakes. Also getting the SYE adapter bolted to the transfer case along with a Tom Woods driveshaft.. it'll be sitting for a bit.. Hopefully I can have it back up before Sept. When my classes start again.

As far as plans for the power upgrade goes, I'm still looking into parts.. Will likely snag a power upgrade bundle from M7 with the ATI, a baffled oil pan, cam, etc....