Navigation & Audio R56 speaker replacement how-to
#751
 06-27-2010, 09:35 PM


Back speakers
With the help of those who went before me in this forum (many thanks to all), I replaced the awful front speakers in my new 2010 convertible, and it made an amazing difference. I got brave enough to try the back speakers this weekend, and when I got the back panel off, was shocked to see 6.5" speakers mounted in a raised plastic shell (riveted in, no less) where I expected to find 6x9s.. Tried to find a way to un-rivet the awful stock speakers so that I could at least put in better 6.5"s, but gave up after 30 minutes and a beer.
It still sounds better than it did when it rolled off the lot - after only $150 of speakers in the front. Will have to be good enough.
It still sounds better than it did when it rolled off the lot - after only $150 of speakers in the front. Will have to be good enough.
#752
06-28-2010, 07:54 AM

tomeav, The proper method for removing a rivet is to drill out the core thereby separating the flange (top) from the core. Once this has been done, the part is released and the core can usually be knocked through or twisted out. I don't know if this helps but it is rather simple to do. Good luck!

#754
07-20-2010, 08:56 AM

1st Gear
Join Date: Jul 2010
Location: Austin, Texas
Posts: 22
Likes: 0
Received 0 Likes
on
0 Posts
Does anyone know the specs of the original head unit on the Mini? Wattage, SNR, etc? Trying to decide if I should have an amp for the front speakers, then another amp for the sub. Currently, I have a sony with 45W x 4CH head unit on my Toyota pickup with Fosgate amp to run the subs and it sounds pretty good. The option of just adding new speakers and an amp to drive the subs sound pretty good to me, but wanted to see if anyone had any complaints with the power of the stock head unit.
2010 MCS Hardtop Just got it this weekend.
2010 MCS Hardtop
Just got it this weekend.
#755
07-22-2010, 12:40 PM
1st Gear
Join Date: Jul 2010
Location: Austin, Texas
Posts: 22
Likes: 0
Received 0 Likes
on
0 Posts
Ok... I have read a ton of pages from this thread (great thread BTW) and I have not seen anyone post the exact dimensions of the space under the passenger seat. I'd like to try to install an amp under there and would like to know if I have room.
Also, has anyone found an easier way to tap into the speaker level lines other than removing the console? Can you just tap from the door speakers? I have a non HIFI system.
Thanks
Also, has anyone found an easier way to tap into the speaker level lines other than removing the console? Can you just tap from the door speakers? I have a non HIFI system.
Thanks
#756
07-22-2010, 04:46 PM
Speaker tap
Hellchicken, If you are looking to add an external amp to the Boost stereo (base system) you can look to this source for neat wiring harnesses and other necessary stuff. Check under "audio upgrades" heres the site:
http://www.newministuff.com
These guys came recommended to me and I have seen them recommended by others in these pages and elsewhere. They are in the UK so expect to pay a bit for shipping. These guys at newministuff might be able too help you with the other questions you have about the Mini stereo.
As far as under the seat...it depends on a number of things like what options and type of interior your car has. Simple solution is to get a measuring tape and have at it. I checked for clearance of my amp and stuff and found that under the passenger seat I had no problem with 14 x 14 x 3.5 inches, but I don't know the maximum sizes you can fit.
Good Luck, Dan
#757
07-23-2010, 06:36 AM
1st Gear
Join Date: Jul 2010
Location: Austin, Texas
Posts: 22
Likes: 0
Received 0 Likes
on
0 Posts
Thanks djdratty! That is exactly what I'm looking for. I will give them a shot and try out their plug.
Thanks for the info on the space under the seat. I've never seen dimensions posted before, just talk about how much room there was under there. I just bought a 19" amp which will run all 6 speakers + a sub. I guess I will try mounting by the boot where the HIFI amp would normally go. I was just trying to avoid running extra wire length by mounting it under the seat.
I believe that I read on this thread that 6.5" and 4" speakers will fit on the doors & 6x9" on the rear, so I plan on replacing all of the factory speakers with Infinity Kappa. The sub I'm not 100% sure there to put it yet, but I want a very clean solution, so I'm looking at making an enclosure that utilizes the floor jack compartment.
wish me luck! I hate the thought of tearing open my brand new Mini
But it must be done
#758
07-24-2010, 05:10 AM

[quote=Hellchicken;3096653]Thanks djdratty! That is exactly what I'm looking for. I will give them a shot and try out their plug.
A word of caution about installing the plug: The accompanying instructions are a bit vague about what plugs back in to the head unit....don't ask how I know.....after you unsnap the multi-connector plug from the back of the head unit you will see a 12 pin plug that mates up with the corresponding plug on the loom. unsnap everything else from the head unit plug and mate it up with the corresponding end of the loom. On my loom(I chose the RCA front channel option) this mates up the speaker outputs. Unsnap all the other plugs that go into the back of the head unit and snap them into the loom plug that replaces the factory plug....in other words put them back from whence they came to preserve the functions they serve....CD, AUX IN...then you'll be good.
Phil
#759
07-25-2010, 08:22 AM
1st Gear
Join Date: Jul 2010
Location: Austin, Texas
Posts: 22
Likes: 0
Received 0 Likes
on
0 Posts
Thanks peporter. I will keep that in mind.
Order has been placed and all of the equipement will be here next week.
Infinity Kappa 42.9i 2-way 4" speaker for upper front door.
Infinity Kappa 62.9i 2-way 6.5" speaker for lower front door.
Infinity Kappa 693.9i 3-way 6x9" speaker for the rear.
Soundstream RUB5.800 5-CH amp, 115Wx4 + 1 mono sub CH 340W all @ 2 Ohm.
10" Kicker Comp speaker
Goal is to have a nice semi loud system great for rock and blues.
Does anyone have any suggestions on Capacitors for the amp? To cap or not to cap... that is the question. Some swear by it, others say it is a waste of money. I don't think I will need one with this system, but not sure what experiences some have had. I guess it depends on how good of an alternator the Mini has. Your feedback and experiences are greatly appreciated.
#760
07-25-2010, 08:27 PM

Polk Audio db6501 Install
First � a sincere thank you to all the contributors to this thread. I spent over 6 months reading and studying all the posts and replies and the knowledge I gained here was invaluable in making the first phase of the speaker swap a complete success.
Over the last two weekends I replaced the door speakers with a pair of Polk Audio db6501s. I used the tweeter adaptor template. Here is what I learned from that � the tweeter adapter only fits one way. During the week, I made mine out of �� veneer I had lying around, painted them black to hide them in the doors and installed the Polk tweeters in them to get a jump on the entire installation. When I got the doors taken apart and tried to line up the holes, I learned that I had both of them backwards and had to disassemble everything and make sure the tweeter adapter �front� faced into the cabin and the holes lined up correctly.
I used a door trim puller to take off the door trim � that went fine with no broken clips. I used the blue painter tape trick to identify the location of all the clips so putting the door trim back on was easy. Thanks for that tip. I also kept the doors locked so as to minimize the chance of messing up the door lock button � the trim pieces came off and went back on easily over the lowered buttons.
I mounted the crossovers in the armrests � they fit perfectly. I kept the crossover covers off (didn�t even try to see if they would fit when re-installing the arm rest covers) and everything fits great. I drilled two small holes in the armrest, placed some foam rubber on the back of the crossovers and screwed them in using the mounting holes in the crossovers (a nut and bolt).
If anyone has read this entire thread, you might remember I was concerned about the speaker wire gauge since I had read other posts in this forum making fun of the factory skinny wires. According to my wire stripper tool, the factory wire is 18 gauge which is the same size as the wire Polk supplies with its speakers, so I was fine leaving it all as is and not rewiring the doors. I used the lower speaker feed as my input source and followed the wire colors listed in this post (https://www.northamericanmotoring.co...1-post274.html) and it was right on target. I tried to be pure and re-use the factory plugs with small spade ends inserted in them, but it seemed not to be as secure as I would have liked and I had visions of the spades falling out inside the door and causing problems down the road. So I clipped off the factory plugs and soldered some speaker wire to the factory wires to be the input to the crossovers in the doors. I taped up the upper speaker plugs and tie wrapped them to another wire in the door cavity. I also used the area behind the tweeter (upper speaker location) to house several inches of speaker wire slack for both the upper and lower speakers in case I ever need to remove them. I also poked a hole in the rubber grommet above the lower speakers to route the wires to the armrest area (thanks for that tip who ever thought of it). The lower speakers went in easily, but on the driver�s side I did have to fall back and spin the speaker a bit to use fresh holes in the plastic as I wasn�t getting good bite with the screws I was using. The passenger door went in with no problems.
I started the passenger door at 4 pm on a Sunday, finished around 6 pm. The next Sunday, I did the driver�s door and that took about 3 hours � I work slow and as I mentioned above, I had to disassemble the tweeters and of course I had to re-route wires as I never get that right the first time. I also had the rear view mirror clip thing happen where the clips come out when the switch is taken out to remove the upper speaker cover, but I remembered reading that they only go in one way and it was obvious and everything went back together fine after three or four tries.
The verdict: This is probably the best $150 I have ever spent on a car. The Polks sound great � natural and warm and just what I was looking for. I now hear things in the music I haven�t heard for almost a year (yes � it took me that long to read and re-read all the posts in this thread, and then decide on a course of action . . .) Bass and treble is so much cleaner and better sounding. The efficiency of the Polks makes the standard Boost stereo certainly adequate for 95% of the listening I do � very loud and clean, but it�s not shaking the mirrors . . .
Based on a recommendation from Crutchfield, I have a set of Kicker KS690 for the rears. I plan to install them and some Dynamat in the fall when the heat is less and working conditions are better. I know that Kicker isn�t a brand well liked or used on this forum, but Crutchfield said they have good bass response, which is what I am looking for from the rear speakers. I can�t justify going the sub-woofer route with the cost of the enclosure etc. and the loss of storage space, but I am not totally sold on the Kickers as I don�t want them to ruin the great sound of the Polks. Perhaps I�ll install a high frequency filter to mute the tweeters on the Kickers . . . so I�ll do the channel swap and install the Kickers and then decide if I want to amp the system to get that last 5% I know I will want . . . .
Again, thanks to all who have shared their successes (and failures) and allowed the rest of us to learn what the heck we got ourselves into when we said �I can do better aftermarket� when looking at the Hi Fi option.
Oh, and I almost forgot - I have a 2009 hardtop with the Boost (standard) audio. One day I figure out how to make a cool signature with a picture of the car . . .
#761
07-29-2010, 07:18 AM
1st Gear
Join Date: Jul 2010
Location: Austin, Texas
Posts: 22
Likes: 0
Received 0 Likes
on
0 Posts
Great post Ekohfarm!
I plan to start my make-over next weekend... still waiting for some last minute items to arrive.
Now, I plan to tap into the harness directly behind my non-Hifi head unit. Has anyone found a better place to tap into the speaker lines and remote wire for the amp? I thought about just getting the speaker lines directly from the speakers, but not sure where to get the remote signal. Is there another signal I can use as a remote that is in the rear of the car? If so, please share!!! It will certainly make the entire project much easier if I don't have to remove the dash to get to the stereo.
One last comment... I bought 20 sqft of dynamat, am I going too extreme? Can anyone post their experience with dynamat and say that covering the entire back makes a more noticeable difference than just placing smaller strips in locations?
I will post pictures when complete. Thanks to everyone who contributed to this thread. I feel more confident knowing the small gotchas from those who have posted before me.
-John
#762
07-29-2010, 10:24 AM

The remote wire for the amp if used will keep the amp on for 15 to 30 minutes after the car has been turned off (this may have changed for 2010 but definitely applies to 2007 -2009) and depending on the amp used can dramatically drain you battery. Many of us have used the cigarette lighte line to turn the amp on and off as it is only on when the engine is running. But in any case I believe the amp turn on turn off line can be found in the connector that sits behind the X9331.
There is a lot of info here on the X9331 connector if you search for it.
BTW I believe that newministuff carries a X9331 harness adapter now.
#763
08-01-2010, 01:53 PM

First � a sincere thank you to all the contributors to this thread. I spent over 6 months reading and studying all the posts and replies and the knowledge I gained here was invaluable in making the first phase of the speaker swap a complete success.
Over the last two weekends I replaced the door speakers with a pair of Polk Audio db6501s. I used the tweeter adaptor template. Here is what I learned from that � the tweeter adapter only fits one way. During the week, I made mine out of �� veneer I had lying around, painted them black to hide them in the doors and installed the Polk tweeters in them to get a jump on the entire installation. When I got the doors taken apart and tried to line up the holes, I learned that I had both of them backwards and had to disassemble everything and make sure the tweeter adapter �front� faced into the cabin and the holes lined up correctly.
I used a door trim puller to take off the door trim � that went fine with no broken clips. I used the blue painter tape trick to identify the location of all the clips so putting the door trim back on was easy. Thanks for that tip. I also kept the doors locked so as to minimize the chance of messing up the door lock button � the trim pieces came off and went back on easily over the lowered buttons.
I mounted the crossovers in the armrests � they fit perfectly. I kept the crossover covers off (didn�t even try to see if they would fit when re-installing the arm rest covers) and everything fits great. I drilled two small holes in the armrest, placed some foam rubber on the back of the crossovers and screwed them in using the mounting holes in the crossovers (a nut and bolt).
If anyone has read this entire thread, you might remember I was concerned about the speaker wire gauge since I had read other posts in this forum making fun of the factory skinny wires. According to my wire stripper tool, the factory wire is 18 gauge which is the same size as the wire Polk supplies with its speakers, so I was fine leaving it all as is and not rewiring the doors. I used the lower speaker feed as my input source and followed the wire colors listed in this post (https://www.northamericanmotoring.co...1-post274.html) and it was right on target. I tried to be pure and re-use the factory plugs with small spade ends inserted in them, but it seemed not to be as secure as I would have liked and I had visions of the spades falling out inside the door and causing problems down the road. So I clipped off the factory plugs and soldered some speaker wire to the factory wires to be the input to the crossovers in the doors. I taped up the upper speaker plugs and tie wrapped them to another wire in the door cavity. I also used the area behind the tweeter (upper speaker location) to house several inches of speaker wire slack for both the upper and lower speakers in case I ever need to remove them. I also poked a hole in the rubber grommet above the lower speakers to route the wires to the armrest area (thanks for that tip who ever thought of it). The lower speakers went in easily, but on the driver�s side I did have to fall back and spin the speaker a bit to use fresh holes in the plastic as I wasn�t getting good bite with the screws I was using. The passenger door went in with no problems.
I started the passenger door at 4 pm on a Sunday, finished around 6 pm. The next Sunday, I did the driver�s door and that took about 3 hours � I work slow and as I mentioned above, I had to disassemble the tweeters and of course I had to re-route wires as I never get that right the first time. I also had the rear view mirror clip thing happen where the clips come out when the switch is taken out to remove the upper speaker cover, but I remembered reading that they only go in one way and it was obvious and everything went back together fine after three or four tries.
The verdict: This is probably the best $150 I have ever spent on a car. The Polks sound great � natural and warm and just what I was looking for. I now hear things in the music I haven�t heard for almost a year (yes � it took me that long to read and re-read all the posts in this thread, and then decide on a course of action . . .) Bass and treble is so much cleaner and better sounding. The efficiency of the Polks makes the standard Boost stereo certainly adequate for 95% of the listening I do � very loud and clean, but it�s not shaking the mirrors . . .
Based on a recommendation from Crutchfield, I have a set of Kicker KS690 for the rears. I plan to install them and some Dynamat in the fall when the heat is less and working conditions are better. I know that Kicker isn�t a brand well liked or used on this forum, but Crutchfield said they have good bass response, which is what I am looking for from the rear speakers. I can�t justify going the sub-woofer route with the cost of the enclosure etc. and the loss of storage space, but I am not totally sold on the Kickers as I don�t want them to ruin the great sound of the Polks. Perhaps I�ll install a high frequency filter to mute the tweeters on the Kickers . . . so I�ll do the channel swap and install the Kickers and then decide if I want to amp the system to get that last 5% I know I will want . . . .
Again, thanks to all who have shared their successes (and failures) and allowed the rest of us to learn what the heck we got ourselves into when we said �I can do better aftermarket� when looking at the Hi Fi option.
Oh, and I almost forgot - I have a 2009 hardtop with the Boost (standard) audio. One day I figure out how to make a cool signature with a picture of the car . . .
Over the last two weekends I replaced the door speakers with a pair of Polk Audio db6501s. I used the tweeter adaptor template. Here is what I learned from that � the tweeter adapter only fits one way. During the week, I made mine out of �� veneer I had lying around, painted them black to hide them in the doors and installed the Polk tweeters in them to get a jump on the entire installation. When I got the doors taken apart and tried to line up the holes, I learned that I had both of them backwards and had to disassemble everything and make sure the tweeter adapter �front� faced into the cabin and the holes lined up correctly.
I used a door trim puller to take off the door trim � that went fine with no broken clips. I used the blue painter tape trick to identify the location of all the clips so putting the door trim back on was easy. Thanks for that tip. I also kept the doors locked so as to minimize the chance of messing up the door lock button � the trim pieces came off and went back on easily over the lowered buttons.
I mounted the crossovers in the armrests � they fit perfectly. I kept the crossover covers off (didn�t even try to see if they would fit when re-installing the arm rest covers) and everything fits great. I drilled two small holes in the armrest, placed some foam rubber on the back of the crossovers and screwed them in using the mounting holes in the crossovers (a nut and bolt).
If anyone has read this entire thread, you might remember I was concerned about the speaker wire gauge since I had read other posts in this forum making fun of the factory skinny wires. According to my wire stripper tool, the factory wire is 18 gauge which is the same size as the wire Polk supplies with its speakers, so I was fine leaving it all as is and not rewiring the doors. I used the lower speaker feed as my input source and followed the wire colors listed in this post (https://www.northamericanmotoring.co...1-post274.html) and it was right on target. I tried to be pure and re-use the factory plugs with small spade ends inserted in them, but it seemed not to be as secure as I would have liked and I had visions of the spades falling out inside the door and causing problems down the road. So I clipped off the factory plugs and soldered some speaker wire to the factory wires to be the input to the crossovers in the doors. I taped up the upper speaker plugs and tie wrapped them to another wire in the door cavity. I also used the area behind the tweeter (upper speaker location) to house several inches of speaker wire slack for both the upper and lower speakers in case I ever need to remove them. I also poked a hole in the rubber grommet above the lower speakers to route the wires to the armrest area (thanks for that tip who ever thought of it). The lower speakers went in easily, but on the driver�s side I did have to fall back and spin the speaker a bit to use fresh holes in the plastic as I wasn�t getting good bite with the screws I was using. The passenger door went in with no problems.
I started the passenger door at 4 pm on a Sunday, finished around 6 pm. The next Sunday, I did the driver�s door and that took about 3 hours � I work slow and as I mentioned above, I had to disassemble the tweeters and of course I had to re-route wires as I never get that right the first time. I also had the rear view mirror clip thing happen where the clips come out when the switch is taken out to remove the upper speaker cover, but I remembered reading that they only go in one way and it was obvious and everything went back together fine after three or four tries.
The verdict: This is probably the best $150 I have ever spent on a car. The Polks sound great � natural and warm and just what I was looking for. I now hear things in the music I haven�t heard for almost a year (yes � it took me that long to read and re-read all the posts in this thread, and then decide on a course of action . . .) Bass and treble is so much cleaner and better sounding. The efficiency of the Polks makes the standard Boost stereo certainly adequate for 95% of the listening I do � very loud and clean, but it�s not shaking the mirrors . . .
Based on a recommendation from Crutchfield, I have a set of Kicker KS690 for the rears. I plan to install them and some Dynamat in the fall when the heat is less and working conditions are better. I know that Kicker isn�t a brand well liked or used on this forum, but Crutchfield said they have good bass response, which is what I am looking for from the rear speakers. I can�t justify going the sub-woofer route with the cost of the enclosure etc. and the loss of storage space, but I am not totally sold on the Kickers as I don�t want them to ruin the great sound of the Polks. Perhaps I�ll install a high frequency filter to mute the tweeters on the Kickers . . . so I�ll do the channel swap and install the Kickers and then decide if I want to amp the system to get that last 5% I know I will want . . . .
Again, thanks to all who have shared their successes (and failures) and allowed the rest of us to learn what the heck we got ourselves into when we said �I can do better aftermarket� when looking at the Hi Fi option.
Oh, and I almost forgot - I have a 2009 hardtop with the Boost (standard) audio. One day I figure out how to make a cool signature with a picture of the car . . .
Hi,
I also purchased the Polk's 6501 components with the crossovers and tweeters. I have to ask you. So currently you are using the STOCK REAR speakers, until you upgrade in the fall? You also have the standard Boost Radio with CD player? (not HiFi or Harmon Kardon, correct?) So my question is, did you do the channel swap or leave it as it is. And it sounds great?
Personally I would rather not mess with the channel swap but I was just curious what you have and what you did, since my setup is pretty much like yours. Please let me know. Thanks.
#764
08-06-2010, 12:48 PM
IMAMINI - Let me clarify. Yes, I am still using the stock rear speakers and I have not done the channel swap yet. The db6501s sound great. The rear speakers sound like crap. They are horrible and will be replaced. I saw no reason to do the channel swap unitl I put in the rear speakers and amp. I'll just do it via the amp wiring and not get involved with re-wiring the 9331. I now drive with the fader almost all on the front and it does sound great - remember that the door speakers can only do so much, so I am commenting on the clarity, spearation, high end frequency response, etc. Bass is nice but heck it could be better . . . and I think the 6x9 Kickers amplified will give enough bass punch to satisfy me. My goal was, in the end, better sound for a reasonable amount of money (defined as $500 - $750) as an alternative to the disappointing high fi option available at the time - I don't want to spend a crazy amount of money - I want to spend about what the hi fi option would have cost.
#765
08-16-2010, 01:22 PM
1st Gear
Join Date: Jul 2010
Location: Austin, Texas
Posts: 22
Likes: 0
Received 0 Likes
on
0 Posts
There is a much better place for the audio lines to be picked up it is called the X9331 connector and it is in the foot well on the left side (drivers side if other than england or japan) of the car.
The remote wire for the amp if used will keep the amp on for 15 to 30 minutes after the car has been turned off (this may have changed for 2010 but definitely applies to 2007 -2009) and depending on the amp used can dramatically drain you battery. Many of us have used the cigarette lighte line to turn the amp on and off as it is only on when the engine is running. But in any case I believe the amp turn on turn off line can be found in the connector that sits behind the X9331.
There is a lot of info here on the X9331 connector if you search for it.
BTW I believe that newministuff carries a X9331 harness adapter now.
I would highly recommend this for a future install. The only issue is that it requires the ignition to the active (Ie: hit the start button once after key is inserted), but it is nice to know that you can control when the amp comes on and goes off. The secret is keeping that negative line to the amp as short as possible. It should be no more than a couple of feet long. That and running the power lines away from the speaker lines. That should ensure a nice quiet system. I did a complete install... new Infinity Kappa speakers all the way around, MTX ReQ5 line level converter, and Soundstream RUB5.800 amp, 10" Kicker Comp Sub.
Don't want to regurgitate too much from all of the previous posts, but here are my lessons learned and useful tips which made it a successful project.
- There are some great posts with detailed wire color. I found that on my 2010 there was one different wire color than posted on most forums. I found one that had a matching x9331 color scheme to my '10 MCS. Oh, and the female end goes to the head unit. 2010 x9331.
- Running the speaker wires from the x9331 made it better to keep the power line and speaker lines separate. The battery is on the passenger side, so I ran the 8 gauge wire all the way back, while the x9331 connect is on the driver side. Very convenient.
- Under the passenger seat is a large area (roughly 13"x16"). Great spot for an amp. Mine only had a small computer module, but plenty of room for a small amp. (Do not try out your system with the front seat airbag cable removed. It will give you a cpu error which has to be cleared at the dealer).
- Lower rear seat comes out by just pulling up from the each front corner. A quick tug will set her free!!
- Definitely putting the painter's tape idea on all of the clip locations made it super easy to get all of the panels back on.
- Purchased door panel removal kit from Harbor Freight. I only used a couple of them, but they are made of plastic and does not scratch the panels. Nice!
- I used FATMAT instead of Dynamat. Much cheaper and works just as good. Here is their link, but ebay was a great place to purchase it with free shipping.
- Lastly, take your time and do it right the first time. Use solder joints and shrink tubing for all the connections, bundle your wires with zip ties, etc... it took me three long days to get the entire job complete, but it was totally worth it.

My system needs some fine tuning, but it surpasses the factory HIFI option by a long shot. All for about $550. WOW!!! Well, I already owned the 10" Kicker Comp sub-speaker
My previous post has the components I purchased. Thanks to all who have contributed to this post. I certainly helps having all of this information going into a project of this magnitude.
#766
08-26-2010, 01:39 PM

Yes!
To all you audiophiles and mini enthusiasts, please check out my post regarding my complete audio upgrade / install. I wanted to separate it from this post since although this post is awesome, it is getting thick.
I would love to here your opinions and feedback, and would truly enjoy some company throughout this experience.
Thanks.
Simba
My Post:
https://www.northamericanmotoring.co...ml#post3119052
I would love to here your opinions and feedback, and would truly enjoy some company throughout this experience.
Thanks.
Simba
My Post:
https://www.northamericanmotoring.co...ml#post3119052
#767
08-27-2010, 09:52 AM

Hi all,
I'll make it thicker yet. Thanks for all the great advice! I replaced my door speakers yesterday with a component set from Hertz Audio, a little known Italian speaker company. Hertz Energy ESK 165 (components) and intend to replace the 6x9s with the Hertz unit as well. I listened to these in comparison to many of the speakers listed on this thread and thought the Hertz Energy series rivaled the twice-as-expensive Focals. (but that's just my ears)
http://www.hertzaudiovideo.com/default_en.htm
I found that these 6.5" fit almost perfectly with a little dremmel reaming around the the cone support. I mounted the tweeter in the old 3.5" opening with the manufacturer supplied support arm (I'm already displeased with this as I can just barely see some wires behind the grille so I think I'll pull the cups off again and mount the tweeters using the template posted elsewhere in this thread.
I also used a dremmel cutoff disk to clean some of the "extra" material out of the door handle so that the component crossover would fit in snugly.
Also, a little tip: when the mirror control button falls apart in your hands as you moan "oh sh*t" - add just a drop of hot glue to the plastic housing as you slide the little metal clips back over them - gives them just enough traction to keep them on so you can reinstall the cup on the door.
Oh, and one more thing. I discovered somewhere here on NAM - or maybe I deduced it from the front/rear swap threads - that the 2 door speakers are run from 2 chanels, not 4, so somewhere amidst the wiretangles these 2 chanels are split and the speakers are run parrallel with one another. I wish I'd realized this yesterday, because in thinking that perhaps the 2 door speakers were running on seperate 15W channels, I chose to run one chanel through the crossover to the tweeter (to protect it from any low frequency signal), and the other channel directly to the 6.5" midrange/woofer - (incorrectly) assuming I'd be utilizing 2x15W in each door. Bummer. The real problem with this is that while I knew positive from negative on the woofer wires because it's discussed elsewhere here, I had to totally guess on the polarity of the 3.5" speaker wires into the crossover/tweeter. Chances are I'm out of phase somewhere.
So NOW that I know about the parallel lines, I think I'm going to rewire the door correctly using the crossover for both the 6.5" and the tweeter - and thus will be positive about polarity of all the speakers (pun intended)
Also, another tip: heed everyone's advice about the amount of Dynamat you can get in the R56 doors - you really can't get access to majority of the door...trust me. I was able to slide 4" x 8" strips through the woofer hole and get adequate pressure, but after messing with the window unit for nearly 2 hours, decided not to try to get any more of the door off...
Mark
Last edited by markward; 08-27-2010 at 10:03 AM. Reason: added thoughts
#768
08-27-2010, 11:30 AM

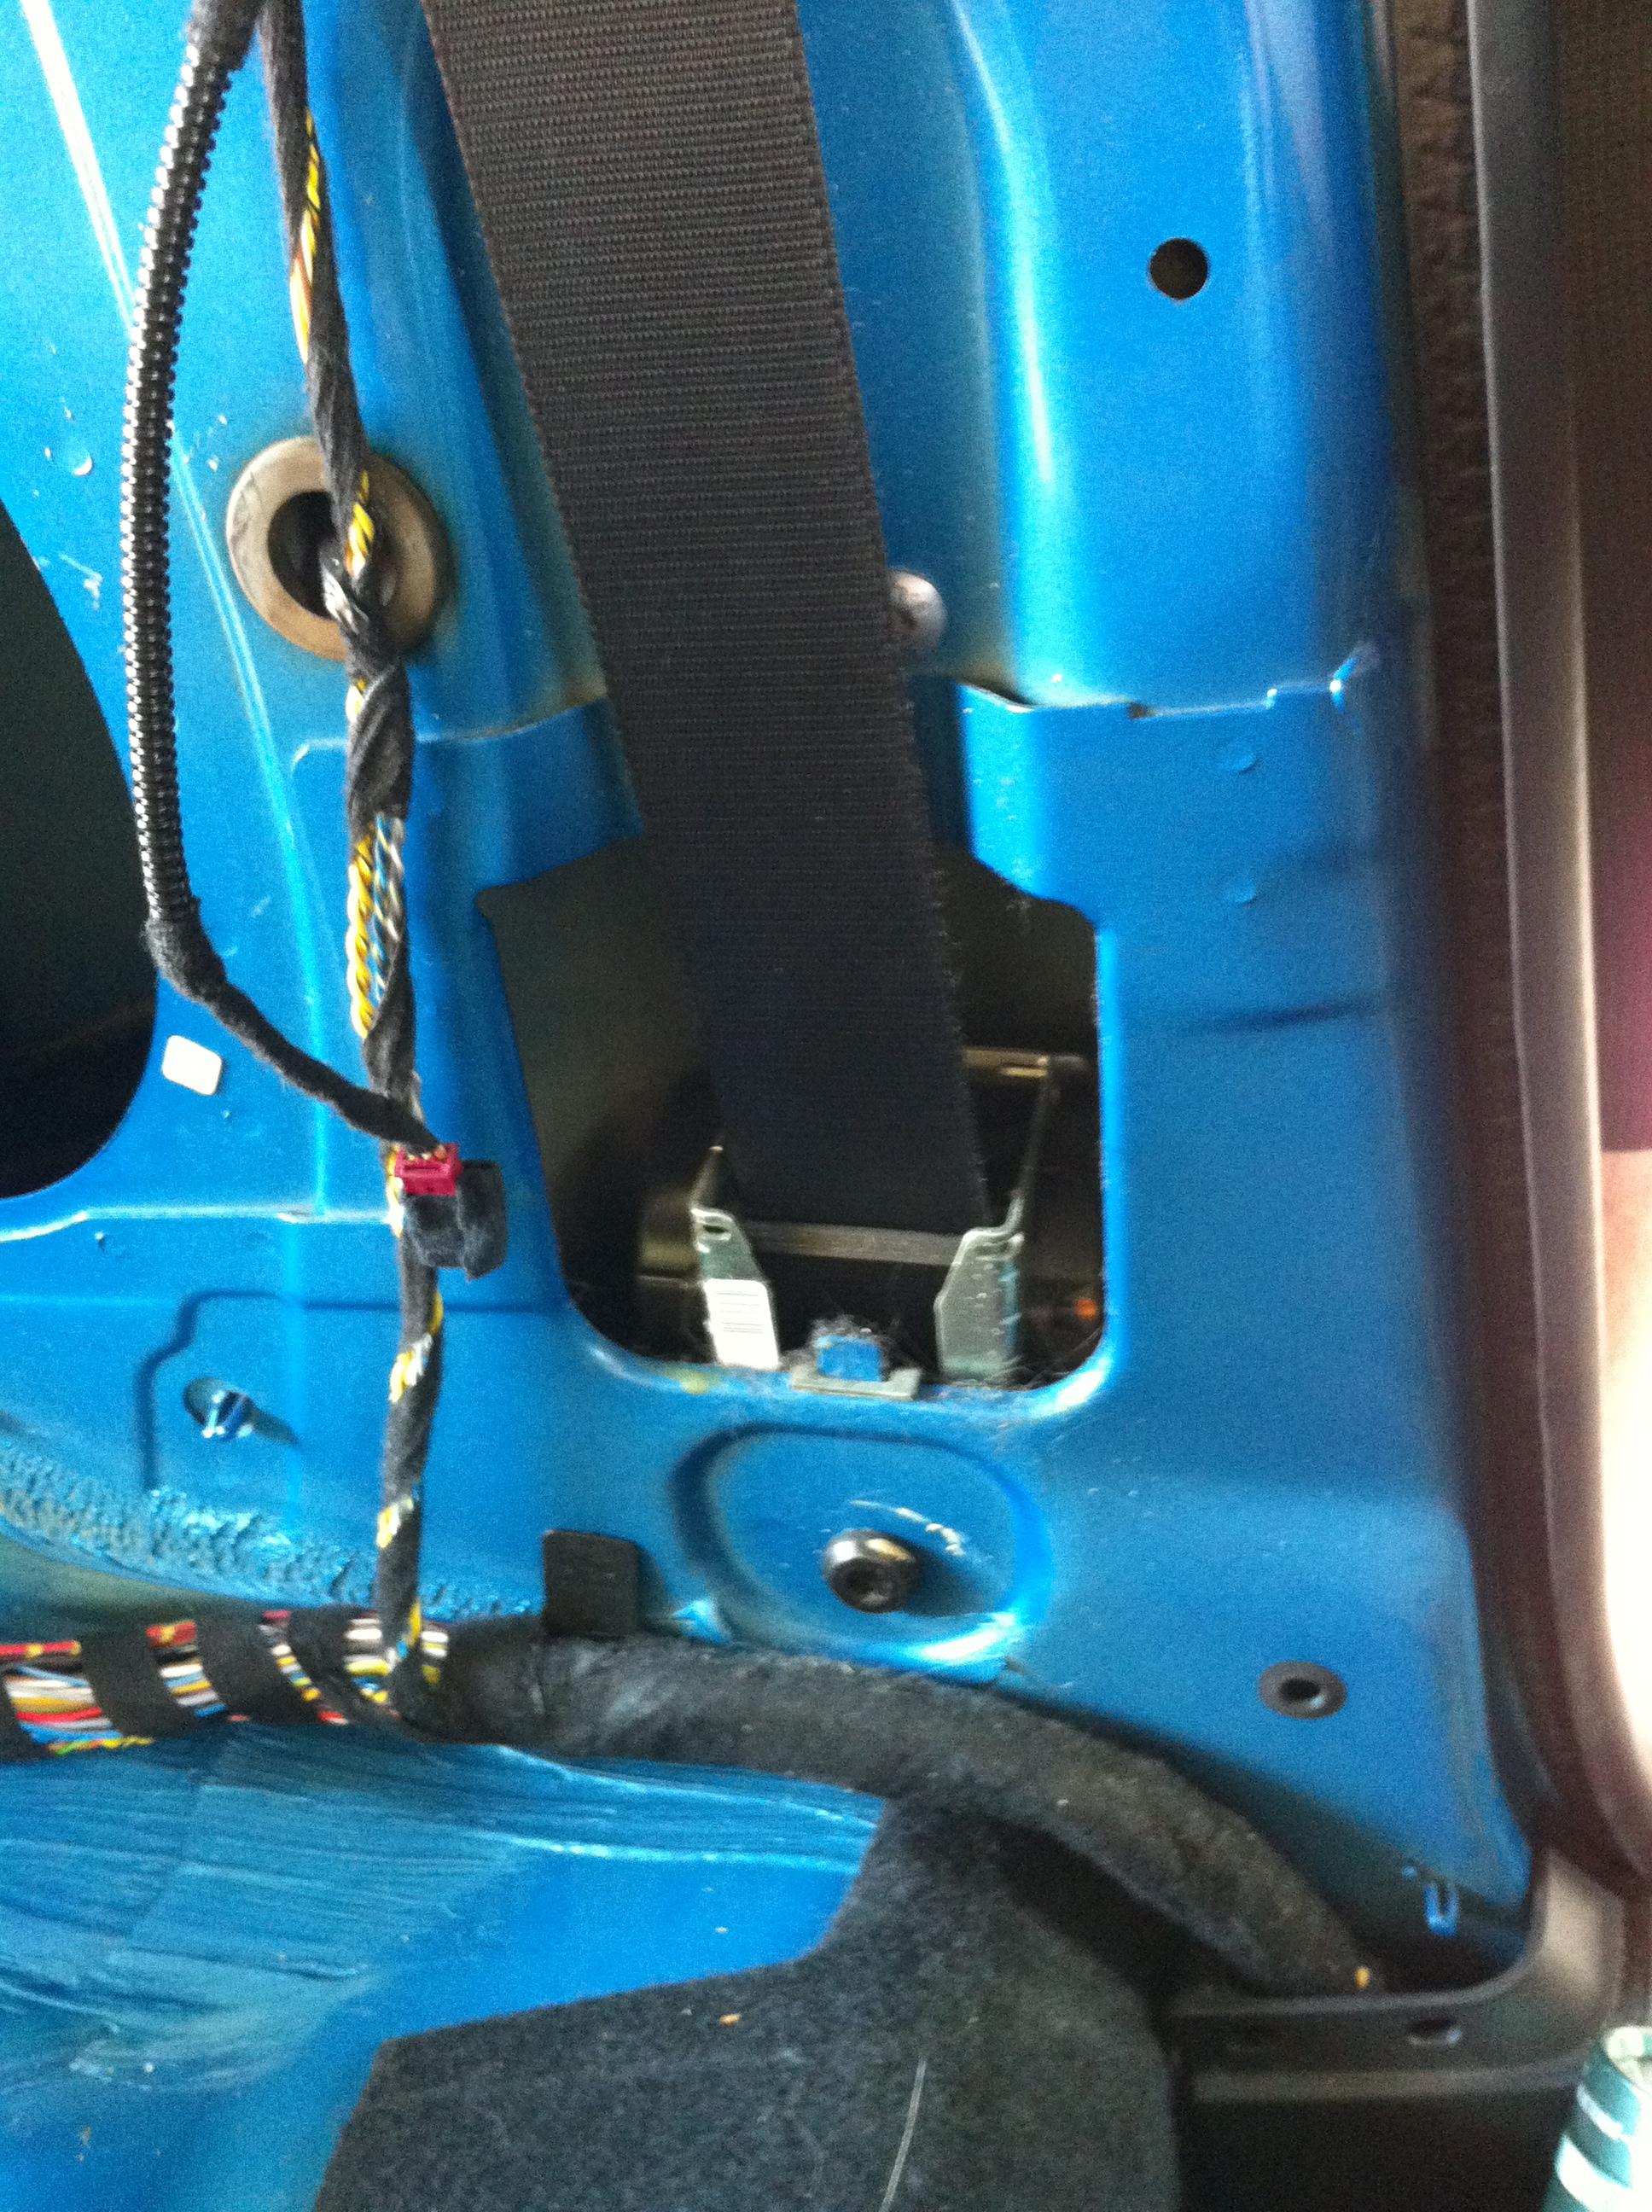
Uh-oh…
While replacing the 6x9s in the back, the side panel screw under the B-pilar fell. I heard it clank around against metal on its way down, and now that I have the whole thing taken apart, I fear it made its way down the hole holding the seat belt tensioner.
Not sure how to get it out without buying a large torx head wrench and some locktite and removing my primary safety device.
Anyone have any other ideas?
This *must* have happened to someone else before… the placement of the screw and the design of the side panel make it almost assured that if the screw falls, it's ending up in that black hole.
(note: there's a wall between the 6x9 speaker hole and the seatbelt tensioner hole, so that won't do. all I can think is to remove the side sill trim from that side and hope there's access from under the car.)
Last edited by fishbert; 08-27-2010 at 11:36 AM.
#769
08-28-2010, 07:11 AM

#770
08-28-2010, 09:29 AM
Unrelated question: when re-installing the rear side trim panels, is it easier if the metal clips at the top are on the trim piece or on the sheet metal? Does it matter? (on removal, about half of them stayed on the panel, half on the metal, so I'm not sure which is preferred.)
#771
11-18-2010, 04:32 PM

Need help with Clubby tear down
I saw it somewhere on this thread a while back but cannot find it now. Does anyone have a link to the write up about taking the back of the Clubby apart.
I have a 2009 JCW Clubman that has already had the front doors, rear barn doors and third door Dynamated, and the front speakers replaced. I also installed a new 6x9 in the third door when I had that open.
Now for the big job, rip out the entire back end to apply Dynamat and replace the remaining 6x9 speaker.
Help!!
I have my panel removers, and am very familiar with the front doors, having opened then twice so far.
Wingman
#772
11-18-2010, 05:50 PM

I saw it somewhere on this thread a while back but cannot find it now. Does anyone have a link to the write up about taking the back of the Clubby apart.
I have a 2009 JCW Clubman that has already had the front doors, rear barn doors and third door Dynamated, and the front speakers replaced. I also installed a new 6x9 in the third door when I had that open.
Now for the big job, rip out the entire back end to apply Dynamat and replace the remaining 6x9 speaker.
Help!!
I have my panel removers, and am very familiar with the front doors, having opened then twice so far.
Wingman
I have a 2009 JCW Clubman that has already had the front doors, rear barn doors and third door Dynamated, and the front speakers replaced. I also installed a new 6x9 in the third door when I had that open.
Now for the big job, rip out the entire back end to apply Dynamat and replace the remaining 6x9 speaker.
Help!!
I have my panel removers, and am very familiar with the front doors, having opened then twice so far.
Wingman
look for theads i created. i replaced the cubby with a alpine. i think i was the first to post how to do it
#773
11-26-2010, 11:20 AM

Does anyone have any suggestions on Capacitors for the amp? To cap or not to cap... that is the question. Some swear by it, others say it is a waste of money. I don't think I will need one with this system, but not sure what experiences some have had. I guess it depends on how good of an alternator the Mini has. Your feedback and experiences are greatly appreciated.
 With the cap, all was well.
#774
11-26-2010, 12:17 PM

Door Speaker fit?
I looking for what fits well in the doors (HiFi).
Apparently the Focal Polyglass 165 v3e's mentioned as a perfect fit early in this thread (3 years ago) are not being made anymore? (can't find them anywhere)
Also saw a post about Infinity Kappa's 42.9i 2-way 4" & 62.9i 2-way 6.5". Do these fit well in the doors? According to crutchfield, they don't fit....?
I'm looking at component's too - 6.5" with a tweeter (with a bracket for the 4" location) - What have people been installing without many headaches?
#775
11-26-2010, 02:28 PM

6th Gear
I looking for what fits well in the doors (HiFi).
Apparently the Focal Polyglass 165 v3e's mentioned as a perfect fit early in this thread (3 years ago) are not being made anymore? (can't find them anywhere)
Also saw a post about Infinity Kappa's 42.9i 2-way 4" & 62.9i 2-way 6.5". Do these fit well in the doors? According to crutchfield, they don't fit....?
I'm looking at component's too - 6.5" with a tweeter (with a bracket for the 4" location) - What have people been installing without many headaches?
Apparently the Focal Polyglass 165 v3e's mentioned as a perfect fit early in this thread (3 years ago) are not being made anymore? (can't find them anywhere)
Also saw a post about Infinity Kappa's 42.9i 2-way 4" & 62.9i 2-way 6.5". Do these fit well in the doors? According to crutchfield, they don't fit....?
I'm looking at component's too - 6.5" with a tweeter (with a bracket for the 4" location) - What have people been installing without many headaches?
http://cgi.ebay.com/165A3-FOCAL-6-5-...item19be62fb06
These would sound incredible (one step above the polyglass) :
http://cgi.ebay.com/165K3P-UV-FOCAL-...item19bec9486b
even if you have a 3 way system the focal polykevlar 2 way would sound better than the polyglass or access 3 way.
I had the polyglass 3 way in my mini and the 2way polykevlar in my truck. The polyglass were awesome but the polykevlars are even better. the midbass from the 6" kevlars hits HARD and clean.
Will your budget allow you the BEST (my opinion)?:
http://cgi.ebay.com/FOCAL-KIT-N07-UT...item1e5d7590c4