

New rotors, pad contact patch weird as if caliper crooked? :confused:


Thread Starter
|
Neutral
Joined: Jan 2015
Posts: 5
Likes: 1
New rotors, pad contact patch weird as if caliper crooked? :confused:
Hey fellow Mini owners!
I have an R53 (2006 MCS), and a few days ago I took on the relatively simple job of changing the rear pads & rotors.
Got Hawk HP+ pads (on the front I use Ferodo DS2500's, but sadly couldn't get those for the rears as they're backordered everywhere.... Hawks seemed like a comparable pad). For the rotors I got Zimmermann (german-made, was recommended by my BMW mechanic for my Z4M, and worked well on that car) rotors from RMeuropean.com
Everything went on fairly smoothly (with the help of excellent thread on this forum and Bentley manual). Harbor Freight caliper tool actually didn't fit (my old pads were really, really, really low), so I used some elbow grease to get the piston in for the first few millimeters. Putting the "inner" pad onto the piston with the little clip thingies was also unintuitive, but not too bad.
After driving it to/from work (40 miles total) I took a look at them - and to my surprise saw that on the outside, it seems that only outer (edge) 1/3 of the pad is touching, on the inside - only the inner 2/3 . I don't know how to explain it better, so I attached a couple of pics - one from the outside of the wheel, other by from the inside (kind of hard to see, but pretty visible).
The only explanation I can think of is that caliper is on crooked? But how is that possible, it gets tightened with screws right in place where it came from. Also, being a floating caliper, wouldn't the outer pad just get straighten out under pressure? I don't understand why not.
Another thought - it's identical on both sides so maybe it's normal? In any case, if pad is making contact under an angle - I imagine it would wear down in a little while and make full contact eventually (once the "angle" would wear down), so maybe it's not a cause of concern at all?
Also, if I didn't get new rotors that were coated a different color - I would have never noticed it...
So, question - what could have gone wrong? Is that a cause for concern? Should I take it apart and do something about it?
I have an R53 (2006 MCS), and a few days ago I took on the relatively simple job of changing the rear pads & rotors.
Got Hawk HP+ pads (on the front I use Ferodo DS2500's, but sadly couldn't get those for the rears as they're backordered everywhere.... Hawks seemed like a comparable pad). For the rotors I got Zimmermann (german-made, was recommended by my BMW mechanic for my Z4M, and worked well on that car) rotors from RMeuropean.com
Everything went on fairly smoothly (with the help of excellent thread on this forum and Bentley manual). Harbor Freight caliper tool actually didn't fit (my old pads were really, really, really low), so I used some elbow grease to get the piston in for the first few millimeters. Putting the "inner" pad onto the piston with the little clip thingies was also unintuitive, but not too bad.
After driving it to/from work (40 miles total) I took a look at them - and to my surprise saw that on the outside, it seems that only outer (edge) 1/3 of the pad is touching, on the inside - only the inner 2/3
. I don't know how to explain it better, so I attached a couple of pics - one from the outside of the wheel, other by from the inside (kind of hard to see, but pretty visible).The only explanation I can think of is that caliper is on crooked? But how is that possible, it gets tightened with screws right in place where it came from. Also, being a floating caliper, wouldn't the outer pad just get straighten out under pressure? I don't understand why not.
Another thought - it's identical on both sides so maybe it's normal? In any case, if pad is making contact under an angle - I imagine it would wear down in a little while and make full contact eventually (once the "angle" would wear down), so maybe it's not a cause of concern at all?
Also, if I didn't get new rotors that were coated a different color - I would have never noticed it...
So, question - what could have gone wrong? Is that a cause for concern? Should I take it apart and do something about it?


I wouldn't worry about it. This is just a bit of irregularity in the surface of the pads vs the very precisely machined rotor. The pad contact area will fill in as the pads wear as you drive more and do more braking. Remember that the rear brakes do far less braking than the fronts and will wear somewhat slower. How quickly the pads wear in will depend on how often you brake and how hard you brake each time.
Did you go through the bedding-in procedure? That would speed up the process.
About the Harbor Freight tool, I am surprised it didn't work for you. I have the same one that I bought a few years back. The thing is that it looks like you can use the tool by itself but it won't. There should be a round plate in the kit that has has 2 short rods sticking out of it. This plate attaches to the tool face by the inbedded magnet. This then engages the slots in the piston in the caliper to turn it in.
Hope this helps.
Last edited by Eddie07S; Aug 23, 2015 at 04:09 AM. Reason: Typo

Thread Starter
|
Neutral
Joined: Jan 2015
Posts: 5
Likes: 1
...
About the Harbor Freight tool, I am surprised it didn't work for you. I have the same one that I bought a few years back. The thing is that it looks like you can use the tool by itself but it won't. There should be a round plate in the kit that has has 2 short rods sticking out of it. This plate attaches to the tool face by the inbedded magnet. This then engages the slots in the piston in the caliper to turn it in.
Hope this helps.
Mikli - I did not have a chance on the day I changed them, and then got sort of freaked out by what they look like today and decided to take it really easy until I get conclusive affirmation that it was okay. Probably bedding them will wear the "angled" bit down and they'll look normal


4th Gear

Joined: Dec 2004
Posts: 490
Likes: 73
From: Pittsburgh, PA
Don't the HP+ pads have a chamfered edge? My HPS pads definitely had a taper to them which caused me no concern and disappeared as the pad wore, giving more contact area against the rotor. Could the rotor itself be a little tilted due to rust or something else on the hub. I'd just keep an eye on it unless you notice something amiss with braking power.

OVERDRIVE
Joined: Jul 2006
Posts: 7,037
Likes: 283
From: Melbourne, FL
this is happening on only 1 side, correct?
I'd double check you got those springs clipped correctly on the inner pad .. easy for them to get dislodged during assembly and then the pads don't sit flush . . .
looking at this picture of a GEN1 rear inner
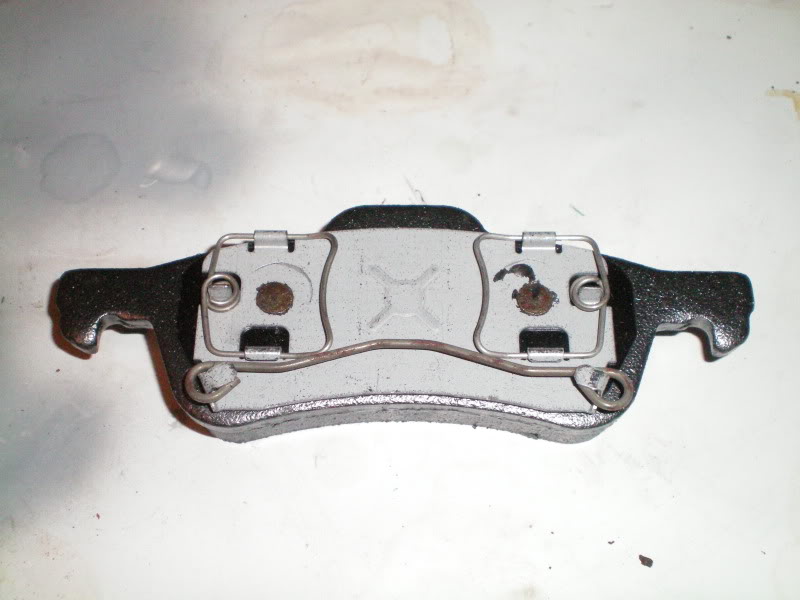
The springs must be in the groove at 3 o'clock, 9 AND 6
If not in the groove @ 6 but the piston is riding ON it, the pad is not flush to the rotor and can't GET flush as the piston compresses. TRYING to get flush might cant the outer pad correspondingly... Hence wear on the outside edge on the outside ... wear on the inside edge (of the rotor face) on the inner side.
Check that the pad is properly clipped in . .
(and if you are SURE .... remember
when you are SURE everything is right
and the program does not work
something you are SURE OF
is wrong . . .
had this framed and hanging in my office beginning when I was a computer programmer)
Last edited by Capt_bj; Aug 23, 2015 at 01:29 PM.

Thread
Thread Starter
Forum
Replies
Last Post
molala
MINIs & Minis for Sale
1
Oct 2, 2015 01:53 PM
Tinklespout
R50/R53 :: Hatch Talk (2002-2006)
16
Sep 6, 2015 11:39 AM