
Ryephix2 Bypass Valve Spring Upgrade


2nd Gear
Joined: Jan 2003
Posts: 75
Likes: 0
From: Philly, PA
It doesn't look like the tool i'm used to seeing, but that doesn't mean that it is not the right tool. I'd have to see a better picture of the jaws on that tool. Either that, or just buy one. $20 is pretty cheap.

Thread Starter
|
6th Gear
Joined: Aug 2003
Posts: 1,474
Likes: 3
From: Over there -->
Back in the Saddle Again...
Took Koopah apart again this afternoon to correct the SC intake tube issue I have been having. It was a success and now acceleration is smooth again!
First of all, I want to say a deep, heartfelt "thank you" to bomboasy for talking me through what I needed to do and for describing what to expect for the connection at the SC intake end. He took time out of a busy working day to give me the benefit of his experience! He also went the extra mile and gave me some good info about improving the intake tube flow.
Second, a big "thank you" as well to Ryephile for developing the Ryephix#2 and making it available. My car feels alive again!
Now, here's what I've learned from this experience:
1. Taking the throttle body off the intake tube allows for better access to the bypass valve. However, the TB and intake tube attach to a bracket that supports the weight of the TB and holds the TB end of the intake tube in alignment with the SC intake port. If you remove the TB and do not support the TB end of the intake tube, you risk the fate that has befallen me.
2. However, you can remove the TB and put back the two bolts closest to the engine (through the bracket and the intake tube) thus re-securing the TB end of the intake tube. This will ensure that the intake tube remains in place and aligned with the SC intake port.
3. The intake tube becomes flanged and rectangular in shape where it mates with the SC intake port. You can see the connection from under the car after removing the front underside apron. The way in which the intake tube connects is rather flexible, even if you haven't broken the plastic tab that secures it to the SC housing via a bolt. If the tab is broken, you can slide the intake tube partway off the SC port. If it is not broken, you can still wiggle the intake tube but it will not slide off the SC port.
4. The SC intake port (rectangular in shape) has a raised lip. A green "press fit" gasket is pressure fit to the lip of the SC intake and creates a larger, pliable rectangular lip for the intake tube. The rectangular flange at the end of the intake tube goes around the outside of this gasket. Thus, if you look at the SC port end of the intake tube, you will not see the gasket since the intake tube covers the outside of the green gasket.
5. My problem was that my intake tube/gasket were not aligned properly on SC lip after I pulled the intake tube off the gasket by mistake. So, to correct things, I carefully reseated the green gasket (lots of patience and creative use of tools required) and the flange on the intake tube. Once that was done, I secured the the TB end of the intake tube with the two TB bolts, locking the intake tube into an aligned position. I reattached the bypass valve/bullhorn assembly (MUCH easier with the intake tube secured), remounted the TB, connected everything else up and remounted the intercooler.
Vrrroooooommmmm
Theo (was now :smile: )
First of all, I want to say a deep, heartfelt "thank you" to bomboasy
for talking me through what I needed to do and for describing what to expect for the connection at the SC intake end. He took time out of a busy working day to give me the benefit of his experience! He also went the extra mile and gave me some good info about improving the intake tube flow.Second, a big "thank you" as well to Ryephile
for developing the Ryephix#2 and making it available. My car feels alive again!Now, here's what I've learned from this experience:
1. Taking the throttle body off the intake tube allows for better access to the bypass valve. However, the TB and intake tube attach to a bracket that supports the weight of the TB and holds the TB end of the intake tube in alignment with the SC intake port. If you remove the TB and do not support the TB end of the intake tube, you risk the fate that has befallen me.
2. However, you can remove the TB and put back the two bolts closest to the engine (through the bracket and the intake tube) thus re-securing the TB end of the intake tube. This will ensure that the intake tube remains in place and aligned with the SC intake port.
3. The intake tube becomes flanged and rectangular in shape where it mates with the SC intake port. You can see the connection from under the car after removing the front underside apron. The way in which the intake tube connects is rather flexible, even if you haven't broken the plastic tab that secures it to the SC housing via a bolt. If the tab is broken, you can slide the intake tube partway off the SC port. If it is not broken, you can still wiggle the intake tube but it will not slide off the SC port.
4. The SC intake port (rectangular in shape) has a raised lip. A green "press fit" gasket is pressure fit to the lip of the SC intake and creates a larger, pliable rectangular lip for the intake tube. The rectangular flange at the end of the intake tube goes around the outside of this gasket. Thus, if you look at the SC port end of the intake tube, you will not see the gasket since the intake tube covers the outside of the green gasket.
5. My problem was that my intake tube/gasket were not aligned properly on SC lip after I pulled the intake tube off the gasket by mistake. So, to correct things, I carefully reseated the green gasket (lots of patience and creative use of tools required) and the flange on the intake tube. Once that was done, I secured the the TB end of the intake tube with the two TB bolts, locking the intake tube into an aligned position. I reattached the bypass valve/bullhorn assembly (MUCH easier with the intake tube secured), remounted the TB, connected everything else up and remounted the intercooler.
Vrrroooooommmmm
Theo (was
now :smile: )

You are welcome and my complements on the two screw idea. It is a great idea and I suggest that it goes with the instructions of the Ryephix#2. It might need to be added also to the warning that I suggested in page 3. I am glad to know that you are running again and breathing. This is what I like about the MINI community.
PS. When you have to go back to replace that runner, do not forget the pictures.
Bomboasy
PS. When you have to go back to replace that runner, do not forget the pictures.
Bomboasy
Theo - GLAD you're back running 
Note for all: I got a handful of bypass valves from Classic MINI today. If you're interested in the Complete, where I change out the spring and adjust the butterfly for you, let me know so I can reserve the last of 'em for you! AlexN and LeeJones, yours are already reserved of course
Cheers,
Ryan
Note for all: I got a handful of bypass valves from Classic MINI today. If you're interested in the Complete, where I change out the spring and adjust the butterfly for you, let me know so I can reserve the last of 'em for you! AlexN and LeeJones, yours are already reserved of course
Cheers,
Ryan

well, my ship came in - ok not really, more like the FedEx guy!
Spring stock is back on my workbench, and I've PM'd all those that've shown interest in the Ryephix just to let you guys know that I'm still here to help!
Just a refresher, the Ryephix is a performance-oriented enhancement that improves the liveliness and response of the engine; as well as quickening the boost generation during throttle transients. Side benefit is it disallows the resonance mode that causes the Yo-Yo! Fuel economy is the downside, approx 9% hit, 'results may vary' of course, and over time you'll relearn how to throttle your car to basically nullify that fuel economy deficit when you're in around-town driving.


6th Gear
Joined: Oct 2002
Posts: 4,831
Likes: 1
From: Phoenix, AZ
Ryephix 2 arrived in the mail today. Got it installed in a hour and half. Big difference in drivability. Looked at the valve on the by-pass and noticed it passing light on one side of the circle, but not the other. Sort of as if the plate was slightly out of round, but distorted. Light came thru at 9, 10 , 11 and 2 o'clock positions.
Anyhow took it for a short trip of mixed freeway and surface streets. Midrange bog is almost gone! Still feeling a bit of surging when cruising at 30 MPH in 2nd. But overall, the ryephix 2 definately was better than tie wrapping (ryephix 1) and greatly better than stock spring.
Thanks again!
Anyhow took it for a short trip of mixed freeway and surface streets. Midrange bog is almost gone! Still feeling a bit of surging when cruising at 30 MPH in 2nd. But overall, the ryephix 2 definately was better than tie wrapping (ryephix 1) and greatly better than stock spring.
Thanks again!
You're welcome Dominic! If you ever want to dive back in there, you can loosen the two screws that hold the butterfly to the shaft, and let the spring close the loose assembly; the shape will force the butterfly to seat as round and tight as possible. Retighted the screws while it's seated, and it'll be as good as it gets in terms of sealing.
--->minicoopermike, you have a PM
If you ever want to dive back in there, you can loosen the two screws that hold the butterfly to the shaft, and let the spring close the loose assembly; the shape will force the butterfly to seat as round and tight as possible. Retighted the screws while it's seated, and it'll be as good as it gets in terms of sealing.--->minicoopermike, you have a PM
6th Gear
Joined: Oct 2002
Posts: 4,831
Likes: 1
From: Phoenix, AZ
Yeah, I noticed they were brass. I'll probably get back in there when I have some time to do that. The part of the reassembly that takes me FOREVER is getting the bullhorn to go into the silicone/rubber/whatever they are/neoprene couplings to the intercooler.

4th Gear
Joined: Feb 2004
Posts: 320
Likes: 0
From: Pendleton, IN
Big thanks for the spring, Ryan. Install went fine, and even though I never had the yo-yo, I do like the earlier boost the spring brings. Early mileage estimates are right where you predicted... about 10% down from previous.BTW, sorry about the ebay head today... I managed to win it.
 Now I have a decision to make. Send it in as a core for a modded head, or buy a Standard Abrasives Kit and attempt my own street port. I'll have to see how far into the ports I can get with my available mandrels. Never tried porting a head, but I have good hand/eye coord, some good measuring tools, and I've always learned well by just doing the research, then jumping in with both feet. I'm on the fence though.
--->Blu: Damn you!  I wanted that head for flow research! Oh well, have fun with it!
I have a few new bypass valves that arrived from Classic MINI again Let me know if you're interested!
I wanted that head for flow research! Oh well, have fun with it! I have a few new bypass valves that arrived from Classic MINI again
Let me know if you're interested!

Butterfly adjustment.
Originally Posted by Ryephile
You're welcome Dominic! If you ever want to dive back in there, you can loosen the two screws that hold the butterfly to the shaft, and let the spring close the loose assembly; the shape will force the butterfly to seat as round and tight as possible. Retighted the screws while it's seated, and it'll be as good as it gets in terms of sealing.
If you ever want to dive back in there, you can loosen the two screws that hold the butterfly to the shaft, and let the spring close the loose assembly; the shape will force the butterfly to seat as round and tight as possible. Retighted the screws while it's seated, and it'll be as good as it gets in terms of sealing. ). Here are a couple of pictures of the light before and after the adjustment. I had to ajust both the set-screw and the butterfly screws. It isn't perfect, leading to believe the die that cuts these isn't perfect either....Anyway, here you are, for what they're worth..... Sorry about the dark bores. I wanted to get the light through the gaps....
Oh yeah, watch out! I found that there was no human way to get to the hose clamps to undo them properly. I can see how easy it would have been when the motor was getting built, but I trashed one real good and had to scroung around for an appropriate hose clamp. Grrrrr.
Matt
Thread Starter
|
6th Gear
Joined: Aug 2003
Posts: 1,474
Likes: 3
From: Over there -->
Originally Posted by Dr Obnxs
...{snip} Oh yeah, watch out! I found that there was no human way to get to the hose clamps to undo them properly. {snip}...
Matt
Matt

Matt--
Looks like you made a significant improvement in the seating of the butterfly. Mine was about the same as yours before I adjusted it. Fortunately, all I needed to do was adjust the set screw; the alignment of the butterfly was acutally quite good.
I'd like to have been able to feel the difference in performance with just the butterfly properly adjusted prior to installing the spring. If anyone out there feels adventurous... Though I suppose the difference would be best measured by instrumentation rather than a "derrier-dyno"!
Theo
Originally Posted by Koopah
I'd like to have been able to feel the difference in performance with just the butterfly properly adjusted prior to installing the spring. If anyone out there feels adventurous... Though I suppose the difference would be best measured by instrumentation rather than a "derrier-dyno"!
Matt
Thread Starter
|
6th Gear
Joined: Aug 2003
Posts: 1,474
Likes: 3
From: Over there -->
Originally Posted by Dr Obnxs
Since I only have a poorly calibrated butt-dyno, I passed on testing at each stage!
Matt
Matt
Theo
Originally Posted by Dr Obnxs
Anyway, here you are, for what they're worth..... Sorry about the dark bores. I wanted to get the light through the gaps....
I've found that most of the BPV's just need the stopper adjusted. Occasionally the butterfly needs to be reseated too, but not as often. Just production tolerance!

SpiderX - just the nature of the beast; the balance of all the components. Kind of how MCS's vary from "the dog" to "the rocket" right off the production line
Note to everyone: I'm out of town for the hoildays - I'll be back home for a few days next week to catch up on Ryephix deliveries - please PM me if you have a concern, but I'll be here on NAM occasionally. Happy Holidays!
Cheers,
Ryan
Note to everyone: I'm out of town for the hoildays - I'll be back home for a few days next week to catch up on Ryephix deliveries - please PM me if you have a concern, but I'll be here on NAM occasionally. Happy Holidays!
Cheers,
Ryan


6th Gear
Joined: Jun 2020
Posts: 1,146
Likes: 313
From: The Netherlands
Fyi, you might also try the mod I did on the BPV. By simply adding 1 or 2 washers, you put more pretension on the spring, effectively putting a somewhat stronger spring in it. Added bonus, its totally reversible without any adverse effects.
The washer is 3cm in diameter and about 3mm thick
Fits like a glove
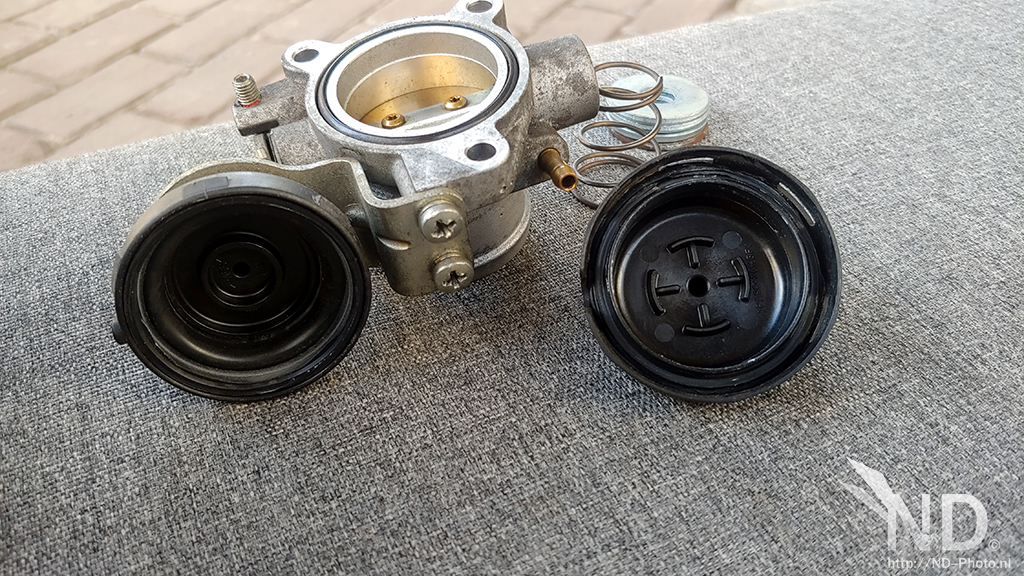
The washer is 3cm in diameter and about 3mm thick


Fits like a glove
