
DIY: Door Lock Actuator - Internal Motor Replacement


DIY: Door Lock Actuator - Internal Motor Replacement
What?
Replace the door-lock actuator internal motors which fail and cause the failure of the power locks. There are many thread on replacing the actuator ($100+ each) and a few on cleaning the motors to get them to work again. In my case I had one motor (driver side) that worked marginally after cleaning and another (passenger side) that was totally shot, rendering my power lock system dead on both doors. This warranted searching for a replacment motor. I highly recommend replacing any motor that needs cleaning. It's only a matter of time before that old motor dies again.
Parts Needed:
• Unlocking (?) motor: Mabuchi FC-280PC-22125 motor with 20mm shaft (not standard 9.8mm shaft). I bought from eBay member "zinky86" for $6 each shipped.
- It turns out this motor is a common size used by many manufacturers in door lock actuators specifcally. The eBay ad I bought from mentions this motor is for Lexus/Toyota actuators.
- Manufacturer Spec Sheet: http://www.mabuchi-motor.co.jp/en_US...fc_280pcsc.pdf
The specs on this sheet all match the motor from the MINI except for shaft length. You can also see this motor size has four options for RPM, torque, current. I pretty-much bought based on finding one of these with a long enough shaft which is how I ended up with the "-22125" model.
• Locking (?) motor: ***NOTE*** From my testing of the functionality of my motors, I discovered that the "20005" and "0301" motors used in this actuator have opposite polarity even though they have the same external dimensions. So in the same slot, one motor spins clockwise and the other spins counter-clockwise. In this case I lucked out and the Mabuchi FC-280PC-22125 motor I used has the same polarity as the broken "20005" motor that needed replacing. I will try to search for a matching motor so I can update this DIY.
Steps:
• Remove Door Panel and Door Lock Actuator: https://www.northamericanmotoring.co...roblems-6.html See other pages in that thread for more removal instructions.
• Disassemble Door Lock Actuator: http://www.instructables.com/id/Repa...or-L/?ALLSTEPS
Some notes from my disassembly: I broke every one of the white clips that hold the case together. I gave up on the second one and just broke them all on purpose. Upon reassembly I found the four torx screw hold the case together well enough. I did not have to remove the black gear shown in step 8 of the instructables.com link.
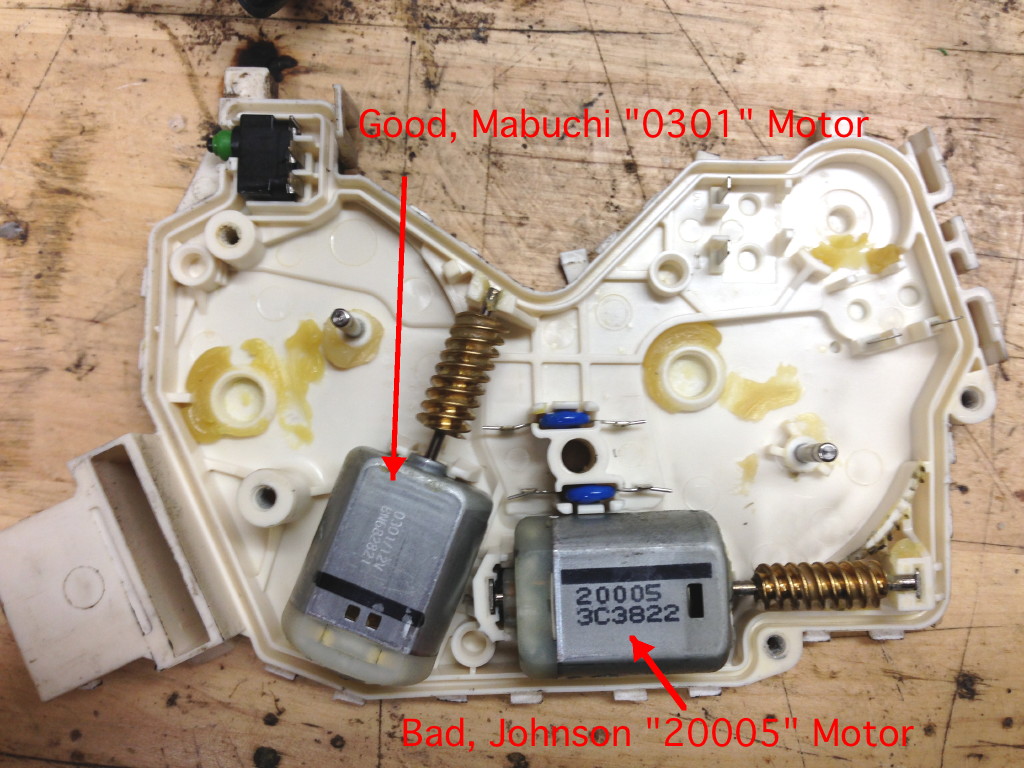
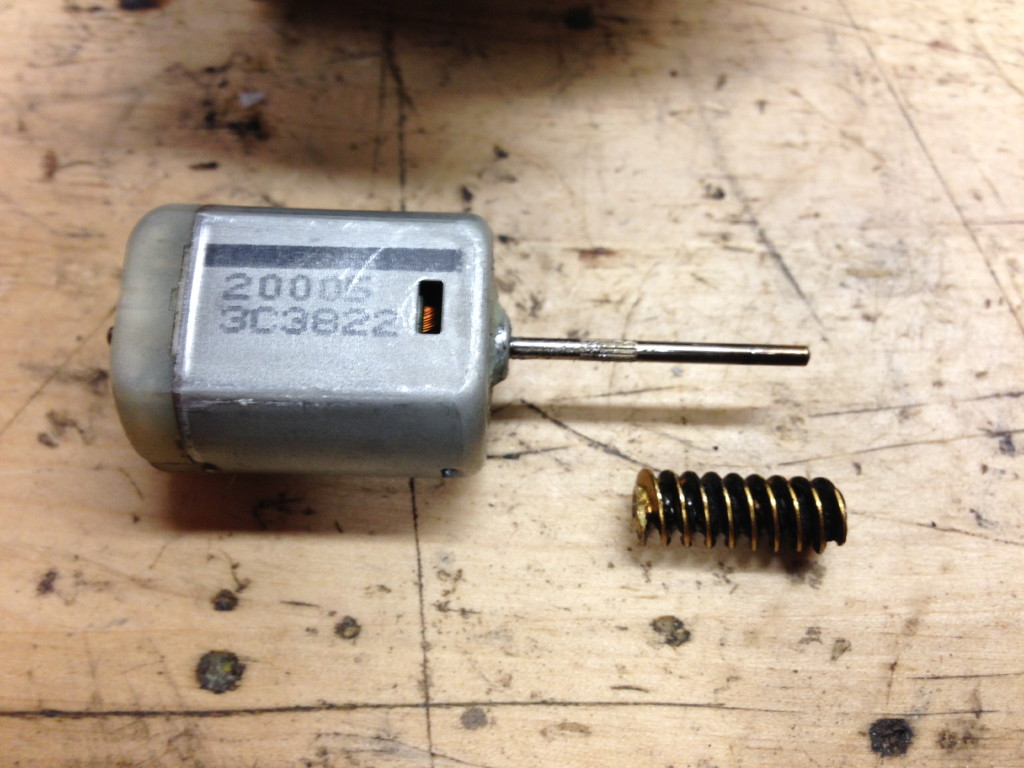
• Here's a shot of my motor set-up. The motor I labelled "0301" is made by Mabuchi and was still functional on both my left and right actuators when I applied 9v/12v. The motor I labelled "20005" is made by Johnson (Controls?) and was broken on BOTH my units, just like the person who did the instructables.com article. I'd bet this motor is the issue on most failed actuators out there. Disregard all red arrows I wrote with a Sharpie on my motors and casing. This was from testing rotation direction as I mentioned above.
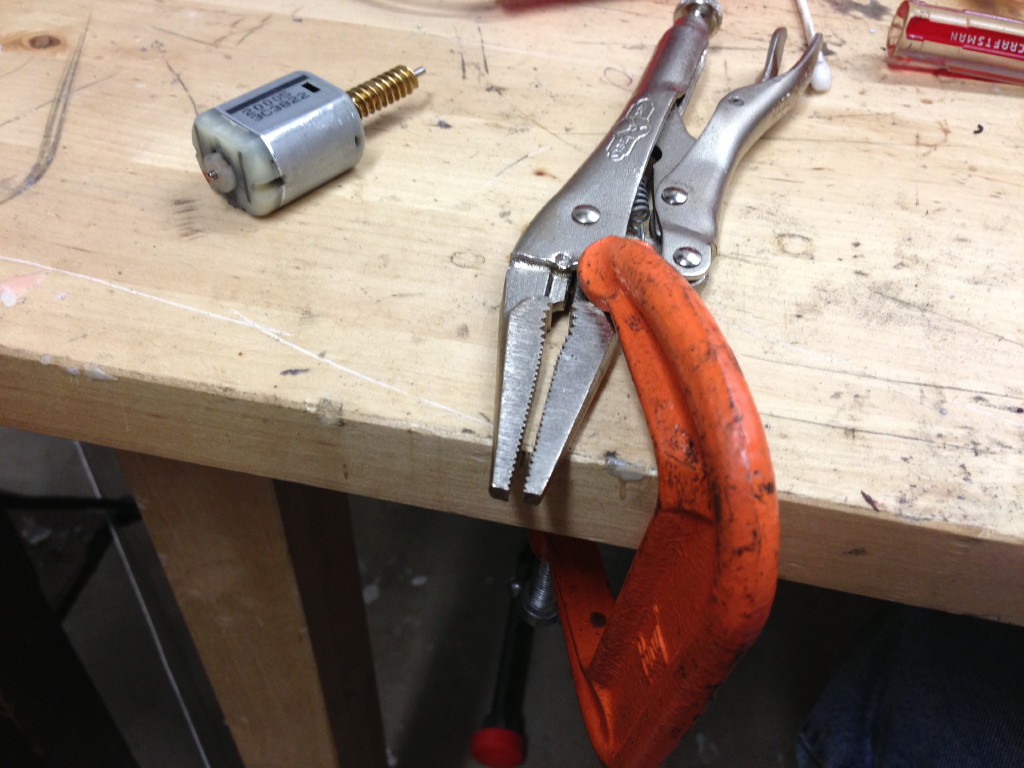
• The first step beyond the instructables.com guide is to salvage the brass worm gear from the original shaft. I set up a vice grips to support the worm gear while not gripping the shaft itself.
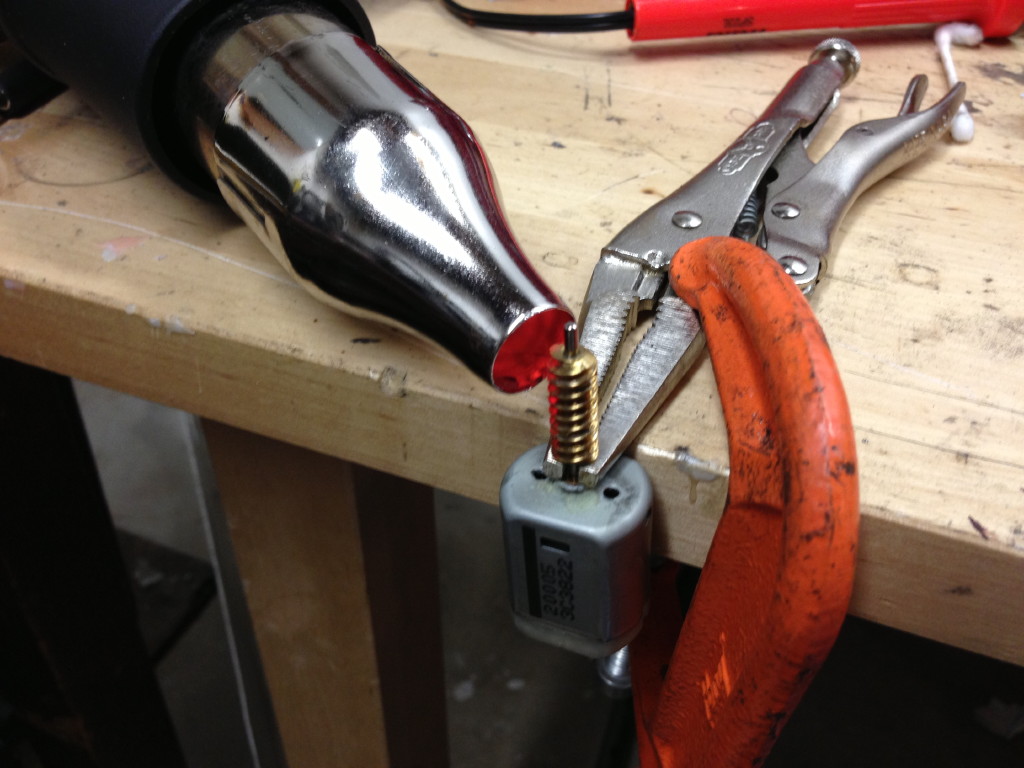
• This worm gear is pressed-on tightly so I used my heat gun, a large screwdriver and a hammer to tap the worm gear off. Since this motor is junk, don't worry about hammering on the motor body. It's not too hard to tap this off but you certainly won't be able to pull it off by hand.
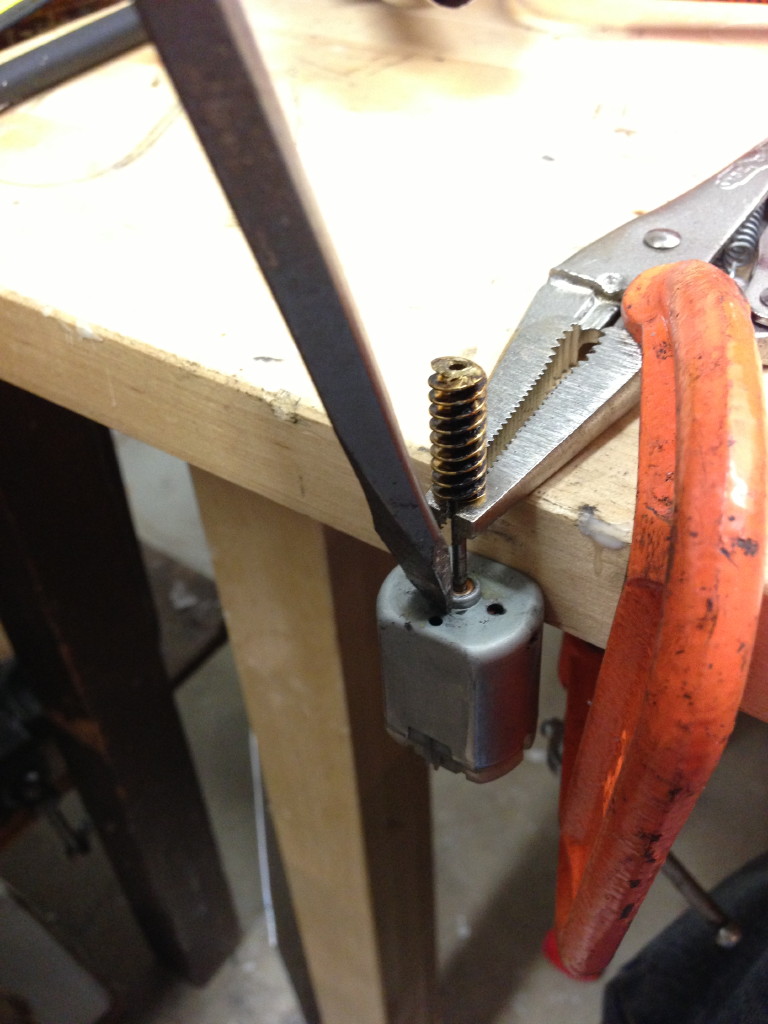
• We have now seperated the worm gear. I suggest degreasing the worm gear before applying heat as you will burn the residual grease.
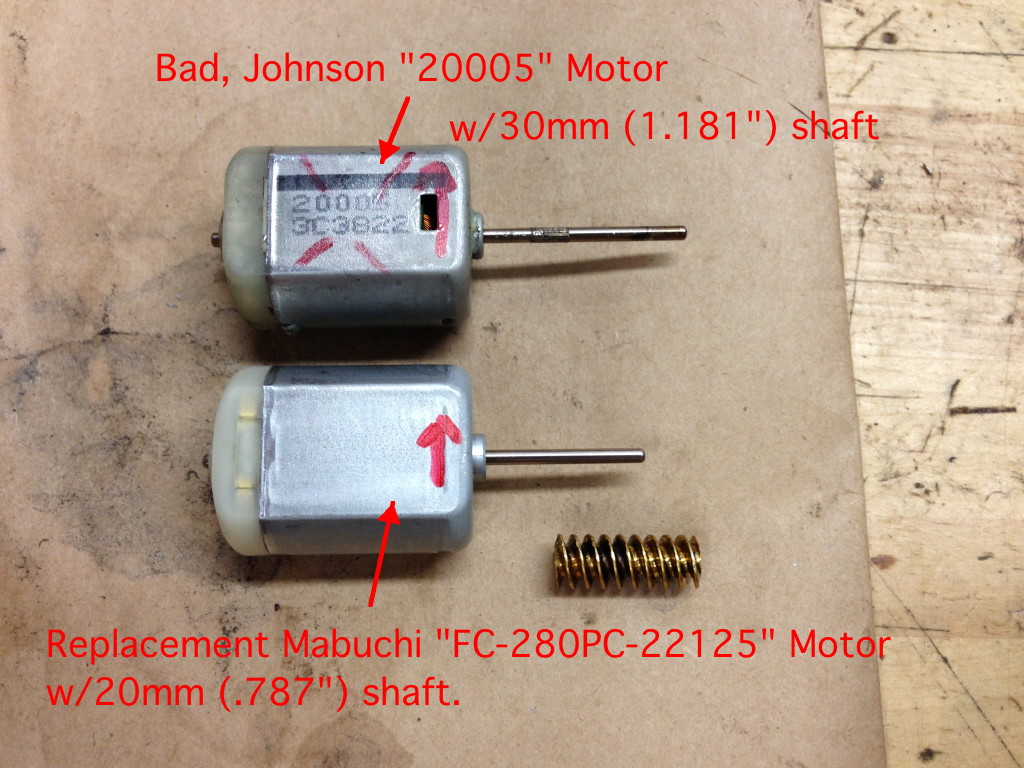
• Now this could be a pretty straighforward motor swap, but I could not find a replacement motor with a roughly 30mm (1.181") shaft like the stock motor. The longest I could find is 20mm (.787"). So, we will need to butt two segments of shaft together, with the butt centered in the middle of the worm gear. Butting in the middle provides the straightest shaft and stongest joint.
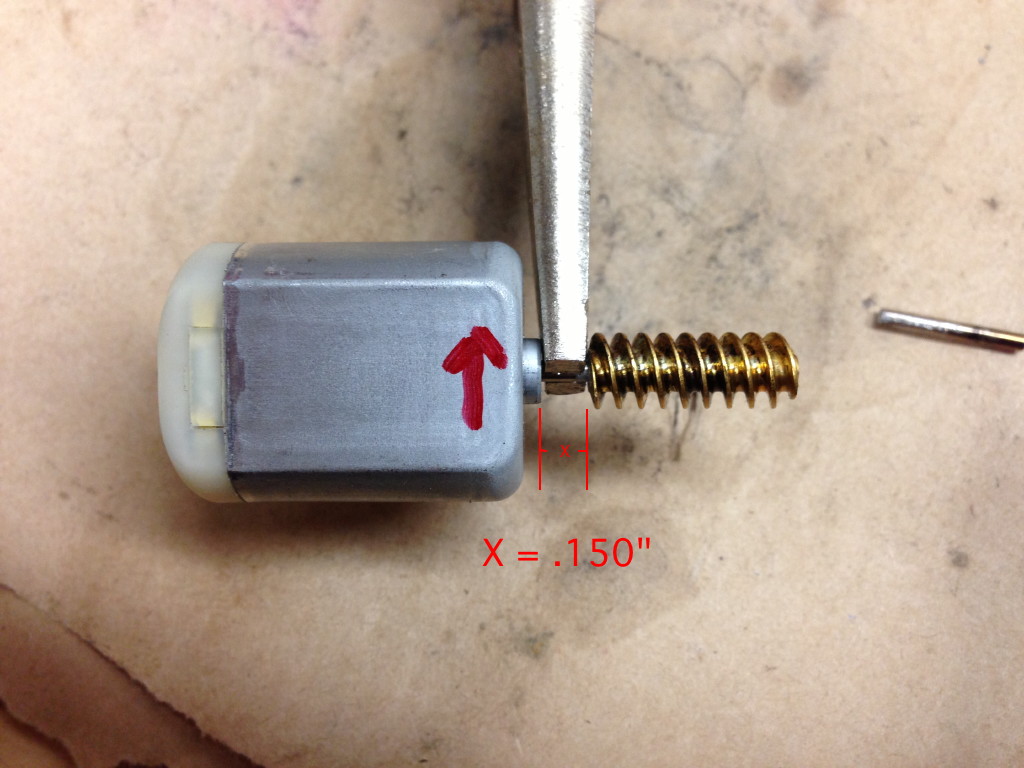
• To accomplish this we first need to trim the NEW motor's exposed shaft to .525". I used a Dremel and cut-off disc for all my cutting.

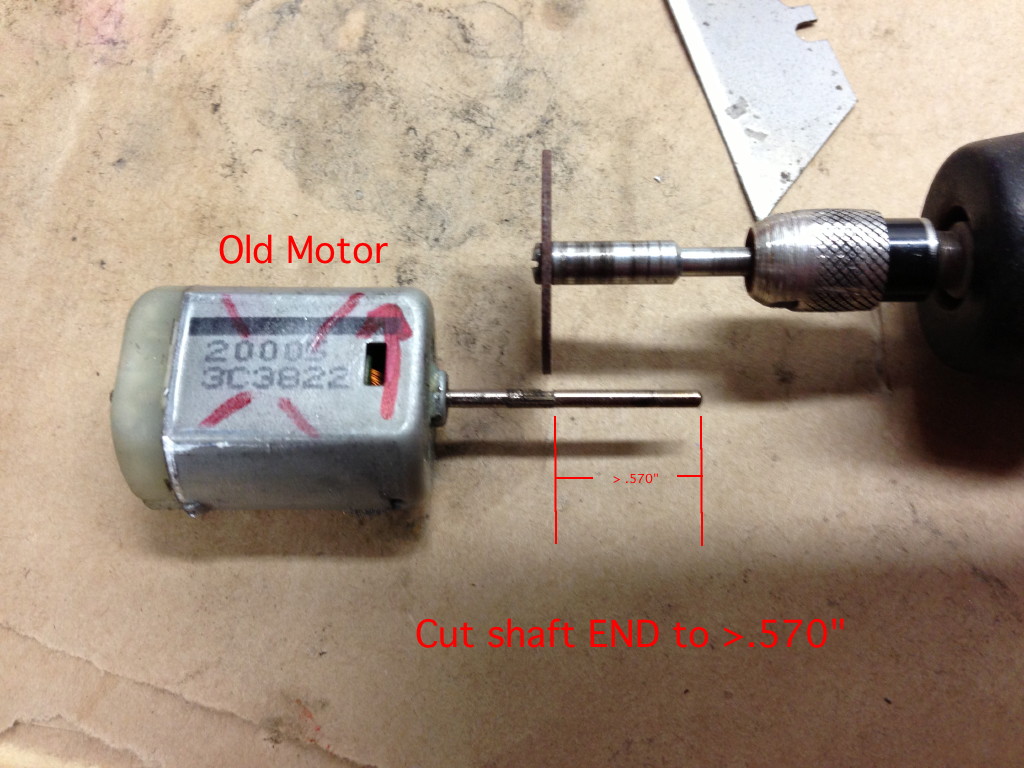
• Next we need to salvage part of the shaft from the junk motor. Cut this piece to AT LEAST .570". One of our last steps will be to do final trimming of the completed shaft assembly, so don't worry about making it a little longer than .570".
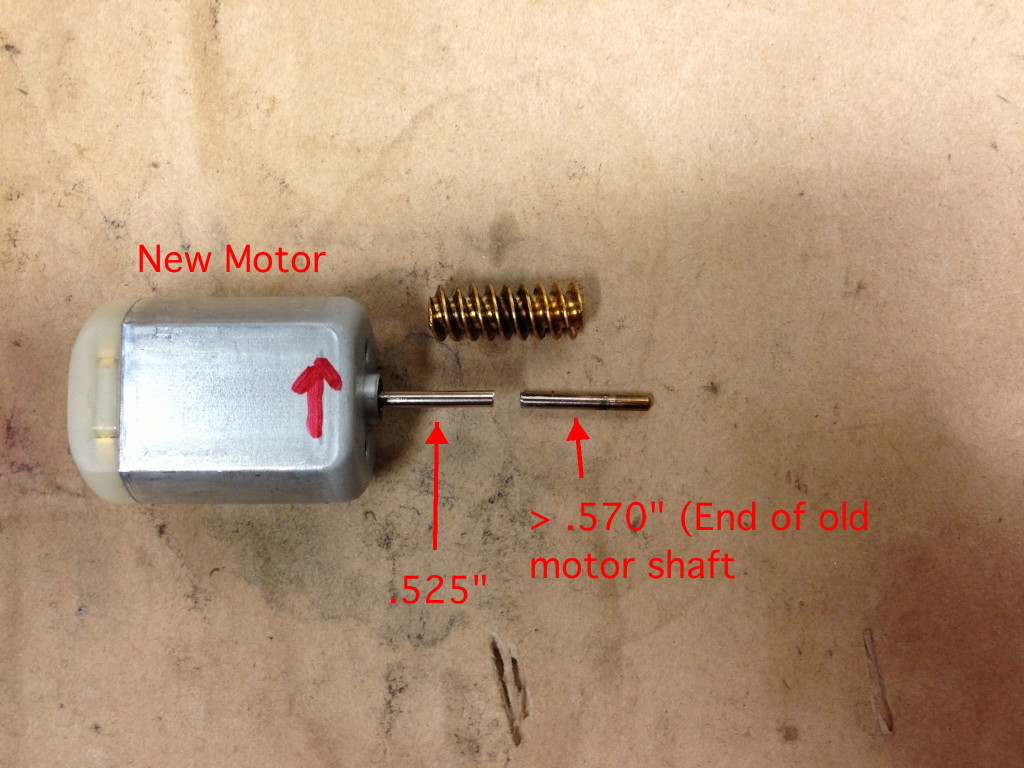
• Now a summary of our pieces. .525" of our new motor, >.570" of our slavaged motor shaft and the general location of the worm gear.
• Now we need to tap the worm gear onto the new motor shaft. First, I suggest using expoy or even red Loctite on the shaft to help secure the worm gear. I also suggest scuffing up the motor shaft to help the expoy adhere. Always support the far end of the motor shaft when tapping the gear on. In this case I put it on my vice's anvil.
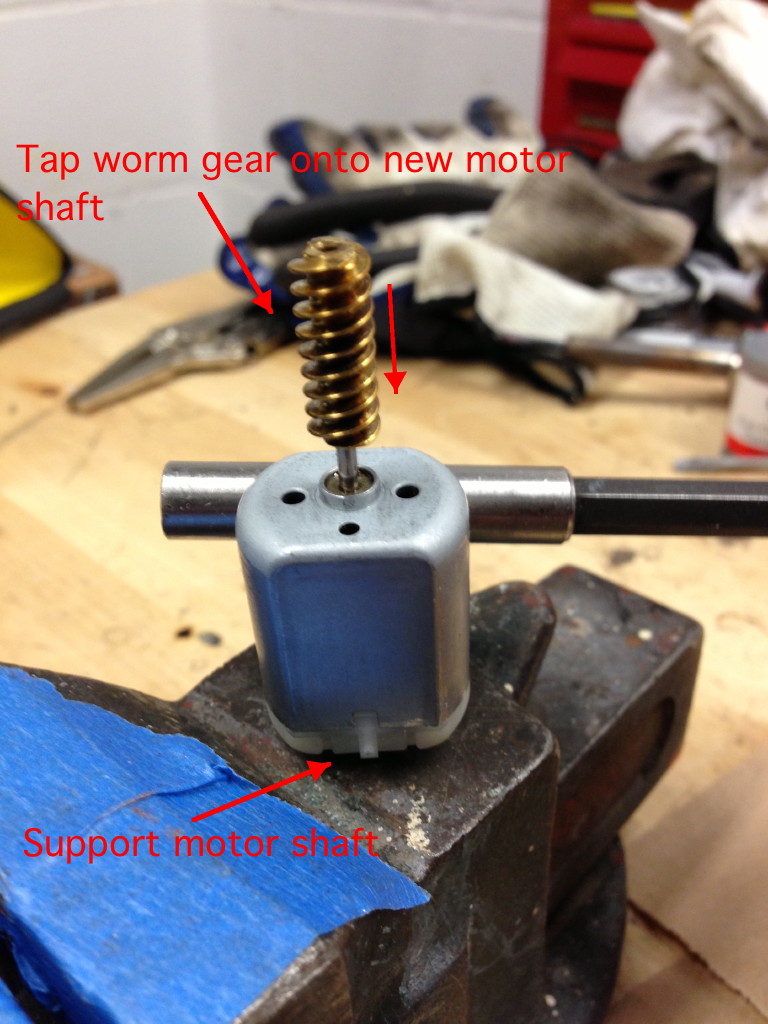
• To center the worm gear on the butt joint, tap the gear on until you get a .150" gap between the worm gear and motor housing. After I tapped it on, I used a needle nose vice grip to prevent the worm gear from moving further down on the shaft when I tap on the salvaged piece of shaft. In this case the width of my needle nose was conincidentally .150".
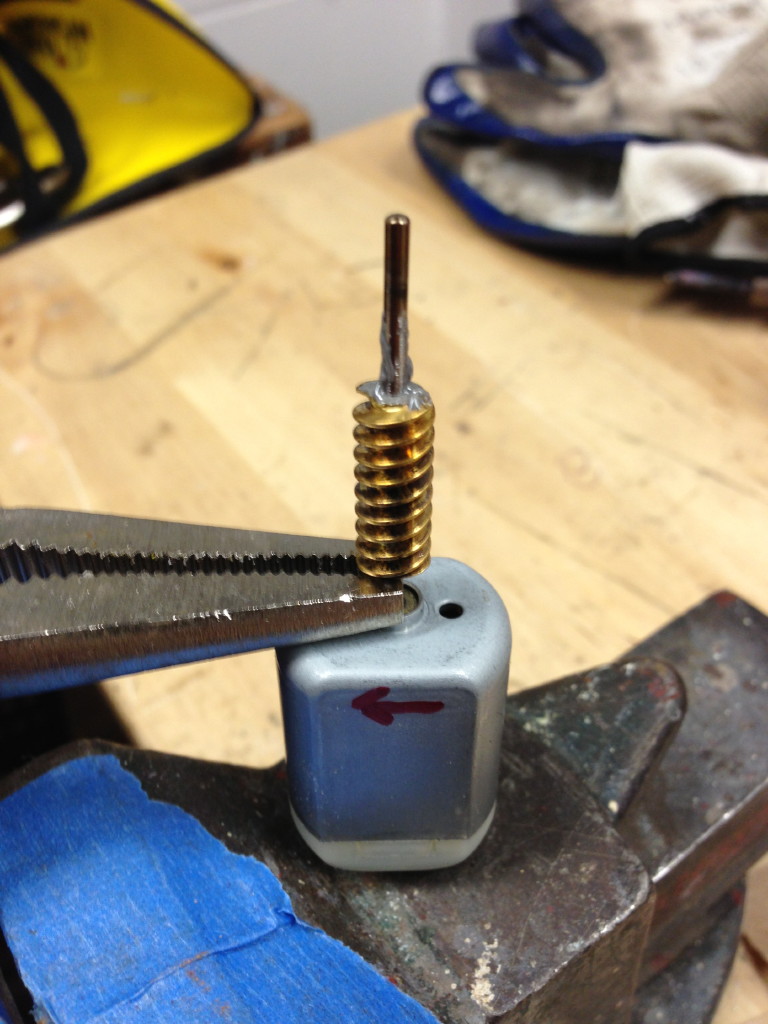
• Starting to tap on the extension with a hammer. The grey goo is the JB Weld epoxy I used. You can feel and hear when the extension is fully seated and in-contact with the motor shaft.
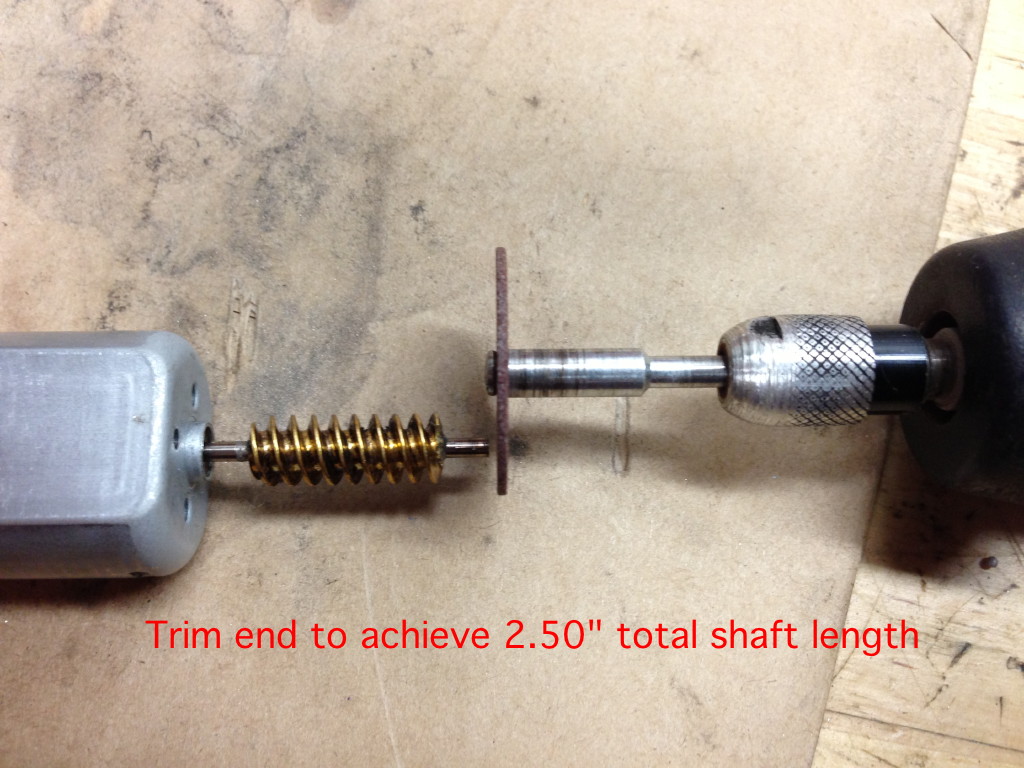
• Clean up the epoxy and measure the TOTAL shaft length. In this case 2.659". The end of the shaft need to be trimmed to achieve no more than 2.50" total shaft length.
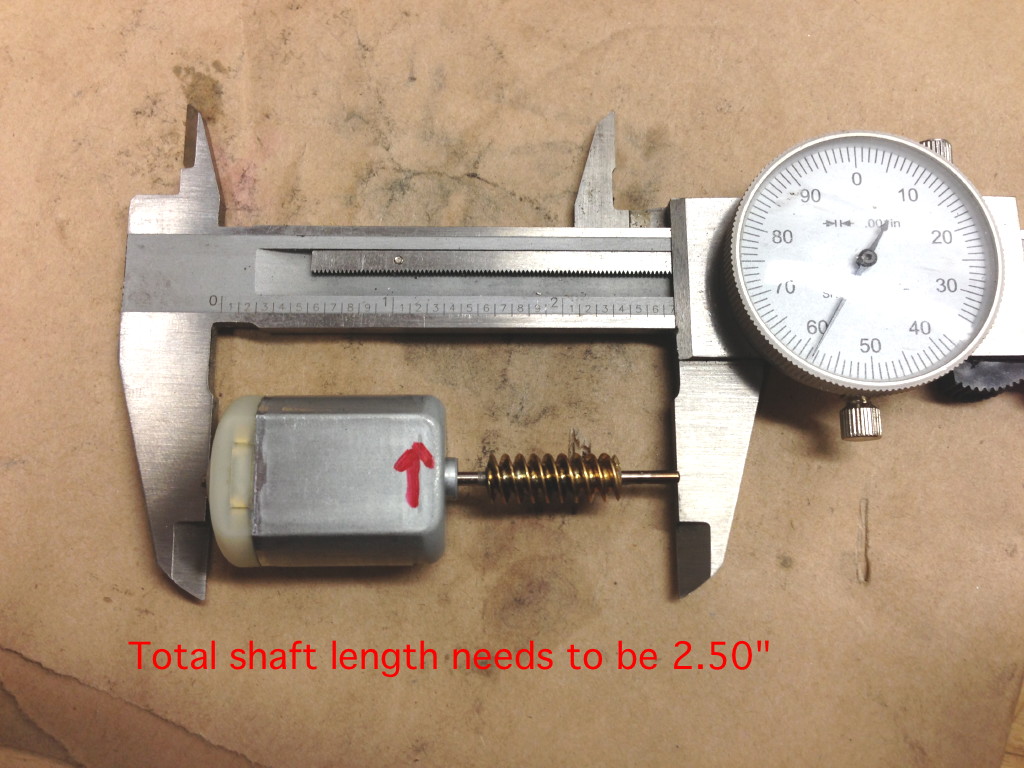
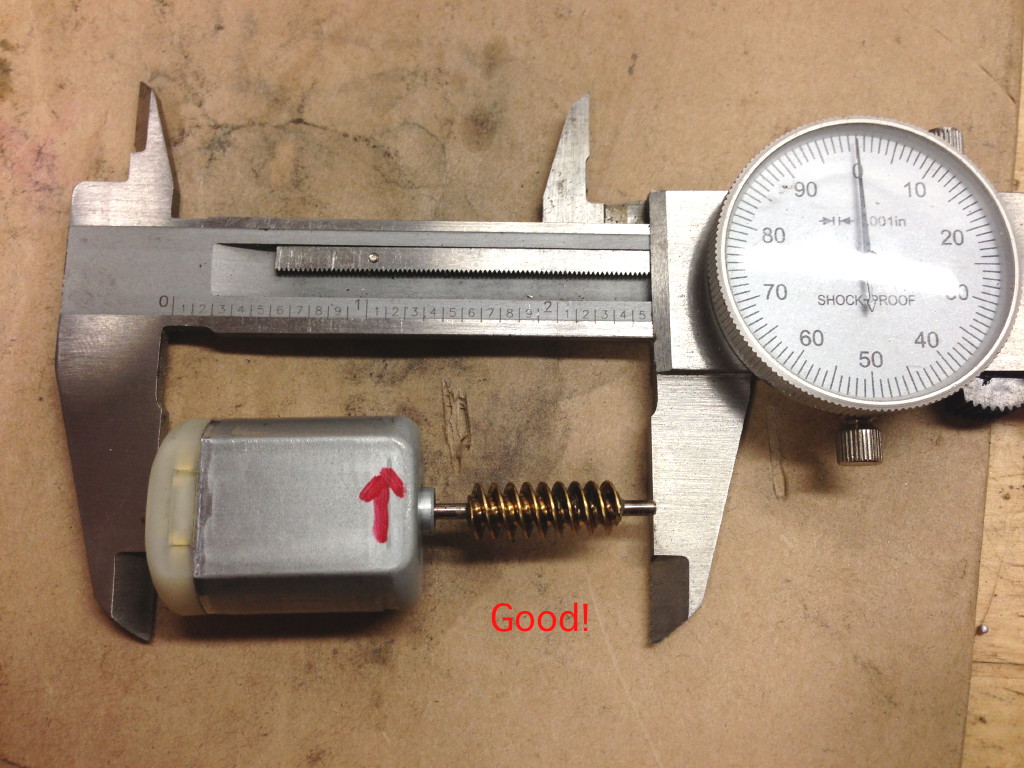
• Trim carefully. I think I ended up at about 2.495" which is just fine. Going over 2.50" will cause friction in the slot the motor clips into (this spec only applys to the unlocking "20005" motor). The "0301" locking motor has a different slot it clips into and is not as critical to total length.
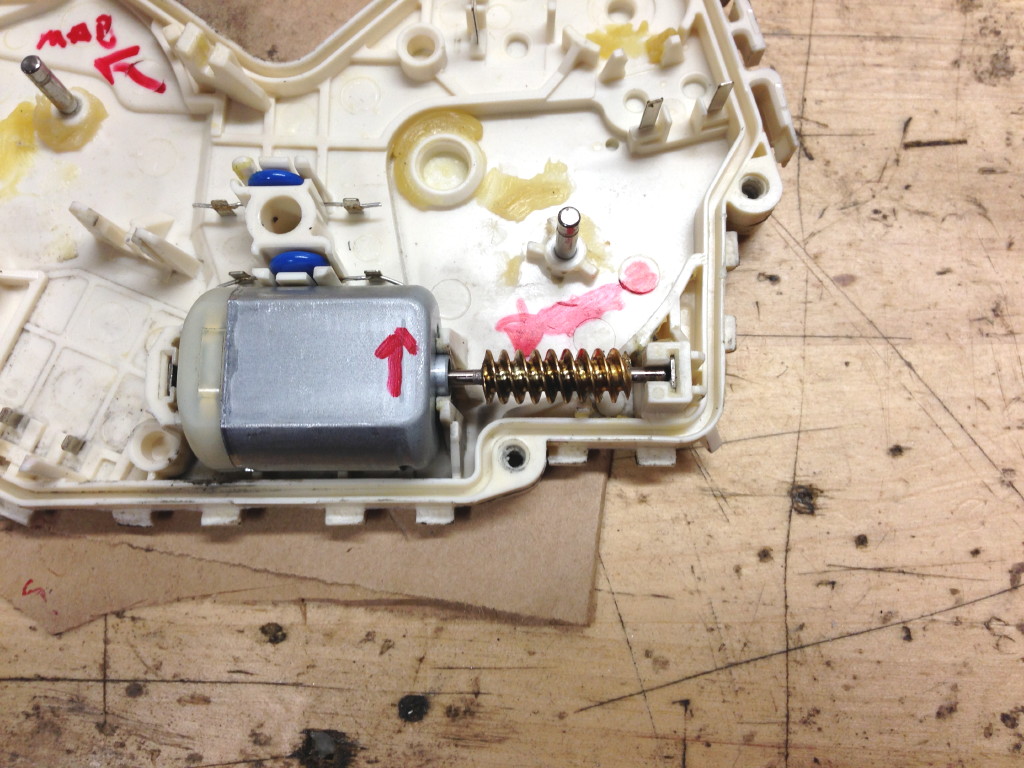
• New motor in place! You can see at each end of this motor shaft are two little metal plate which dictate having a precise overall length. The other motor has "open" ends.
Summary:
After replacing both "20005" motors in my car (left and right door), my central/power lock system is now 100% functional! $12 well spent
Overall the project is not very hard. Getting the actuator out of the door is a little tricky, but after the first one it becomes easy and you learn where things go and how it's put together. Disassembling the actuator itself is pretty easy and as I mentioned above, all my white clips broke. I had little 1" square pieces of plastic milk jug ready to go but could not slip a single one in a clip.
I suggest using new grease in the new actuator. Just wipe off the original white grease and wipe on new stuff.
When installing the interior door pull cable, I suggest using a pea-size glob of RTV silicone and squishing it in onto the blue plastic end of the cable after you snap it into place. This is the end of the cable that commonly comes loose and making the interior pull inoperative. The silicone gives just enough glue effect that it will probably never come loose again, but its also soft enough to remove the cable without issue.
I think the trickiest part of the project is mating the "L" shaped latch and actutor (motor housing) together. There is a few levers that need to be in the right place for it to snap together. I have noted a few below. And don't be afraid to flip the levers around a bunch to see what-moves-what. No parts will go flying.
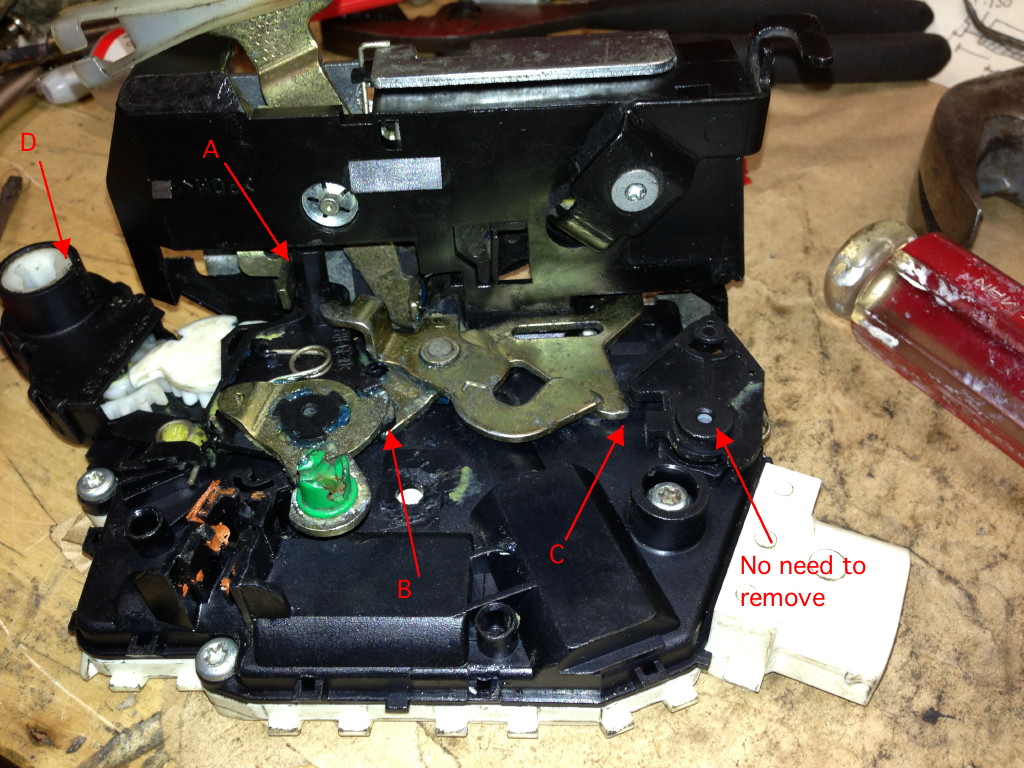
First, the gear I labelled "No Need To Remove" can stay put. You do need to take off the little white connector seen in the instructables.com article, but after that's off you can flip the lever to one position and have just enought room to get the torx screw out that sits behind it.
A:
The little gold lever is spring loaded and its natural position is to move towards the middle of the latch. You need to hold the lever against its spring pressure and have the black plastic lever hold it back.
B:
The lower metal lever had a "U" shaped cutout. There is a black plstic pin that needs to rest in the middle of the "U".
C:
The metal lever needs to stay inboard of the black plastic pin.
D:
This piece is on the driver's side actuator only. There is a little notch on the white piece and mark on the black piece that should line up. This white piece rotates about 180 degrees. When lined up on the mark, it should be able to rotate about 90 clockwise or 90 counter clockwise. This correlates to your key slot in which you can rotate 90 clockwise to lock your door or 90 counter-clockwise to unlock it.
Replace the door-lock actuator internal motors which fail and cause the failure of the power locks. There are many thread on replacing the actuator ($100+ each) and a few on cleaning the motors to get them to work again. In my case I had one motor (driver side) that worked marginally after cleaning and another (passenger side) that was totally shot, rendering my power lock system dead on both doors. This warranted searching for a replacment motor. I highly recommend replacing any motor that needs cleaning. It's only a matter of time before that old motor dies again.
Parts Needed:
• Unlocking (?) motor: Mabuchi FC-280PC-22125 motor with 20mm shaft (not standard 9.8mm shaft). I bought from eBay member "zinky86" for $6 each shipped.
- It turns out this motor is a common size used by many manufacturers in door lock actuators specifcally. The eBay ad I bought from mentions this motor is for Lexus/Toyota actuators.
- Manufacturer Spec Sheet: http://www.mabuchi-motor.co.jp/en_US...fc_280pcsc.pdf
The specs on this sheet all match the motor from the MINI except for shaft length. You can also see this motor size has four options for RPM, torque, current. I pretty-much bought based on finding one of these with a long enough shaft which is how I ended up with the "-22125" model.
• Locking (?) motor: ***NOTE*** From my testing of the functionality of my motors, I discovered that the "20005" and "0301" motors used in this actuator have opposite polarity even though they have the same external dimensions. So in the same slot, one motor spins clockwise and the other spins counter-clockwise. In this case I lucked out and the Mabuchi FC-280PC-22125 motor I used has the same polarity as the broken "20005" motor that needed replacing. I will try to search for a matching motor so I can update this DIY.
Steps:
• Remove Door Panel and Door Lock Actuator: https://www.northamericanmotoring.co...roblems-6.html See other pages in that thread for more removal instructions.
• Disassemble Door Lock Actuator: http://www.instructables.com/id/Repa...or-L/?ALLSTEPS
Some notes from my disassembly: I broke every one of the white clips that hold the case together. I gave up on the second one and just broke them all on purpose. Upon reassembly I found the four torx screw hold the case together well enough. I did not have to remove the black gear shown in step 8 of the instructables.com link.
• Here's a shot of my motor set-up. The motor I labelled "0301" is made by Mabuchi and was still functional on both my left and right actuators when I applied 9v/12v. The motor I labelled "20005" is made by Johnson (Controls?) and was broken on BOTH my units, just like the person who did the instructables.com article. I'd bet this motor is the issue on most failed actuators out there. Disregard all red arrows I wrote with a Sharpie on my motors and casing. This was from testing rotation direction as I mentioned above.

• The first step beyond the instructables.com guide is to salvage the brass worm gear from the original shaft. I set up a vice grips to support the worm gear while not gripping the shaft itself.

• This worm gear is pressed-on tightly so I used my heat gun, a large screwdriver and a hammer to tap the worm gear off. Since this motor is junk, don't worry about hammering on the motor body. It's not too hard to tap this off but you certainly won't be able to pull it off by hand.


• We have now seperated the worm gear. I suggest degreasing the worm gear before applying heat as you will burn the residual grease.

• Now this could be a pretty straighforward motor swap, but I could not find a replacement motor with a roughly 30mm (1.181") shaft like the stock motor. The longest I could find is 20mm (.787"). So, we will need to butt two segments of shaft together, with the butt centered in the middle of the worm gear. Butting in the middle provides the straightest shaft and stongest joint.

• To accomplish this we first need to trim the NEW motor's exposed shaft to .525". I used a Dremel and cut-off disc for all my cutting.

• Next we need to salvage part of the shaft from the junk motor. Cut this piece to AT LEAST .570". One of our last steps will be to do final trimming of the completed shaft assembly, so don't worry about making it a little longer than .570".

• Now a summary of our pieces. .525" of our new motor, >.570" of our slavaged motor shaft and the general location of the worm gear.

• Now we need to tap the worm gear onto the new motor shaft. First, I suggest using expoy or even red Loctite on the shaft to help secure the worm gear. I also suggest scuffing up the motor shaft to help the expoy adhere. Always support the far end of the motor shaft when tapping the gear on. In this case I put it on my vice's anvil.

• To center the worm gear on the butt joint, tap the gear on until you get a .150" gap between the worm gear and motor housing. After I tapped it on, I used a needle nose vice grip to prevent the worm gear from moving further down on the shaft when I tap on the salvaged piece of shaft. In this case the width of my needle nose was conincidentally .150".

• Starting to tap on the extension with a hammer. The grey goo is the JB Weld epoxy I used. You can feel and hear when the extension is fully seated and in-contact with the motor shaft.

• Clean up the epoxy and measure the TOTAL shaft length. In this case 2.659". The end of the shaft need to be trimmed to achieve no more than 2.50" total shaft length.

• Trim carefully. I think I ended up at about 2.495" which is just fine. Going over 2.50" will cause friction in the slot the motor clips into (this spec only applys to the unlocking "20005" motor). The "0301" locking motor has a different slot it clips into and is not as critical to total length.


• New motor in place! You can see at each end of this motor shaft are two little metal plate which dictate having a precise overall length. The other motor has "open" ends.

Summary:
After replacing both "20005" motors in my car (left and right door), my central/power lock system is now 100% functional! $12 well spent
Overall the project is not very hard. Getting the actuator out of the door is a little tricky, but after the first one it becomes easy and you learn where things go and how it's put together. Disassembling the actuator itself is pretty easy and as I mentioned above, all my white clips broke. I had little 1" square pieces of plastic milk jug ready to go but could not slip a single one in a clip.
I suggest using new grease in the new actuator. Just wipe off the original white grease and wipe on new stuff.
When installing the interior door pull cable, I suggest using a pea-size glob of RTV silicone and squishing it in onto the blue plastic end of the cable after you snap it into place. This is the end of the cable that commonly comes loose and making the interior pull inoperative. The silicone gives just enough glue effect that it will probably never come loose again, but its also soft enough to remove the cable without issue.
I think the trickiest part of the project is mating the "L" shaped latch and actutor (motor housing) together. There is a few levers that need to be in the right place for it to snap together. I have noted a few below. And don't be afraid to flip the levers around a bunch to see what-moves-what. No parts will go flying.

First, the gear I labelled "No Need To Remove" can stay put. You do need to take off the little white connector seen in the instructables.com article, but after that's off you can flip the lever to one position and have just enought room to get the torx screw out that sits behind it.
A:
The little gold lever is spring loaded and its natural position is to move towards the middle of the latch. You need to hold the lever against its spring pressure and have the black plastic lever hold it back.
B:
The lower metal lever had a "U" shaped cutout. There is a black plstic pin that needs to rest in the middle of the "U".
C:
The metal lever needs to stay inboard of the black plastic pin.
D:
This piece is on the driver's side actuator only. There is a little notch on the white piece and mark on the black piece that should line up. This white piece rotates about 180 degrees. When lined up on the mark, it should be able to rotate about 90 clockwise or 90 counter clockwise. This correlates to your key slot in which you can rotate 90 clockwise to lock your door or 90 counter-clockwise to unlock it.
Last edited by AutoCoarsen; May 19, 2013 at 10:03 AM.

2nd Gear
Joined: Jul 2013
Posts: 95
Likes: 2
From: Austin, TX
Thanks for this! My passenger door lock went out several months ago and I finally got around to fixing it. I followed your guide and this instructable. I didn't replace my non functioning motor, but opened it up and cleaned it and all is well again.

I am surprised as well. This is definitely a very nice write up and great resource as it should be very useful for the gen 1 MINI owners with actuator issues.
__________________
Your Trusted Source For DIY and Parts
FREE SHIPPING over $99 click here
MINI Parts | DIY Help | Facebook | Twitter | Instagram | YouTube | Promos
888.280.7799 | 6am - 5pm PST

FREE SHIPPING over $99 click here
MINI Parts | DIY Help | Facebook | Twitter | Instagram | YouTube | Promos
888.280.7799 | 6am - 5pm PST
2nd Gear
Joined: Jul 2013
Posts: 95
Likes: 2
From: Austin, TX
I broke most of the brittle white plastic clip pieces off on mine. At first by accident, then almost out of spite. They didn't seem necessary to hold it back together.

This was a great fix and a solution to the "fonzie method" , well done.
__________________

MINI Guru/ MINI Owner Since 2004 | NEW Lifetime Part Replacement | Local Pickup
Milltek | Genuine MINI | Forge Motorsport | NM Engineering | ECS Performance | M7 Speed
Customer Service Hours: 8am-8pm EST|Sales Team Hours: 8am-11pm | SAT 10am-7pm 800.924.5172
MINI Guru/ MINI Owner Since 2004 | NEW Lifetime Part Replacement | Local Pickup
Milltek | Genuine MINI | Forge Motorsport | NM Engineering | ECS Performance | M7 Speed
Customer Service Hours: 8am-8pm EST|Sales Team Hours: 8am-11pm | SAT 10am-7pm 800.924.5172

Neutral
Joined: Jun 2016
Posts: 1
Likes: 0
Question about motors
Good afternoon, you're the only one on the internet that has the solution to this problem, I congratulate you for such a good guide.
I have a Discovery 2 and the passenger door do not open or close, I guess that it is a bad motor and the tail door has the same problem.
I wonder which motor make and model did you used for the locking motor? that have understood that the motor to UNLOCK is the FC-280PC-22125 model. But to LOCK is the same motor model and spec?
Once more congratulations for such explicit guide and sorry for my English, I'm from Venezuela.
Trending Topics

Neutral
Joined: Mar 2017
Posts: 1
Likes: 0
Congrats for the tutorial on the fix. It is very useful.... the only problem that I am encountering is that when I try to open the door it locks and when I try to unlock it locks o.O ... any suggestions please, I have bought the Mabuchi FC-280PC-22125 motor and replaced the same faulty motor as described on the tutorial

Neutral
Joined: Apr 2017
Posts: 4
Likes: 0
Congrats for the tutorial on the fix. It is very useful.... the only problem that I am encountering is that when I try to open the door it locks and when I try to unlock it locks o.O ... any suggestions please, I have bought the Mabuchi FC-280PC-22125 motor and replaced the same faulty motor as described on the tutorial

were you able to fix your problem? Is this actuator same for Land Rover Discovery 2?


Neutral
Joined: Nov 2017
Posts: 2
Likes: 0
Thanks for this! My passenger door lock went out several months ago and I finally got around to fixing it. I followed your guide and this instructable. I didn't replace my non functioning motor, but opened it up and cleaned it and all is well again.
Neutral
Joined: Nov 2017
Posts: 2
Likes: 0

Neutral
Joined: Apr 2018
Posts: 1
Likes: 0
Take out the motor and cleaning it well is also a good way to check the problem but if this doesn't work then find nearby locksmith and ask them to replace the actuator. Repair can cost much as compared to replacement and there is probability of getting it serviced again so replacement is necesaary.

Neutral
Joined: Jun 2018
Posts: 1
Likes: 0
I had hired locksmith dallas tx for that work , they replaced the actuator and solenoid both. Now it works fine with no issues.

Neutral
Joined: Jul 2018
Posts: 1
Likes: 0
Congrats for the tutorial on the fix. It is very useful.... the only problem that I am encountering is that when I try to open the door it locks and when I try to unlock it locks o.O ... any suggestions please, I have bought the Mabuchi FC-280PC-22125 motor and replaced the same faulty motor as described on the tutorial

Neutral
Joined: Oct 2018
Posts: 1
Likes: 0
John i think you should talk to locksmith brooklyn, may be they can help you with it. My all lock issues has been resolved by them.

Neutral
Joined: Apr 2019
Posts: 2
Likes: 2
This is caused by the motor being the wrong polarity. Instead of it rotating right (for the lock) its rotating left. Simply reverse the rear of the motor 180 degrees, you may have to notch the casing to allow it to reseat back in but it does work.
I just resolved my door locks the same way. You can also use the 20mm motors without the need for adding the extra spindle length. The rest of the spindle is for support but the motors are such a good fit in the housing it does not impact the operation of the doors without the extra length. Simply order the Mabuchi FC-280PC-22125 motor with 20mm shaft as stated, rotate the rear 180 degrees if you receive the wrong polatiry motors. That means you can use these for all the motors in the locks.
I realize this is an old thread but I did have the same issue so I've added it in the hope I can save someone a lot of time scratching their head.

Neutral
Joined: Jan 2020
Posts: 6
Likes: 1
Motor reverse
This is caused by the motor being the wrong polarity. Instead of it rotating right (for the lock) its rotating left. Simply reverse the rear of the motor 180 degrees, you may have to notch the casing to allow it to reseat back in but it does work.
I just resolved my door locks the same way. You can also use the 20mm motors without the need for adding the extra spindle length. The rest of the spindle is for support but the motors are such a good fit in the housing it does not impact the operation of the doors without the extra length. Simply order the Mabuchi FC-280PC-22125 motor with 20mm shaft as stated, rotate the rear 180 degrees if you receive the wrong polatiry motors. That means you can use these for all the motors in the locks.
I realize this is an old thread but I did have the same issue so I've added it in the hope I can save someone a lot of time scratching their head.
I just resolved my door locks the same way. You can also use the 20mm motors without the need for adding the extra spindle length. The rest of the spindle is for support but the motors are such a good fit in the housing it does not impact the operation of the doors without the extra length. Simply order the Mabuchi FC-280PC-22125 motor with 20mm shaft as stated, rotate the rear 180 degrees if you receive the wrong polatiry motors. That means you can use these for all the motors in the locks.
I realize this is an old thread but I did have the same issue so I've added it in the hope I can save someone a lot of time scratching their head.
I just replaced both the motors and I was driving mad after seeing that the lock motor run in reverse!!
This evening I re-open the actuator, rotate the motor head and see if it finally works.
Last edited by Multistrada_guy; Jan 8, 2020 at 11:12 PM.
Neutral
Joined: Jan 2020
Posts: 6
Likes: 1
Hello everybody,
as I wrote yesterday I re-opened the driver side's door lock actuator wich was working bad after I replaced both the motors.
In particular the issue was with the LOCKING motor wich was working inversely (unlocking the lock instead of locking it).
I easily turned the plastic motor's head of 180� (as Josseh explained), reassembled the actuator....AND NOW IT WORKS PERFECTLY!!
At the moment also the passenger door handle's cable is detached from its door lock so, since I'll have to disassemble the door's panel, I'll take advantage of it to change the motors as well.
Thank you again to AutoCoarsen and Josseh!
Last edited by Multistrada_guy; Jan 8, 2020 at 11:38 PM.
Neutral
Joined: Apr 2019
Posts: 2
Likes: 2
Hello everybody,
as I wrote yesterday I re-opened the driver side's door lock actuator wich was working bad after I replaced both the motors.
In particular the issue was with the LOCKING motor wich was working inversely (unlocking the lock instead of locking it).
I easily turned the plastic motor's head of 180� (as Josseh explained), reassembled the actuator....AND NOW IT WORKS PERFECTLY!!
At the moment also the passenger door handle's cable is detached from its door lock so, since I'll have to disassemble the door's panel, I'll take advantage of it to change the motors as well.
Thank you again to AutoCoarsen and Josseh!
as I wrote yesterday I re-opened the driver side's door lock actuator wich was working bad after I replaced both the motors.
In particular the issue was with the LOCKING motor wich was working inversely (unlocking the lock instead of locking it).
I easily turned the plastic motor's head of 180� (as Josseh explained), reassembled the actuator....AND NOW IT WORKS PERFECTLY!!
At the moment also the passenger door handle's cable is detached from its door lock so, since I'll have to disassemble the door's panel, I'll take advantage of it to change the motors as well.
Thank you again to AutoCoarsen and Josseh!


