When you click on links to various merchants on this site and make a purchase, this can result in this site earning a commission. Affiliate programs and affiliations include, but are not limited to, the eBay Partner Network.
General MINI TalkShared experiences, motoring minutes, and other general MINI-related discussion that applies to all MINIs, regardless of model, year or trim.
Wow, looking great. What do you use to preserve the leather?
Well, the seat back I installed was brand new. Other than that I have not treated the leather seats at all. I do have some leather conditioner that I plan on using soon.
I've been dipping my Minis for 3 years now. I could give you some pointers if you're ever near Des Plaines. Dipping your headlight rings, washer covers, tail light rings, emblems, and grille trim are a great place to get started. After that, check out the Matte Blackout Beltline mod from Outmotoring. I'd probably avoid doing a PlastiDip racing stripe. Buy a real one and have it done professionally if you can. Dipping is best on trim IMHO. Here's the link and a picture of the results of my dipping my Red Pepper...
This is just the rings, grille trim, and beltline. I've already done the washer covers and the license plate cover but it was after this picture. I'll be doing the emblems in the spring.
Well, the alternator took a poop, so my son installed a new one and our friend has a great shop with a lift, and he only charges $20 to use it! Then, son bought me my first actual mod not counting plastidipping. Got a one ball. Nice new sound and a bit more zip :>)
Finally got around to doing some rear hatch and bumper detailing. Whatever glue Mini used to put these quasi fake grill stickers on was a PITA to remove.
Last edited by Bernard Barbour; 01-03-2017 at 06:53 AM.
Well, the alternator took a poop, so my son installed a new one and our friend has a great shop with a lift, and he only charges $20 to use it! Then, son bought me my first actual mod not counting plastidipping. Got a one ball. Nice new sound and a bit more zip :>)
You gentleman are very fortunate to have a lift available for the low price of $20.00. That's one thing I really miss not being near a military installation that had an autocraft shop (lift, tire changer, paint both, welding etc) for $5.00 an hour and all the tools. Cheers and keep up the good work.
When I purchased my R53 last August, the previous owner told me the armrest was broken. The armrest cover that slides open to access the center console storage compartment wouldn't stay closed. Over time, the small tab that provides friction to keep the cover closed either broke or worn down. Every time your elbow rested on the cover, it would slide open. Talk about annoying and frustrating!! I found myself having to close the cover every five minutes while driving to prevent my elbow from going into the storage compartment. :-(
I'm not sure how many have had this same issue but figured there were enough (I watched a YouTube video of a guy using rare earth magnets to fix this problem). After trying the magnet fix, and failing, I tried something else. Since my fix was easier, cheaper and worked really well, I thought I'd share it with the NAM community.
After removing the arm rest, I noted there was an upper and lower track in the lower storage portion of the console. The armrest cover had two sets of short plastic pins on its' underside. These pins snapped into the tracks and guided the cover's movement forward and back when opening and closing.
First, I cut a small piece of masking tape to mark the width and location of the front plastic pins. I noted the pins' forward most position when closed. Second, I transferred the masking tape to the lower console's top track, marking the pin's "closed" position. Then I removed the upper armrest cover. The masking tape markers ended up being about .25" back from the start of the upper track.
Finally, using a shortened wooden kabob stick, I added a large drop of epoxy to each of the upper tracks where the single pin slides back and forth. I hoped adding a little "bump" in the upper track would provide the necessary resistance to keep the armrest cover closed. After the first drop dried for a couple hours, I added a second drop to each track to make sure the bump was large enough to provide the necessary resistance. I waited about 12 hours for the epoxy to fully cure before I tested my fix.
I'm happy to say that my problem is now solved! The cost of my fix was $5 for the epoxy and about a day to remove, repair and replace the armrest. The cost to replace my center console with OEM parts would have been a little over $200 + shipping. I'm including a couple pics to illustrate.
Hope this cheap hack will help someone else.
Last edited by Neka; 01-05-2017 at 10:19 PM.
Reason: clarity
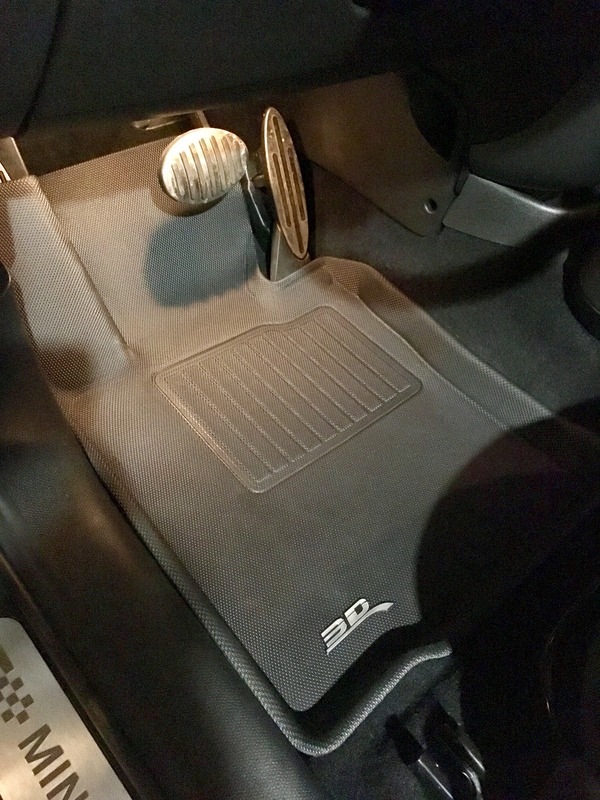
Bought these "3D Maxpider" floor liners. They seem awesome. Lightweight and more of a soft material. They fit fantastically. Hundred bucks for all 4.
Ive got Husky Liners in my truck and the hard plastic just seemed too brutal for the Mini...since its my wife in heels most of the time....hence the wrong transmission...
Last edited by iwashmycar; 01-06-2017 at 04:37 PM.
Today I finished 1/2 of my project. 2 years ago I replaced my leather heated sport seats with a set of heated JCW Lounge leather seats. This was done in the summer, so it was a surprise to me in the winter when I found out the seats I bought were not heated. I disassembled my old seats and removed the heating elements and electronics to install into my new seats. I finally completed that task on the driver's seat. I also added foam to build up all my bolsters. It feels like new! Sunday I will complete the passenger side.
Absolutely nothing.... I spent most of the day plowing out my 1/4 mile driveway after a 18" snowfall so I could drive the Clubman next Tuesday.
Sprung a leak in the plow hydraulics so that fix is in progress before I can finish plowing.
Mini won't go in DEEP snow despite studded snows
Having just bought it with 41K on it I assume oil has only been changed at 15 and 30K miles.
It showed. Dirtiest oil I have ever seen. After I disposed of the used oil this is what the pan looked like. Never seen it cling that black to it before.
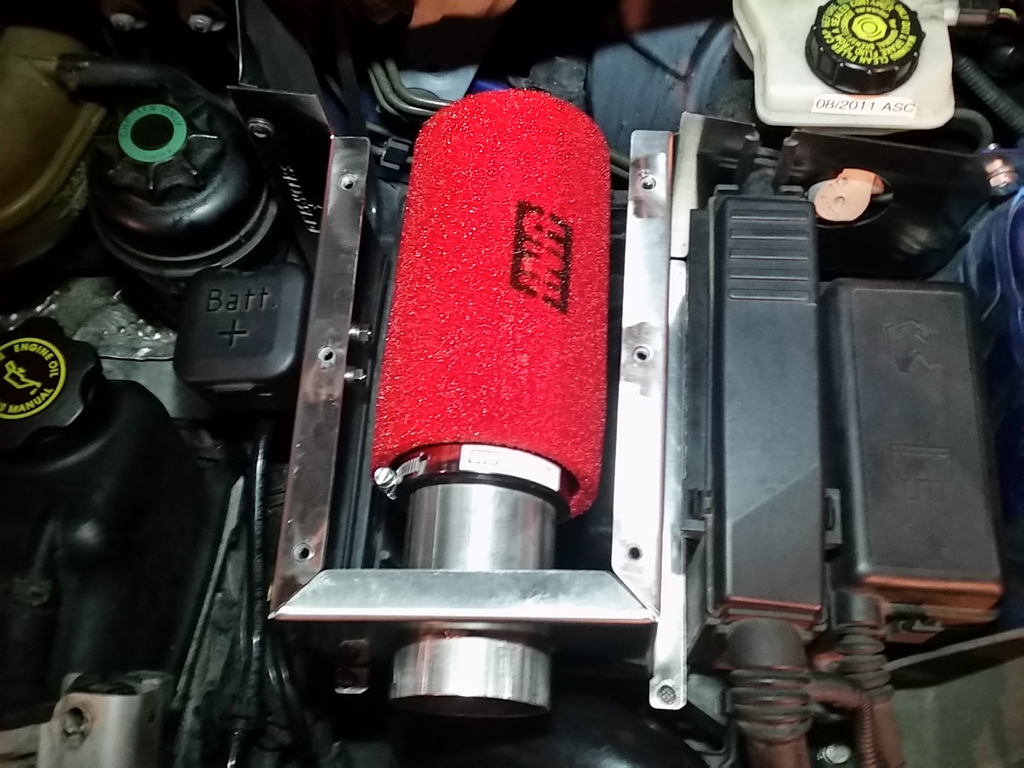
Then I checked the air filter. Geesh. Youd think the BMW dealer might just pop their head in there...but no
Bought these "3D Maxpider" floor liners. They seem awesome. Lightweight and more of a soft material. They fit fantastically. Hundred bucks for all 4.
I bought them recently, but I'm a bit disappointed. I had to cut a 5"x4" section out of the rear floor mat to allow it to fit under the cup holders. The fitment of the passenger seat mat is shoddy. (See attached pic)
How well does yours fit?
Also, I saw your wife on the Countryman Owners Group on FB. Husband is on NAM, wife on FB... typical. lol
Yep thats us!.
My rear mats were separate and fit great on each side of the hump. I heard about having to do that on one-piece designs though.
As far as the pass side one it did slightly bulge but i just yanked it a little towards the console and it went away. Sort of pulled and pushed it under the storage net sort of motion. Hopefully it 'wears in' that way.
After abut a month of Egan sitting in my garage, I took him out once again for a little drive, braving the cold temps in the teens. It was certainly nice to drive the Mini again, although I'm afraid he is showing signs of wear. :(
On my way home, I noticed the clutch was slipping in the higher gears (give it some throttle, the revs shoot up, but not much increase in speed). After 160k miles on that clutch, and everything else mechanical, it might be time to do some TLC later this winter season. I already bought a new clutch master cylinder, and clutch slave cylinder (have not installed them yet) and I should also do a brake fluid flush, on top of changing the gearbox fluid as well.
Having just bought it with 41K on it I assume oil has only been changed at 15 and 30K miles.
It showed. Dirtiest oil I have ever seen. After I disposed of the used oil this is what the pan looked like. Never seen it cling that black to it before.
Then I checked the air filter. Geesh. Youd think the BMW dealer might just pop their head in there...but no
Aught to run a little bit happier now I hope!!
It always amazes me. The dealers say they have this 100 point inspection and all that, I don't think so! One time I bought a car and there was no air filter. So from now on I have a to act like a bad guy because I make them put any car I buy on a lift, check everything, make them change the oil if it looks dirty, and fill it with gas before I drive off the lot. If they want my money they will get it but on my terms or I walk. To many times they do this crap and you the buyer end up buying a filter, oil change etc. No more!
It always amazes me. The dealers say they have this 100 point inspection and all that, I don't think so! One time I bought a car and there was no air filter. So from now on I have a to act like a bad guy because I make them put any car I buy on a lift, check everything, make them change the oil if it looks dirty, and fill it with gas before I drive off the lot. If they want my money they will get it but on my terms or I walk. To many times they do this crap and you the buyer end up buying a filter, oil change etc. No more!
Yeah, I had them put this one up on a lift but I was specifically looking for leaky oil solenoids and lines ect. Totally would have thought they would have hit it in that "100pt inspection"...maybe this BMW only had a 90 point LOL
I just wonder, had some 20y/o 'drive-it-like-an-appliance' type-person bought it (probably like the one who maybe owned it), they'd probably have put another 40K miles on that freaking filter.
Wow, thats pretty dirty. I dont think that been changed since new on the filter. That oil is pretty dirty also. On the turbo engines the MINI oil gets pretty dirty quick compared to my Gen 1 MINI non supercharged. Glad you got that stuff done.
I had the CEL come on again today! This is the third time in the last three weeks. Each time it comes on it says P2188 too rich at idle. At first I thought that the cold had been doing it, it's been about 9 degrees f for the last couple weeks. I have checked the connections on all the tubing and it's good. Yay.
Oil change, transmission fluid flush and removed the fake sticker "grill" from the rear bumper. Found a busted control arm bushing while I was under there.

 01-03-2017, 05:18 AM


 despite studded snows