R50/53 My 160k Mile Service

Thread Starter
|
2nd Gear
Joined: May 2016
Posts: 59
Likes: 0
From: Portland, OR
My 160k Mile Service
Hey everyone,
So I had this thread going in the 1st gear forum and figured I�ll kill that one and put it here where other R53 users hang out. I love making write-ups and love taking pictures. I don�t intend on this being a detailed How-to write-up. But, if you�re like me and want to know how difficult your project will be then there should be plenty of that detail for you. Also, apologies in advance for how long this is and for my rambling. I know most won't read all that I�ve written, but that's why I have pictures! Those are easy to read.
Check out my original thread if you want. There is some good stuff in there on page 2.
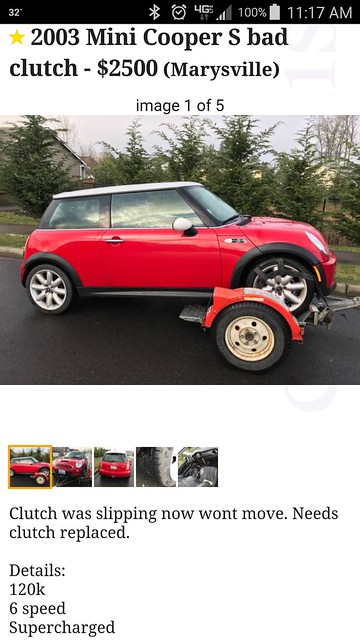
So long story short, I bought an 05 Cooper S and love it.
Long story longer, at the time my daily driver was an 08 Chevy Avalanche and commuting was getting expensive and the thought of parking it downtown gave me nightmares. Don�t get me wrong, I love my Avy!
But I wanted something that was fun to drive, did better than 10 MPG in town, and would be easier to find parking for. There were lots of options I had considered but the Mini Cooper S was the only one that really stood out for me. I haven�t got a hat backwards enough or jeans skinny enough to drive a civic or wrx. And the only way I�d drive a smart car is if it had the Hayabusa conversion. I don�t know. The �ricer� option just isn�t my thing or my crowd...

My Mini had 154k miles on it when I bought it and was completely stock. The decision to buy it came while on the test drive. I came over a little rise in the road and thought I�d go from 4th to 3rd, get the R�s up a little and listen for any weird noises going into a corner. That�s when the owner in the back seat nearly had kittens. �Whoa! Whoa! Don�t do that! You�ll hurt it.� When I asked what she meant she said she always puts it in neutral and idles down hills and never does that because it�s hard on it� Uh, SOLD�
Since, I�ve done some minor things. Fancy UV window tint, Mini power steering recall, MSD coil pack, plugs and wires, DDMWorks cold air intake, Detroit tuned bypass valve and some windshield scoops. Other than that I have just been getting to know the car and reading through the folder of service records.
Right now I�m in what I�m calling stage one. Everything on this car is stock and worn. Based on the service records and tires there have been alignment issues; so stage one is suspension and handling. I�ve done a lot of research and built a substantial list of things the car needs as well as a few goodies I want. The orders started rolling in and during the 2016 Christmas break I started the great 160k mile service.
And here we go! Enjoy
11/16/2016 Preparation For Day 1 - The Old 7p�s Adage
It's a fact! Proper Planning and Preparation Prevents **** Poor Performance!
I�ve watched so many YouTube videos and read enough How-To�s that I felt like I could work on this car with my eyes closed. I knew where everything was and what to and not to do before I even got started. This was REALLY helpful. Also, get a Bentley Service Manual. It is an AWESOME manual and is worth every penny. Highly recommend one of those and highly recommend these guys.
ModMINI�s Youtube channel and Pelican Parts Write-ups are fantastic! Both of these resources really helped me through this project.
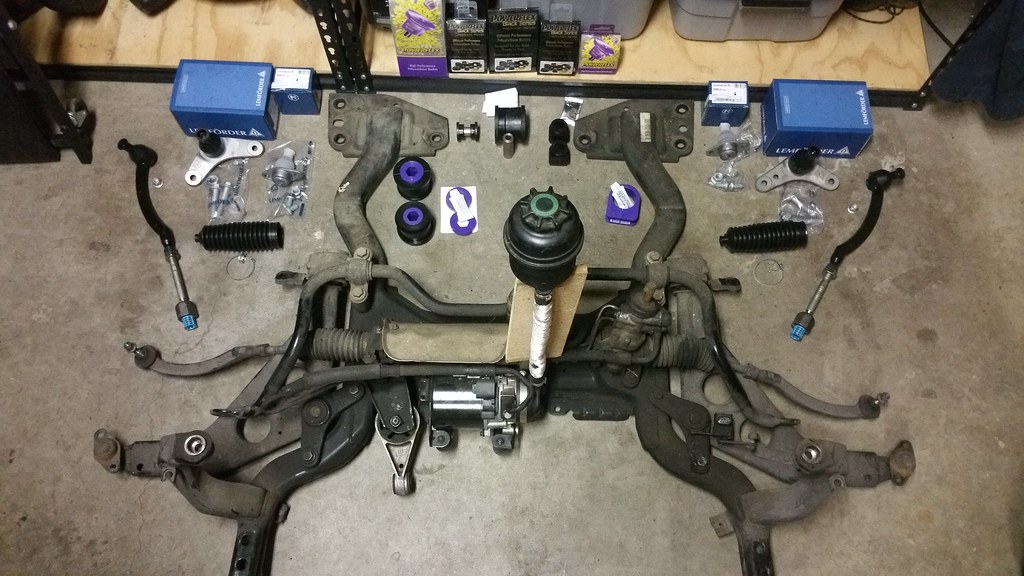
Between NAM, YouTube and Pelican Parts resources I spent a solid month researching what goes bad and what I would want to replace while the subframe was out. Here�s the list I made and the lessons I learned along the way.
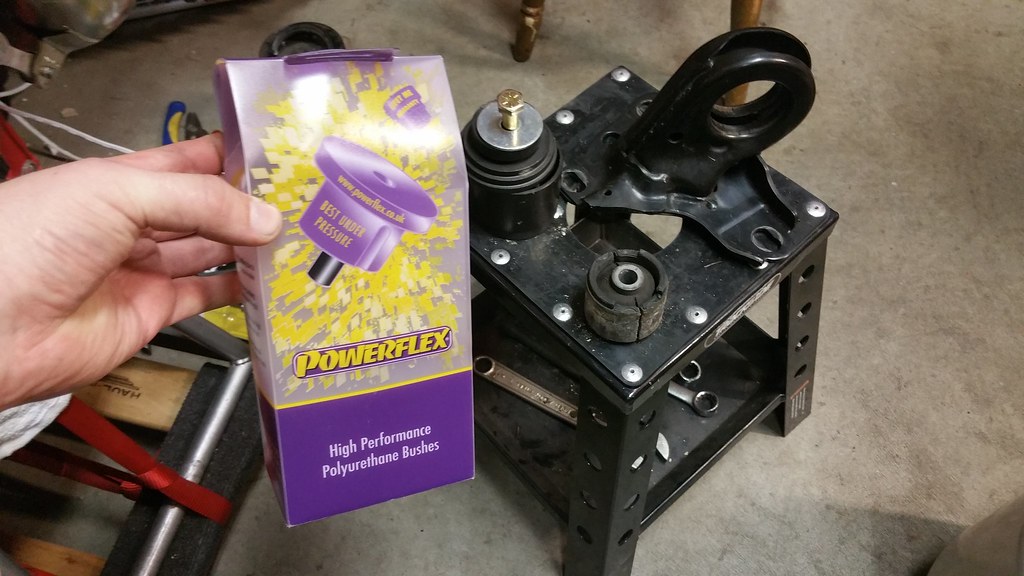
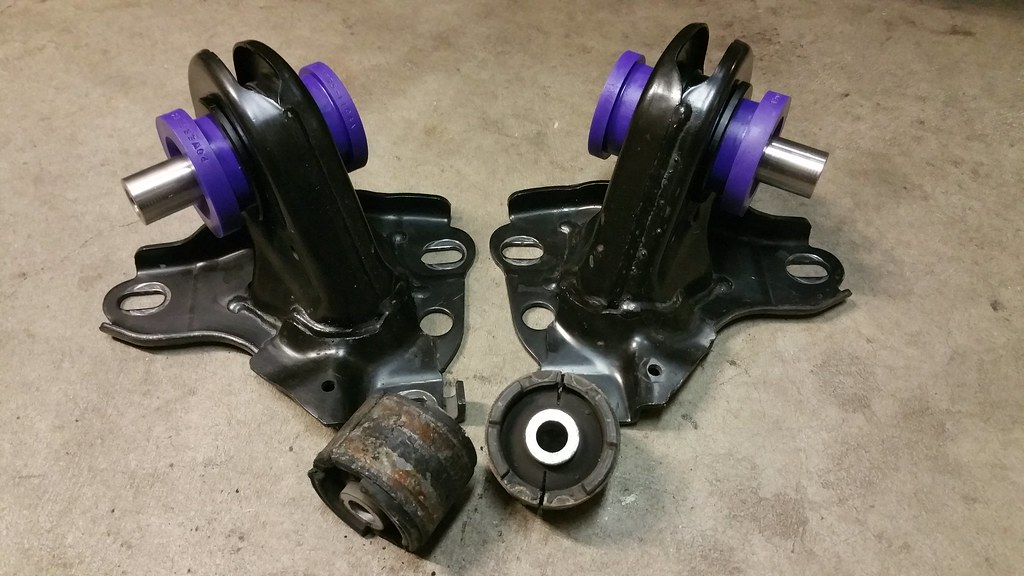
Suspension - Powerflex Bushings
I had a mix of race and street durometer bushings I ordered based on the research I did. A last minute decision to go to Megan coilovers and adjustable control arms kinda screwed things up and I had to return some stuff because they no longer apply. Also, get the steering rack bushings in race. That was just silly on my part. Street durometer is fine but if you�re trying to tighten everything up in the steering like I am then this little bushing just makes sense to be in the Race durometer.
Front control arm bushings - Street
Steering rack bushing - Street (go with race)
Rear trailing arm bushings - Street
Rear control arm bushings - Street
Rear strut tower bushings - Street
Front sway bar (stock) bushings - Race
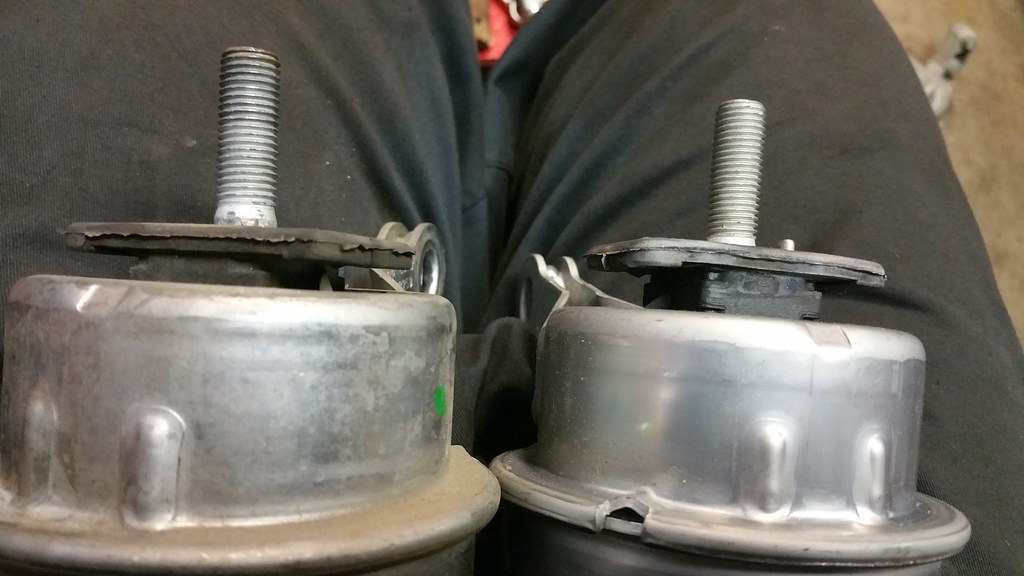
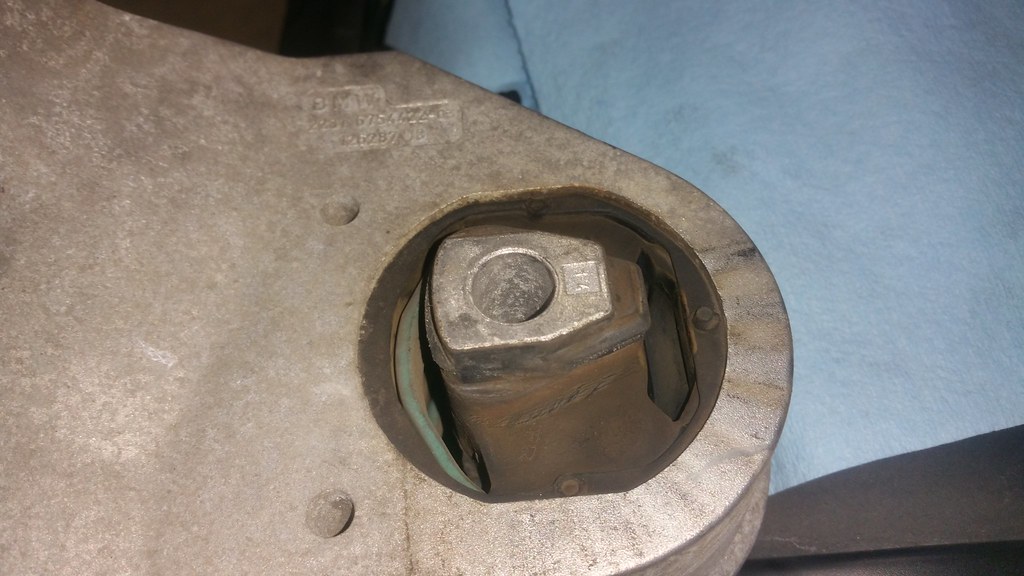
Large & Small Engine Mounts - Race
Gearbox Mounts - Race
If you�re going to coilovers and adjustable control arms don�t bother with the rear control arm bushing or the rear strut tower bushings. I had planned on staying with an OEM equivalent set of struts but at the last minute decided to blow my budget out of the water and went with Megan coilovers and Megan upper and lower control arms. Also note that depending on your coilovers and/or camber plates Cravenspeed under tower indurators will not work either. Additionally, the powerflex gearbox bushings replace the two ribbed pie shaped gearbox stop buffers so don�t order OE replacements for those either.
Suspension - All The Hardware
I knew my drivers side outer ball joint was shot. The boot was torn and I could see the sand and rocks inside. Plus there was a ring of grease on the trany where a CV boot was flinging grease and dealership reported left front wheel bearing flinging grease. When the subframe is out this stuff is SUPER easy to replace. So I seized the opportunity and replaced them all. Here�s the list.
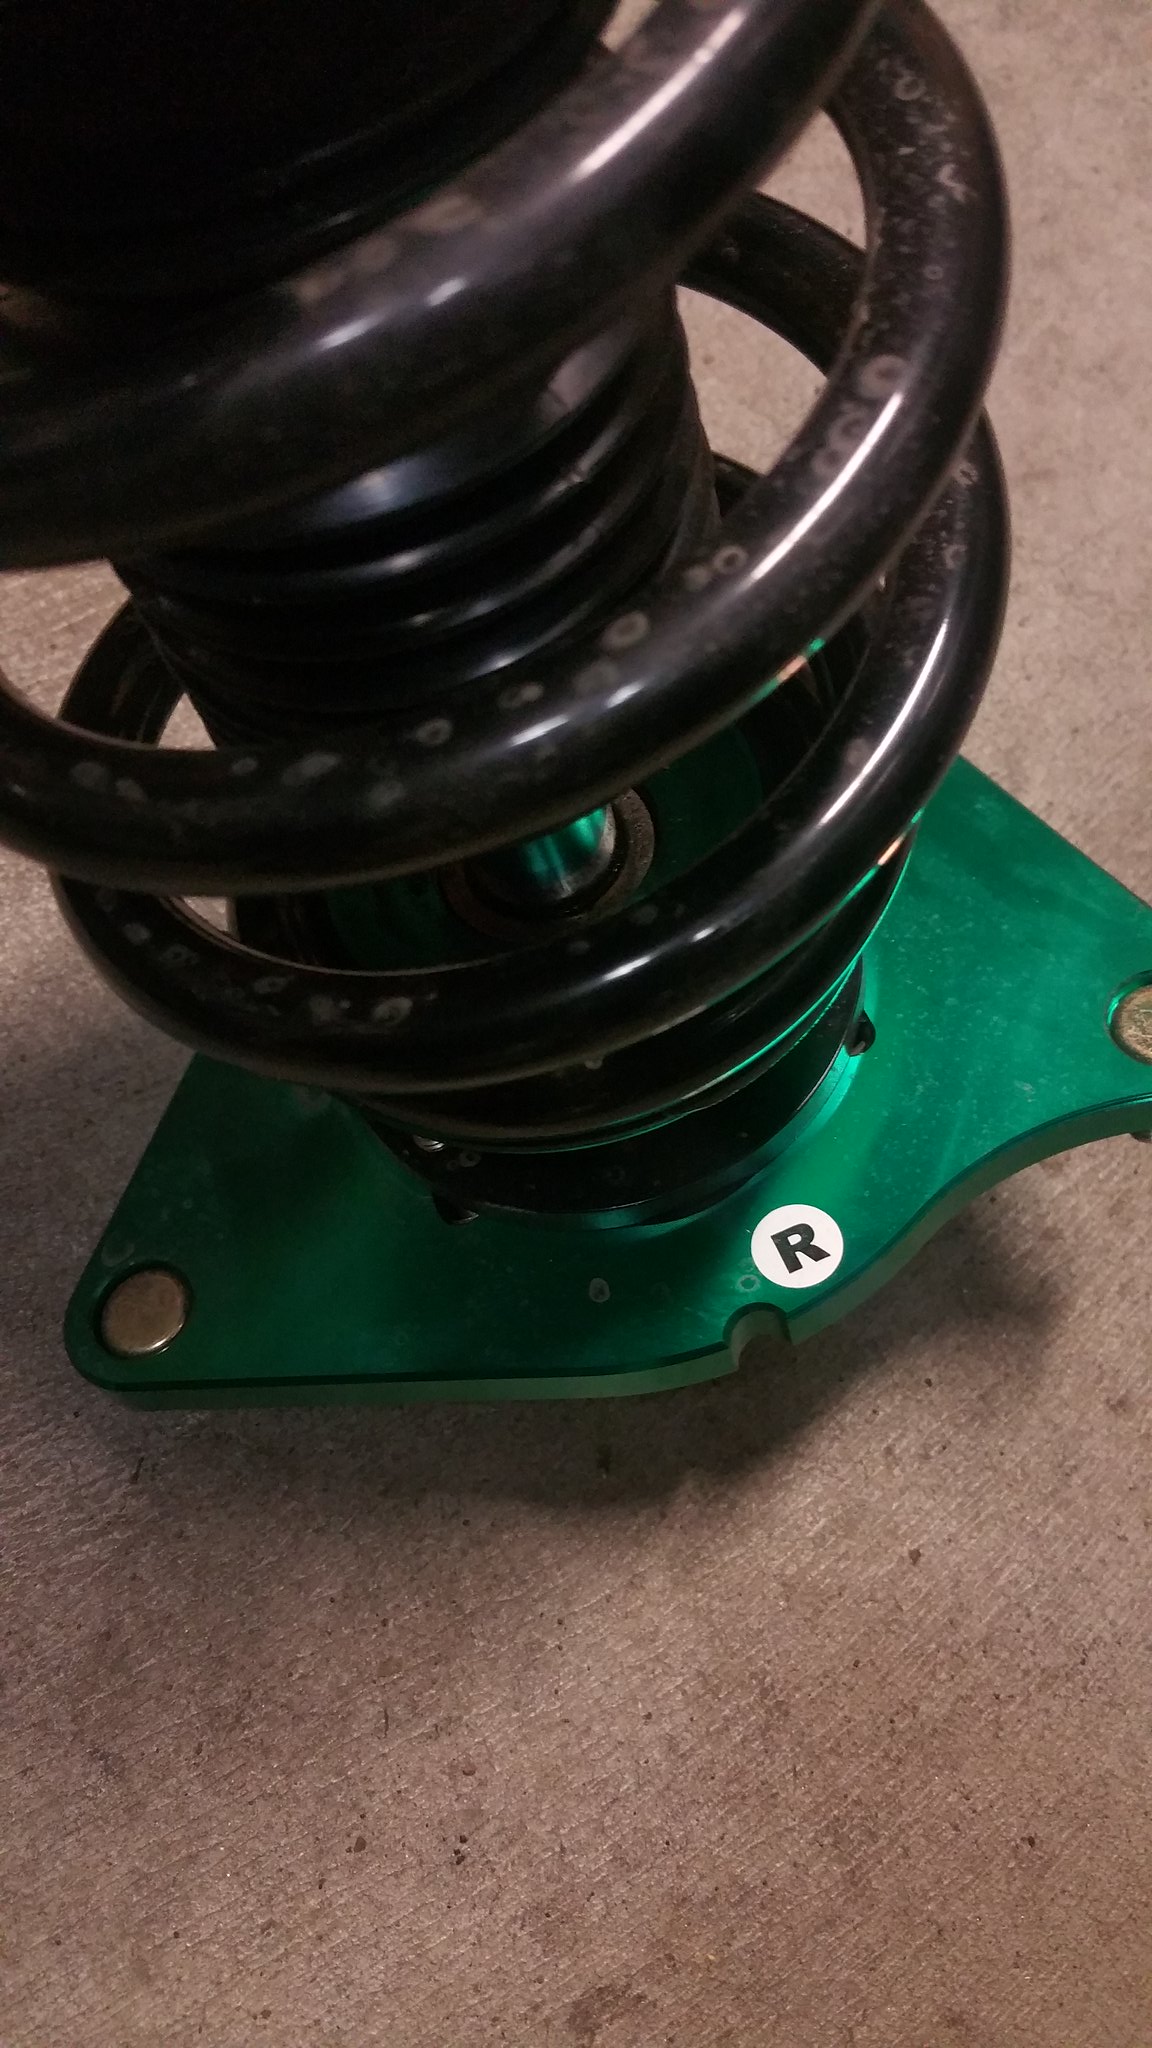
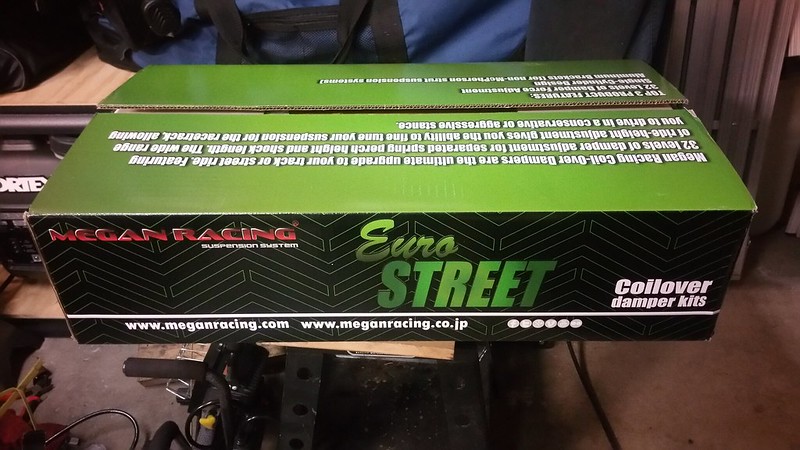
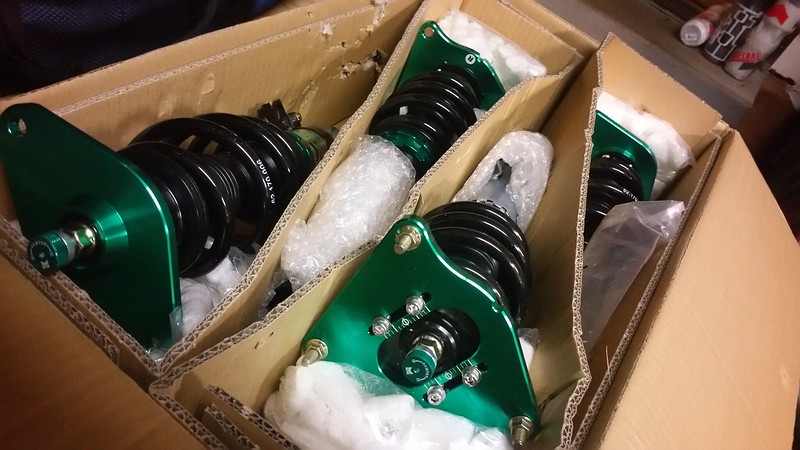
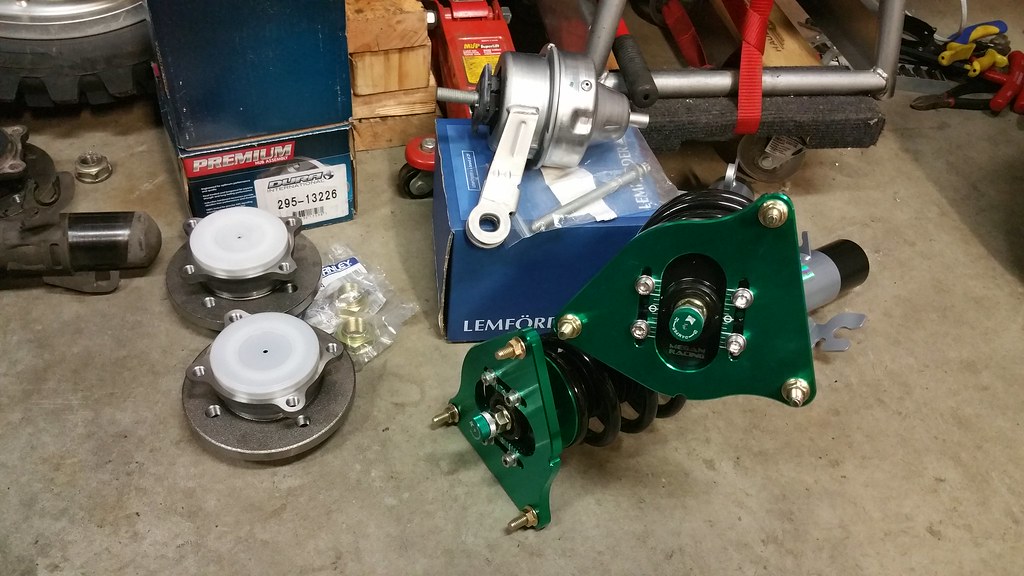
Megan Racing Euro Street Coilovers (with camber plates)
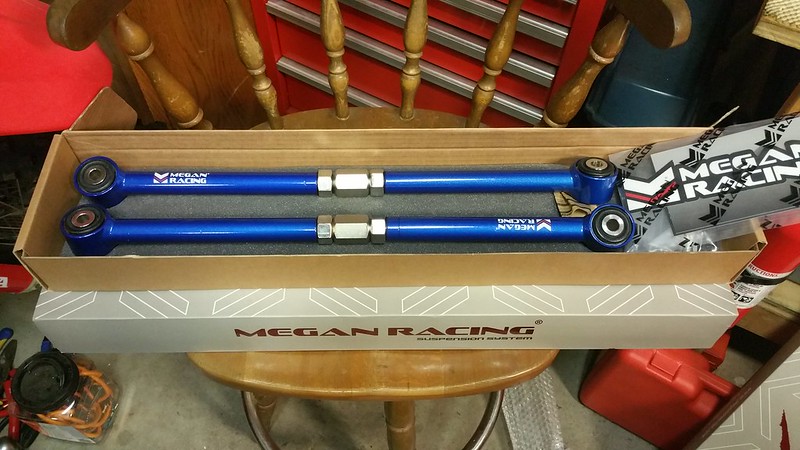
Megan Racing Upper/Lower Adjustable Control Arms
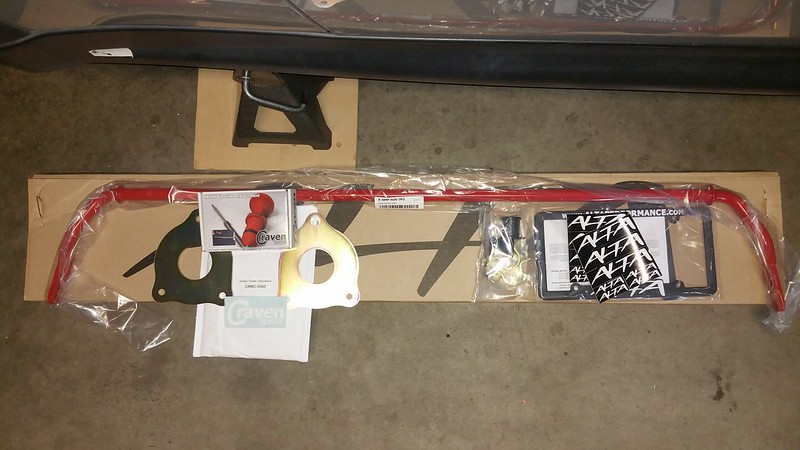
Alta 22mm Rear Sway Bar
Cravenspeed under tower indurators (don�t fit with my coilovers)
Lemforder Left/Right Inner ball joints
Lemforder Left/Right Outer ball joints
Lemforder Left/Right Tie Rod assemblies (inner and outer)
Left/Right Amazon mystery brand wheel bearings (I might regret this in the near future)
Left/Right Tie Rod Boots
Inner and Outer CV axle Boots
Replacement Left/Right axle nuts
General Maintenance and Hardware
While the car was in front end service mode and subframe out I fixed some leaky stuff that was bothering me. Mini of Portland did the power steering recall and noted a bunch of stuff that needed replaced. Power steering lines were leaking and would be 500 bucks to replace. Dipstick tube o-rings 150 bucks. Crank position sensor o-ring 200 bucks. When they were all done and gave me the report it was over 10,000 worth of repairs that were recommended! HAHAHA! Who in their right mind� Yeah� Stealerships�

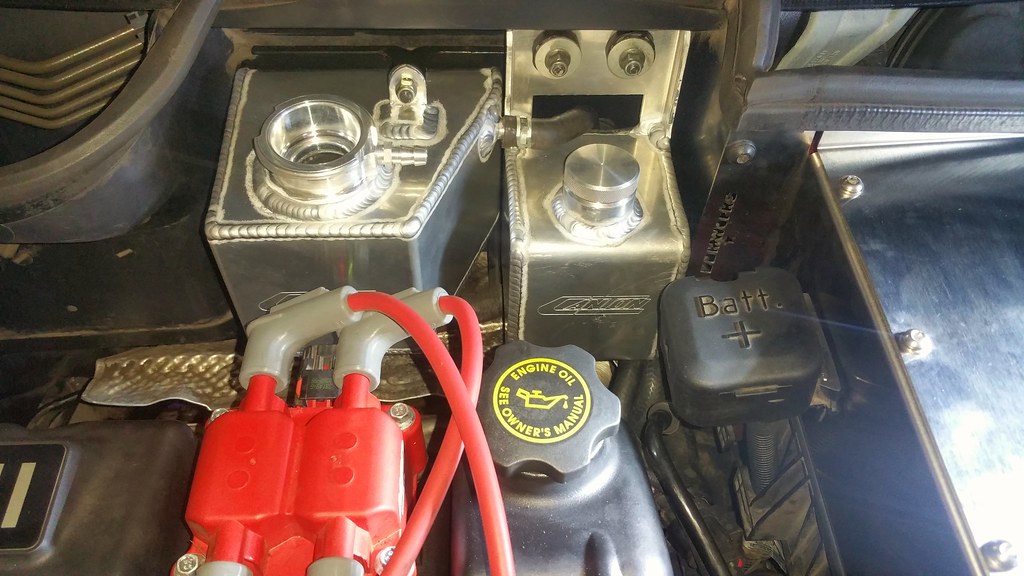
Canton aluminum coolant reservoir
16psi full size radiator cap
Canton aluminum power steering reservoir
Power steering crush washers
Power steering high pressure line
Power steering return line
Power steering inlet line
Crank position sensor o-ring
Oil pan gasket
Oil filter housing gasket
Serpentine belt
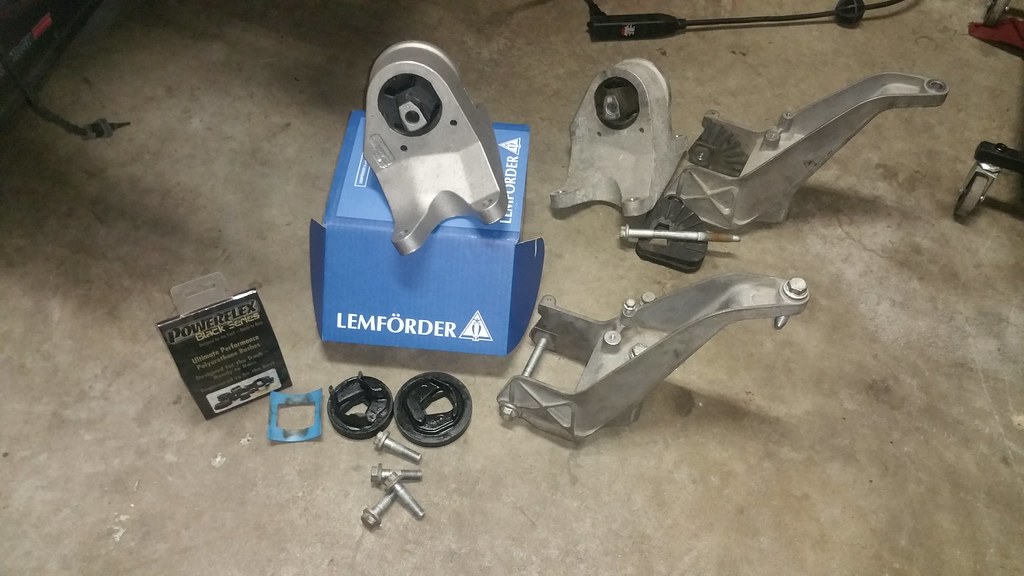
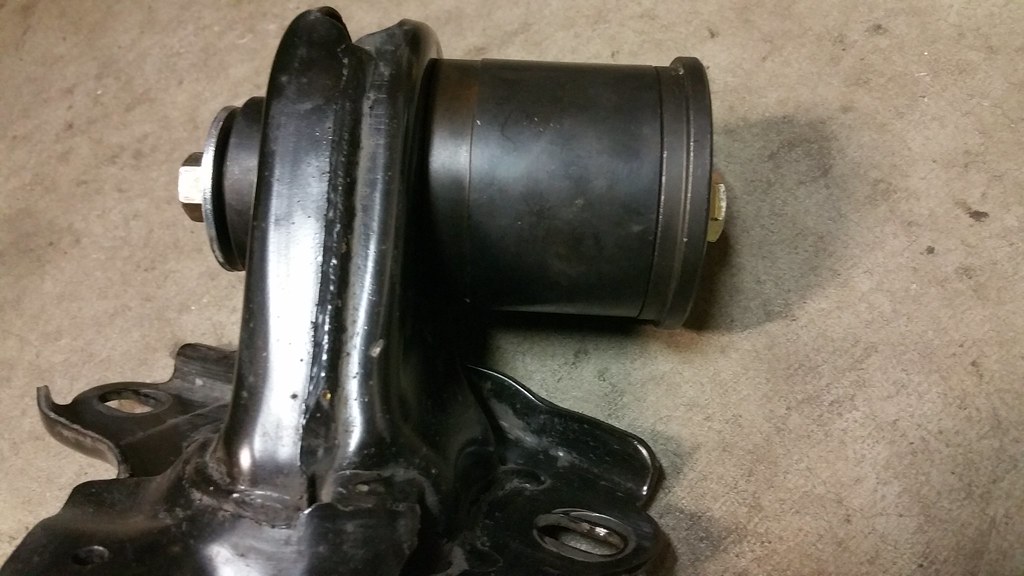
Lemforder left hydraulic engine mount
Lemforder left hydraulic engine mount lower bolt
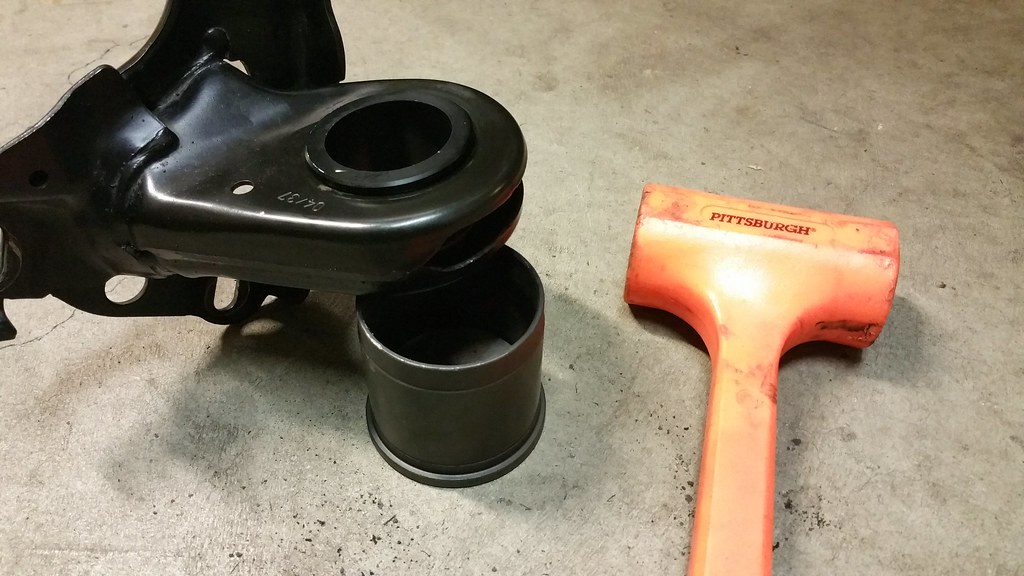
Lemforder transmission bushing
Ebay replacement transmission bracket
Redline MTL transmission fluid
Castrol Edge 5W-30 Full Synthetic
Mann oil filter
Mann active carbon cabin air filter
Cravenspeed Dipstick
Replacement �Cooper S� hatch emblems
Oetiker stepless 1-Ear clamp kit with pliers
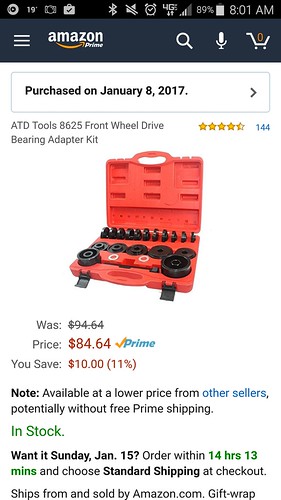
ATD wheel bearing replacement adapter set
Mini belt tensioner tool
Foxwell BMW NT510 OBD2 System diagnostic scanner
Hand fulls of those silly trim piece push rivets that break
V3 Sprint Booster
Fresh set of BFG Comp 2 A/S 215/45-17�s
Alignment from my favorite local shop
Working on this car is a piece of cake! Shoot me a PM if you�re concerned and we can talk through your project if you�d like. Even if you�re fairly new to wrenching, you can do it! Take pictures or write down notes as you go if you�re worried about it. But trust me, other than an alignment there�s nothing I did in that gigantic list of parts that I�d say is best left in the hands of a shop. But if it�s not your thing feel free to go to the dealer and pay over $10,000 LOL! Still blows my mind...
Saying all that, one thing that really surprises me are how low the torque values are for this car. Most �big� subframe bolts are around 74 lbs*ft so BE CAREFUL and don�t go all Hulk on a small bolt and strip out something really important.
12/28/2016 Day 1 - The Good Day
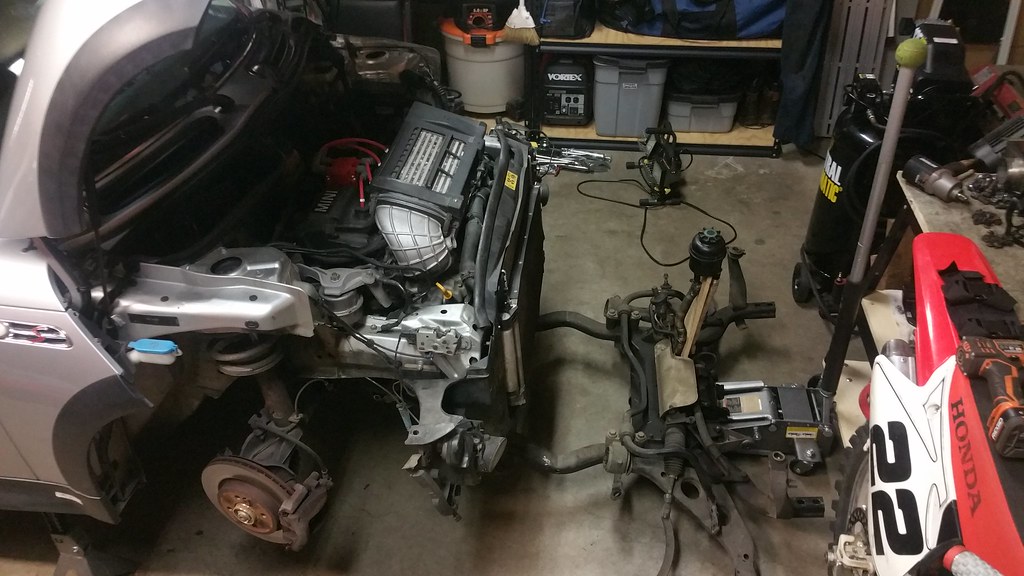
So I cleared out a bunch of junk and pushed the dirt bikes into the corners and squeezed the mini into my garage. I jumped right into the project with the complicated process of putting the mini on jack stands� Yeah, shouldn�t be complicated but it was for some reason. All 4 of my jack points are missing and it took me a while to decide what to do. Ultimately, I just set the stand where the jack points should have been and lifted the car from the rocker panels using my favorite piece of 2x4. Mod MINI has an awesome video about this topic.
So I had this thread going in the 1st gear forum and figured I�ll kill that one and put it here where other R53 users hang out. I love making write-ups and love taking pictures. I don�t intend on this being a detailed How-to write-up. But, if you�re like me and want to know how difficult your project will be then there should be plenty of that detail for you. Also, apologies in advance for how long this is and for my rambling. I know most won't read all that I�ve written, but that's why I have pictures! Those are easy to read.
Check out my original thread if you want. There is some good stuff in there on page 2.
So long story short, I bought an 05 Cooper S and love it.
Long story longer, at the time my daily driver was an 08 Chevy Avalanche and commuting was getting expensive and the thought of parking it downtown gave me nightmares. Don�t get me wrong, I love my Avy!
But I wanted something that was fun to drive, did better than 10 MPG in town, and would be easier to find parking for. There were lots of options I had considered but the Mini Cooper S was the only one that really stood out for me. I haven�t got a hat backwards enough or jeans skinny enough to drive a civic or wrx. And the only way I�d drive a smart car is if it had the Hayabusa conversion. I don�t know. The �ricer� option just isn�t my thing or my crowd...
My Mini had 154k miles on it when I bought it and was completely stock. The decision to buy it came while on the test drive. I came over a little rise in the road and thought I�d go from 4th to 3rd, get the R�s up a little and listen for any weird noises going into a corner. That�s when the owner in the back seat nearly had kittens. �Whoa! Whoa! Don�t do that! You�ll hurt it.� When I asked what she meant she said she always puts it in neutral and idles down hills and never does that because it�s hard on it� Uh, SOLD�
Since, I�ve done some minor things. Fancy UV window tint, Mini power steering recall, MSD coil pack, plugs and wires, DDMWorks cold air intake, Detroit tuned bypass valve and some windshield scoops. Other than that I have just been getting to know the car and reading through the folder of service records.
Right now I�m in what I�m calling stage one. Everything on this car is stock and worn. Based on the service records and tires there have been alignment issues; so stage one is suspension and handling. I�ve done a lot of research and built a substantial list of things the car needs as well as a few goodies I want. The orders started rolling in and during the 2016 Christmas break I started the great 160k mile service.
And here we go! Enjoy
11/16/2016 Preparation For Day 1 - The Old 7p�s Adage
It's a fact! Proper Planning and Preparation Prevents **** Poor Performance!
I�ve watched so many YouTube videos and read enough How-To�s that I felt like I could work on this car with my eyes closed. I knew where everything was and what to and not to do before I even got started. This was REALLY helpful. Also, get a Bentley Service Manual. It is an AWESOME manual and is worth every penny. Highly recommend one of those and highly recommend these guys.
ModMINI�s Youtube channel and Pelican Parts Write-ups are fantastic! Both of these resources really helped me through this project.
Between NAM, YouTube and Pelican Parts resources I spent a solid month researching what goes bad and what I would want to replace while the subframe was out. Here�s the list I made and the lessons I learned along the way.
Suspension - Powerflex Bushings
I had a mix of race and street durometer bushings I ordered based on the research I did. A last minute decision to go to Megan coilovers and adjustable control arms kinda screwed things up and I had to return some stuff because they no longer apply. Also, get the steering rack bushings in race. That was just silly on my part. Street durometer is fine but if you�re trying to tighten everything up in the steering like I am then this little bushing just makes sense to be in the Race durometer.
Front control arm bushings - Street
Steering rack bushing - Street (go with race)
Rear trailing arm bushings - Street
Rear control arm bushings - Street
Rear strut tower bushings - Street
Front sway bar (stock) bushings - Race
Large & Small Engine Mounts - Race
Gearbox Mounts - Race
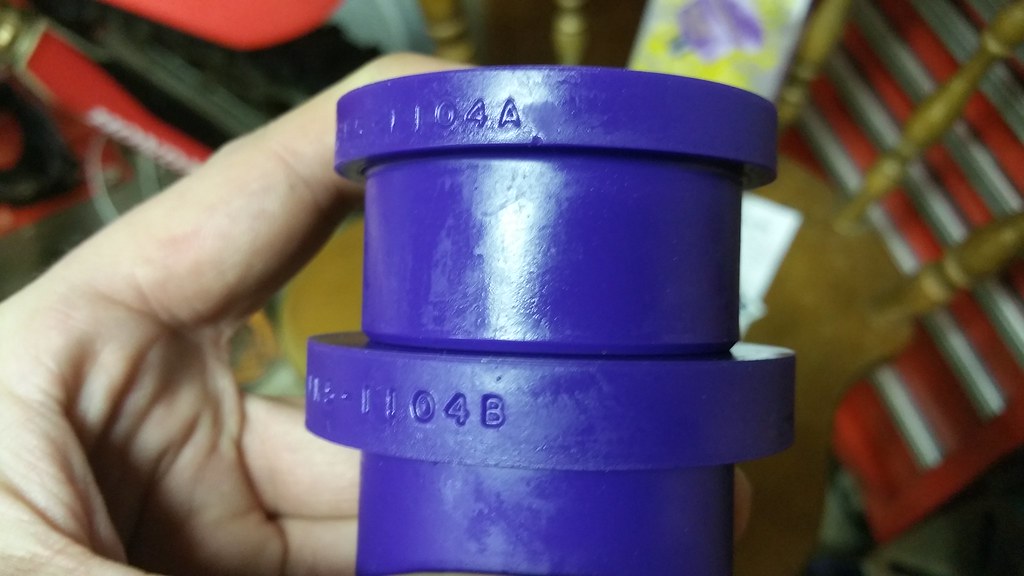
If you�re going to coilovers and adjustable control arms don�t bother with the rear control arm bushing or the rear strut tower bushings. I had planned on staying with an OEM equivalent set of struts but at the last minute decided to blow my budget out of the water and went with Megan coilovers and Megan upper and lower control arms. Also note that depending on your coilovers and/or camber plates Cravenspeed under tower indurators will not work either. Additionally, the powerflex gearbox bushings replace the two ribbed pie shaped gearbox stop buffers so don�t order OE replacements for those either.
Suspension - All The Hardware
I knew my drivers side outer ball joint was shot. The boot was torn and I could see the sand and rocks inside. Plus there was a ring of grease on the trany where a CV boot was flinging grease and dealership reported left front wheel bearing flinging grease. When the subframe is out this stuff is SUPER easy to replace. So I seized the opportunity and replaced them all. Here�s the list.
Megan Racing Euro Street Coilovers (with camber plates)
Megan Racing Upper/Lower Adjustable Control Arms
Alta 22mm Rear Sway Bar
Cravenspeed under tower indurators (don�t fit with my coilovers)
Lemforder Left/Right Inner ball joints
Lemforder Left/Right Outer ball joints
Lemforder Left/Right Tie Rod assemblies (inner and outer)
Left/Right Amazon mystery brand wheel bearings (I might regret this in the near future)
Left/Right Tie Rod Boots
Inner and Outer CV axle Boots
Replacement Left/Right axle nuts
General Maintenance and Hardware
While the car was in front end service mode and subframe out I fixed some leaky stuff that was bothering me. Mini of Portland did the power steering recall and noted a bunch of stuff that needed replaced. Power steering lines were leaking and would be 500 bucks to replace. Dipstick tube o-rings 150 bucks. Crank position sensor o-ring 200 bucks. When they were all done and gave me the report it was over 10,000 worth of repairs that were recommended! HAHAHA! Who in their right mind� Yeah� Stealerships�
Canton aluminum coolant reservoir
16psi full size radiator cap
Canton aluminum power steering reservoir
Power steering crush washers
Power steering high pressure line
Power steering return line
Power steering inlet line
Crank position sensor o-ring
Oil pan gasket
Oil filter housing gasket
Serpentine belt
Lemforder left hydraulic engine mount
Lemforder left hydraulic engine mount lower bolt
Lemforder transmission bushing
Ebay replacement transmission bracket
Redline MTL transmission fluid
Castrol Edge 5W-30 Full Synthetic
Mann oil filter
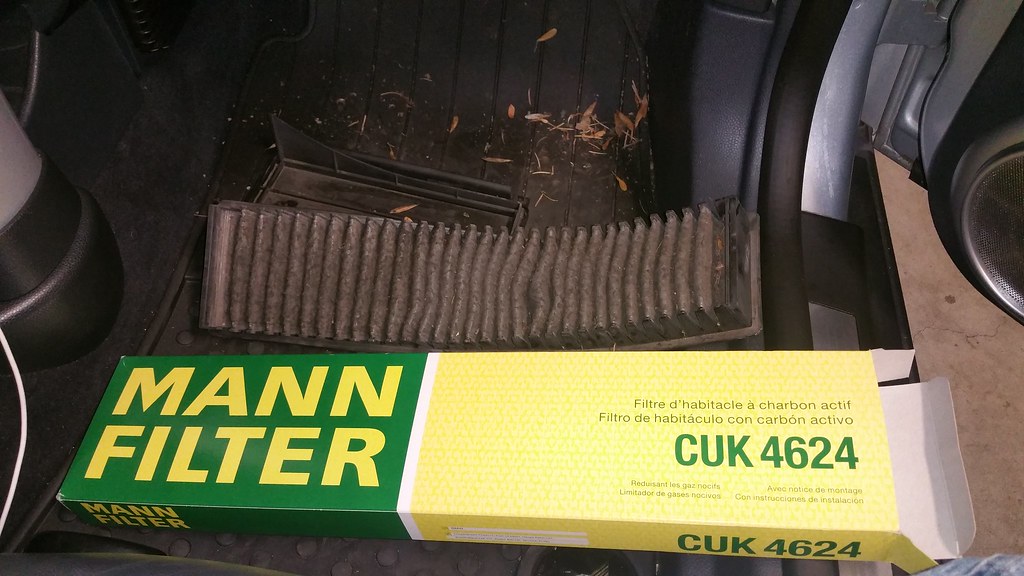
Mann active carbon cabin air filter
Cravenspeed Dipstick
Replacement �Cooper S� hatch emblems
Oetiker stepless 1-Ear clamp kit with pliers
ATD wheel bearing replacement adapter set
Mini belt tensioner tool
Foxwell BMW NT510 OBD2 System diagnostic scanner
Hand fulls of those silly trim piece push rivets that break
V3 Sprint Booster
Fresh set of BFG Comp 2 A/S 215/45-17�s
Alignment from my favorite local shop
Working on this car is a piece of cake! Shoot me a PM if you�re concerned and we can talk through your project if you�d like. Even if you�re fairly new to wrenching, you can do it! Take pictures or write down notes as you go if you�re worried about it. But trust me, other than an alignment there�s nothing I did in that gigantic list of parts that I�d say is best left in the hands of a shop. But if it�s not your thing feel free to go to the dealer and pay over $10,000 LOL! Still blows my mind...
Saying all that, one thing that really surprises me are how low the torque values are for this car. Most �big� subframe bolts are around 74 lbs*ft so BE CAREFUL and don�t go all Hulk on a small bolt and strip out something really important.
12/28/2016 Day 1 - The Good Day
So I cleared out a bunch of junk and pushed the dirt bikes into the corners and squeezed the mini into my garage. I jumped right into the project with the complicated process of putting the mini on jack stands� Yeah, shouldn�t be complicated but it was for some reason. All 4 of my jack points are missing and it took me a while to decide what to do. Ultimately, I just set the stand where the jack points should have been and lifted the car from the rocker panels using my favorite piece of 2x4. Mod MINI has an awesome video about this topic.
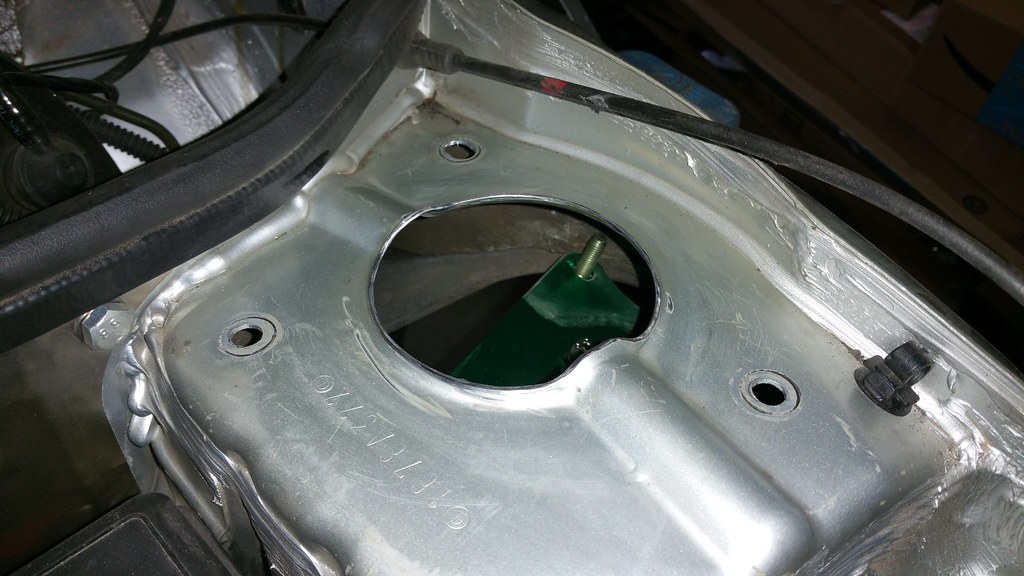
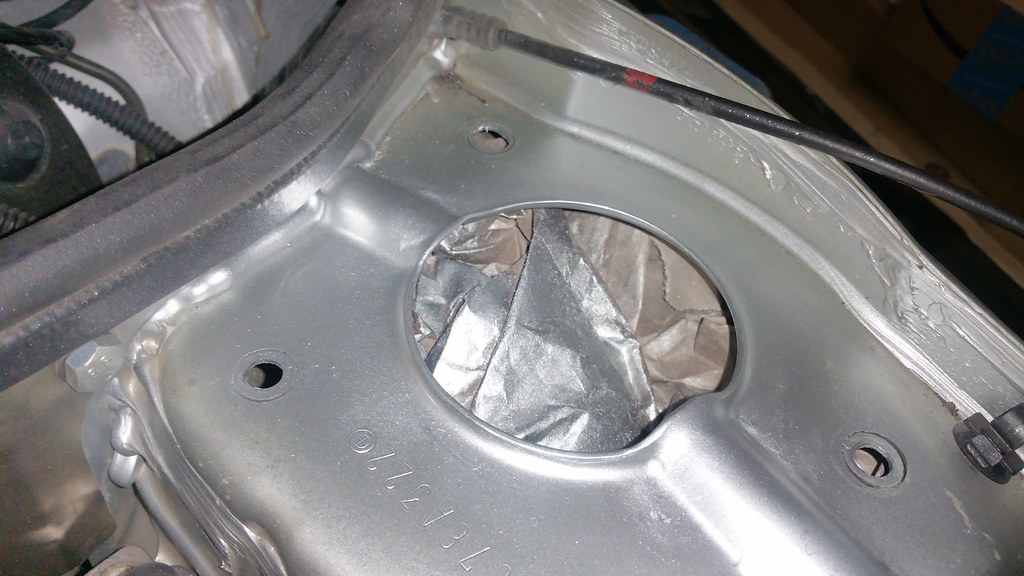
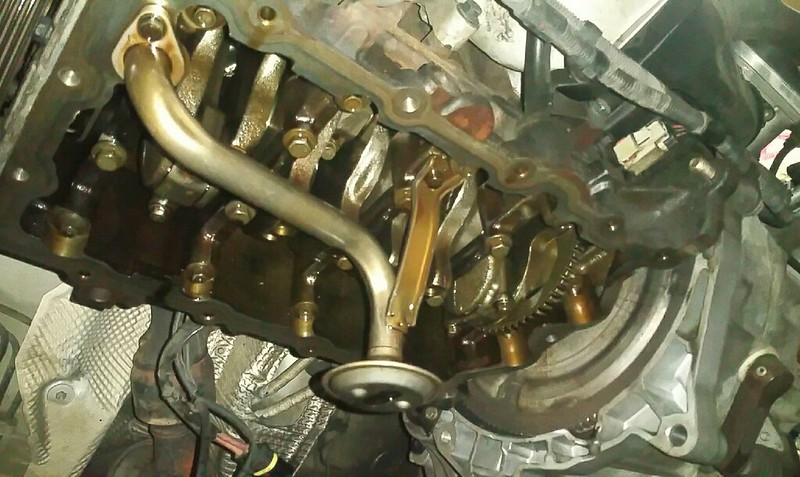
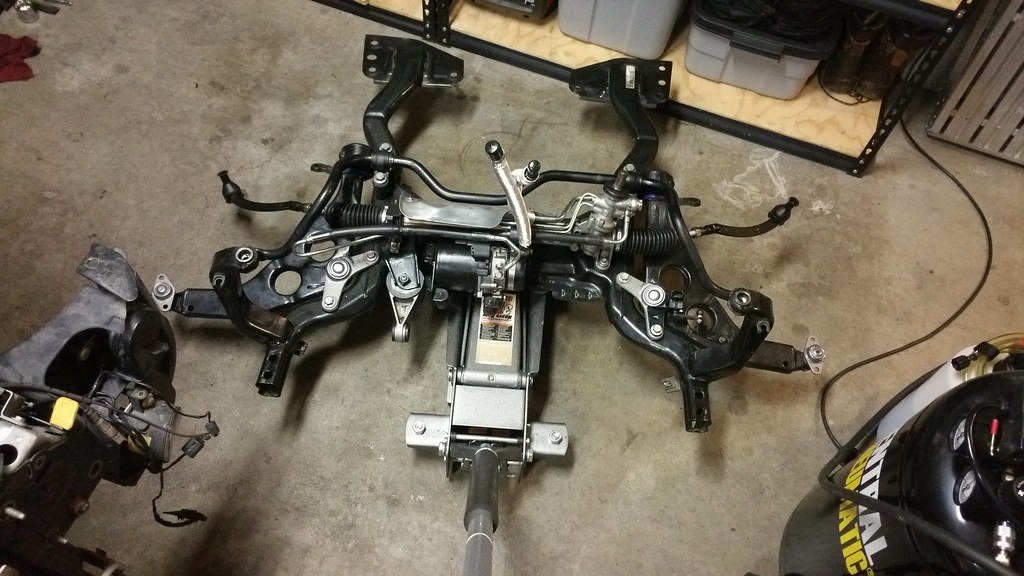
Mod MINI (clutch part 1) and Pelican both have awesome information on how to put the car in front end service mode and how to pull the subframe. It sounds complicated and scary if you�ve never done it before. But truly, it's really simple stuff. Just make sure everything is unplugged and guide it out slowly. There is a large round �hole� or ring of metal in the center of the subframe. That's a perfect point to support the subframe and is almost a perfect center of mass.

As I pulled things apart I like using a sharpie for things I might get screwed up putting back together. TAKE NOTES! It might sound stupid but it can really save you some time later. A simple �subframe - long bolts go top front� or �4 bolts with X go to CV bearing block� and �Arrow at top, points outward� can save you a lot of time. Lay your parts out and keep the nuts and bolts in groups. Until you know what goes where don�t just throw all your fasteners into a box.
Once I had the subframe out and could get a good look at things this is when I decided to order the power steering lines and CV boots. They were clearly leaking and with 160k miles on them it was time to be freshened up. The new power steering pump and fan the dealership put in for the recall wouldn�t last long with fluid dripping all over them.
Everything came FLYING off the car. Taking it apart was super easy and after the first full day in the guy-rage rocking out and wrenching a beer was super nice. I laid out all my parts to make sure I had everything in anticipation for the work to be done tomorrow. Had I known the hell that was going to be day 2 I wouldn�t have bothered�
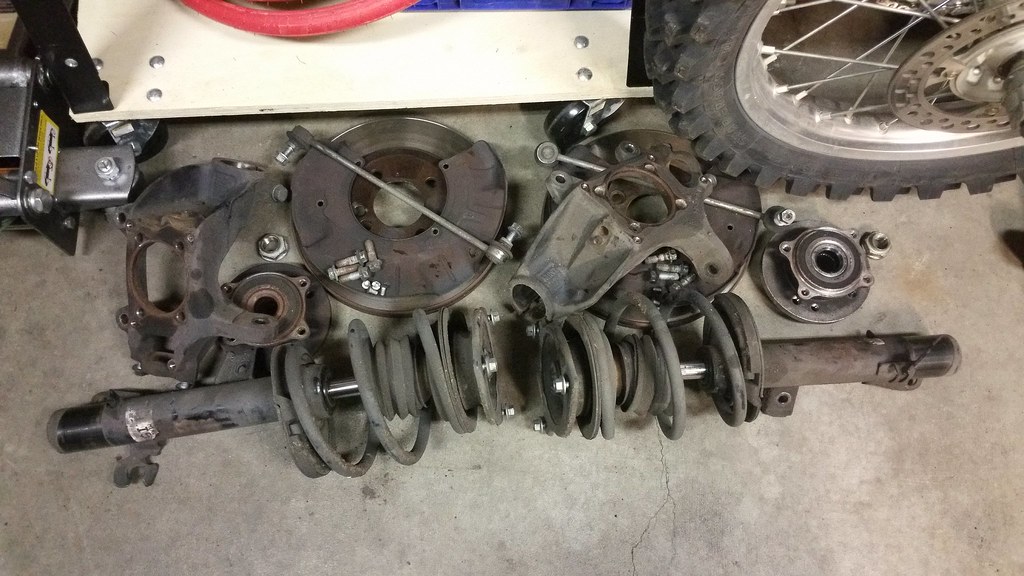
12/29/2016 DAY 2 - Today Really SUCKED
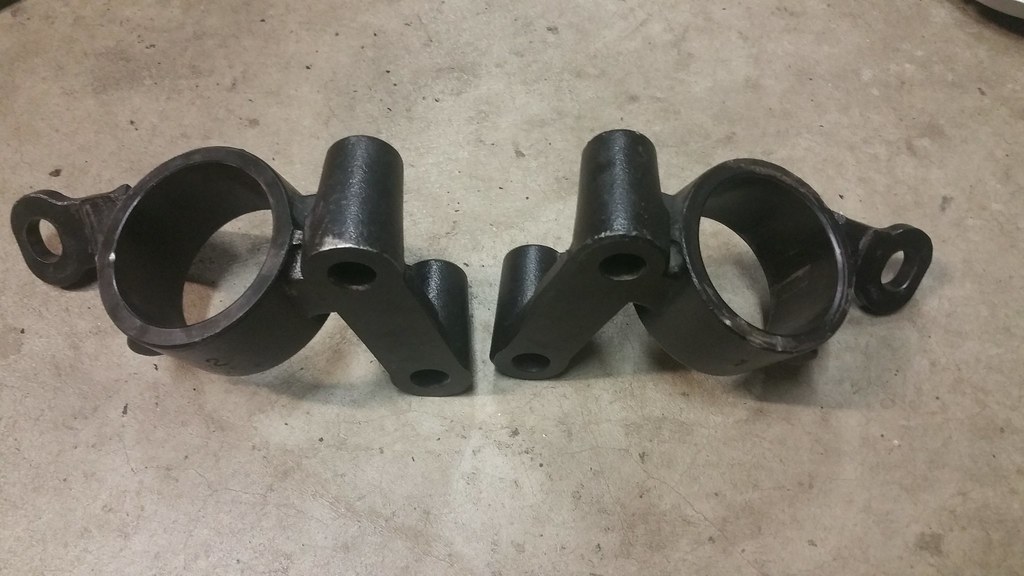
Every video I have watched the ball joints just pop right out. Maybe with a little �tap tap� but generally they come out easily. I was not so fortunate. I nearly spent the whole day trying to get one of my inner ball joints out of the front control arm. It was a NIGHTMARE.

CHECK!
I have a puller that didn�t work. I tried using my press but couldn�t hold the control arm right. Then I rented the big bad boy ball joint press from Autozone and proceeded to mushroom the stud. This thing refused to come out. I finally broke down and in an act of desperation bought an impact hammer and ball joint fork at Harbor Freight. I rammed that sucker in as tight as possible and proceeded to pound on it with my 10lb steel mallet. I figured it's coming out, right here, right now or I�m buying a new control arm and throwing this POS in the garbage.
Well, it finally broke loose but only after deforming the stud so much I had to grind it down to get it out of the control arm. The control arm was rusted up pretty bad and the next time I�m doing something with it I�ll be replacing it for sure.


After that debacle I was running low on patience and should have called it for the day because next were the front control arm bushings.
There are various methods to remove these but I opted to use my press and figured I�d just pop these bad boys out and move on with my life. Wrong. Again. If you have a press it better be a nice one and you better have a huge selection of different diameter tubes and rams. Without all that you�re hosed. I broke my press and resorted to methods I�m ashamed of to remove the control arm bushings from their brackets.
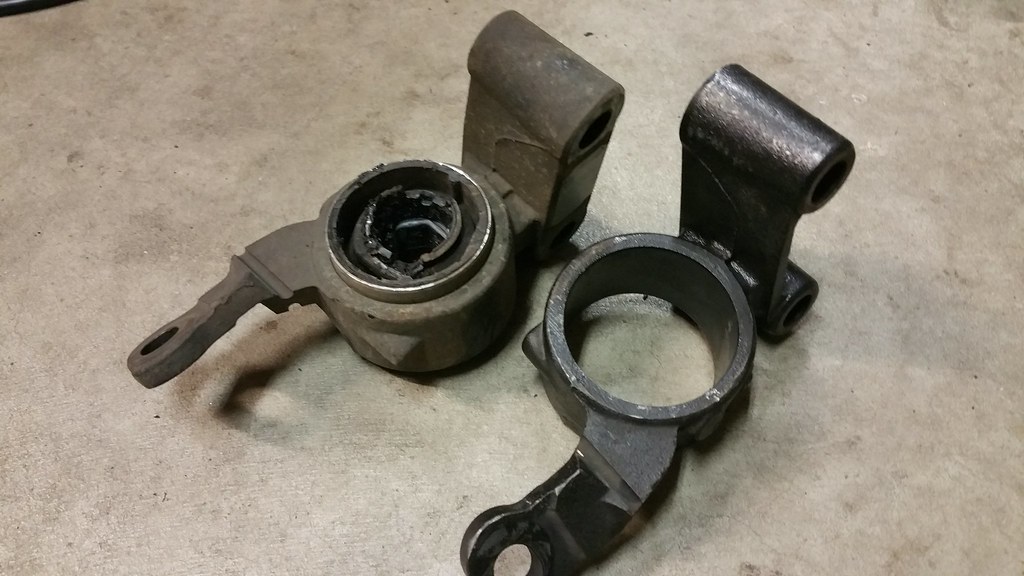
At this point I didn�t have the ATD wheel bearing replacement adapter set from Amazon yet. Had I, I think this would have been a breeze. I never did get to use this kit on the control arm bushings but I�m sure with the right bolts it would work just fine. Don�t be a schmuck and think you�ll use your press. Or an amature and pound them out in a flurry of frustration with a punch� Yeah� I�m that schmuck...
The whole day wasn�t horrible. I did get the lower engine mount bushings in, strut tower mushrooms pounded out and the steering rack ready for the new power steering hoses that were coming from Pelican.
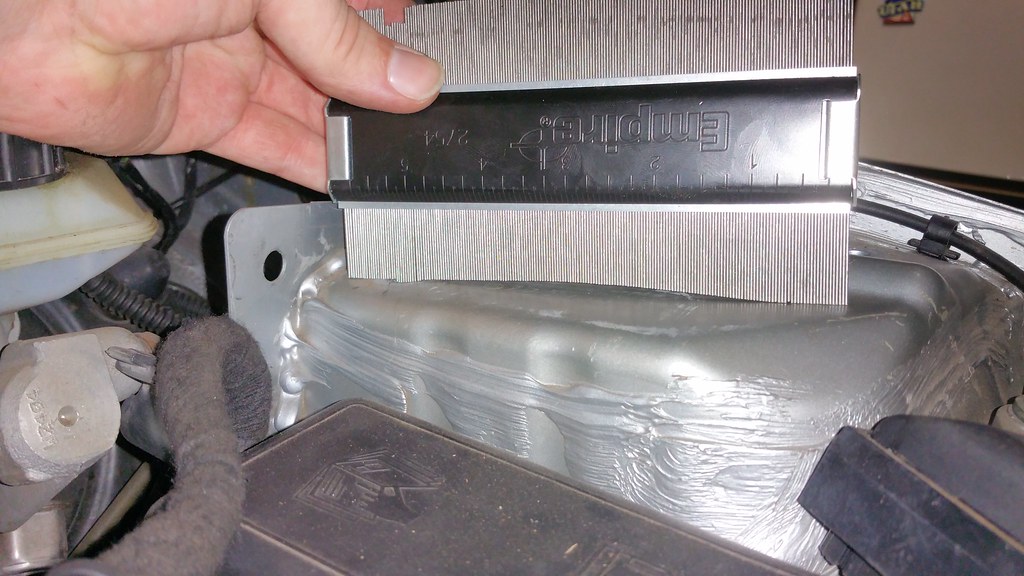
The strut tower mushrooming is really easy to remove. BE CAREFUL! It is really easy to over straighten them. I used an assortment of chunks of wood and my mallet and just worked it out. It doesn�t take much and Mod MINI has an excellent video about doing this.
The rest of my day I spent trying to calm down. I slummed around nursing a beer in one hand and a can of cleaner and roll of shop towels in the other just cleaning up everything. I love shiny clean parts; my OCD can't handle it if they�re not.
12/30/2016 DAY 3 - Let�s just forget about yesterday...
I decided to sleep in and take a cup of coffee for a drive to the other side of Portland today. I stopped by and had a chat with the guys at Craven and Alta. Awesome guys, all of them. I hadn�t mounted the struts yet so I didn�t know the indurators were not going to work. But I picked the indurators and a dipstick up from Craven and a 22mm sway bar from Alta. FYI, if you can make it to the Alta showroom to buy your parts, do it, they�ll be cheaper! That was a very pleasant surprise.
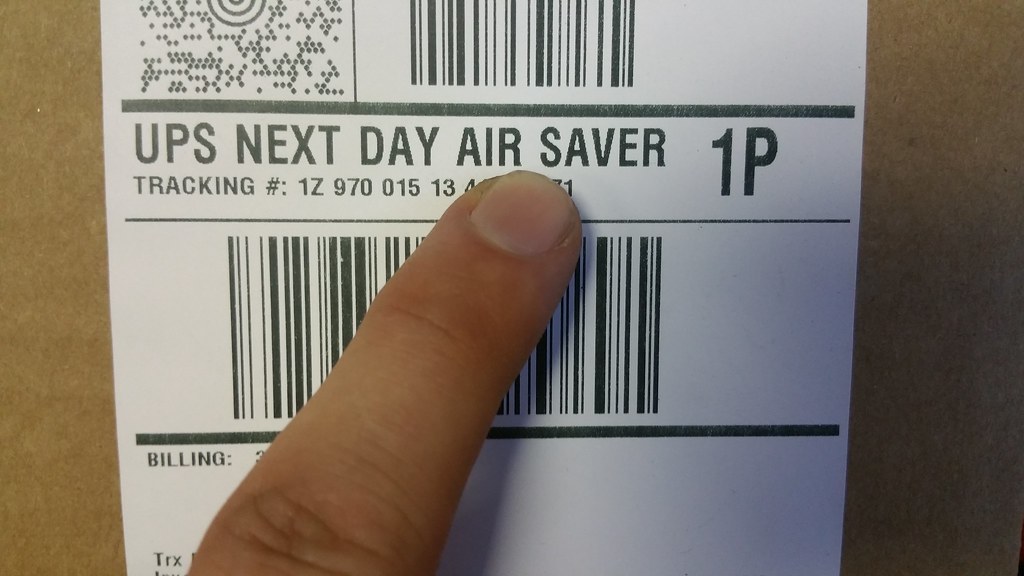
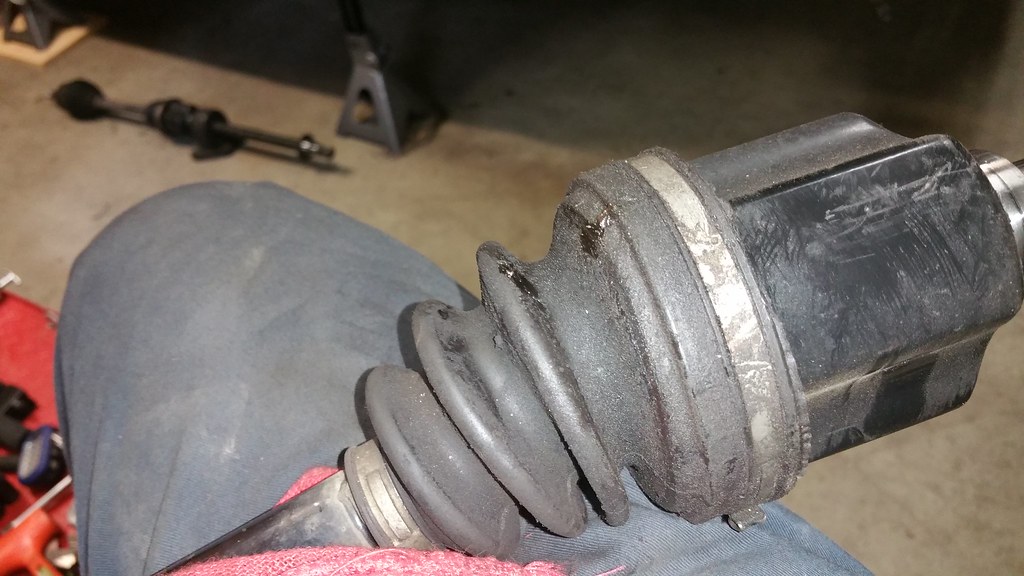

UPS saves the day! My power steering lines and CV boots show up! Replacing the CV boots isn�t bad at all. Pop the clips off the boots and start breaking the CV�s down to just the shaft. There�s a little clip that holds the little 3 way roller deal on. I used a little punch and gently worked it off the end of the shaft. The boots then slip right off. Easy. The new ones go on and supplied grease goes in. Again easy. Just make sure you slip on the left/right inner boot clamps before you put the outer boot on. Otherwise you�ll be taking it apart again to put the clamps on.
A lot of people use the standard worm gear hose clamps you can buy everywhere. I imagine those would be fine to use but I wanted to stay with the 1-Ear OE style clamps and bought the pliers. It's really easy to crimp them but know you�re ready to crip before you do. It's a one way street and can't undo them. I�ve never used these before but I�m really liking them. Pretty sure I�m going to convert my dirt bike over to them instead of the screw type clamps.
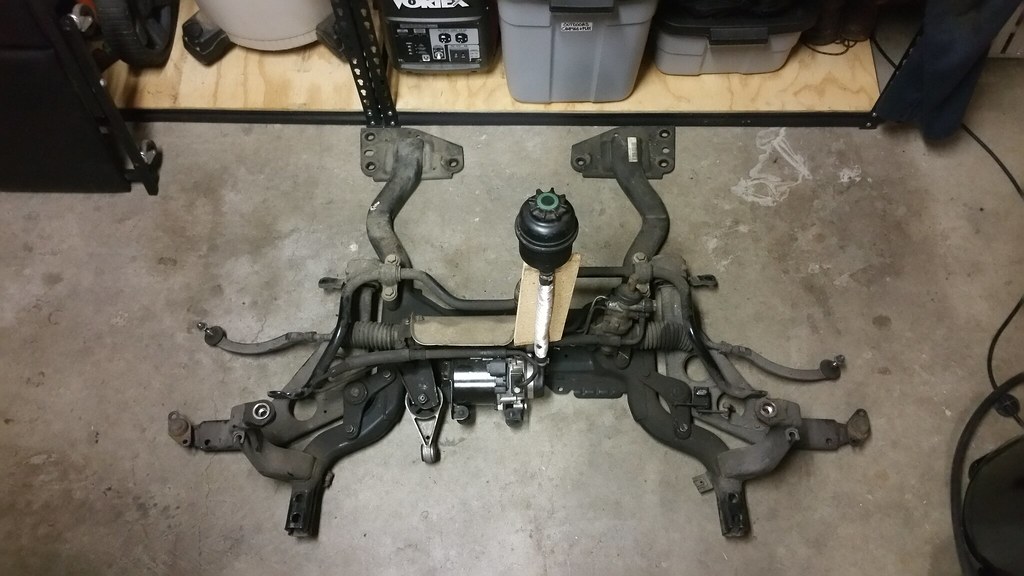
The subframe is DONE! All the bushings and ball joints in, power steering hoses, and bolts all torqued to spec. Told you I have a crazy case of OCD!
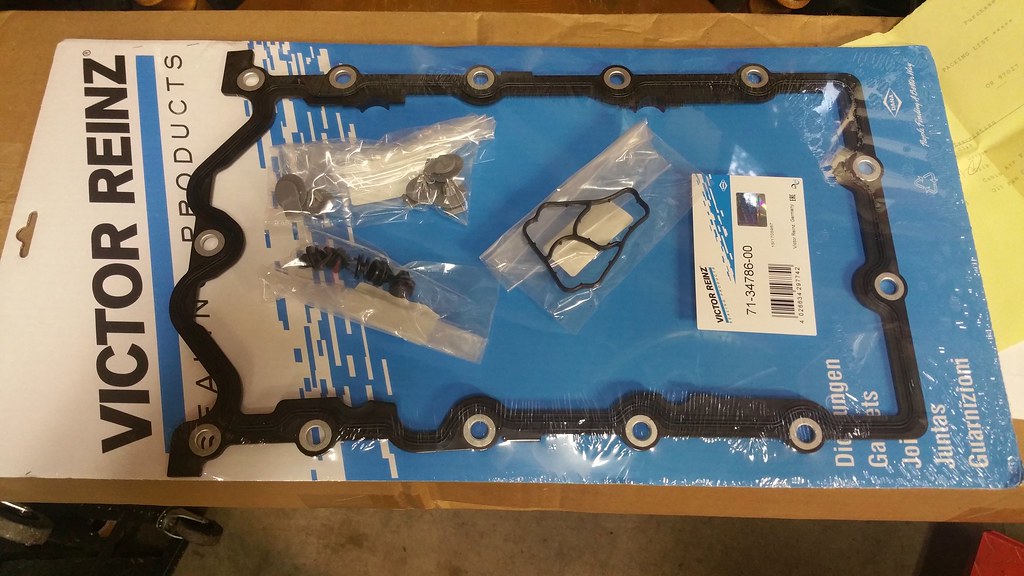
At this point I�m starting to see the writing on the wall. If this project is going to be done on schedule I�m going to need to make some serious progress. This is when I ordered all the gaskets and serpentine belt.
1/7/2017 DAY 8 - I see the light! Nope, it�s muzzle flash�
Oil pan gasket, oil filter housing o-ring, cabin air filter and a fist full of push rivets all show up and I decide to make some magic happen. At least that was the plan�
I drained the engine oil and transmission fluid and proceeded to replace all the old leaky gaskets. The oil pan was easy. While still on the car I marked the pan with the bolt numbers which made it super easy to remove and put back on. It surprised me how much oil came out with the bolts. Keep a pan or at the least some rags handy. Oil filter housing o-ring is self explanatory. Do yourself a favor and just remove the heat shielding. FYI the bolt into the filter housing is way easier to work with from the top side.

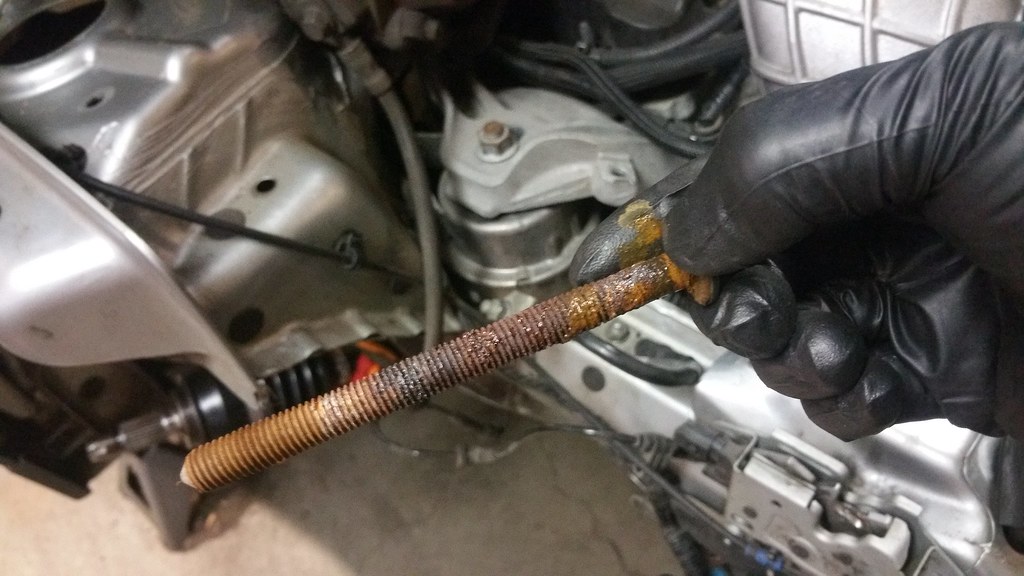
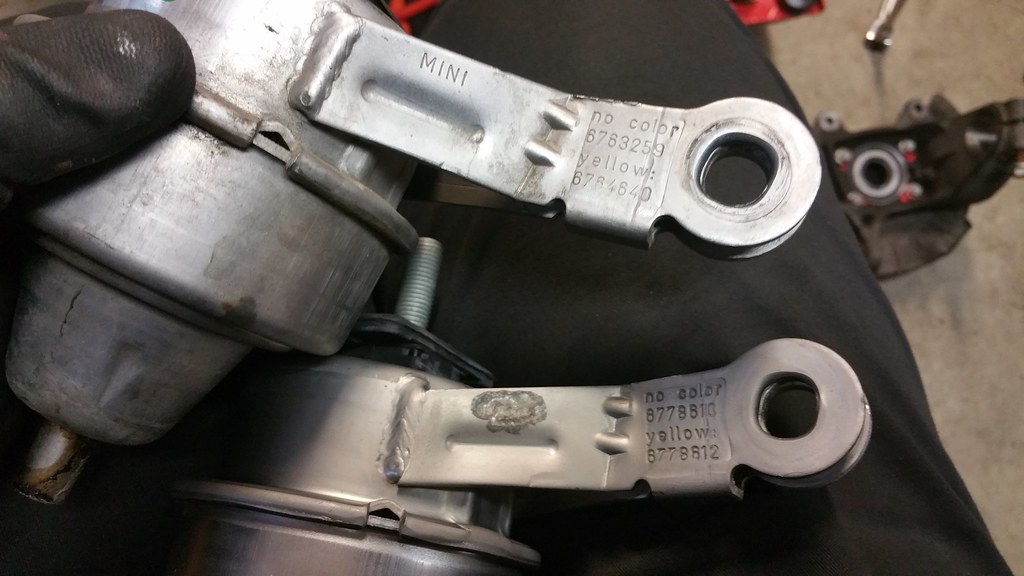
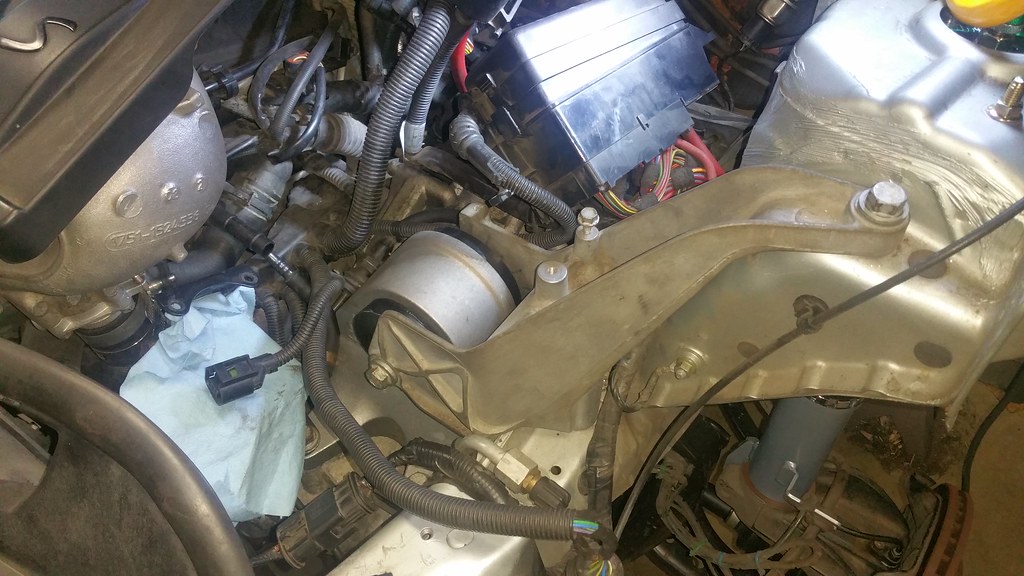
Next I moved on to the engine mounts. I�ve read that the lower bolt to the right engine mount can get nasty. Well myth confirmed. Glad I ordered a replacement because there�s NO WAY my OCD would let me screw that rusted POS into my brand new engine mount. OMG what a horrible thought� My skin is crawling just thinking about that. Kind of funny how Lemforder parts are exactly like the MINI parts coming off the car only with MINI ground off. I noticed this on several parts I replaced with Lemforder.
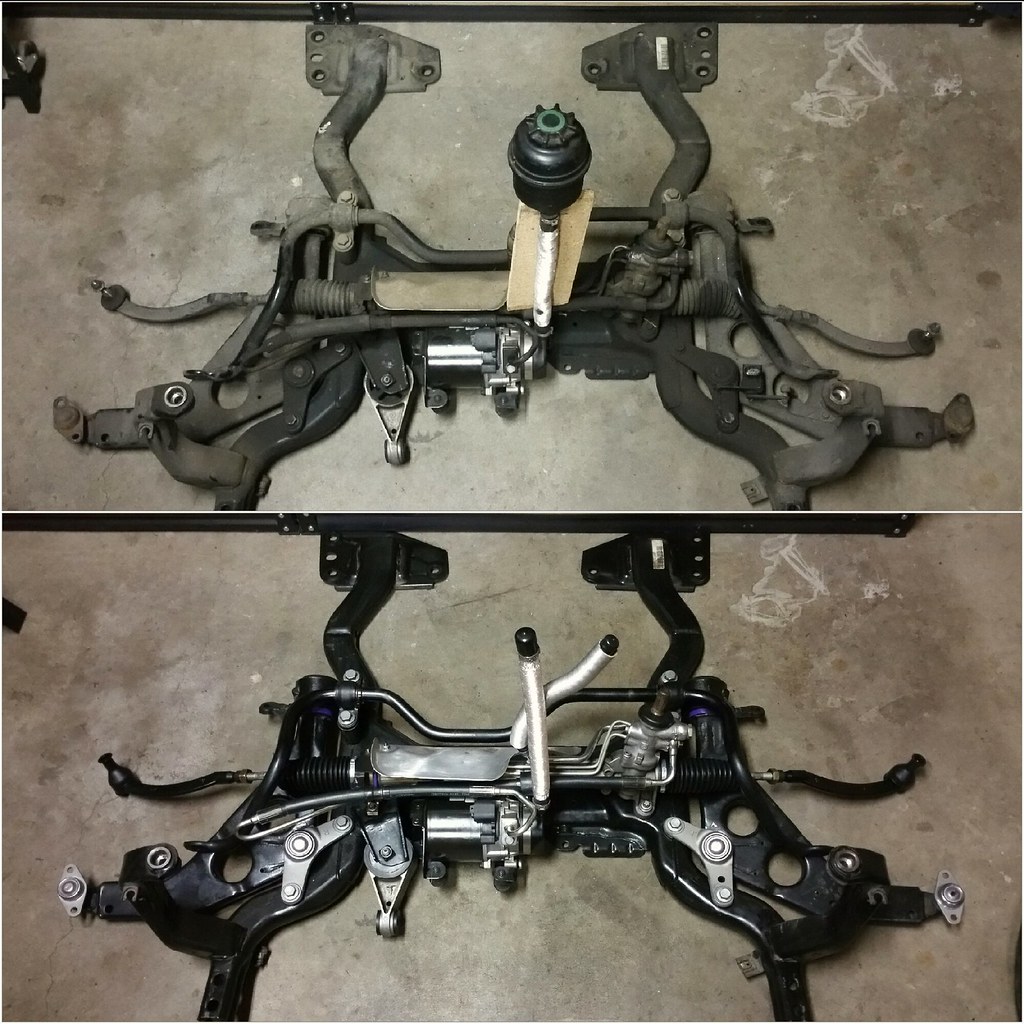
Making some awesome progress! Time to get the axles with their new boots and subframe in. Getting the subframe in is a little tricky. Just go slowly and make sure nothing is binding or getting pinched. Focus on making sure that the steering knuckle is aligning with the steering column pinch bracket. Once the frame is close to the body get a bolt started on the left and right side of the subframe to help keep it aligned. Slowly just jack it up into position. Piece of cake.
This is when my hopes of finishing on schedule went down the tubes. Subframe is in, axles in, steering knuckles in, struts in, and the front end is pretty much bolted together. Once everything was torqued I decided it was time to do the gearbox bushing and move to the back of the car and get started there.
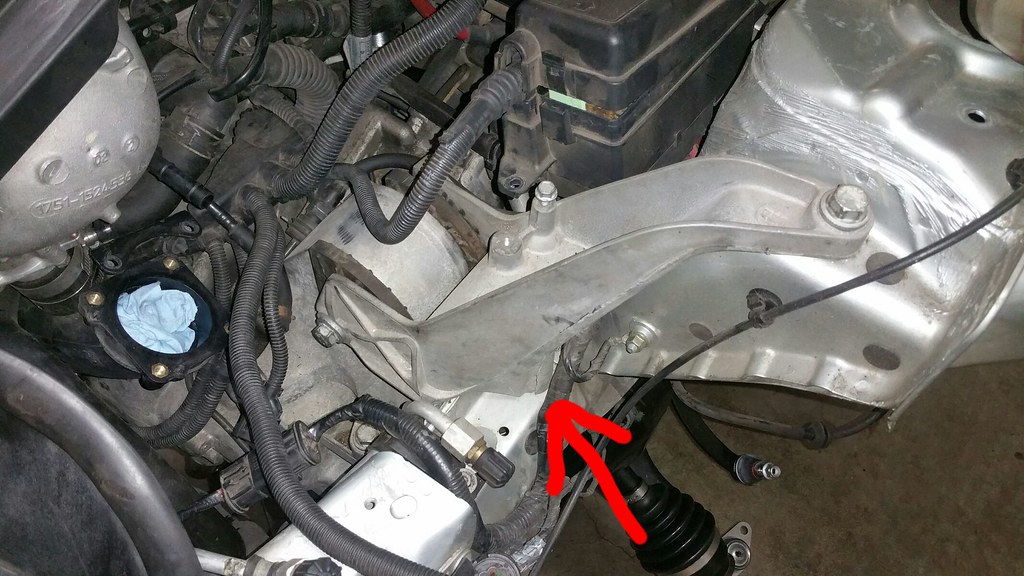
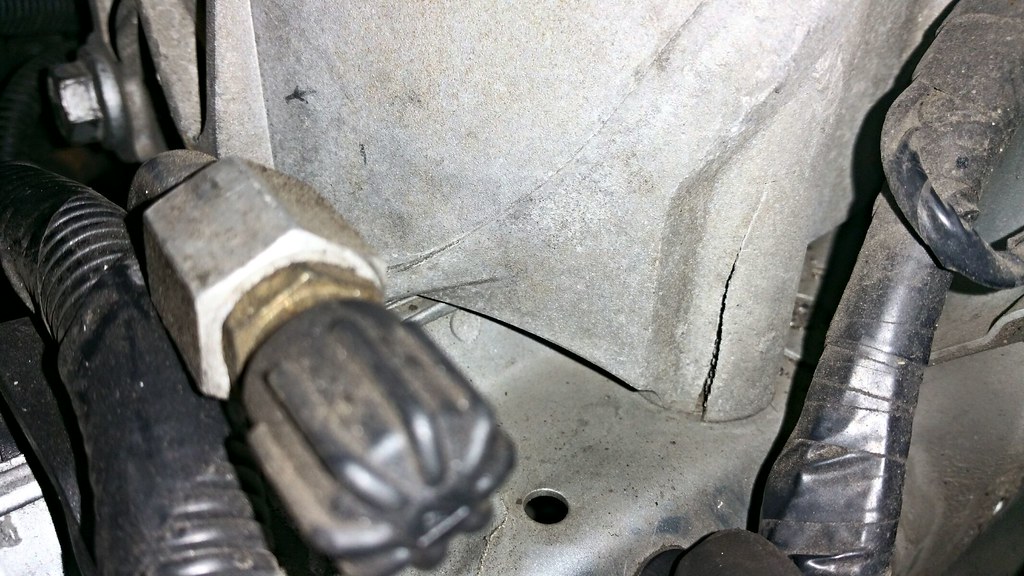
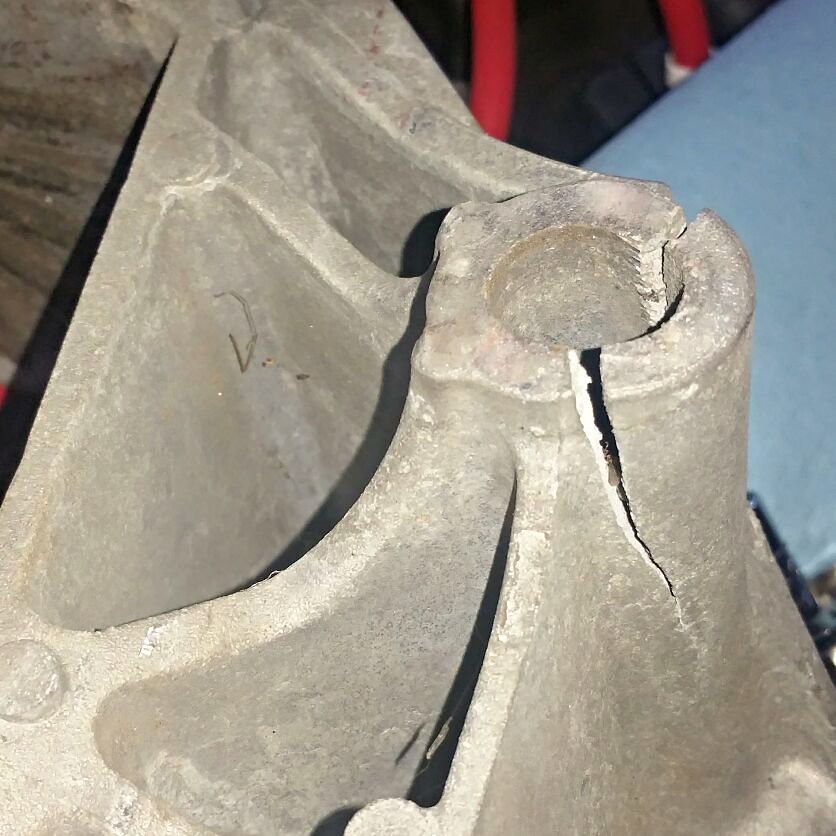
Bad news bears. It looks like someone worked on the big bolt that goes through the transmission bracket to the body with an impact and blew out the corner of the bracket. Nice work dumb dumbs. I�m a little disappointed with Mini of Portland about this. Prior to buying this car it went in there for a clutch and rear main seal. They either A) didn�t notice it or B) did the damage and didn�t notice. Both possibilities are disappointing.
MOVING ON! Its getting late and I�m not going to let this hold up my progress today.
HAHA! Just kidding. I tore apart the back of the car and got to the trailing arm bushing and the night came to an end.
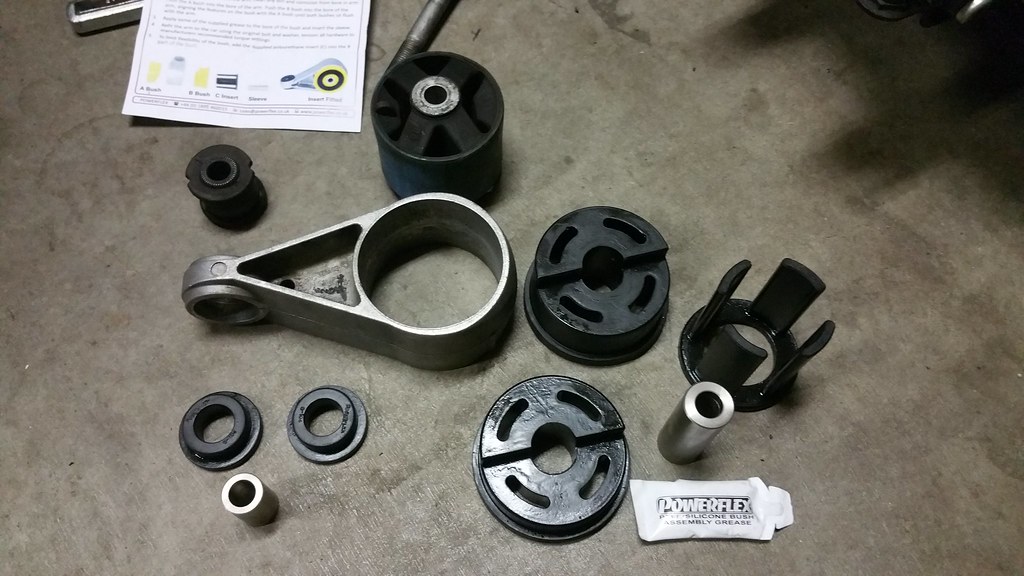
I opened the Powerflex box and poured out the contents for the trailing arm bushing and started reading the directions. Press out the OE bush, OK. Press in the supplied collar, OK. Insert Bush A here and Bush B there, OK. Would you look at that, Bushing B, Bushing B, Bushing B, Bushing B. Crap. They didn�t put any A bushings in my kit!
I surrender; might as well order some more parts because school starts back up on Monday and free time will become a thing of the past. Replacement transmission bushing and ebay transmission bracket, aluminum coolant and power steering tanks ordered. RMA generated for returning the rear trailing arm bushing too.

1/10/2017 DAY 14 - This is taking FOREVER
Portland came to a stop the evening of January 10th 2017. I went to Ace Hardware after work for some bolts to go with my new tool kit for pressing the rear trailing arm bushing out. When I came out of Ace it was DUMPING snow. It was surreal. It was completely clear on my way in and on my way out there was an inch of snow.
Portland got a couple inches of snow and everyone lost their freaking minds. People just abandoned their cars on the freeways and start walking around. The governor declared Oregon in a State of Emergency and everything. I�m embarrassed to admit I live here sometimes� Needless to say UPS, FedX and USPS were not at their best.

So with everything shut down and bored out of my mind I took to craigslist and found this awesome deal on a Cooper S. I called the guy and he had someone coming to look at it that night and next morning the ad was deleted. Man, that would have been a sweet deal for one of the kids. I was really excited there for a while.
Okay, back on topic. The kit and Ace Hardware bolts pressed out the rear trailing arm bushing no problem. Very pleased with how that worked. When you�re pressing out the rear trailing arm bushing you�re best bet is to hit it with an impact because of the split in the bracket. If you slowly load it up the bushing will bind and refuse to budge. Hit it a little at a time quickly or with an impact and it walks the bushing right out.
The new Lemforder transmission bushing and ebay transmission bracket show up finally and I got that swapped out quick. The bracket was an awesome deal. Found it on ebay for $32 shipped. Also got the aluminum reservoirs mounted and cabin air filter in before calling it an afternoon. Replacement Powerflex bushings are still MIA.
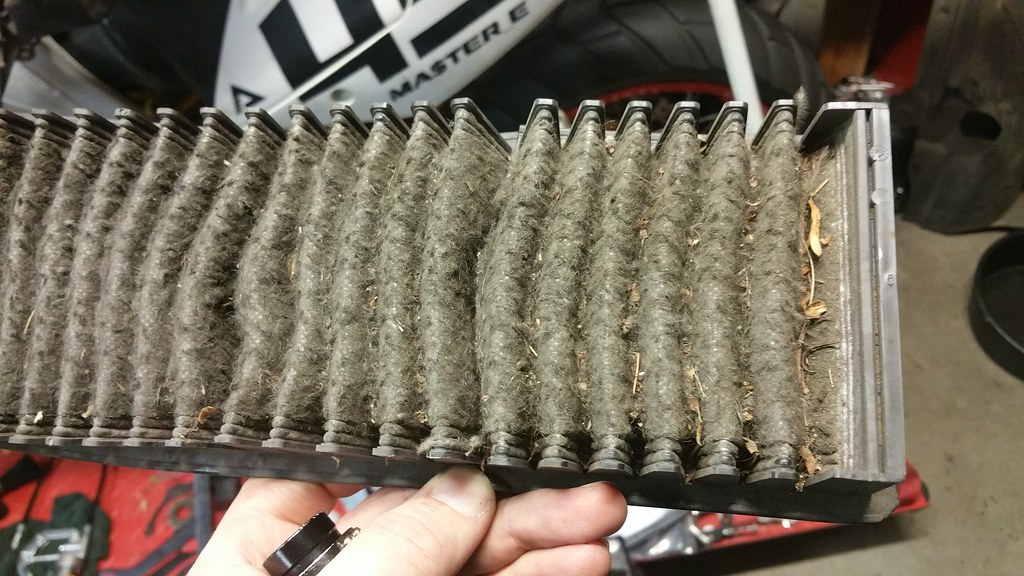
Replace your cabin air filters more often than once a decade! When I pulled my old one out a pile of debris came with it and man was that filter nasty. It's quite possible it�s the original filter that came in the car.
1/18/2017 DAY 22 - It�s ALIVE!
I finally started the car. Fresh oil, transmission fluid and coolant all stayed on the inside! It was a beautiful thing. I was surprised about the oil though. I topped off all the fluids and fired it up. There were no big ugly leaks so I let it idle for a bit before I stopped it to check the levels of everything. Surprisingly there wasn�t a drop of oil on the dipstick and it took nearly a whole quart to fill it up. I thought that was really strange.
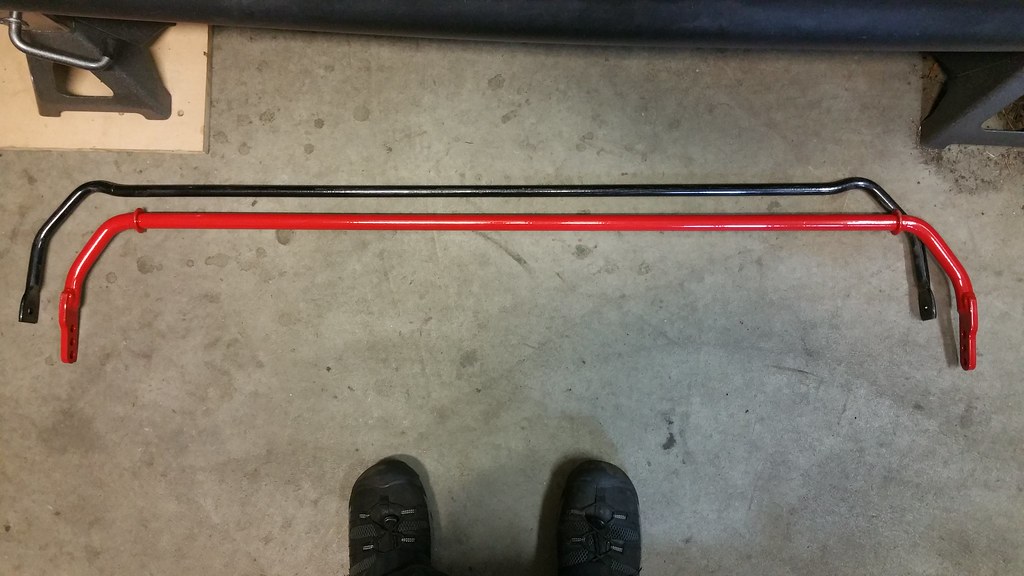
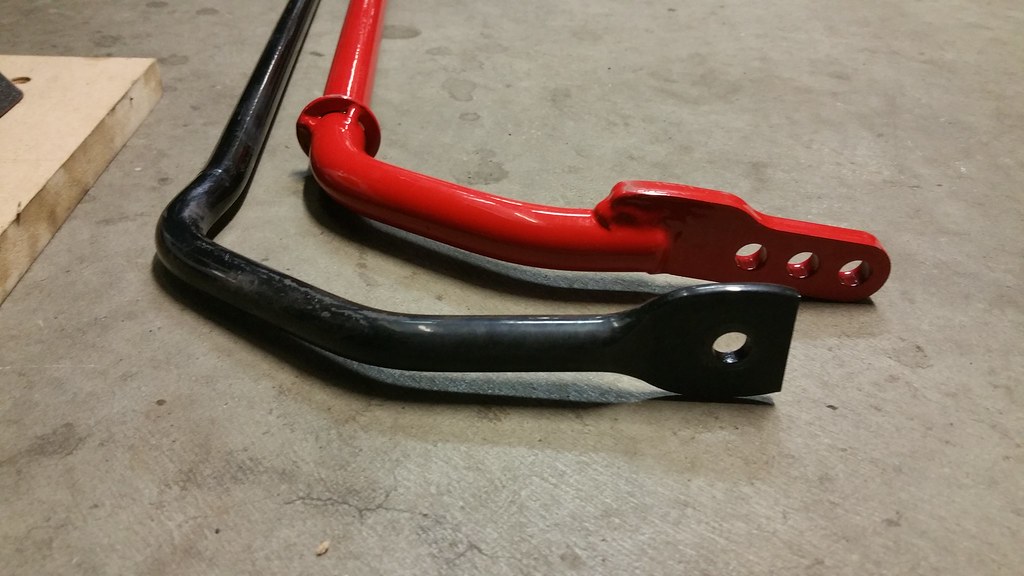
The backend of the car got my attention next. The Alta sway bar was the first thing I put in once I had both left and right side completely torn down. Mod MINI has a good video about replacing a trailing arm that helps. The bolts for the control arms are a bit of a PITA to remove. They�ll take some time, just be patient and remember to breathe.
The Alta directions are a little misleading. They say the rear subframe �may� need to be lowered to get the bar in. HA! I haven�t a clue how you�d be able to get it in there without lowering it. Just lower it right away and save yourself some time while you're removing the original bar.
Next was getting the remote adjusters installed for the rear shocks. This wasn�t horrible once I figured out how to get the rear seats out. It's a little funky but once you know how it works it's actually pretty slick. Mod MINI has a great video about replacing the fuel filter that shows how the seats come out.
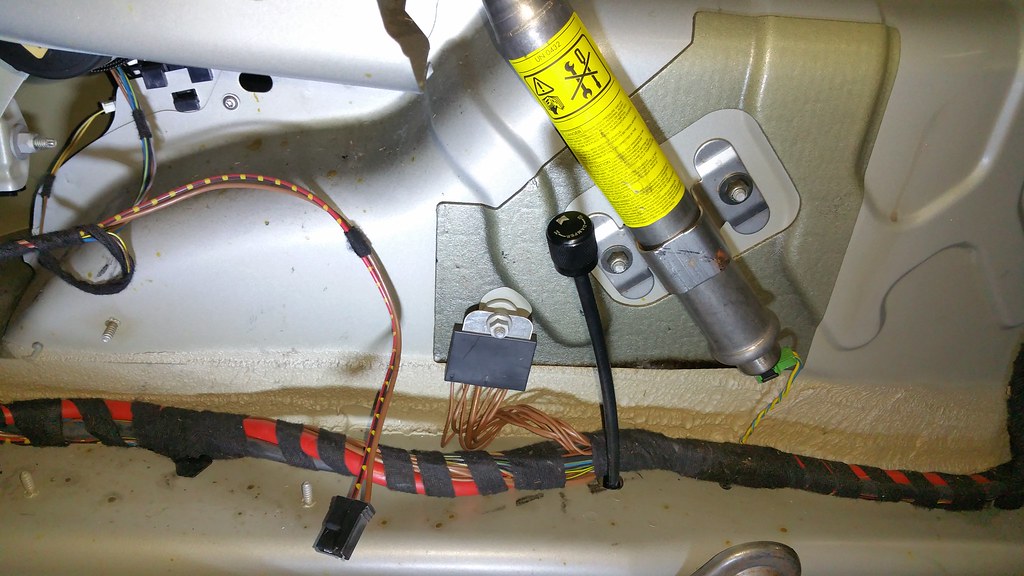
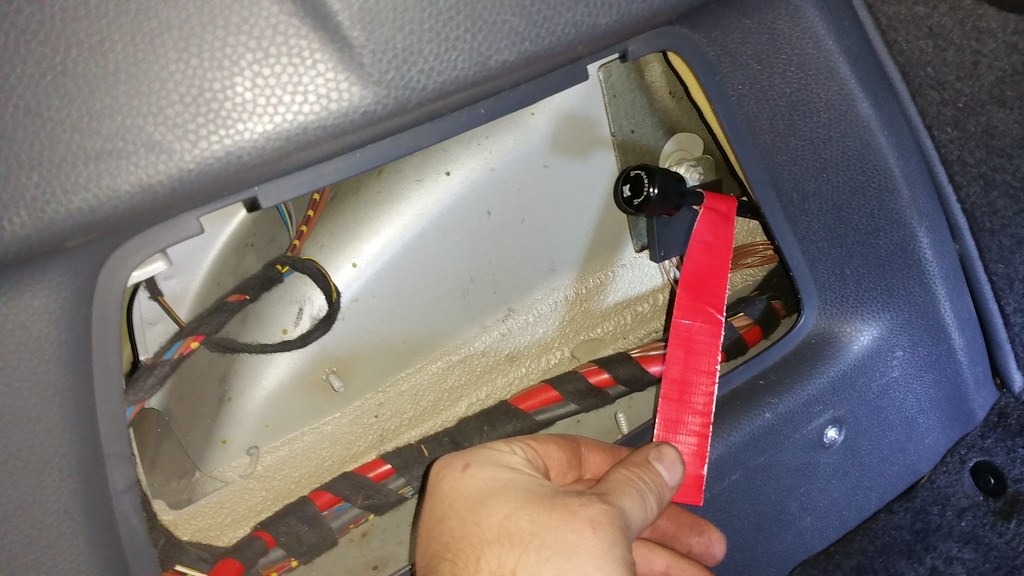
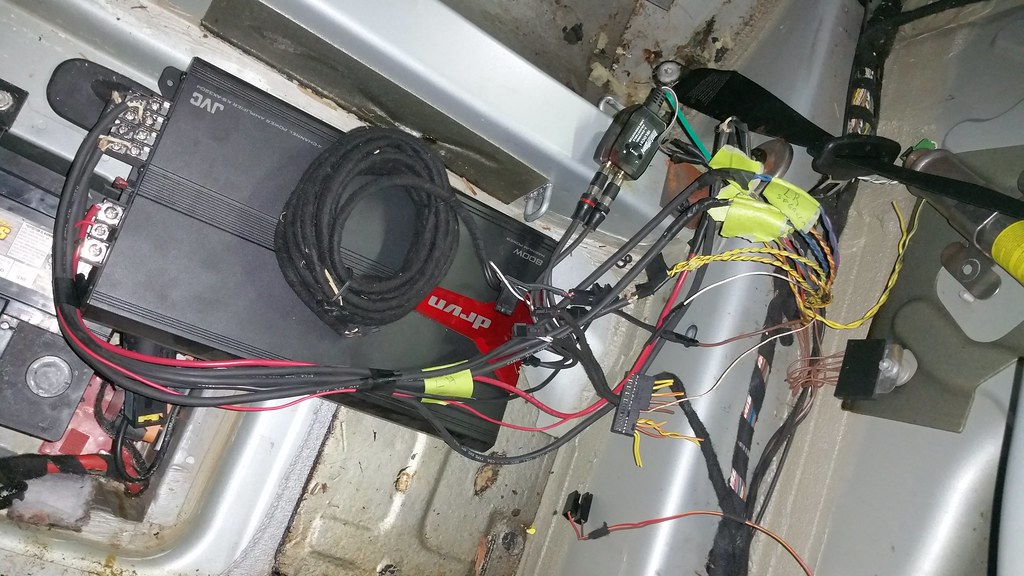
The remote adjusts are AWESOME to have. Adjusting my suspension in 5 minutes is well worth the effort. Unfortunately, sticking with the theme of my project everything was going great until I found what some knucklehead did with the sound system.
When I bought the car I knew it had a nice Alpine deck in place of the OEM stereo and a JVC 800 Watt amp installed behind the right access panel. Pulling the right back panel off unveiled some of the most horrific audio hack work I have ever seen. My OCD kicked into hyperdrive and is still going crazy. I mean why?! There are 3 pre amps on the back of the deck! WHY! WHY!!!
Meanwhile, the rear trailing arm bushings have finally been located. Turns out a replacement set from ECS wasn�t sent out right away. They were waiting for my return to be processed before issuing a credit and having Powerflex drop ship the replacements. That's about when Interstate 84 was closed for a week across the majority of the state of Oregon and my parts sat in a UPS truck somewhere until the snow melts�
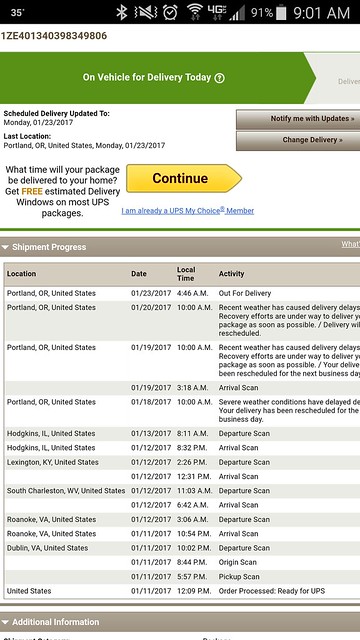
1/24/2017 DAY 28 - FINALLY, I HAVE BUSHINGS!
UPS finally delivered the bushings and my car could finally be finished up! After school Monday I got with my boss and explained the situation to him. Surely he�ll understand going home early to finish this project up. Only I forgot I had volunteered to be the swing shift engineering support Monday night. LAME� Leave it to work to get in the way of a good time...

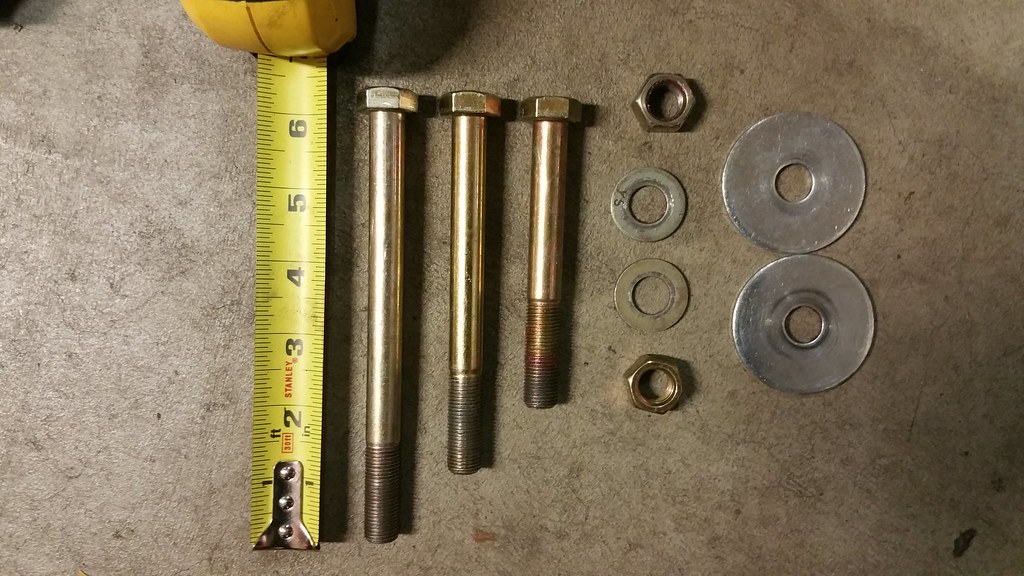
Regardless, the Powerflex rear trailing arm bushings had finally been delivered and as an added bonus the kit was complete! Here�s a little series of pictures I took to show how I pressed them out with the Amazon kit and Ace Hardware bolts. Again I�m pretty sure this would work great for the front control arm bushings and lower engine mount too. This kit is way cheaper than some of the specific MINI control arm kits and it does it all.

Getting the new Powerflex collar into the bracket is super easy. Hold the bracket in one hand and tap on the collar to get it started in the bracket. Once started keep it square and walk it into the bracket until it's seated. I took the rubber mallet and one of the rings out of the Amazon kit and made sure it was completely seated. This ended up being WAY easier than I thought. Pressing the new collar in is do-able but walking the collar in by hand is way easier
I finally got the backend all put back together and can put the tires on and take it off the jack stands. So beautiful!
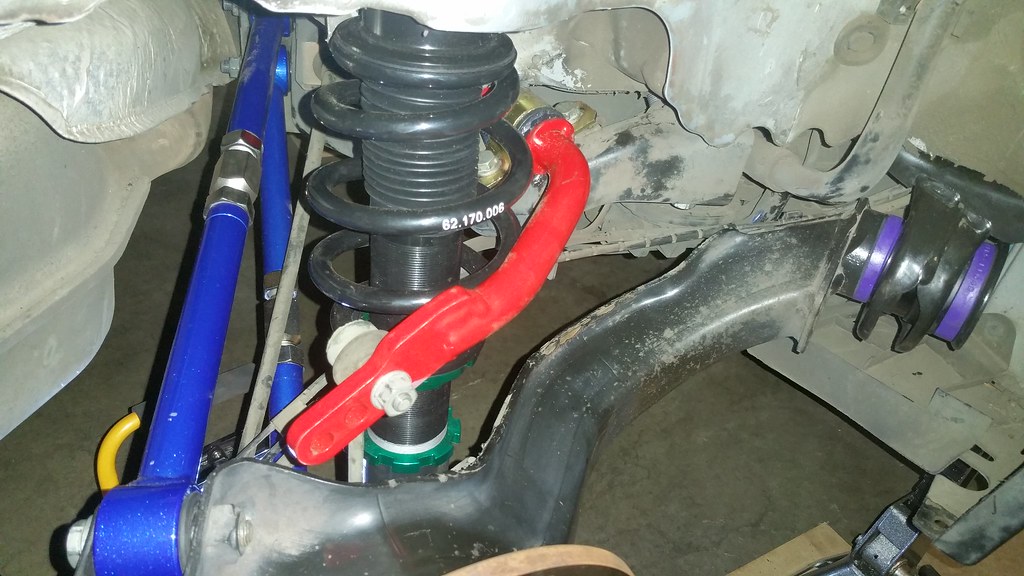
Sadly, at midnight I threw in the towel when I realized my ride height was WAY off. I knew the Megan springs would be stiffer and that I might be off a little bit. But 1.5� off was a lot off. When I had the struts out I set them all be be about the same length as the stock struts. Yeah, that was a bad idea. Don�t do that if you want a stock ride height. It was too late to monkey with it anymore. The mini will have to wait one more day.
1/25/2017 DAY 29 - The first ride!
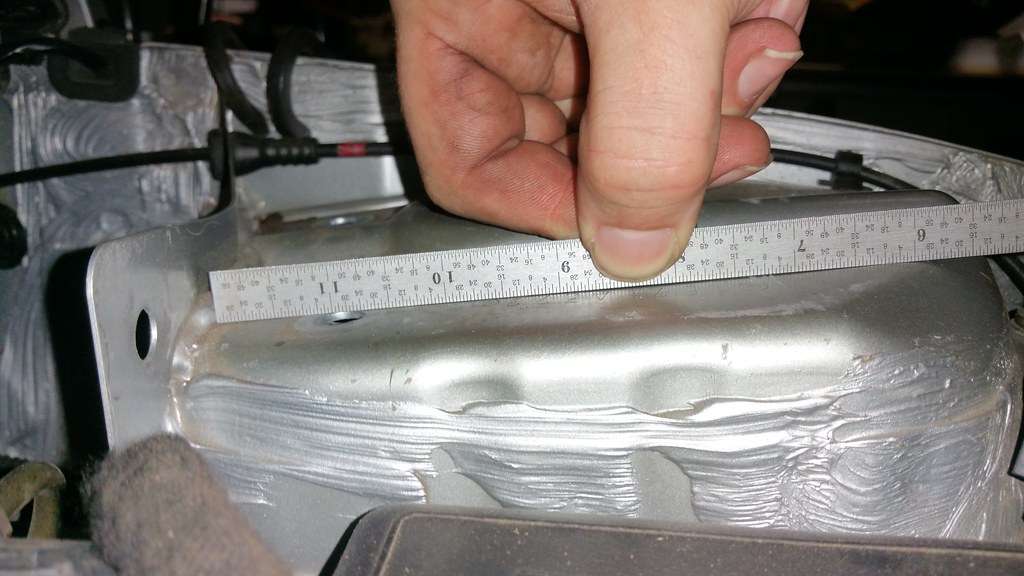
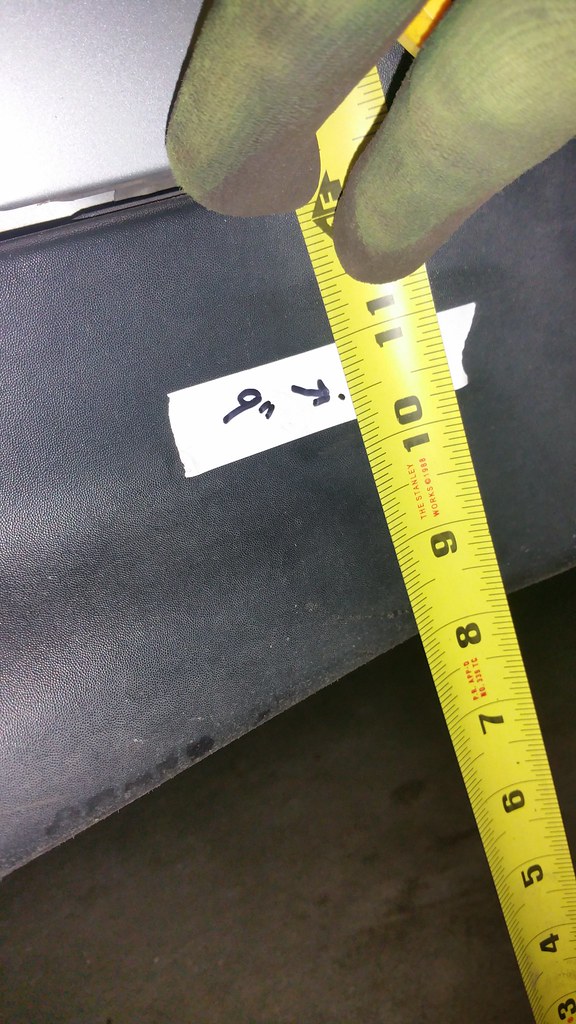
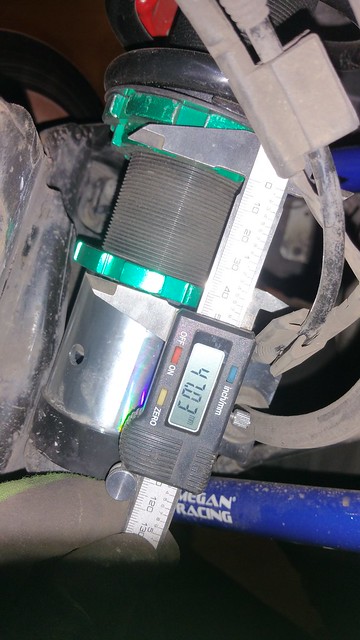
I spent a lot of time screwing around with the ride height trying to get it set right. I also waited on putting the wheel liners in. That really helped with access to everything I needed to adjust. As I was adjusting the struts I noticed the clearance between the tire and the spanner lock nut is very small. I plan on going up a tire size (215�s) and this will make it even tighter. Once some money grows back I�ll likely go with a set of 12mm wheel spacers. The measurements below are the final settings I ended up with to get back to a stock ride height.
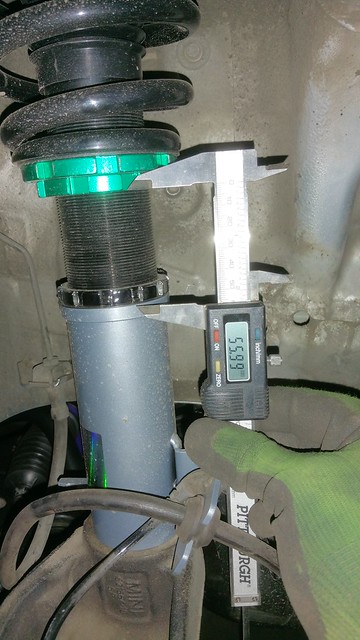

For the first ride I had the suspension dialed in 1 click from the hardest setting. I didn�t make it to the end of the block before I pulled over to fix that. WOW was that violent. It would be awesome for a nice smooth track but for my bumpy old street it was extremely rough. 1-10 clicks from the softest setting isn�t bad. It�s a little rough but the handling is amazing.
Even with shot tires and an alignment that's all over the place it handles WAY better than before. I can't wait for new tires and an alignment. Just look at how bad the rear tires were. Yikes!

1/26/2017 Day 30 - First day on the road
I convinced the girlfriend to tag along on a little jaunt to the gas station. Bwahahaha! There�s still clench marks in the passenger seat! HAHA. It handles amazing! The engine mounts sure do put a lot of vibration into the cabin, there�s no body roll at all, and the suspension is very firm and inspire confidence. Exactly what I wanted.
I tried breaking it loose a couple times and it wouldn�t have it. A 90 degree turn at a light was the only time it came loose and that was because I cut it through the gravel. I pushed it hard enough even I was uncomfortable with the speed but my girlfriend doesn�t need to know that. LOL Even on old crap tires and a bad alignment I�m pleased.
2/7/2017 DAY 42 - My Project Summary
I�m calling it! I�m going to call this project complete. Everything is back together and running great. The new tires are on and it goes in for the alignment tomorrow. I�ve been driving it every day for nearly 2 weeks now and here�s my final thoughts.
Engine Mounts
Surprisingly this is the biggest change. If you don�t like noise in the cabin or engine vibrations the Race durometer bushings are not for you.
At low RPM�s like taking off from a stop sign there�s a lot of noise. The dash and every panel in the car rattles pretty intensely and I�d guess that this would not make very many people happy. I personally love it and plan on installing some dynamat type product in the future to help stop all the plastic panels from driving me crazy in stop and go traffic. But once you get up to speed it's not bad at all and feedback is excellent. Just keep this in mind if you�re replacing engine mounts and trying to make a decision. With Race durometer you feel the engine start and at low RPM�s under load it is a very aggressive feedback.
Everything Else
Everything else I�m lumping together. Obviously, coilovers, sway bar, bushings, new tires, etc will make any driving experience better and they definitely have. The car handles awesome now and I couldn�t be happier. I�ve got a couple things little things left to do.
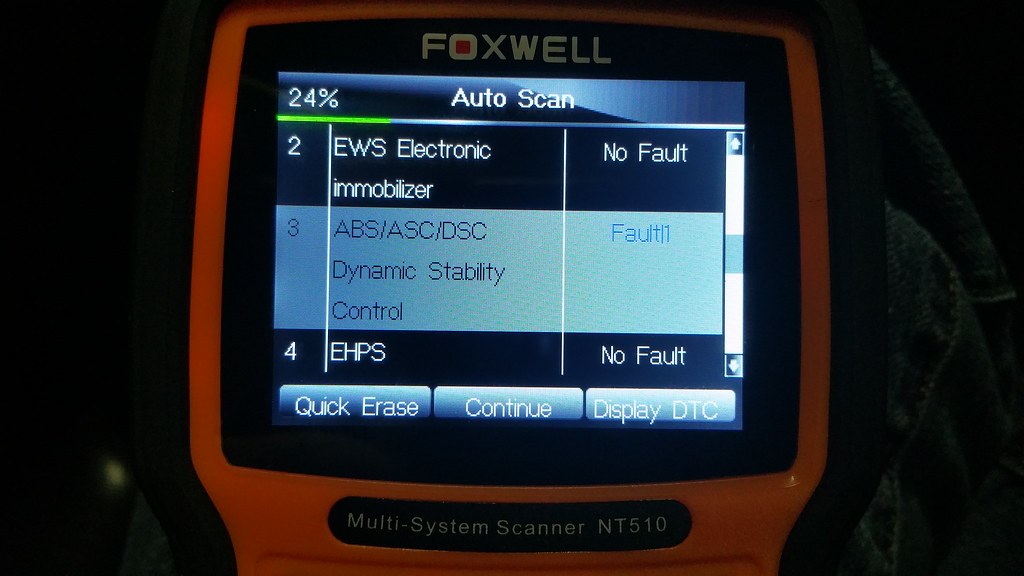
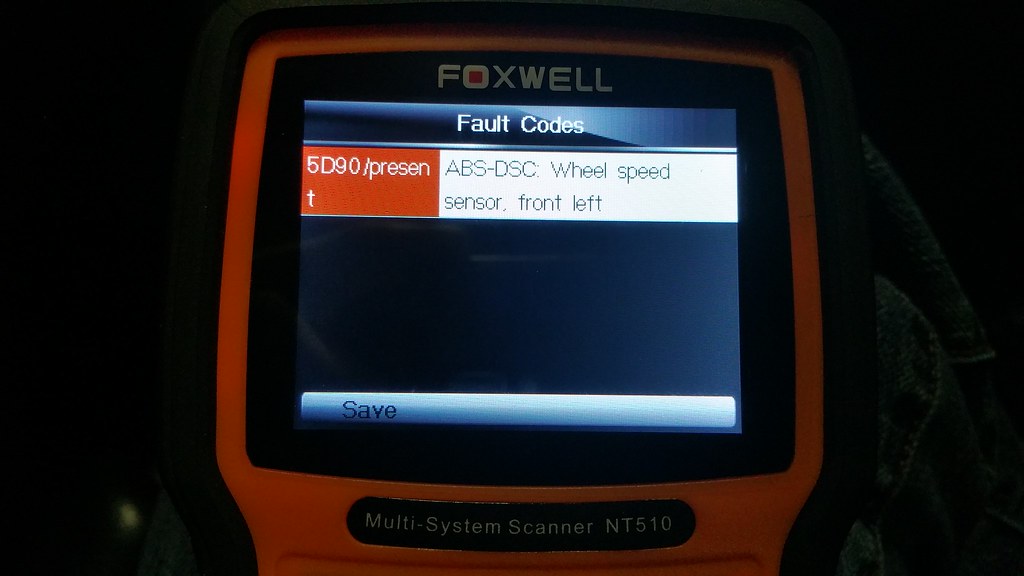
I�ve got a fault with an ABS sensor, the airbag system fault pops right back up once cleared, I can�t get my tire pressure sensor system to reset, and I might put a set of 12mm wheel spacers on due to clearance and aesthetics.
The V3 print booster is still under review. I�ve been screwing around with it and my feelings are still neutral. It makes a difference but I�m not sure if I�d say it's the difference I was expecting. Just off the bottom of the throttle position there isn�t much of a change. Even in �race� mode on the #9 setting. The throttle comes on much faster than before and it's super easy to peal the tires now but the bottom is still dead.
Assuming idle is 0% it's like an exponential curve compared to what I�m calling a linear OEM curve. You get to 100% throttle a lot faster but the difference between the two curves at 5% isn�t much. Thats where I was expecting to see a bigger improvement.
With that I�m going to end this novel. Thanks to everyone and I hope this comes in handy for someone some day.
Cheers!
Eric