

4th Gear
I seem to have a nasty habit of answering my own questions, not long after I ask them here, LOL.
I just spoke with a Crutchfield tech advisor, reguarding my questions above, and I learned the following:
The red "Ignition" wire, in fact, can and should be connected to the factory purple/blue "Accessory" wire (PIN-16). What I was basically told was that, because this pigtail connector is used for more than one model vehicle, the red wire is not included within the connector because most of those other vehicles cannot use it. ...But ours' can.
The orange "Illumination" wire also should be connected to the factory grey/red "Illumination" wire (PIN-14). The tech advisor seemed to be kind of surprised that an orange wire was NOT included in the pigtail. Looks like I'll be using a "vampire clip" to tap into the factory wire for that one!
But here was the big surprise for me...it was kind of an "...Oh, by the way"-question: The aftermarket HU's (Alpine, in my case) blue/white "REMO" (Amp Turn-On) wire DOES NOT connect to the factory white "Power Antenna" wire (PIN-13). This wire must be run directly from the HU to the amp/s, or whatever you're using it to turn on. Instead, the HU's blue "P. Antenna" wire should be connected to the factory white (PIN-13) wire (via the blue wire in the pigtail). The question immediately becomes, why is this important...these cars don't even have power antennas? The answer is that they DO have antenna booster modules. The factory "Power Antenna" wire powers this module. If the Amp Turn-On lead is connected to the booster module, it will be "hot" all the time, whenever the HU is switched on. This may cause noise, or interference, when modes other than AM or FM radio is used. (Could this be why so many people experience noise issues with aftermarket installations? ) And of course, if neither the blue OR the blue/white leads are connected to the booster module, the module will never get power, the symptom being bad radio reception.
I'm posting all this here because, based on all my searching, I don't think ANYBODY else here actually knew this! (No need to thank me.)
I just spoke with a Crutchfield tech advisor, reguarding my questions above, and I learned the following:
The red "Ignition" wire, in fact, can and should be connected to the factory purple/blue "Accessory" wire (PIN-16). What I was basically told was that, because this pigtail connector is used for more than one model vehicle, the red wire is not included within the connector because most of those other vehicles cannot use it. ...But ours' can.
The orange "Illumination" wire also should be connected to the factory grey/red "Illumination" wire (PIN-14). The tech advisor seemed to be kind of surprised that an orange wire was NOT included in the pigtail. Looks like I'll be using a "vampire clip" to tap into the factory wire for that one!
But here was the big surprise for me...it was kind of an "...Oh, by the way"-question: The aftermarket HU's (Alpine, in my case) blue/white "REMO" (Amp Turn-On) wire DOES NOT connect to the factory white "Power Antenna" wire (PIN-13). This wire must be run directly from the HU to the amp/s, or whatever you're using it to turn on. Instead, the HU's blue "P. Antenna" wire should be connected to the factory white (PIN-13) wire (via the blue wire in the pigtail). The question immediately becomes, why is this important...these cars don't even have power antennas? The answer is that they DO have antenna booster modules. The factory "Power Antenna" wire powers this module. If the Amp Turn-On lead is connected to the booster module, it will be "hot" all the time, whenever the HU is switched on. This may cause noise, or interference, when modes other than AM or FM radio is used. (Could this be why so many people experience noise issues with aftermarket installations?
) And of course, if neither the blue OR the blue/white leads are connected to the booster module, the module will never get power, the symptom being bad radio reception.I'm posting all this here because, based on all my searching, I don't think ANYBODY else here actually knew this! (No need to thank me.)

1st Gear
elcapitan, I'm considering going Alpine, probably the X305S, and was wondering how the add on power amp worked, did it fit behind the head-unit or did you need to find a different spot for it?
(BTW, your info here is great, will make my install much easier.)
carl.
(BTW, your info here is great, will make my install much easier.)
carl.

4th Gear
I just ordered a pair of Pioneer TS-G1643R to go along with my previously installed Pioneer DEH-P710BT from Crutchfield... Will let you all know how it goes.
I had to go cheap. I lost my front left speaker (blown) and it has been annoying the crap out of me and I have no money... We'll see.
I had to go cheap. I lost my front left speaker (blown) and it has been annoying the crap out of me and I have no money... We'll see.
4th Gear
I haven't done the install yet. I was just getting all the wiring sorted out and figured I'd share what I found out... Having said that, I have no realistic expectation that the Power Pack will sucessfully fit behind (or above, or below) the HU. I'm figuring it'll tie up somewhere behind, or beneath, the glove box. There's more than enough length of wire to reach any reasonable distance.
1st Gear
I'm having some issues regarding wiring with my aftermarket head unit installation - can't listen to the radio, I can not save the time, nor save any settings. My installer said he did a quick wiring job due to he didn't know which wire setup was correct (and that it'd be a few hour job alone). I tried this harness: http://www.amazon.com/Metra-70-9003-...pr_product_top and didn't have any success. I can't seem to find MINI 2010's radio wiring diagram (I found the MINI 2008 one - http://www.wiringdiagrams21.com/wp-content/uploads/2008/11/xcom-radio-wiring-diagram.png) . I found this harness: http://www.installer.com/item/displa...php?it=BMRC-01
but I'm hesitant on buying this $100 item after spending $1500+ on new equipment. However, if I must, I suppose I have to. This may be a silly question, but will the wiring diagram on the OP work on my car? Or does the wiring change every year?
Can anybody please shed some light on this problem of mine? I'd love to hear the radio and have my HU fully functional
4th Gear
The "2nd Gen." guys may be better able to help you, but I'd say if you had an installer do this "work", keep bringing it back 'til he gets it right.
PS: I'm still waiting on some sort of a thaw in the weather here, to do my install, as I don't have the luxury of a garage.
PS: I'm still waiting on some sort of a thaw in the weather here, to do my install, as I don't have the luxury of a garage.

2nd Gear
Quote:
I think you just answered the question I had as well! Thanks!Originally Posted by astrochex
You can find harnesses, but it depends on your head unit. For example, the PAC SWI-JACK works for most upgraded Alpine head units and 2006 MINIs, http://www.pac-audio.com/productDeta...&CategoryID=29 .
1st Gear
Quote:
PS: I'm still waiting on some sort of a thaw in the weather here, to do my install, as I don't have the luxury of a garage.
Eek, my apologies.Originally Posted by ellcapitan
The "2nd Gen." guys may be better able to help you, but I'd say if you had an installer do this "work", keep bringing it back 'til he gets it right.PS: I'm still waiting on some sort of a thaw in the weather here, to do my install, as I don't have the luxury of a garage.

4th Gear
Okay, so I had just enough sunlight over the past few days that I was actually able to get something done!
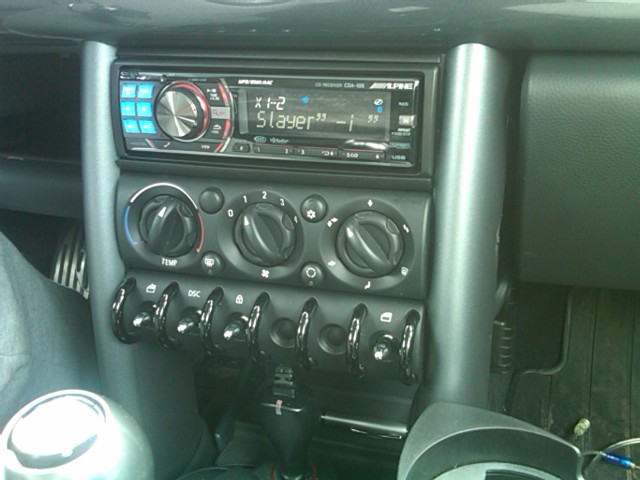
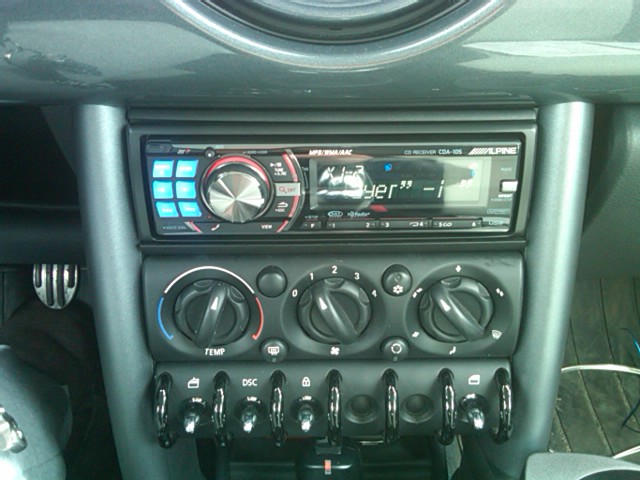
First off...refering to the pics and instructions at the very beginning of this thread, while still very helpful, you cannot simply remove the 4 torx screws and expect the down-tubes to "slide down and out". They won't slide ANYWHERE (on an '05, at least...I know there were changes made to the console around that year) until you remove two screws inside the cup holders and two more beneath the power mirror/seat heater panel, and slide the console rearward. The bottoms of the tubes slide with it, eventually making for enough clearance for them to clear at the tops. ...Then, it's a simple matter of moving the tubes aside just enough to access the four head unit (torx) screws. (To their credit, Crutchfield's instructions were exactly correct in this matter.)
As for the replacement head unit, I did have somewhat of a battle getting all the stuff in there. A simple unit by itself would likely have gone in with no problem at all, but I had a "Power Pack" amp, an XM tuner, an XM adapter module, a bluetooth module, and all the associated wiring (not to mention the factory wire connector, which is roughly half the size of my fist).
Completely removing the glove box made the job much easier (...more like, made the job possible).
I ended up stuffing the "Power Pack" and the XM tuner behind the passenger side kick panel (turns out there's plenty of precious room down there), the XM adapter module above and to the left of the glove box, the bluetooth module directly beneath the head unit (taking care not to impede the HVAC actuater cables), and I tied up all the wiring above the glove box...to the metal supports that hold the passenger side shiny panel in place.
Eventually, the glove box went back in...barely. There's NOT a lot of room for extra stuff in this car's dash! The idea of making it "pretty" went out the window very quickly...I just stuffed things where they would fit.
Then I had an issue with getting the head unit itself in place. This Alpine head unit is actually slightly shallower (less deep) than the factory unit, but with all that wiring...well, you get the idea...the last inch or two took some "persuasion". Thankfully, with the glove box removed I could actually reach back there and manipulate the bundles of wires as I slid the new unit in. HOWEVER, I made the mistake of bending the tabs on the din-sleeve a little too far out, and they were hitting the radio opening in the dash, not allowing the unit to slide home all the way. (By the time I figured this out, I had actually cracked the mounting plate, trying to get that last 1/8th of an inch! I HATE DIN SLEEVES.) After I straightened that situation out, it slid in the rest of the way without any further fight.
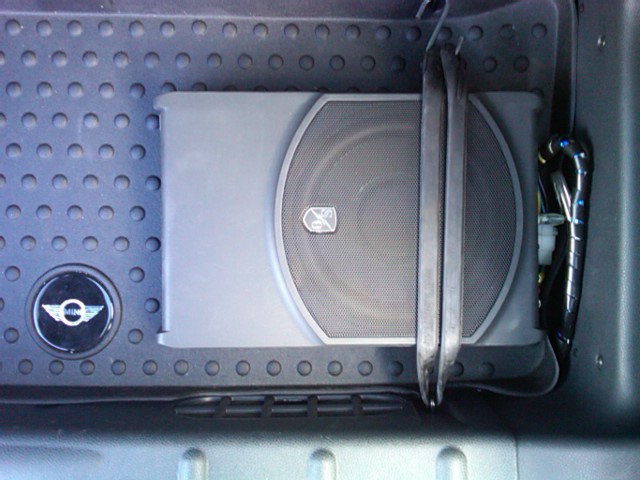
Today, I threw in the Sound Ordinance powered subwoofer (even though it was 20 degrees and windy out . At least it wasn't snowing or sleeting.) (Any typos you read here are likely due to the fact that my fingers are still thawing.) I did not try, but I don't think this sub would fit under either of the seats. I'm almost certain that, even if it could be stuffed there, the seat's up/down adjustment would, um, interfere... So, in the hatch it went! I did not want any kind of permanent installation; I wanted it easily removable for dog/cargo-duty . So, I have it held tightly down with a bunjee cord (with one-side adhesive foam strips underneath, to help prevent it from ever shifting), and I have the power, remote, and ground leads going through a wire connector for easy removal. The only thing I would like to do differently is use some right-angle RCA plugs (for the signal cables), because it looks like the straight ones there now might come in contact with the side panel if the sub were to shift to the right at all.
Everything works correctly. The wiring details I mentioned in my previous posts ARE correct. There is no noise, and no issues with radio reception. I can confidently say that this is THE correct way to wire a new head unit into a MINI Cooper.
After some tuning and tweaking, I am actually very happy with the way this system sounds. It's loud, it's clear, and the subwoofer actually has no problem keeping up (amazing, for it's size). It sounds better than anything this car has seen yet, AND SURPRISINGLY, it sounds better than some of my previous cars' much more expensive systems! I believe I've acheved my goal of creating a "super-stock" audio upgrade for a MINI Cooper, and then some. It will not likely win any "sound-offs", but again that is not what I was looking for. Unless you're looking for bass that will rattle your tooth fillings, I would highly recommend every component I've chosen for this install. Given my budget and goals, it easily exceeds my expectations. ...And although I don't profess to be an audiophile per se, I DO have some reasonably high expectations ...
...
First off...refering to the pics and instructions at the very beginning of this thread, while still very helpful, you cannot simply remove the 4 torx screws and expect the down-tubes to "slide down and out". They won't slide ANYWHERE (on an '05, at least...I know there were changes made to the console around that year) until you remove two screws inside the cup holders and two more beneath the power mirror/seat heater panel, and slide the console rearward. The bottoms of the tubes slide with it, eventually making for enough clearance for them to clear at the tops. ...Then, it's a simple matter of moving the tubes aside just enough to access the four head unit (torx) screws. (To their credit, Crutchfield's instructions were exactly correct in this matter.)
As for the replacement head unit, I did have somewhat of a battle getting all the stuff in there. A simple unit by itself would likely have gone in with no problem at all, but I had a "Power Pack" amp, an XM tuner, an XM adapter module, a bluetooth module, and all the associated wiring (not to mention the factory wire connector, which is roughly half the size of my fist).
Completely removing the glove box made the job much easier (...more like, made the job possible).
I ended up stuffing the "Power Pack" and the XM tuner behind the passenger side kick panel (turns out there's plenty of precious room down there), the XM adapter module above and to the left of the glove box, the bluetooth module directly beneath the head unit (taking care not to impede the HVAC actuater cables), and I tied up all the wiring above the glove box...to the metal supports that hold the passenger side shiny panel in place.
Eventually, the glove box went back in...barely. There's NOT a lot of room for extra stuff in this car's dash! The idea of making it "pretty" went out the window very quickly...I just stuffed things where they would fit.
Then I had an issue with getting the head unit itself in place. This Alpine head unit is actually slightly shallower (less deep) than the factory unit, but with all that wiring...well, you get the idea...the last inch or two took some "persuasion". Thankfully, with the glove box removed I could actually reach back there and manipulate the bundles of wires as I slid the new unit in. HOWEVER, I made the mistake of bending the tabs on the din-sleeve a little too far out, and they were hitting the radio opening in the dash, not allowing the unit to slide home all the way. (By the time I figured this out, I had actually cracked the mounting plate, trying to get that last 1/8th of an inch! I HATE DIN SLEEVES.) After I straightened that situation out, it slid in the rest of the way without any further fight.
Today, I threw in the Sound Ordinance powered subwoofer (even though it was 20 degrees and windy out
. At least it wasn't snowing or sleeting.) (Any typos you read here are likely due to the fact that my fingers are still thawing.) I did not try, but I don't think this sub would fit under either of the seats. I'm almost certain that, even if it could be stuffed there, the seat's up/down adjustment would, um, interfere... So, in the hatch it went! I did not want any kind of permanent installation; I wanted it easily removable for dog/cargo-duty . So, I have it held tightly down with a bunjee cord (with one-side adhesive foam strips underneath, to help prevent it from ever shifting), and I have the power, remote, and ground leads going through a wire connector for easy removal. The only thing I would like to do differently is use some right-angle RCA plugs (for the signal cables), because it looks like the straight ones there now might come in contact with the side panel if the sub were to shift to the right at all.Everything works correctly. The wiring details I mentioned in my previous posts ARE correct. There is no noise, and no issues with radio reception. I can confidently say that this is THE correct way to wire a new head unit into a MINI Cooper.
After some tuning and tweaking, I am actually very happy with the way this system sounds. It's loud, it's clear, and the subwoofer actually has no problem keeping up (amazing, for it's size). It sounds better than anything this car has seen yet, AND SURPRISINGLY, it sounds better than some of my previous cars' much more expensive systems! I believe I've acheved my goal of creating a "super-stock" audio upgrade for a MINI Cooper, and then some. It will not likely win any "sound-offs", but again that is not what I was looking for. Unless you're looking for bass that will rattle your tooth fillings, I would highly recommend every component I've chosen for this install. Given my budget and goals, it easily exceeds my expectations. ...And although I don't profess to be an audiophile per se, I DO have some reasonably high expectations
...

4th Gear
^...Just a couple more pics...^
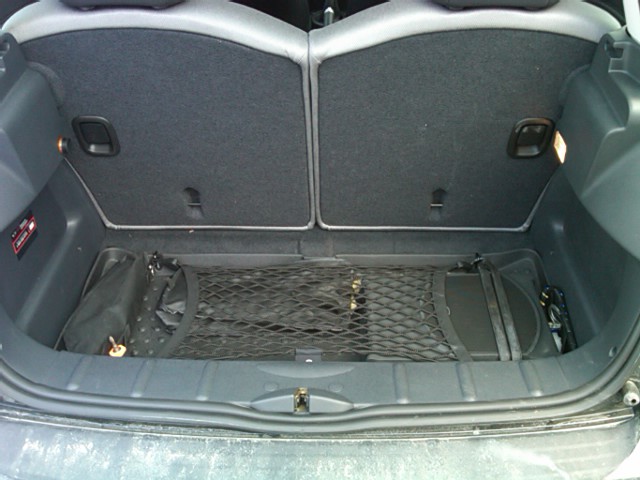
The second one's with all my "junk in the trunk". This sub does not take up much room at all.
The second one's with all my "junk in the trunk". This sub does not take up much room at all.

3rd Gear
ellcapitan, how's the power pack?? Your components dont seem "underpowered" do they? I bought the pioneer 4 channel 75x4 and was worried it might not be enough power. So I might bridge it to run my components and run the rears off of the HU. I plan on getting diamond audio 6 1/2's comp for the fronts and 6x9 for the rears
4th Gear
It's loud. It's louder than you'd expect from 45 watts, and it's very clean. I don't know how they get away with no gain control (there's just a high and low gain switch...I have mine set to high), but I can't hear any distortion at all.


Sure- if that's what you have laying around, new and unused:
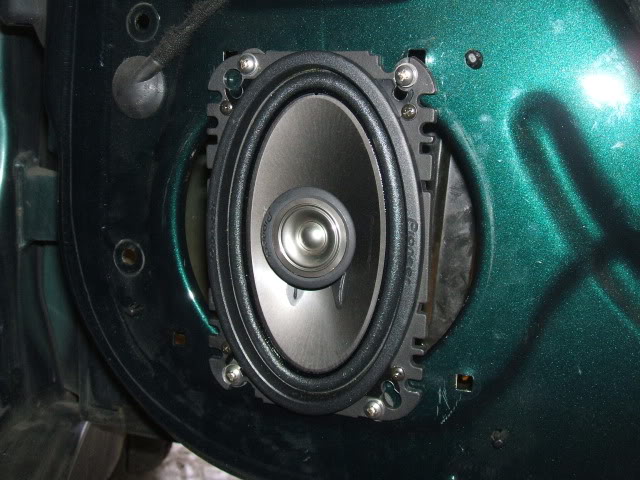
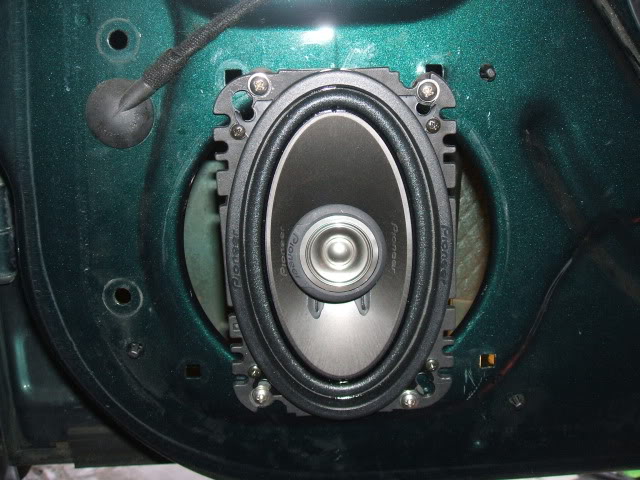
These are left over Pioneer speakers that didn't make it into my previous car. They were almost $70 for the pair, so I thought I'd see if they would work in the doors of my '02 since the factory speakers went dead. As you can see, I popped out the factory plastic mounting things to allow for ease of mounting. They did have to fit in that direction, as the hole is a bit bigger top to bottom. Between the frame and the door I put rubber washers to help eliminate rattles, and I used nylon insert nuts on the back to help prevent the bolts loosening up.
They/it sound(s) great (much better than the stock speakers, IMHO) and I can't wait to do the other side!
So for all of you who have a set of 4x6 speakers laying around (and I know there must be thousands of you!) here's your answer- they will fit!
Val
6th Gear
ellcapitan, any updates on how everything is working? In particular, the connections that you discovered for the power and illumination. I did an install just a week before you posted this information, so I went on the older information from Crutchfield and other sources. Now, that you've discovered these, I might change my wiring.
Question though, doesn't the 12V lead stay hot for a while after turning off the car? Maybe I'm confusing this with other circuits, but for instance, I know with the factory HU, you can play it without having to turn the car on, so, I'm going to assume, it was drawing it's current from a different line than the purple/blue that you talk about.
Anyways, this is a good thread!
4th Gear
To answer your questions, my setup is still working flawlessly. I still recommend the wiring details I laid out as the right way to go...
As for the timed power-with-ignition-off option of the stock setup, this was one of the questions I had early on (unanswered, of course, by anyone here ). The answer is, you will lose this function. It was a function of the stock "Boost" unit itself, and had nothing to do with the vehicle's wiring or programming. The only thing you should still be able to do (depending on the particular aftermarket head unit, I guess) with the ignition off, is eject a disc...just like in any other car.
As for the timed power-with-ignition-off option of the stock setup, this was one of the questions I had early on (unanswered, of course, by anyone here
). The answer is, you will lose this function. It was a function of the stock "Boost" unit itself, and had nothing to do with the vehicle's wiring or programming. The only thing you should still be able to do (depending on the particular aftermarket head unit, I guess) with the ignition off, is eject a disc...just like in any other car.6th Gear
That's good to hear. Yeh, I was aware of that feature, and don't care about that, my reason for asking was out of concern that the radio would continue to play for a brief period until that circuit is shut off. Evidently, that is a different circuit from the one that powers the radio when the car is off. I'm going to make those changes as soon as I can!
Quote:
As for the timed power-with-ignition-off option of the stock setup, this was one of the questions I had early on (unanswered, of course, by anyone here ). The answer is, you will lose this function. It was a function of the stock "Boost" unit itself, and had nothing to do with the vehicle's wiring or programming. The only thing you should still be able to do (depending on the particular aftermarket head unit, I guess) with the ignition off, is eject a disc...just like in any other car.
Originally Posted by ellcapitan
To answer your questions, my setup is still working flawlessly. I still recommend the wiring details I laid out as the right way to go...As for the timed power-with-ignition-off option of the stock setup, this was one of the questions I had early on (unanswered, of course, by anyone here
). The answer is, you will lose this function. It was a function of the stock "Boost" unit itself, and had nothing to do with the vehicle's wiring or programming. The only thing you should still be able to do (depending on the particular aftermarket head unit, I guess) with the ignition off, is eject a disc...just like in any other car.
2nd Gear
Thanks for posting this info, ellcapitan! I just finished replaced my HU, and the wiring suggestions are working perfectly! I also put the polk components in the front, and have a set of polk db690s for the rear that will probably go in tonight. Very pleased, and happy to avoid cutting out grills and drilling holes!

3rd Gear
Quote:
First off...refering to the pics and instructions at the very beginning of this thread, while still very helpful, you cannot simply remove the 4 torx screws and expect the down-tubes to "slide down and out". They won't slide ANYWHERE (on an '05, at least...I know there were changes made to the console around that year) until you remove two screws inside the cup holders and two more beneath the power mirror/seat heater panel, and slide the console rearward. The bottoms of the tubes slide with it, eventually making for enough clearance for them to clear at the tops. ...Then, it's a simple matter of moving the tubes aside just enough to access the four head unit (torx) screws. (To their credit, Crutchfield's instructions were exactly correct in this matter.)...
I've got an 05 S also, and I found a MUCH easier way to pull those down tubes out: Pull up gently on the middle (off-colored) portion of the dash.Originally Posted by ellcapitan
Okay, so I had just enough sunlight over the past few days that I was actually able to get something done! First off...refering to the pics and instructions at the very beginning of this thread, while still very helpful, you cannot simply remove the 4 torx screws and expect the down-tubes to "slide down and out". They won't slide ANYWHERE (on an '05, at least...I know there were changes made to the console around that year) until you remove two screws inside the cup holders and two more beneath the power mirror/seat heater panel, and slide the console rearward. The bottoms of the tubes slide with it, eventually making for enough clearance for them to clear at the tops. ...Then, it's a simple matter of moving the tubes aside just enough to access the four head unit (torx) screws. (To their credit, Crutchfield's instructions were exactly correct in this matter.)...
The center piece goes on first, then the steering wheel portion and the passenger's side portion clip over it. It just unclips from the dash, with a firm tug, and allows you to swing the downtubes down so you can remove them. This saves you the hassle of unscrewing and removing all the console/e-brake housing.
Quote:

As you can see, I popped out the factory plastic mounting things to allow for ease of mounting.
So for all of you who have a set of 4x6 speakers laying around (and I know there must be thousands of you!) here's your answer- they will fit!
Val
That's cool. I had a hell of a time installing my MB quart 6 1/2" components. I eventually ripped the speaker out of those factory mounting bracket things and pulled the factory grille off the door panel. PITA. Glad you got some use out of those 4x6's.Originally Posted by valvashon
Sure- if that's what you have laying around, new and unused:As you can see, I popped out the factory plastic mounting things to allow for ease of mounting.
So for all of you who have a set of 4x6 speakers laying around (and I know there must be thousands of you!) here's your answer- they will fit!
Val
1st Gear
Hey, el Capitain, Where did you hook in power for all your pieces? I'm in about to install (after I figure out how to de-bollox up the wiring with the OEM iPod adapter) and am looking for power. I've got all the same pieces you do (HU, Sirius (instead of XM), KTP-445, BT, plus the Imprint) all told I think its 10 + 7.5 +7.5 +7.5 +2 amps. Did you hang this all off the existing radio power lead?
4th Gear
There are 2 power leads, one switched with the ignition, and one constant battery (like in most cars). Between the two, you'll have no problem with power draw. There is no need to add any relay circuits or use a higher rated fuse. FWIW, the Power Pack is a class-D amp, and doesn't draw much. Even with the sub, no matter how loud I make it, I see no effect at all on the headlights...at idle, or with engine not running.
1st Gear
Thanks, so you just used the existing radio circuits? "battery" (red/brown) and "accessory" (purple/blue)?
3rd Gear
I started wiring up my headunit only to find out that the steering wheel interface I order doesnt work with my year mini only the newer ones. *WARNING* if you have a older mini, I'm guessing all R53, R52 and R50's dont buy the Metra axxess ASWC. Even though it was compatible with my kenwood HU is not compatible with the car. I've been told know that the PAC SWI-JACK will work....
4th Gear
Quote:
Originally Posted by carlmuck
Thanks, so you just used the existing radio circuits? "battery" (red/brown) and "accessory" (purple/blue)?
1st Gear
I've installed a bunch of new Alpine stuff, using (for the moment) the stock speakers. After planning out everything. Getting all the stuff laid out and finding places for all the pieces, carefully selecting power circuits and grounds I get it all installed an power up and NO sound.
Everything, from what I can tell is working. As I peel back the pieces I get no closer to sound. At max power I can just hear a slight "bzz bzz" that seems to be the faintest signal getting to the speakers. Here's what I've got
1) Alpine X305s, connected using newministuff adapter
2) Alpine KTP-445 (head unit "power pack") basically in-line amp
3) Alpine Sirius interface with sirius direct tuner
4) Alpine PXA-H100 imprint unit
5) Alpine KCE-400BT (bluetooth interface)
I'm at a loss, if I disconnect the alpine stuff, and put the OEM radio back in its fine. Plug just head unit, and nothing.
As far as I can tell all the various components are talking to the HU fine. Sirius activated, when I press the "MultiEQ" button I can tell I'm in the imprint unit. Bluetooth pairs and seems to work. I just can't get any sound out.
Any pointers? Anything obvious that I'm missing? I don't have HK (at least the speakers aren't and I don't see an amp with the HK one would be) so I'm at a loss. THere's nothing special about the stock speakers, right?