

R56 R56 cooper S custom SatNav

Thread Starter
|
1st Gear
Joined: Mar 2014
Posts: 18
Likes: 2
R56 cooper S custom SatNav
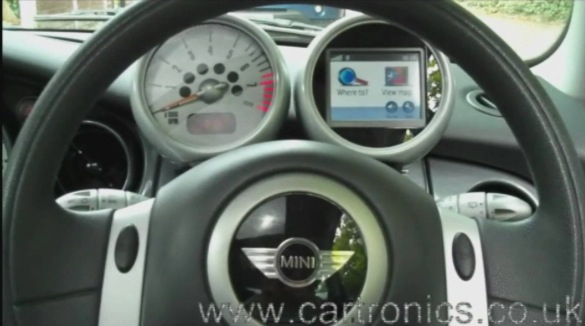
I bought my 2008 R56 cooper S about 6 months ago and wanted to add a sat nav without paying through the teeth or stick it to the wind screen. A saw an image on Google that UK company cartronics had done to a R53 and I wanted a piece of the action!
This is the image that inspired me;

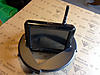
I bought a used rev counter from eBay for �30 and got to work with a dremel multi tool and some spray paint. Here's the finished article;
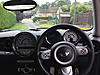

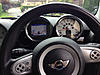
For a professional look I also have the nav unit booting up while displaying the Mini logo.
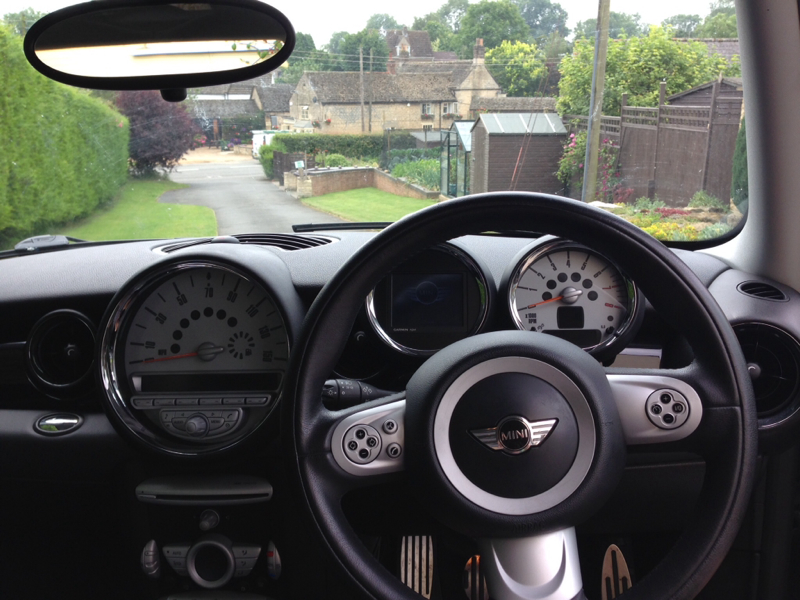
Mounting it so I could see through the wheel was a bit tricky, at first I fabricated a steel bar but this left the 2 pods sitting too high behind the wheel so I took my favourite hammer and bent and hacked away at the metal mounting brackets, re-drilling the holes to mount the pods. The original pod was fastened on with 2 torx screws, now there is only 1 through each pods mounting bracket. This is plenty tight enough to secure the pods, I did consider connecting them together with a metal bar across the back of them but this has been unnecessary. I have provided power for the sat nav from the rear of the cigarette lighter socket, all nicely hidden away.
I hope you like what I have done!
This is the image that inspired me;
I bought a used rev counter from eBay for �30 and got to work with a dremel multi tool and some spray paint. Here's the finished article;


For a professional look I also have the nav unit booting up while displaying the Mini logo.
Mounting it so I could see through the wheel was a bit tricky, at first I fabricated a steel bar but this left the 2 pods sitting too high behind the wheel so I took my favourite hammer and bent and hacked away at the metal mounting brackets, re-drilling the holes to mount the pods. The original pod was fastened on with 2 torx screws, now there is only 1 through each pods mounting bracket. This is plenty tight enough to secure the pods, I did consider connecting them together with a metal bar across the back of them but this has been unnecessary. I have provided power for the sat nav from the rear of the cigarette lighter socket, all nicely hidden away.
I hope you like what I have done!


Mickey Mouse ears on the R56, that's what they call it on the Gen1 very nice.  Great Job and a very cool DIY. Looks very clean.
Great Job and a very cool DIY. Looks very clean.
__________________

MINI Guru/ MINI Owner Since 2004 | NEW Lifetime Part Replacement | Local Pickup
Milltek | Genuine MINI | Forge Motorsport | NM Engineering | ECS Performance | M7 Speed
Customer Service Hours: 8am-8pm EST|Sales Team Hours: 8am-11pm | SAT 10am-7pm 800.924.5172
MINI Guru/ MINI Owner Since 2004 | NEW Lifetime Part Replacement | Local Pickup
Milltek | Genuine MINI | Forge Motorsport | NM Engineering | ECS Performance | M7 Speed
Customer Service Hours: 8am-8pm EST|Sales Team Hours: 8am-11pm | SAT 10am-7pm 800.924.5172
Thread Starter
|
1st Gear
Joined: Mar 2014
Posts: 18
Likes: 2
Here we go, a bit of reverse engineering for the how to guide.
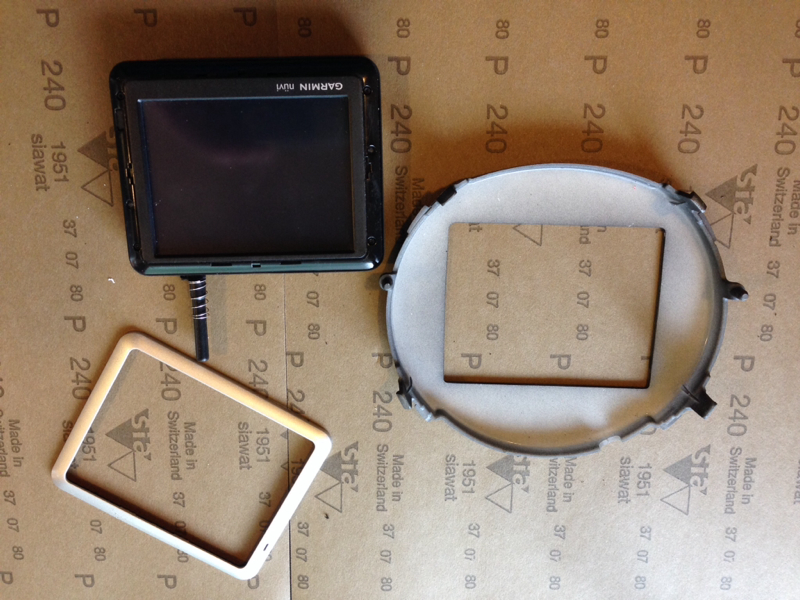
Here is the garmin nuvi (mine is a nuvi1240 with the latest upload of European maps) with the plastic silver surround removed. To measure the cut out for the rev counter clear screen I positioned the nuvi in place behind the screen and marked out the hole with masking tape. A bit of careful drilling, cutting and filing later I had an interference fit rectangle to place the nav unit in to.
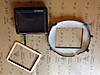
I then used some hycote plastic primer aerosol spray paint to prime the outside of the sceen with newly cut hole, following up with hycote satin black spray paint. Paint was from amazon uk at around �7 total for paint & primer. I then discarded the original silver surround that was on the nav unit.
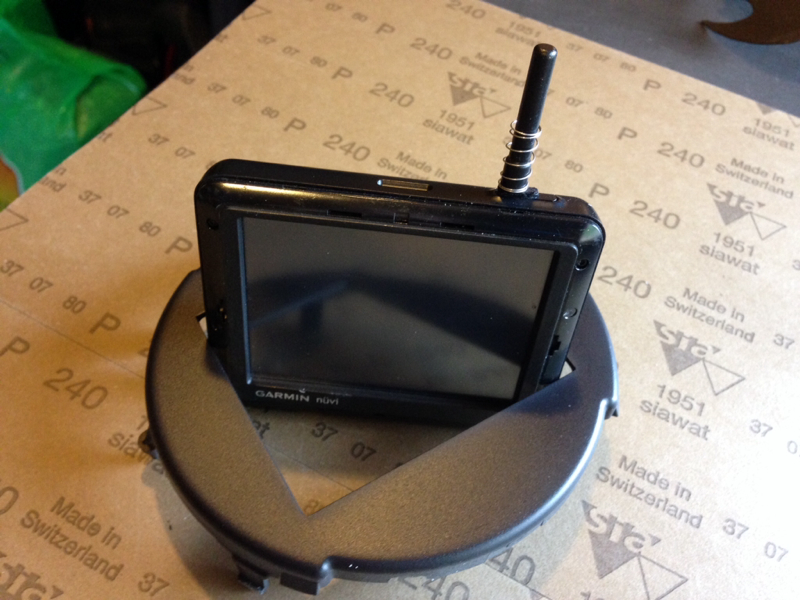
I removed the buttons from the rev counter, keeping one of them to enable the power button to be pressed, it's just the right length but I had t trip the end down that is attached to the nav button. The unit powers up when the ignition is switched on but this button also allows access to the brightness menu so it's kind of essential. This was then glued on with super glue.
This is the power button post fitting, I think you'll agree it looks just like a bought one!
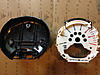
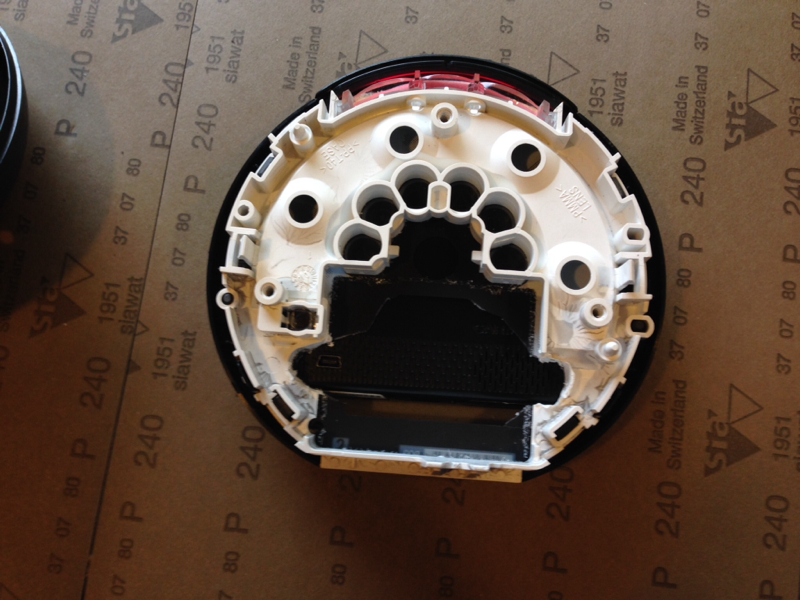
The next thing to do was to remove the rev counter needle and the electronics from behind the rev counter, if I remember rightly the PCB was screwed to the back of the dial face. The pointer took a bit of force to get off. These are now decorating my workshop. I cut out quite a lot from the rev counter dial, partly for access for the power supply and partly for the speaker to allow sound to travel out.
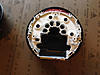
This is the view from the rear of the rev counter dial with the nav unit in place, you should be able to see the holes where the nav unit speaker is mounted and the USB power inlet.
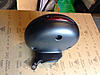
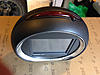
Here is the unit reassembled with the back of the pod trimmed to fit against the dash mouldings. Note I drilled an extra hole at the end of the bracket to gain a bit of extra distance between the pods. I did the same to the rev counter (but opposite) to enable mounting side by side. I have mine mounted so they are just touching each other. So far this has been creak and rattle free unlike some other areas of my mini's dash.
If you go to the beginning of this thread you'll see the end result installed in my car!
Even my wife was impressed, although she thinks I should grow up a bit!
Here is the garmin nuvi (mine is a nuvi1240 with the latest upload of European maps) with the plastic silver surround removed. To measure the cut out for the rev counter clear screen I positioned the nuvi in place behind the screen and marked out the hole with masking tape. A bit of careful drilling, cutting and filing later I had an interference fit rectangle to place the nav unit in to.
I then used some hycote plastic primer aerosol spray paint to prime the outside of the sceen with newly cut hole, following up with hycote satin black spray paint. Paint was from amazon uk at around �7 total for paint & primer. I then discarded the original silver surround that was on the nav unit.
I removed the buttons from the rev counter, keeping one of them to enable the power button to be pressed, it's just the right length but I had t trip the end down that is attached to the nav button. The unit powers up when the ignition is switched on but this button also allows access to the brightness menu so it's kind of essential. This was then glued on with super glue.

This is the power button post fitting, I think you'll agree it looks just like a bought one!

The next thing to do was to remove the rev counter needle and the electronics from behind the rev counter, if I remember rightly the PCB was screwed to the back of the dial face. The pointer took a bit of force to get off. These are now decorating my workshop. I cut out quite a lot from the rev counter dial, partly for access for the power supply and partly for the speaker to allow sound to travel out.
This is the view from the rear of the rev counter dial with the nav unit in place, you should be able to see the holes where the nav unit speaker is mounted and the USB power inlet.

Here is the unit reassembled with the back of the pod trimmed to fit against the dash mouldings. Note I drilled an extra hole at the end of the bracket to gain a bit of extra distance between the pods. I did the same to the rev counter (but opposite) to enable mounting side by side. I have mine mounted so they are just touching each other. So far this has been creak and rattle free unlike some other areas of my mini's dash.
If you go to the beginning of this thread you'll see the end result installed in my car!
Even my wife was impressed, although she thinks I should grow up a bit!
Trending Topics

3rd Gear
Joined: Feb 2014
Posts: 191
Likes: 2
From: Des Plaines, IL
I'm really curious if I can make this work...


I'd like to remove the guts of both gauges and install the modern tach internals to one side and GPS to the other. I don't really like the idea of having to damage my stock tach to make them both fit.
I'd like to remove the guts of both gauges and install the modern tach internals to one side and GPS to the other. I don't really like the idea of having to damage my stock tach to make them both fit.

Yes, you did a great job on this.
Just an update the old R50 R52 R53 GPS kits are here: Gen 1 . Centium
https://www.northamericanmotoring.co...ication-2.html
Just an update the old R50 R52 R53 GPS kits are here: Gen 1 . Centium
https://www.northamericanmotoring.co...ication-2.html
__________________
MINI Guru/ MINI Owner Since 2004 | NEW Lifetime Part Replacement | Local Pickup
Milltek | Genuine MINI | Forge Motorsport | NM Engineering | ECS Performance | M7 Speed
Customer Service Hours: 8am-8pm EST|Sales Team Hours: 8am-11pm | SAT 10am-7pm 800.924.5172
MINI Guru/ MINI Owner Since 2004 | NEW Lifetime Part Replacement | Local Pickup
Milltek | Genuine MINI | Forge Motorsport | NM Engineering | ECS Performance | M7 Speed
Customer Service Hours: 8am-8pm EST|Sales Team Hours: 8am-11pm | SAT 10am-7pm 800.924.5172

2nd Gear
Joined: Jan 2015
Posts: 146
Likes: 2
From: Auburn Hills, MI
Yes, you did a great job on this.
Just an update the old R50 R52 R53 GPS kits are here: Gen 1 . Centium
https://www.northamericanmotoring.co...ication-2.html
Just an update the old R50 R52 R53 GPS kits are here: Gen 1 . Centium
https://www.northamericanmotoring.co...ication-2.html
Sorry to hijack your thread, 1973party... I like your install so much I ordered a tach the other day off eBay, but this factory mount ECS referrenced may be even better.
You are welcome.
Yea, Gen 2 is to that ball mount. Certain Garmins. Guess you could mount it other ways.
Yea, Gen 2 is to that ball mount. Certain Garmins. Guess you could mount it other ways.
__________________
MINI Guru/ MINI Owner Since 2004 | NEW Lifetime Part Replacement | Local Pickup
Milltek | Genuine MINI | Forge Motorsport | NM Engineering | ECS Performance | M7 Speed
Customer Service Hours: 8am-8pm EST|Sales Team Hours: 8am-11pm | SAT 10am-7pm 800.924.5172
MINI Guru/ MINI Owner Since 2004 | NEW Lifetime Part Replacement | Local Pickup
Milltek | Genuine MINI | Forge Motorsport | NM Engineering | ECS Performance | M7 Speed
Customer Service Hours: 8am-8pm EST|Sales Team Hours: 8am-11pm | SAT 10am-7pm 800.924.5172


Thread
Thread Starter
Forum
Replies
Last Post
Wohnson89
R50/R53 :: Hatch Talk (2002-2006)
4
Jun 10, 2020 04:53 AM
ECSTuning
Vendor Announcements
0
Aug 12, 2015 01:24 PM
ECSTuning
Accessory Products
0
Aug 11, 2015 12:19 PM
ECSTuning
Vendor Classifieds
0
Aug 11, 2015 12:18 PM