
Brakes for Fiona...


Thread Starter
|
6th Gear
Joined: Jun 2006
Posts: 5,692
Likes: 2
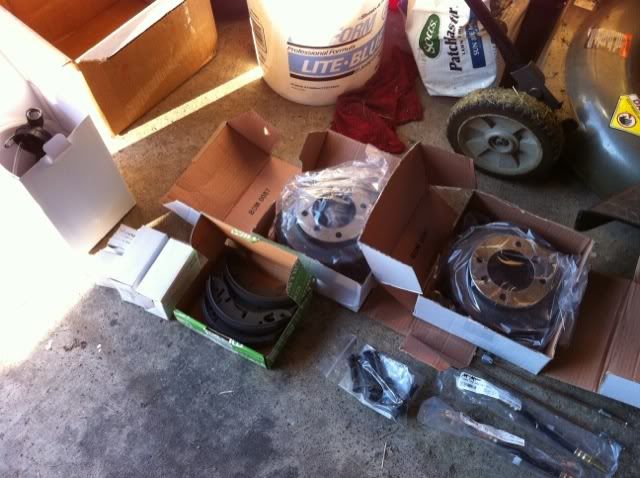
Began the brake job this morning and already hit some obstacles.
Snag #1 - I'm trying to replace the rear brake adjuster, but the threaded adjuster post thing cannot be removed out the rear of the back plate, as there is a metal band which has a hole that's smaller diameter than the threads of the adjuster post. Looks like it's supposed to come out the FRONT of the backing plate (the side facing the brake shoes), but the same band that's keeping the adjuster from going out the back is also keeping me from reaching the square nut on the end of the post. Hrm...
On that same note....who the ^%$#@! decided to make that thing SQUARE instead of nut-shaped. Grrrrr....
Snag #2 - There's supposed to be *two* screws holding the rear brake drums to wheel assembly, but I only have 1 per side. I figured that someone got lazy and only installed 1/2 the screws, but, no, the plate they screw into only has *one* threaded receptacle hole. WTF??? I can see that the screws only serve to keep the drum tight against the back plate and that the wheel studs make it turn, but the extra hole in the drum is, I'm sure, letting moisture into the drum. Maybe I should seal them with silicone because of the heat?
Can anyone offer any wisdom?
PS - the line wrenches are working GREAT - thanks for that tip!
Thread Starter
|
6th Gear
Joined: Jun 2006
Posts: 5,692
Likes: 2
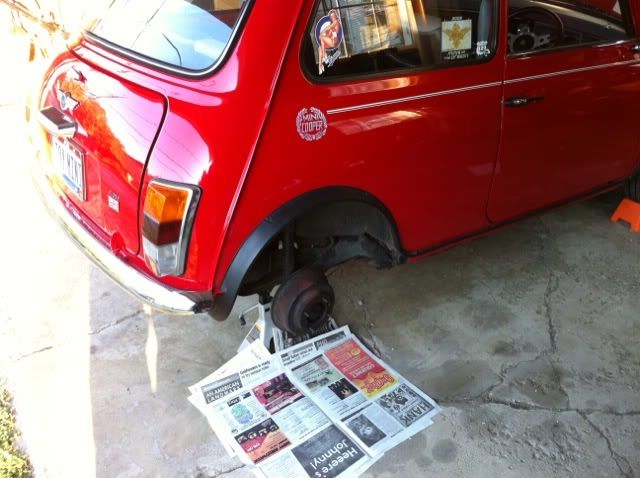
Well the retaining strap is flexible so I just bent it out of the way - they definitely come out towards the brake shoe side and not the other way.
Got one adjuster out but the other lil f**ker's rusted in place and won't turn. And since it's partway adjusted in, with the new, thicker shoes in place now I can't get the drum on. *&^%$#@!
Gonna try the blowtorch method and a ton of penetrating catalyst. I don't suppose anyone near Columbus, OH has a square brake adjuster wrench?

Back from the tool box. I thought I still had them, but sorry to report that all of my special Brit tools were given to my friend Bill to use on his Austin Healey.
Heat is good, keep it away from anything rubber, like wheel cylinders. A good pair of vise grips may help you. As a long time suffer of old Brit cars I'll tell you it will most likely break. I think the perfect fix is to buy a new adjuster, but you know that already.
Heat is good, keep it away from anything rubber, like wheel cylinders. A good pair of vise grips may help you. As a long time suffer of old Brit cars I'll tell you it will most likely break. I think the perfect fix is to buy a new adjuster, but you know that already.
Thread Starter
|
6th Gear
Joined: Jun 2006
Posts: 5,692
Likes: 2
Score after today:
Mini: 1
Matt: 0
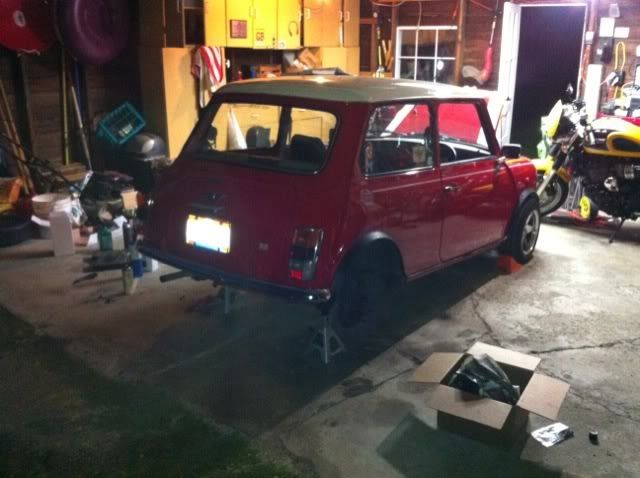
The day begins... So much potential...
Look how CLEAN everything is! (That won't last long...)
Got one side done, but the other side's brake adjuster was completely frozen into the backing plate. How frozen you say? Well, even after heating and multiple rounds of penetrating oil, here's what it did to my wrench:
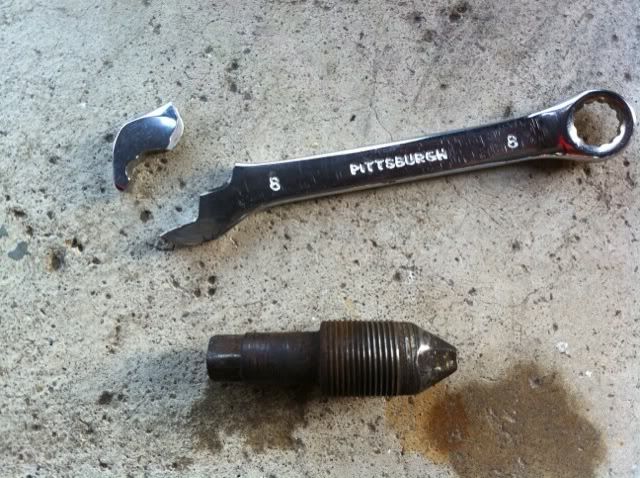
(NOTE: old, non-frozen adjuster from the other side shown for comparison - I'd like to find the person who designed this and introduce him to my friends Mr. Rubber Hose and Ms. Bicycle Chain... Grrr....)
As the sun sets, I slink back to the house, defeated. I'll let the penetrating oil sit overnight, just in case. (Sigh)...
PS - Chuck - I have a new adjuster screw and wedges, but I can't get the old *&^%$#@ one out. At this rate, I may need an entire new backing plate. GAHHHHH!!!
Mini: 1
Matt: 0
The day begins... So much potential...
Look how CLEAN everything is! (That won't last long...)
Got one side done, but the other side's brake adjuster was completely frozen into the backing plate. How frozen you say? Well, even after heating and multiple rounds of penetrating oil, here's what it did to my wrench:
(NOTE: old, non-frozen adjuster from the other side shown for comparison - I'd like to find the person who designed this and introduce him to my friends Mr. Rubber Hose and Ms. Bicycle Chain... Grrr....)
As the sun sets, I slink back to the house, defeated. I'll let the penetrating oil sit overnight, just in case. (Sigh)...
PS - Chuck - I have a new adjuster screw and wedges, but I can't get the old *&^%$#@ one out. At this rate, I may need an entire new backing plate. GAHHHHH!!!


Welcome to the world of Brit cars...
One day you will look back on this & laugh.
If you have room take an angle grinder & have at it. Nice Harbor Freight wrench there. As my friend Eric used to say "cheap & worth every penny".
Keep at it Matt you will succeed.
If you have room take an angle grinder & have at it. Nice Harbor Freight wrench there. As my friend Eric used to say "cheap & worth every penny".
Keep at it Matt you will succeed.
Thread Starter
|
6th Gear
Joined: Jun 2006
Posts: 5,692
Likes: 2
Yeah, they've been great wrenches until I encountered the Demon Bolt From Hell. My better wrenches aren't snapping like that, but the damn bolt's so frozen it's literally *scoring the inside facets of the crescent wrench*, which is something I didn't even know could happen...
Would an 8-point socket work maybe? I dunno - the little beveled corners are pretty much shot by now, and IIRC the 8-points work on square nuts by trapping the corners. I also can't tell if I need a 5/16 or 7/16 square adjuster wrench - I know 1/4" is too small...
Would an 8-point socket work maybe? I dunno - the little beveled corners are pretty much shot by now, and IIRC the 8-points work on square nuts by trapping the corners. I also can't tell if I need a 5/16 or 7/16 square adjuster wrench - I know 1/4" is too small...
Thread Starter
|
6th Gear
Joined: Jun 2006
Posts: 5,692
Likes: 2
Nope - since the beveled corners are gone there's not enough to get the vice grips seated - they just slide. I get best torque from either a 5/16 or 8MM crescent, seated against the remaining flat facets, but the 8MM cracked in half from the torque and my good 5/16 is now scored on the inside of the crescent jaws from the fastener. I heated it 3 or 4 times then sprayed the Blaster on it as it was cooling, as I've heard that can help "wick" the catalyst into the threads, but so far no joy. It's really, really in there...
Worst case I can tow it to Riverside and have the pros try it and/or install me a new back plate I suppose... I can't even *find* removal instructions for the back plate in the Haynes book. Grrrr...
Worst case I can tow it to Riverside and have the pros try it and/or install me a new back plate I suppose... I can't even *find* removal instructions for the back plate in the Haynes book. Grrrr...
Thread Starter
|
6th Gear
Joined: Jun 2006
Posts: 5,692
Likes: 2
Will do - thanks!
Hey, Chuck - Do you know what size square adjuster wrench fits on that fastener? I bought a 1/4" -7/16" square adjuster wrench on FleaBay, but I fear the 1/4" is too small and the other end will be too big. A 5/16 crescent or an 8MM fits on the flat facets pretty snugly.
Hey, Chuck - Do you know what size square adjuster wrench fits on that fastener? I bought a 1/4" -7/16" square adjuster wrench on FleaBay, but I fear the 1/4" is too small and the other end will be too big. A 5/16 crescent or an 8MM fits on the flat facets pretty snugly.

6th Gear

Joined: May 2007
Posts: 3,790
Likes: 10
From: Kansas City
So you need a 5/16" square socket, see if you can get a black 'hardened" one. You also might try smacking it pretty good on the end with a hammer to help break it loose, but don't bell the end out or you won't be able to get the socket on. Also, try tightening it a bit, before trying to go the other way.....
Removing the backing plate is not hard, first you have to remove the hub. Take the center cap off, remove the cotter and adjusting nut and pull it off. Then there should be 3 or 4 bolts holding the backing plate on IIRC.
Be sure and lube all the parts of the adjuster with a light coating of grease when you put it back together.
Here's what it looks like with the hub removed....
Thread Starter
|
6th Gear
Joined: Jun 2006
Posts: 5,692
Likes: 2
Success!!! Managed to wiggle the adjuster back and forth till it broke free and managed to get it out. The vacuum bleeder worked a charm and the brakes are now rock solid. Went out with Amy for a nice drive and evening with friends - awesome. Thanks again for everyone who asserts with this!!
4th Gear
Joined: Feb 2008
Posts: 515
Likes: 0
From: Akron Ohio
Hell, even the motorized tools I've bought from them held up fine, let alone simple things with no moving parts like wrenches. It's not like I do this for a living and need a tool that will be used on a daily basis. Doesn't help that I've broken my fair share of (much pricier) Craftsman tools, and were then told that the lifetime guarantee didn't apply to them... 
I have the local manager trained the last three times I asked for him he saw me and said "Just give him what he wants" and walked away


Thread
Thread Starter
Forum
Replies
Last Post
Tinklespout
R50/R53 :: Hatch Talk (2002-2006)
16
Sep 6, 2015 11:39 AM
PelicanParts.com
Tires, Wheels & Brakes
0
Sep 3, 2015 03:22 PM