
Interior/Exterior Door Mod: LED Puddle Lights and Map Compartment Light


5th Gear
Joined: Oct 2004
Posts: 835
Likes: 1
From: Manassas, Virginia
I believe he also used the power from the OEM puddle light for the map light. This is going to be my spring project when time comes around. I have an 02 and no OEM puddle light but plan on routing through the door along with the door lock and window wires, etc. IF it's easily accessible from the inside near the foot-wells and then will route the wires to the foot-wells. I'll be taking a look at this tomorrow to see if its possible before making my purchase so I'll post what I find out.

Thread Starter
|
6th Gear
Joined: Jun 2006
Posts: 5,692
Likes: 2
Since you don't have lights i the door as an OEM option, how *I* would do it if I were in your shoes would be:
1. Tap into the wires driving the OEM FOOT WELL lights (above your feet, under the dash)
2. Identify the wiring loom running to the door - it should be a cluster of wires wrapped in tape or other covering material.
3. Either push the wires through that bundle (if you have room and it's not wrapped with friction tape) or zip-tie the wires to the BACK of that wiring loom with black zip ties.
4. Once the wires are in the door, you're all set, and the power will still be driven by the dimming cabin light circuit. As I said, since LEDs draw so little current, you can run LED strips as well as the LED in the door all on the single circuit.
PM me if something above didn't make sense - it's early here and I haven't had my coffee yet.


5th Gear
Joined: Oct 2004
Posts: 835
Likes: 1
From: Manassas, Virginia
Looks good!
And in order to do the puddle lights its necessary to drill(In Pre 05 where there is no OEM Puddle Light). Where the wires run into the cabin they connect to like a plug or something which you would have to drill to run the wires through. Do a search here on NAM and you'll see what I'm talking about. I'm going to try and find a way around it. I'll keep ya posted!
EDIT:
Talking about MINIs without OEM Puddle Light
3rd Gear
Joined: Aug 2005
Posts: 204
Likes: 0
From: Pulaski, TN
Sorry for the shaky pics, but I was too lazy to run get the tripod.
Blue LEDS in the footwell and puddle light and 2 more in the door pocket.
To the eye the color is a lot less bright than the pics show. I really like the way it turned out. The colors are compliment each other without being too crazy. The orange matches up with the factory lights perfectly. With the hard top I've got plenty of light in the cabin and the way they dim with the rest of the lights is just too cool.
ImagoX - you're right the blue LEDs are not crazy bright. I think the main reason is the way the mount. They are pointing sideways instead of straight down. If they were pointing straight down I think they would be much brighter. The LEDs are somewhat directional.
3rd Gear
Joined: Aug 2005
Posts: 204
Likes: 0
From: Pulaski, TN
Rain no, carwash yes. The blue are just 194 Matrix LEDs from www.autolumination.com that swap with the factory bulbs. The orange is 2 (per door) of the superflux prewired LEDs from www.oznium.com. With my install there should be no more water issue than a stock setup. I removed the door panels and drilled the holes for the 2 door pocket leds. They are silicone glued in and should be water tight.
 ImagoX shoud be getting commission!
ImagoX shoud be getting commission!
Thread Starter
|
6th Gear
Joined: Jun 2006
Posts: 5,692
Likes: 2
It's rained several times on my "full" install of the cans and sealed LEDs and there are no problems. Like I said before - the OEM door sill light is simply a plastic lens clipped into a square hole, whereas my can LEDs are sealed with silicone on all axis, and should be, if anyhting, MORE moisture resistant than the OEM lens. You should have no moisture issues from the map pocket LED unless you spill someting directly into the door pocket - either way, more silicone makes for an excellent adhesive for that LED, so that should seal it out as well.
5th Gear


Joined: Nov 2004
Posts: 1,044
Likes: 19
From: Bedford, TX.
I did some testing last night and in my option the map compartment light idea looks better if the LED is facing down into the pocket instead of up through it, i think im going to find a way to run it up along the edge of the pocket opening so it faces down.
5th Gear
Joined: Oct 2004
Posts: 835
Likes: 1
From: Manassas, Virginia
I wish I had the OEM Puddle Light.... Running wires in the later models is a pain. I still can't figure out how to get the rubber tube away from the door hinge where it is bolted. (Yes I removed the bolt but its still tight on the other side.)
Rubber Tube:

This is as far as I can get it...
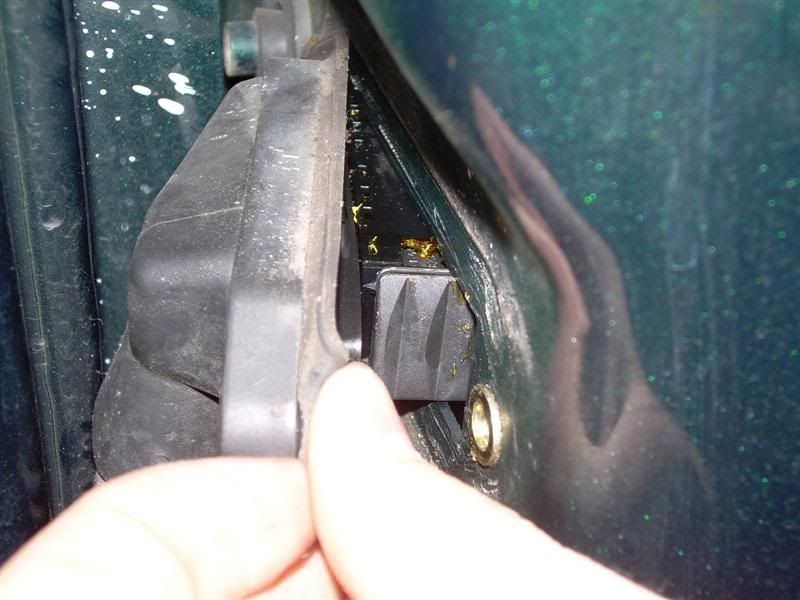
Anyone able to help me here?? Do I need to just put more muscle behind it?
By the way its an '02 MC
Thanks in advance!
Rubber Tube:
This is as far as I can get it...
Anyone able to help me here?? Do I need to just put more muscle behind it?
By the way its an '02 MC
Thanks in advance!

5th Gear
Joined: Oct 2005
Posts: 942
Likes: 4
My latest puddle lights
Thanks to ImagoX, who told me the trick to getting the door panel off, I was able to finish my puddle light project. I mounted a strip of 24 LEDs (oxnium's flex LEDs) inside the door panel. I drilled 24 1/4 inch holes and mounted the lights flush. Very easy job once I got the secret release figured out (thanks again to ImagoX).
Here is the bug's eye view of the bottom of the door.

This view looks very close to reality. (adjusted in Photoshop to look real)

YD
Here is the bug's eye view of the bottom of the door.
This view looks very close to reality. (adjusted in Photoshop to look real)
YD

LED Puddle Lights
Thanks to ImagoX, who told me the trick to getting the door panel off, I was able to finish my puddle light project. I mounted a strip of 24 LEDs (oxnium's flex LEDs) inside the door panel. I drilled 24 1/4 inch holes and mounted the lights flush. Very easy job once I got the secret release figured out (thanks again to ImagoX).
Here is the bug's eye view of the bottom of the door.
This view looks very close to reality. (adjusted in Photoshop to look real)
YD
Here is the bug's eye view of the bottom of the door.
This view looks very close to reality. (adjusted in Photoshop to look real)
YD
I plan to do the same mod but with one Oznium's SuperFlux 4Chip LED's. What trick is there to removing the door panels - can you share? I'm new to NAM and wasn't sure if it would be OK to just send you a PM since thread was back on 12/15

5th Gear
Joined: Oct 2005
Posts: 942
Likes: 4
If'n you want I will post a series of pics, or more easily on long pic with beginning to end pics of what I did. I have not looked at the lights you plan to use (physical size or wiring). Maybe I need to do that first.
The wiring for the 24 LED strip from oxnium is the most basic simple 12 vdc connection there is... other than laying a wrench across your battery terminals... hehe, that is easier.. and I have done it. All you do is connect the two wires from the lights to the two wires going to the stock light. If it doesn't work, you have the wires backwards. Reverse the wires and you will be in business.
I'll start working on the big long pic and post it asap.
YD