
Interior/Exterior Door Access Question: Dissasembly?


Thread Starter
|
6th Gear
Joined: Jun 2006
Posts: 5,692
Likes: 2
Door Access Question: Dissasembly?
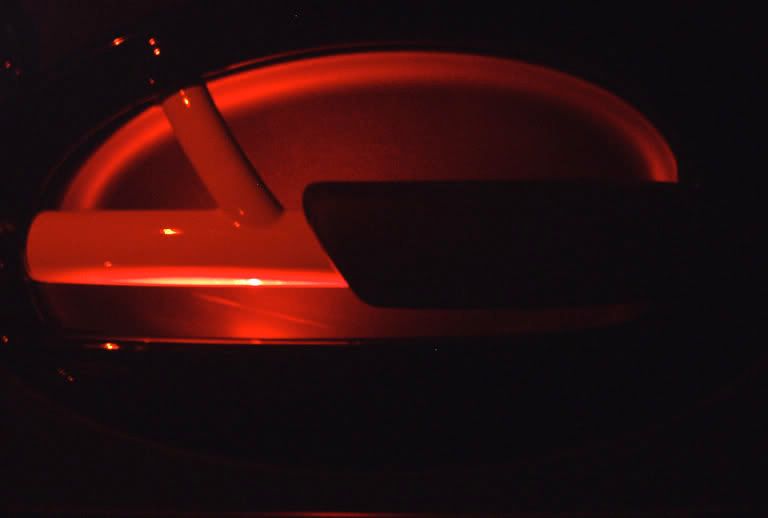
I have an idea for something, but I need to gain access to the inside of the door assembly, specifically to the area at the bottom of the plastic interior panel (where the OEM downwards-facing door light is installed). Before I start unscrewing things, does anyone have a link to a How-to or write-up that details disassembling the interior of the door? I don't want to accidentally FUBAR my windows or something...
Thanks!
Thanks!

Thread Starter
|
6th Gear
Joined: Jun 2006
Posts: 5,692
Likes: 2
Hmmm... I THINK that's what I need... It's hard to tell though. I wish they'd shown a dissassembled picture. I need to get inside the LOWER section of the "oval" surrounding the grab handle. Thanks!
imagox- remove the torx screws (one hidden under the reflector)
grab the map holder area, gently give it a tug... then grab the top
part of the door panel and pull towards you (not up). should come
right off. btw, put a piece of masking tape over the handle/tweeter
circles as it will fall off when you give the initial tug.
grab the map holder area, gently give it a tug... then grab the top
part of the door panel and pull towards you (not up). should come
right off. btw, put a piece of masking tape over the handle/tweeter
circles as it will fall off when you give the initial tug.
Thread Starter
|
6th Gear
Joined: Jun 2006
Posts: 5,692
Likes: 2

Kenchan, when removing the torx screws, do I have to pull off the padded arm rest peice as well, like in the linked How-to? I have two holes in the grab handle, plus there's a third screw behind the reflector... Is there a fourth that needs to be removed?
When I have the screws out, will just the oval map holder peice pop off, or will the entire door panel, black part and all, also come off?
Thanks so much, guys! Sorry to ask so many questions, but every time I try something like this it seems like I get 75% dissassembled before being faced with some sort of clip or fastener that I can't puzzle out and I have to reassemble, ask again and stasrt from scratch.

Trending Topics
imagox- no the pad can stay. the oval is molded onto the rest of the
door. it's one piece. check to see if there was another torx hidden
by the chrome door handle. Ive done several different cars (stereo install)
since working on the MCS, i forgot where all the screws were.
door. it's one piece. check to see if there was another torx hidden
by the chrome door handle. Ive done several different cars (stereo install)
since working on the MCS, i forgot where all the screws were.
Thread Starter
|
6th Gear
Joined: Jun 2006
Posts: 5,692
Likes: 2
Jerjer, all LEDs can be softened in the way you describe by filing down the round "lens" at their tip - this will produce a much more diffuse and "soft" illumination. All an LED is is a diode encased in solid, clear plastic (you can see the wires and the diode inside when you look at it), so all you really have to do is file down the rounded tip to get the effect you're looking for.
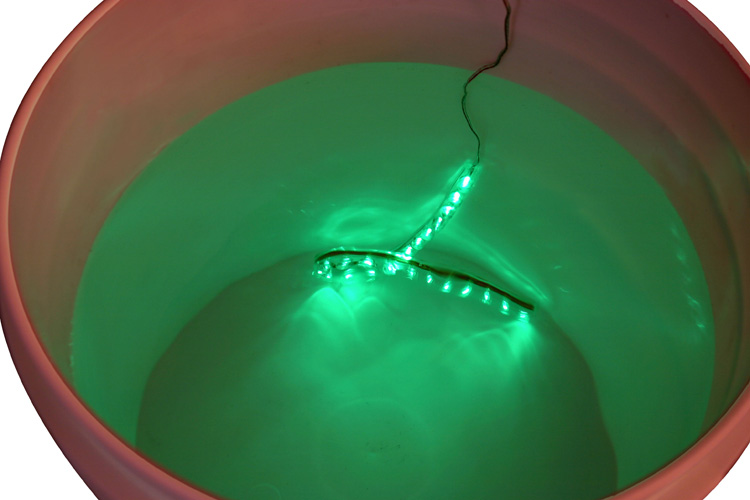
If you're looking for something REALLY bright and diffuse, try THIS:
This is a strip of 3MM ultra-bright LEDs in a sealed silicone strip. They're already wired with resistors - just hook them to any 12v. power source and you're good to go. The tuner/underbody lighting crowd use these for illuminating engine bays or wheel wells, since they're totally moisture proof (below is a pic of one lit in a bucket of water), so they'd be great inside the map compartment...
imagox- np! good luck with your illumination mod.
ive yet to try that file the top of the LED lens trick. i wired up
illumination LED's on my civic (just used generic LED's from radioshack
with high candella (sp?) ) for the center console and passenger foot
area. i aimed the focal point so that i didn't shine like a flash light but
that filing trick would probably make it even better.

Coordinator :: Nashville�Middle Tennessee MINI Club
Joined: Aug 2003
Posts: 500
Likes: 0
The arm rest pad does need to come off on the newer models because there is one more bolt hidden behind it. To remove the pad, (first put tape on the plastic part up next to the pad), then stick a skinny screw driver long ways behind the pad to push a tab in. This releases the pad, you then slid the pad toward the front of the car.
Thread Starter
|
6th Gear
Joined: Jun 2006
Posts: 5,692
Likes: 2
imagox- np! good luck with your illumination mod.
ive yet to try that file the top of the LED lens trick. i wired up
illumination LED's on my civic (just used generic LED's from radioshack
with high candella (sp?) ) for the center console and passenger foot
area. i aimed the focal point so that i didn't shine like a flash light but
that filing trick would probably make it even better.
ive yet to try that file the top of the LED lens trick. i wired up
illumination LED's on my civic (just used generic LED's from radioshack
with high candella (sp?) ) for the center console and passenger foot
area. i aimed the focal point so that i didn't shine like a flash light but
that filing trick would probably make it even better.
Simply flattening it should do the trick. Or, you can always sand the lens with fine grain wood sandpaper if you want to retain the rounded upper surface of the lens for some reason...
Thread Starter
|
6th Gear
Joined: Jun 2006
Posts: 5,692
Likes: 2
I still haven't looked inside the door yet to see if I have the room, but I did go to the hobby store last night and found some 5/16" brass tubing that will make PERFECT "cans" for the LEDs. My Dremel made short work of the tubing. I'll probably crack open the door either this afternoon (if I can get a bit of time from work) or possibly this weekend.
If there's room for the brass tubes, then the install willl be childishly simple I think. the big "if" is the room inside the door. To get the proper focus on the LED glow that I want to acheive, the "cans" will have to be about 1 1/2" long with a bit of additional clearance for the wires and resistors, so say 2". Has anyone that's been inside there seen how much space is in there from any hardware (power window motors, the lowered window glass, etc.)?
I'll probably crack open the door either this afternoon (if I can get a bit of time from work) or possibly this weekend.If there's room for the brass tubes, then the install willl be childishly simple I think. the big "if" is the room inside the door. To get the proper focus on the LED glow that I want to acheive, the "cans" will have to be about 1 1/2" long with a bit of additional clearance for the wires and resistors, so say 2". Has anyone that's been inside there seen how much space is in there from any hardware (power window motors, the lowered window glass, etc.)?
Thread Starter
|
6th Gear
Joined: Jun 2006
Posts: 5,692
Likes: 2
LEDs can handle the dimming effect built intio the cabin lighting, and I'll not want the extra illumination form the OEM lights anyway. 4 or 5 LEDs per door will draw less power than the existing halogen bulb, so there will be no need to worry about the existing fuses.
Thread Starter
|
6th Gear
Joined: Jun 2006
Posts: 5,692
Likes: 2
Nah - they'll be facing DOWN and will shine on the street when the door is open so they only need to come on when the cabin lighting comes on. That said, I MAY add some additional LEDs inside the map compartment, but even if I do I'd still wire them to come on with the rest of the cabin lighting.
Thread Starter
|
6th Gear
Joined: Jun 2006
Posts: 5,692
Likes: 2
Hmmm... I got all the screws out but I can't figure how to seperate the panel from the door. I tried lifting up then prying from the top of the panel. but it's not budging. I don't want to pry at such a visible area with a screwdriver or anything, nor break any retaining clips or whatnot. What's the secret?
Thanks!
Thanks!
pull harder, you wimp. 

you can fit one of these too at the bottom where the panel
has a little slot, but make sure you tape the tool with masking tape
or you will scratch the paint.
this is why i just tug on the map holder area to pop off the few
tabs enough to get my finger between the door and panel.

you can fit one of these too at the bottom where the panel
has a little slot, but make sure you tape the tool with masking tape
or you will scratch the paint.
this is why i just tug on the map holder area to pop off the few
tabs enough to get my finger between the door and panel.