
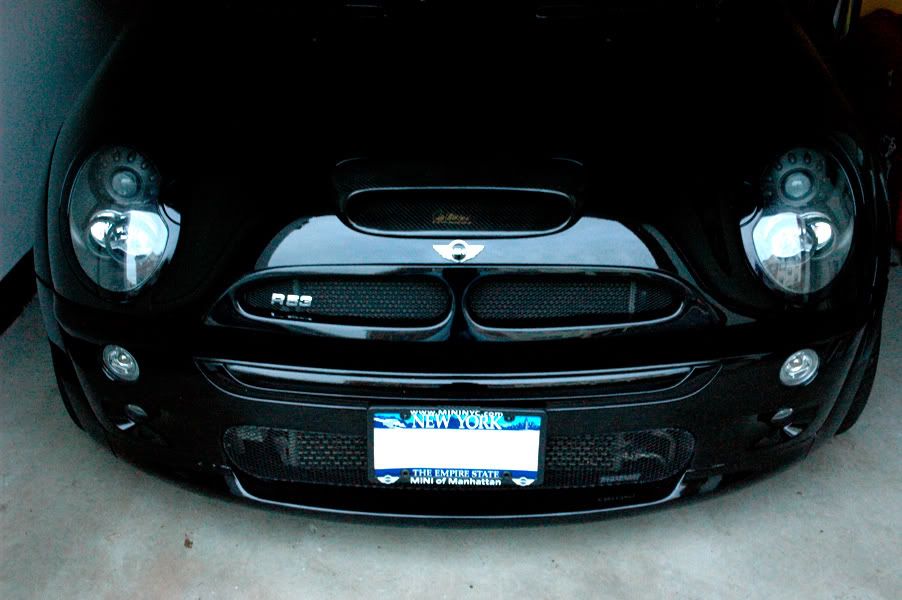
Interior/Exterior Joey Mod!!! (pepper white) I love it..


4th Gear
Joined: Jan 2007
Posts: 371
Likes: 0
From: northern VA
i think it looked great but i would still do blacked out lights ...the pepper white match shows the gaps within the headlight housing too much . it almost accentuates the black housing ....the balcked out joey mods hide this though....either way great job ...and the rings well youre going to have to completely strip or find the best primer in the world to have paint stick well on the chrome....i heard muriatic acid ( sp ) if soaked in the acid it peels off the chrome ....i went a different route though and i tried to sand the living shiiiii out of the rings ...ended up ruing them and coming to terms with the chrome ...


Get the rings wrapped in vinyl, they'll resist chips better that way. By the way, I'm loving the pepper white, that looks great! I agree though, it needs black headlight rings.
Joined: Feb 2007
Posts: 1,146
Likes: 0
From: Severna Park, MD
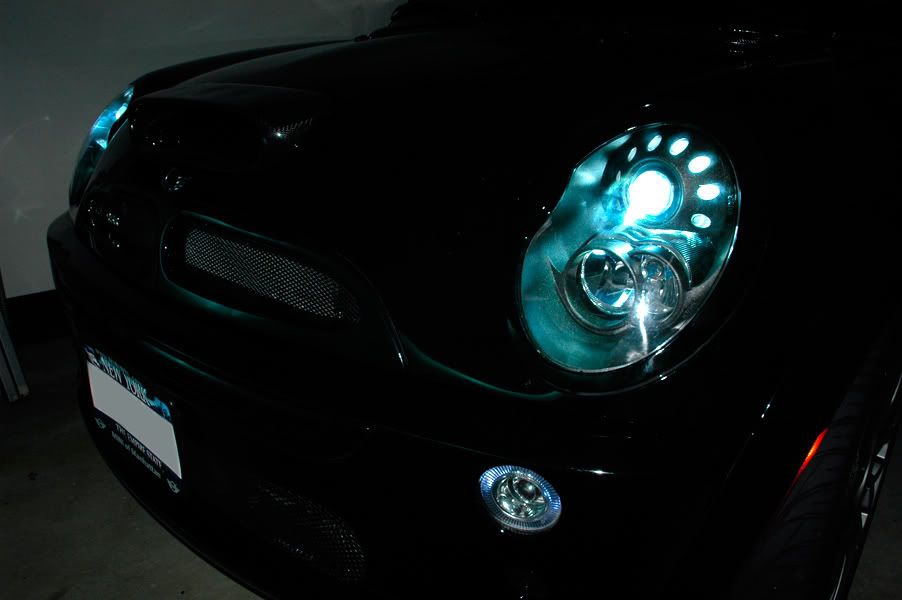
yeah. once i get time i'll probably be wrapping them in black vinyl. after stripping the paint. or maybe even painting them black. it all depends.
more pics to come once i get time to do them.
(been busy at work recently. has it's ups and downs)
more pics to come once i get time to do them.
(been busy at work recently. has it's ups and downs)

5th Gear
Joined: Mar 2007
Posts: 678
Likes: 5
 )
)Hey Minjae,
So I to am in the process of modding my Xenon's, they are off the car and sitting in my trunk right now.
I am wondering though, I to bought a can of Jet Black from minispeed a while back when I ordered the Orciari's Cowl Scoops from them, I still have some left and was planning to use that.
Question though, did you sand down the painted parts and prime them, if so what type of primer? and did you use a clear coat at the end?
I was looking into engine paint that can withstand heat since I am wondering about the wear over time from the Xenon's heat.
I would like to paint the insides a black with slight silver speckling or a mat black and the rings the standard jet black with a clear coat and clear vinyl to prevent chipping.
Any outside thoughts on the choice of colors..
The Pepper White looks Tight!!


I really like the look but that mod is beyond my skill level ! LOL ! For me I went with Lgaston's vinyl rap in a satin black vinyl for my head light rings. It works very well for me in my quest for my black and white theme. I only have the side repeaters and door handles to go and I will be done.


Sweet , I was just looking at my HID's last night wondering what to paint, think I'm gonna do just the insides of mine, the light loss was my main concern. So you don't notice a difference in the light? Never had Xenons until the MINI & I likee!
, I was just looking at my HID's last night wondering what to paint, think I'm gonna do just the insides of mine, the light loss was my main concern. So you don't notice a difference in the light? Never had Xenons until the MINI & I likee!
5th Gear
Joined: Mar 2007
Posts: 678
Likes: 5
Modd has begun..
My lights are in my trunk right now.
I'll be working on them this weekend...Can't wait
I'm planning on match painting the rings, and painting the inside a black with slight silver speckling. Think it will look good!
Will report back soon, with some pictures along the way!
I'll be working on them this weekend...Can't wait
I'm planning on match painting the rings, and painting the inside a black with slight silver speckling. Think it will look good!
Will report back soon, with some pictures along the way!
Joined: Feb 2007
Posts: 1,146
Likes: 0
From: Severna Park, MD
wow..so sorry about late response. didnt realize people still commented on my thread.
and was gone from the forums for a good long while. only checked the sale forums..(gotta buy myself something for christmas..xD )
if it's not too late midnitecoop..
i didnt sand. i just sprayed and put it on. but later on. i'll probably be opening it up again and taking off the paint, sanding it, prime it and repaint it. it'll come out REAL nice. but painting right on top wont do much harm. it'll still come out good.
but to cushin14..
there's really no light loss. i kind of like how the light shines on the painted part. you notice it more at night that i painted it. well kind of.
but to midnitecoop again. post some pics!
and thanks for the comments guys. i still love the way they look
(oh and i painted the rings black..i DO have pictures. if anyone is interested ill post..but ill probably be strippin the paint and covering it with vinyl so i wont have to worry about it chipping)


Joined: Feb 2007
Posts: 1,146
Likes: 0
From: Severna Park, MD
same here. not much of a fan for chrome. anyone else got some joey mods that they did recently? it really is quite easy. not much to be scared of. just gota start it. once you do. it's pretty much downlhill from there.


Coordinator :: Eastern Iowa MINIs
Joined: Dec 2006
Posts: 5,520
Likes: 4
From: Decorah, IA
The tricky part is avoiding breaking off the small plastic mounting tabs during the process. The challenge is exacerbated by the little squares of double-stick tape holding the ring on to the headlight fixture.
The tabs at the top of the fixture are slightly smaller than those at the bottom. Using a few small, flat-bladed screwdrivers, you can wedge them one at a time between the ring and the fixture to break the spots of tape free. Leave the screwdriver wedged in the gap and use another one to separate the adjacent spot of tape. Once you have top of the ring slightly worked free from the fixture, you can gently pry the small tabs and they should pop off. Once 3 or 4 of the little ones on top are free, the larger ones on the bottom come right off very easily.
Took me 10-15 minutes to get the first one off because I didn't have this technique down yet and I was being extra careful not to break any tabs. I was able to remove the second ring in about 3 minutes.
Wish I would have taken pics...
Last edited by Gil-galad; Jan 6, 2008 at 07:08 PM.


5th Gear
Joined: May 2006
Posts: 646
Likes: 1
From: Illadelphia
I didn't use an oven, first tried heating up the glue with a heat gun where it was sticking out a bit and the heat hardly made it any softer. So I went the other route & used a Dremel tool to get them open.

The tricky part is avoiding breaking off the small plastic mounting tabs during the process. The challenge is exacerbated by the little squares of double-stick tape holding the ring on to the headlight fixture.
The tabs at the top of the fixture are slightly smaller than those at the bottom. Using a few small, flat-bladed screwdrivers, you can wedge them one at a time between the ring and the fixture to break the spots of tape free. Leave the screwdriver wedged in the gap and use another one to separate the adjacent spot of tape. Once you have top of the ring slightly worked free from the fixture, you can gently pry the small tabs and they should pop off. Once 3 or 4 of the little ones on top are free, the larger ones on the bottom come right off very easily.
Took me 10-15 minutes to get the first one off because I didn't have this technique down yet and I was being extra careful not to break any tabs. I was able to remove the second ring in about 3 minutes.
Wish I would have taken pics...
The tabs at the top of the fixture are slightly smaller than those at the bottom. Using a few small, flat-bladed screwdrivers, you can wedge them one at a time between the ring and the fixture to break the spots of tape free. Leave the screwdriver wedged in the gap and use another one to separate the adjacent spot of tape. Once you have top of the ring slightly worked free from the fixture, you can gently pry the small tabs and they should pop off. Once 3 or 4 of the little ones on top are free, the larger ones on the bottom come right off very easily.
Took me 10-15 minutes to get the first one off because I didn't have this technique down yet and I was being extra careful not to break any tabs. I was able to remove the second ring in about 3 minutes.
Wish I would have taken pics...