When you click on links to various merchants on this site and make a purchase, this can result in this site earning a commission. Affiliate programs and affiliations include, but are not limited to, the eBay Partner Network.
I've been reading through every forum and page I can find about this issue, and I can't seem to find any answers, so I figured I'd ask here.
I have a 2011 Countryman S All4, approx 103000 KM (60K Miles)
Recently, after sitting for a week in the cold weather, it refused to start. Had it towed into an indie shop that specializes in BMW. They replaced the spark plugs as they were fouled, and got the vehicle to start, but it was running rough and they said the HPFP was not giving the proper pressure and it needed to be replaced. They said the LPFP was functioning correctly. They quoted $3000 CAD, so I told them I would do it myself.
I ordered an aftermarket pump from eBay (Item # 332348290033) and went to install it today. Install was pretty straightforward, but since the vehicle was driven just the day before, I assumed the fuel lines would be pressurized, so I decided I would pull the fuse for the fuel pump and start the car so the lines should depressurize. Before I did this, I started the vehicle again for a few seconds just to verify it still starts fine. So I removed the fuse, tried to start the car, turned for a while and that was that.
I followed the instructions from several DIY's, replaced the pump, and reassembled everything.
I went to try to start the vehicle, and nothing. Just turns and turns and turns and won't start. Yes I reinstalled the fuel pump fuse that I had previously removed.
After searching around for any other causes, I figured my new pump might be a lemon, so I reinstalled the original HPFP to see if the vehicle would at least start and run like it was before. Nothing, just cranks and cranks but won't start.
So I reinstalled the new HPFP again just to be certain, and nothing.
Do you guys have any suggestions for what I could try next? Is it possible that the LPFP was also a problem but my Indy shop couldn't diagnose it before replacing the HPFP? Is there a simple way to verify that the LPFP is working correctly?
Thanks a lot for any help you can offer.
Alex
I forgot to mention, before attempting the HPFP replacement, I was getting a CEL and the code was P0172. Since replacing, I am still getting that code, but additionally am now getting Mini code P15DF. Hopefully that might help pinpoint the problem.
Last edited by zanderch; 02-16-2018 at 04:52 PM.
Reason: Forgot to post about error codes
The main part is included with other parts (not just the HPFP itself). KT or Kits are noted. The main part is the just the part number. One from MINI and one from a MINI supplier, and one from Peugeot (PSA) direct (MINI shared engine).
Over the last year or so the price has gone up from MINI and the suppliers. My bet is when it was first posted it was at a warranty replacement price as the comparable BMW engine HPFPs were way more than the PSA/MINI one, at that time.
FYI. The price of hpfp's have dropped recently. You can pick them up from a dealership for around $500. The one for a 2011 s is now $506 as opposed to over $850 from some online vendors. https://www.minipartsmass.com/parts/...&siteid=215989
First of all thanks so much Sandwlkr for the write up. Super rad of you to take the time to help out.
Just finished up 1st HPFP install and it was pretty uneventful. Took a little time with some stuck plugs and also I had a 3/8 inch torx set that made it a little more cumbersome.
For the weekend youtube mechanic.... make sure you swing by harbor freight to get the crows feet wrenches in metric and 1/4 inch torx set will make your life alot easier. Because of the tight space there's an increase chance to cross thread when putting it all back together.
Magnet to catch the bolts is a must also.
Sandwlkr mentioned this in his post as well.
Oh yeah and don't forget to plug the cam sensor back in until you hear a click LOL!
Last edited by thesilkiest; 03-23-2018 at 08:09 AM.
Replaced pump after it tested bad still not getting pressure
I took it to a shop they tested the fuel pump said the hpfp was bad. I replaced it and the car still is doing the same thing as before. Starts and shirts right off again. They are able to run the car off starter fluid. The intank fuel pump is supplying 10 bars but the hpfp is only putting out 10bars. Also the wires running to the hpfp do they just monitor pressure? Wondering if maybe they are apart of the kssis.
Just an update, we have these back in stock. The MINI ones come with a 2 year warranty but if you have an issue beyond that we will help you out. We also now have an OES version for the -8/2010 N14 and the 8/2010-3/2012 version. We also have the bosch version for the 3/2012+ version.
I'll keep the intro short and to the point. I'll give background in a follow-up post and get straight to business here.
Note: all safety is up to you to figure out and be responsible for. Metallica didn't write the lyric, "fuel, give me fire, give me ..." if fuel didn't give fire. So be careful.
Also Note: I did this on an engine that hadn't been turned on in a day or two. I recommend working on a cool engine.
Noteworthy: the Bentley book recommends steps that I personally thought were unnecessary and that involved lifting the car. I did not do it that way. I kept it as simple as possible and did none of the removal of the intake manifold or replacement of the fuel line.
Help Improve This "How To" Guide: If anyone would like to add polish to this tutorial for the benefit of future users, just post comments, and I'll update the post. I'm terrible at auto mechanics, and people deserve better than me making a tutorial by myself lol. This post will be updated based on user input. All updates will be marked in red.
Part: Fuel Pump - High Pressure
Mfg Part #13517588879 ECS Tuning - $199.07
They had it $55 cheaper than Pelican Parts. Shipped day after I ordered. Arrived 2 days after for 3 days turn-around on $14.12 shipping charge. Better than expected delivery time for sure!
"A failure to plan is a plan to fail." Here's the list of stuff you need, so that you don't have to make 2-3 trips to Lowe's or an auto parts store like I did midstream. If you have this stuff up-front, this should take a pro 20-40 minutes.
Screwdriver kit that includes several torx bits (I think T15, T20, T25 are good enough)
Ratchet
T30 Torx ratchet bit (will be 1/4 drive) - I picked up a set with several different bits at Lowe's for like $9.50
1/4 drive ratchet extender
A 10-100 ft lb torque wrench
12mm Crow foot socket bit (link to examplesthanks to nine5raptor!). I was able to pick up a set for ~$20 at my local auto store.
Crescent wrench
A small amount of transmission fluid (supposed to coat fuel line in it during installation)
A pin punch (I used 1/16", but you can substitute this for any narrow pointed object)
Rags or shop towels
Magnetic wand - so handy
Flashlight (if needed)
Something to put a few screws into
Eye protection for dealing with the fuel lines
Torque Reference
This data is per the Bentley maintenance manual
Note: I moved some hoses out of the way as best I could. You disconnect stuff as you think you need room to work.
Note: There is an object that seems to be in the way of accessing some of the screws. I have no idea what it is, but it's essentially a vertical plastic post that stands vertically in front of where the HPFP is.
In order to move this out of the way, You have to lift up (see pic) on the object. It has two "feet" posts that slide up and out of two holes below it. By lifting it up, it lest you flex the part out of the way.
During reassembly, all you have to do is make sure to realign these feet in order to get it to slide back down.
The Bentley book refers to both lines as the "fuel line," so I don't know exactly what's going on with that. I'll update this part if anyone has comments to specify here.
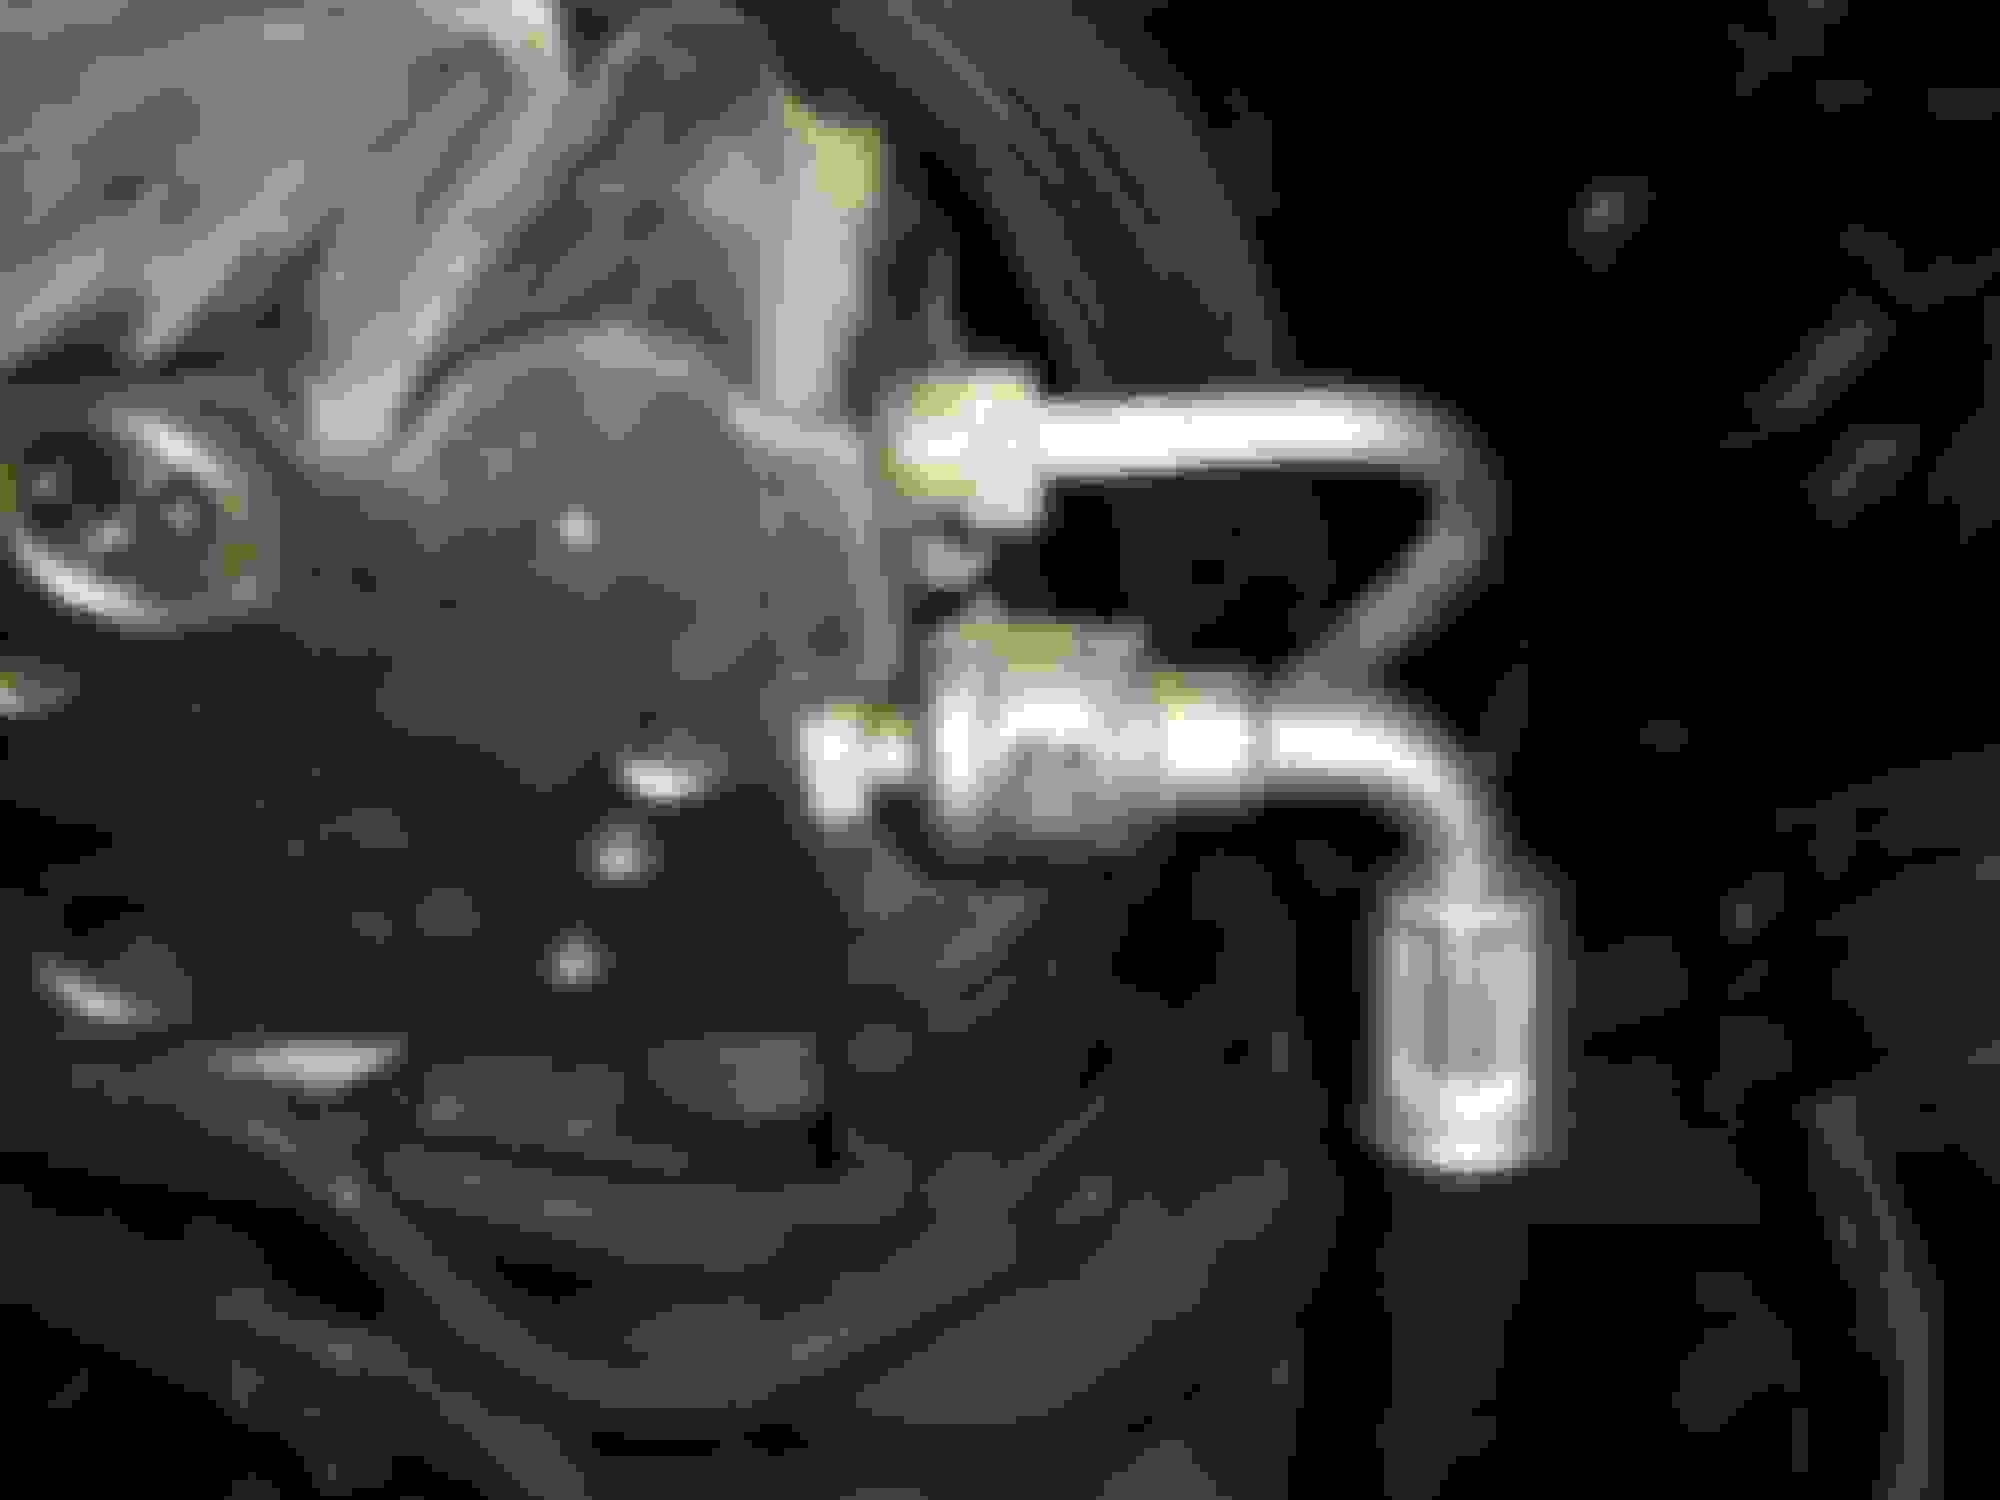
The right line has a special head on it that according to the book says it needs the "MINI special tool 13 0 250." I couldn't find that anywhere, so I figured it couldn't be too hard.
My "special tool" was a 1/16" punch, but you can probably use a ballpoint pen. There is a black pin on the passenger side of where the special part connects to the HPFP. The other side has something like that as well, but it doesn't depress. It's fixed in place, so don't worry about it.
To remove the line, you have to depress the left pin with the punch first. While keeping it depressed, pull the connector towards the HPFP, and then pull it off. You can't straight pull it to the rear without first pushing it forward.
It comes off very easily. There was a little fuel that came out, but I had a tray under the car to catch any spilled oil, and it didn't get a drop on it.
It's recommended to cover the lines to prevent contamination.
Note: ECS posted here a link to the actual special part. So not necessary IMO, but I added the link for a reference since they were so helpful to find it out.
So there's a narrow, metallic fuel line that runs into the HPFP to the left of the other line, and I used a crescent wrench to remove it.
This part is pretty straightforward.
Note: since I have no idea how to actually get a torque wrench around a nut that has a fuel line running through it, I tightened until it seemed pretty tight. I then referred back to a photo I took before removal to confirm it looked the same.
I recommend you do the same. This was pre-removal:
This takes a T30 torx ratchet bit (see picture below). I used the pictured 1/4" drive torx ratchet bit on a narrow 2" extender and a bit that allowed me to use this on a 3/8" ratchet in order to remove these screws.
They aren't easy to get to, so this 1/4" drive bit and extender were critical. I tried removing them with my torx screwdriver set, and I simply didn't have the leverage via grip strength to undo them.
Rotate the drive on your new HPFP to match the same angle as the one on your old part (my thumb on the above pic is touching the drive piece).
The drive is what connects to the groove on the intake camshaft. You won't be able to get the part in if it isn't aligned properly. You can eyeball it from the outside, but using the old part as a reference helped me quite a bit.
10 - Re-attach the fuel lines & electrical pre-installation
Note: the book says coat the fuel line in transmission fluid.
Don't worry about torque yet.
11 - Align the new HPFP drive against the engine
This is where the drive's position comes into play. If it isn't aligned with the groove on the intake camshaft, just play with it and it will work out.
12 - Hand tighten the screws back in place connecting the HPFP back into place.
13 - Torque it down
Get your torque wrench, and according to the book tighten the screws that attach to the engine to 8.1 ft-lbs. Refer to the torque data section for what the Bentley book provided. My wrench is a 10-100 ft lb. I went to 10 and stepped it down to 8.5.
14 - Torque the fuel line nut
The book says tighten stage 1, 2 and 3.
UPDATE: Thanks to nine5raptor who identified the tool I was lacking to properly torque the fuel line nut. I picked up a 3/8" drive metric Crow Foot set at my local auto parts store for under $20. The link nine5raptor provided is here to see what options Sears has. You need the 12mm wrench, but they basically all come as a part of a set.
Proper torque will not be possible without this tool. So get a kit.
See the torque section at the top of this for the proper torque settings according to the Bentley book.
15 - Re-assemble anything you changed around the HPFP to get access to it
For that annoying vertical black post right in front of the front two screws of the HPFP, just remember to make sure the two feet fit back into the grooves.
16 - Re-attach the air box
17 - Survey your work to make sure it's all done
18 - Re-attach the battery
19 - TEST START
I had trouble getting anything to happen for probably half a dozen starts.
I don't know for sure that this does the trick, but while the car was giving me trouble starting while the pump was bad, one thing that helped get it drivable was to go ahead and put it in gear and the second it starts up, go ahead and give it gas in reverse/1st gear.
This got it started perfectly for me.
Idle runs fine. I hooked up the OBD2 scanner, cleared my codes. No new error codes.
Took her for a test drive. She finally can generate mean torque again. So happy it's done!
20 - Retorque on warm engine (N14 engines)
// 1 - For the N14 engines (including mine), warm up the engine for 5 mins.
// 2 - Repeat step 1 - disconnect battery
// 3 - Repeat step 2 - remove air box in order to gain access to the fuel line nut.
// 4 - Re-apply the proper amount of torque (see torque section at beginning of this guide)
// 5 - Re-assemble the air box
// 6 - Reconnect the battery
// 7 - Start her up to make sure she works.
I have a question for you - amazing work with the article btw - Pelican Parts site is saying you have to replace both the Fuel Feed lines if they are ever removed - but your article doesn't mention anything about replacing either fuel line - did you have any problems reusing the same fuel lines? Thanks in advance! - PAUL
Interesting! Well, I have seen a lot of people with the N18 express that their HPFP has failed. As far as ratios go, I am unsure, but it would be very interesting to see. Maybe someone should start a thread here on NAM asking those with the N18 if they have dealt with HPFP failures.
68k on my N18 engine and I'm recently having cold hard start issues with stalling and stumbling during 1st start up. I'm dropping $1k for a known part that fails and MINI won't cover it but instead skyrockets the price. I handed this car down to my daughter and at first she didn't even want it but now she loves the damn thing.
For me it's a total love hate relationship, I love the uniqueness and the sporty fun factor of the Mini's but hate having to throw money at it when the Mini stealerships want to price gouge you for their crappy parts!!!!
We have the N18 parts listed above way below the $1K listed right above on post #165.
I wish I could take advantage of the huge saving but unfortunately your lowest price HPFP is on back order until September. I need one now and the others that are supposedly in stock starts at $770+ and up. Pull some strings?
Thats the ones we have and they have free shipping now. If your car is down, just call into our guys and they work on upgrading the shipping so you can get it quicker. Call in and Contact Michael Panning on the Sales side. The PSA ones will not be in till around end of September.
Hello, please can somebody confirm, that with N18 engine can work HPFP from PSA with OE number 9819938580 .I have cold start issues in my 2011 Mini Cooper S with N18 engine, with Engine error faults (on OBD it's HPFP error). Thanks a lot.
Hello, please can somebody confirm, that with N18 engine can work HPFP from PSA with OE number 9819938580 .I have cold start issues in my 2011 Mini Cooper S with N18 engine, with Engine error faults (on OBD it's HPFP error). Thanks a lot.
Yes it will work. I have it in my N18 MCS 2011 and it is great.
looks like the plastic tabs are broken on my fuel line connector so I can't get it off. can I swap that piece and leave the line connected? looks like its removable from the pump with a hex. I pushed like mad on the tabs, which I don't think are there for like an hour. didn't feel anything give. I think I have to either leave it connected and swap the parts, or I'll have to buy a new fuel line.
looks like the plastic tabs are broken on my fuel line connector so I can't get it off. can I swap that piece and leave the line connected? looks like its removable from the pump with a hex. I pushed like mad on the tabs, which I don't think are there for like an hour. didn't feel anything give. I think I have to either leave it connected and swap the parts, or I'll have to buy a new fuel line.
Follow that fuel line down the back the engine and under the car. There's a point where it meets a hard line that is far easier to disconnect than the union at the fuel pump.
Follow that fuel line down the back the engine and under the car. There's a point where it meets a hard line that is far easier to disconnect than the union at the fuel pump.
well I'm trying put in a new HPFP, so I need to get the fuel line off my broken HPFP. looks like the metal tube that the fuel line slides onto is removable from the pump, thats what I'm asking about. that seems like my only option unless I buy a new fuel line which I dont want to.
 02-16-2018, 04:46 PM