
How To HOW TO: Sunroof wind deflector R&R


Thread Starter
|
1st Gear
Joined: Mar 2012
Posts: 32
Likes: 0
From: Grafton, Ohio
HOW TO: Sunroof wind deflector R&R
When I bought my JCW about a month ago I noticed that the wind deflector for the sunroof had a slight tear so while at speed I touched the torn area and the damage spread quickly like it was unraveling. So I checked on this site and posted about the problem without much response and I couldn't find any info on how to replace the piece so I poked around a bit and found the replacement part at ECS tuning for $67 (MINI part #54102755850) and went about the mini project. Aside from about 15 minutes of time all you need is the replacement part and a flat head screwdriver or pocket knife.
Here is my damaged deflector.....

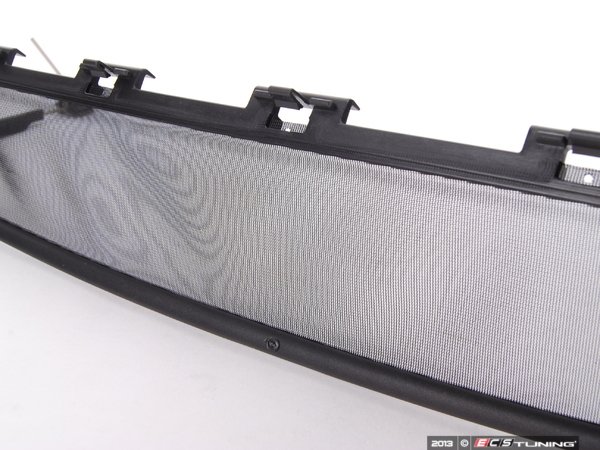
Here is a pic of the new one with a closeup of the front retaining clips....


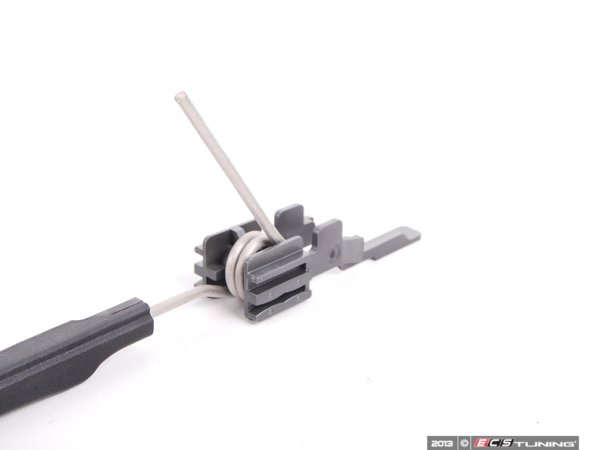
I opened my sunroof and the first thing I removed were the side spring clip thingies.....

I can barely reach in with my sausage fingers to pinch the clips in towards the spring to release them so I used a screwdriver/pocket knife to gently pry the clips inward (I was too lazy to look for my screwdriver at this point.....hence the knife in some shots)....


Once the clips are free slide the spring/clips towards the front of the car and this cutout in the aluminum rail.....

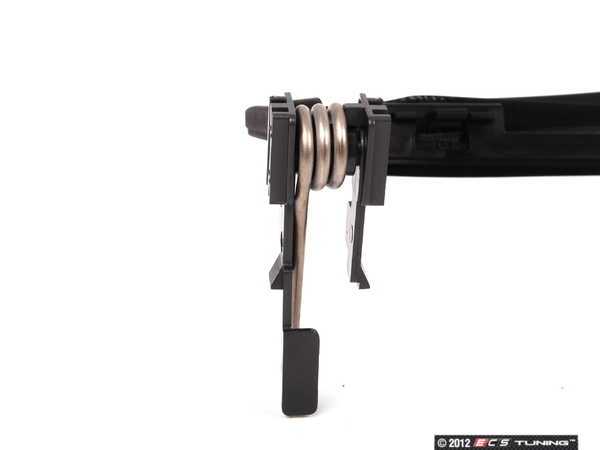
.....then tilt and lift the piece free.....

Just repeat for the other side....

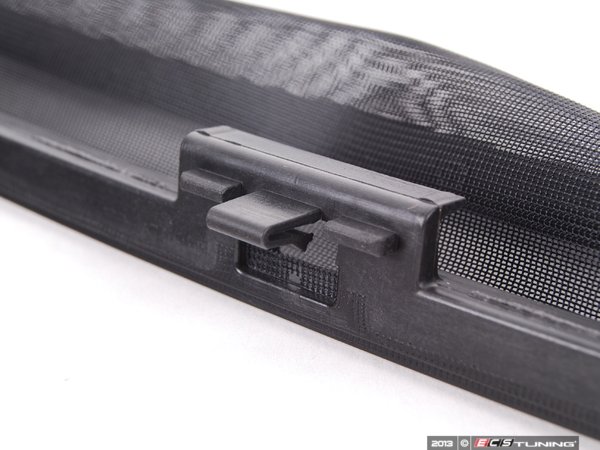
Where it's attached on the bottom/front edge you can see the plastic clips where they protrude through the front of the sunroof tray......

....just gently depress each one with the screwdriver/knife while applying pressure on the deflector towards the rear of the car and they will release......

......presto, all gone.....

....notice how part of my plastic is broken in the center above the clip area. I'm not sure how this happened since I didn't hear/feel any damage while I removed this clip. i suspect it was probably cracked during installation when new or maybe this piece was replaced prior causing the damage (the broken piece came off with the old deflector). I'm not worried about it, it's not like it is really visible once the new piece is installed and, once installed, the deflector feels quite secure. I only point this out so it's realized that this area is not super sturdy and damage can occur (of which I take no responsibility so perform this swap at your own risk ).....

On to installation......
It was hard to get a clear pic of this using my phone but just line up the clips on the new piece to the slots......

.....and apply pressure towards the front of the car snapping them into place....

Orient the spring and clips like so.....

....slide it down through the cutout in the channel. Now here it is possible that the spring arm and clip will become separated as you apply pressure on the spring when it contacts the bottom of the channel. It's not a big deal just pull it out, reorient and try again keeping some pressure on the clip/spring to keep them together. It took me a few tries over about a minute with some trial and error. Again, my clumsy fingers don't help in tight spaces...


Once in the channel you may have to wiggle it a bit to orient the clips in the rails properly but I found they line up with minimal manipulation.....

Then just slide the assembly towards the rear of the car to lock in place and use the screwdriver/knife to make sure that the clips are snug in their locking positions....


Repeat for the other side.
All done......

Hope this helps!
Here is my damaged deflector.....
Here is a pic of the new one with a closeup of the front retaining clips....
I opened my sunroof and the first thing I removed were the side spring clip thingies.....
I can barely reach in with my sausage fingers to pinch the clips in towards the spring to release them so I used a screwdriver/pocket knife to gently pry the clips inward (I was too lazy to look for my screwdriver at this point.....hence the knife in some shots)....
Once the clips are free slide the spring/clips towards the front of the car and this cutout in the aluminum rail.....
.....then tilt and lift the piece free.....
Just repeat for the other side....
Where it's attached on the bottom/front edge you can see the plastic clips where they protrude through the front of the sunroof tray......
....just gently depress each one with the screwdriver/knife while applying pressure on the deflector towards the rear of the car and they will release......
......presto, all gone.....
....notice how part of my plastic is broken in the center above the clip area. I'm not sure how this happened since I didn't hear/feel any damage while I removed this clip. i suspect it was probably cracked during installation when new or maybe this piece was replaced prior causing the damage (the broken piece came off with the old deflector). I'm not worried about it, it's not like it is really visible once the new piece is installed and, once installed, the deflector feels quite secure. I only point this out so it's realized that this area is not super sturdy and damage can occur (of which I take no responsibility so perform this swap at your own risk
).....On to installation......
It was hard to get a clear pic of this using my phone but just line up the clips on the new piece to the slots......
.....and apply pressure towards the front of the car snapping them into place....
Orient the spring and clips like so.....
....slide it down through the cutout in the channel. Now here it is possible that the spring arm and clip will become separated as you apply pressure on the spring when it contacts the bottom of the channel. It's not a big deal just pull it out, reorient and try again keeping some pressure on the clip/spring to keep them together. It took me a few tries over about a minute with some trial and error. Again, my clumsy fingers don't help in tight spaces...
Once in the channel you may have to wiggle it a bit to orient the clips in the rails properly but I found they line up with minimal manipulation.....
Then just slide the assembly towards the rear of the car to lock in place and use the screwdriver/knife to make sure that the clips are snug in their locking positions....
Repeat for the other side.
All done......
Hope this helps!
6th Gear
Joined: Jun 2010
Posts: 1,129
Likes: 4
Has anyone tried the WeatherTech deflector for sun and wind?
http://www.weathertech.com/mini/2010...ind-deflector/
http://www.weathertech.com/mini/2010...ind-deflector/


It was posted in this thread also, but the images are gone.
https://www.northamericanmotoring.co...move-this.html
Maybe I can help. 54102755850 superseded to 54107355232
Slipstream Deflector Part # 54107355232
http://www.ecstuning.com/Search/SiteSearch/54107355232/

1. Slide the sunroof back. slide out the tabs on the side. They are spring loaded and have a little tab.
Clip out the front section, they clip to the main frame plastic of the sunroof ain the front gutter, just be careful when installing not to break them and then replace in reverse.
You can use the tips above.
Thanks
https://www.northamericanmotoring.co...move-this.html
Maybe I can help. 54102755850 superseded to 54107355232
Slipstream Deflector Part # 54107355232
http://www.ecstuning.com/Search/SiteSearch/54107355232/
1. Slide the sunroof back. slide out the tabs on the side. They are spring loaded and have a little tab.
Clip out the front section, they clip to the main frame plastic of the sunroof ain the front gutter, just be careful when installing not to break them and then replace in reverse.
You can use the tips above.
Thanks
__________________

MINI Guru/ MINI Owner Since 2004 | NEW Lifetime Part Replacement | Local Pickup
Milltek | Genuine MINI | Forge Motorsport | NM Engineering | ECS Performance | M7 Speed
Customer Service Hours: 8am-8pm EST|Sales Team Hours: 8am-11pm | SAT 10am-7pm 800.924.5172
MINI Guru/ MINI Owner Since 2004 | NEW Lifetime Part Replacement | Local Pickup
Milltek | Genuine MINI | Forge Motorsport | NM Engineering | ECS Performance | M7 Speed
Customer Service Hours: 8am-8pm EST|Sales Team Hours: 8am-11pm | SAT 10am-7pm 800.924.5172
Last edited by ECSTuning; Nov 20, 2023 at 11:23 AM.
Looks like the photos on this old How to are gone, but you can see them here: https://www.google.com/search?sca_es...fRhJSyWCeU5pnM
__________________
MINI Guru/ MINI Owner Since 2004 | NEW Lifetime Part Replacement | Local Pickup
Milltek | Genuine MINI | Forge Motorsport | NM Engineering | ECS Performance | M7 Speed
Customer Service Hours: 8am-8pm EST|Sales Team Hours: 8am-11pm | SAT 10am-7pm 800.924.5172
MINI Guru/ MINI Owner Since 2004 | NEW Lifetime Part Replacement | Local Pickup
Milltek | Genuine MINI | Forge Motorsport | NM Engineering | ECS Performance | M7 Speed
Customer Service Hours: 8am-8pm EST|Sales Team Hours: 8am-11pm | SAT 10am-7pm 800.924.5172

Thread
Thread Starter
Forum
Replies
Last Post
Lex2008
R56 :: Hatch Talk (2007+)
22
Jan 31, 2023 12:59 PM
Lex2008
How to
47
Jun 15, 2022 06:18 AM