F55/F56 Bike Rack


1st Gear
Joined: May 2014
Posts: 19
Likes: 0
From: Windham County, CT
kgehrig - do you have the sunroof on your F56? I do, and they tell me that you can't mount a roof rack. I am not sure I believe them, as I have sen YaKima racks that are quite tall and would allow the sunroof to clear it.
Assuming you have the sunroof, could you list the parts you ordered to get your rack? There are "Q-clips" that are required. Here is an email I just got from Yakima, but it provides few specifics. If I can get a rack on this can I will be all set!! Thanks.
Message from Yakima Support:
"Thank you for contacting Yakima, Whispbar and ProRack Customer Support.
The Mini Cooper has a couple "pockets" under the rubber trim. Our Q-128 clips fit inside those pockets. You can check for them by sliding a credit card under the rubber trim. I have sent your request to my warranty manager who works with the fit department to ensure the 2014 and 2014+ are the same. If you need further assistance, don't hesitate to contact us again or by giving us a call at 888.925.4621 between 8:00a and 5:00p Pacific Time Monday to Friday.
Thank you for your inquiry!
Yakima Customer Support"
1st Gear
Joined: May 2014
Posts: 19
Likes: 0
From: Windham County, CT
Thanks for the information
1) You mentioned you can't use the fairing but the pic shows the fairing installed on a car with sunroof. (??) Just on for show perhaps?
2) The rack Q-clips tuck under the rain guard - any problems with water getting under there?
3) By "longer mounts" I take you to mean the Yakima Frontloader racks. Those would be my first choice, unfortunately...
Thanks again for your advice!

1st Gear
Joined: Dec 2013
Posts: 39
Likes: 0
From: Kansas
Wow that looks pretty slick. Thanks loads for the tip. I have looked at Yakima websites many times and even have Yakima racks for other vehicles, but never found a link to the fit guide site. Couple of question though: 1) You mentioned you can't use the fairing but the pic shows the fairing installed on a car with sunroof. (??) Just on for show perhaps? 2) The rack Q-clips tuck under the rain guard - any problems with water getting under there? 3) By "longer mounts" I take you to mean the Yakima Frontloader racks. Those would be my first choice, unfortunately... Thanks again for your advice!
You can't open the sunroof with the fairing on. I had no leaking issues with it installed.
1st Gear
Joined: May 2014
Posts: 19
Likes: 0
From: Windham County, CT
I have looked at that one as well. Trouble is the way it attaches. The straps have to go over top of the rear spoiler and get tucked in under where the hinges go. (All parts are included). I am concerned that the straps will rub on the paint where it goes over the spoiler. I also notice that similar rack on my other car leaves scratches where the side support hooks grip to the hatch. I am holding out for the rear mount rack, even thought it will likely cost $550 plus $150 for PCM recoding.... :(

So did anyone pay the $250 and get the bike rack prep option? If so can you enlighten all of us as to what it got you? Looking to order today/tomorrow and still haven't gotten a straight answer as to what the $250 gets you.

Thread Starter
|
2nd Gear
Joined: Apr 2014
Posts: 71
Likes: 0
From: Toronto, Canada
And haven't seemed to get an answer on what fits into that square slot on the left hand side of the car. Sorry I couldn't be of much help - but please do update the thread if you find out any additional info. As far as bike racks - I think I'm leaning towards getting some Yakima Q towers and going the roof option; nobody in North America seems to know much about the OEM rack from Mini.
1st Gear
Joined: May 2014
Posts: 19
Likes: 0
From: Windham County, CT
I too read somewhere that the prep option is for the EU version with the lights and such. Has anyone looked at the VIP Bike Rack threaded insert: http://www.vipcustomparts.com/F56%20parts%20page.htm
Two SS rods and a threaded hole for $200. Seems a little pricey and what you get..
Two SS rods and a threaded hole for $200. Seems a little pricey and what you get..

3rd Gear
Joined: Feb 2010
Posts: 203
Likes: 2
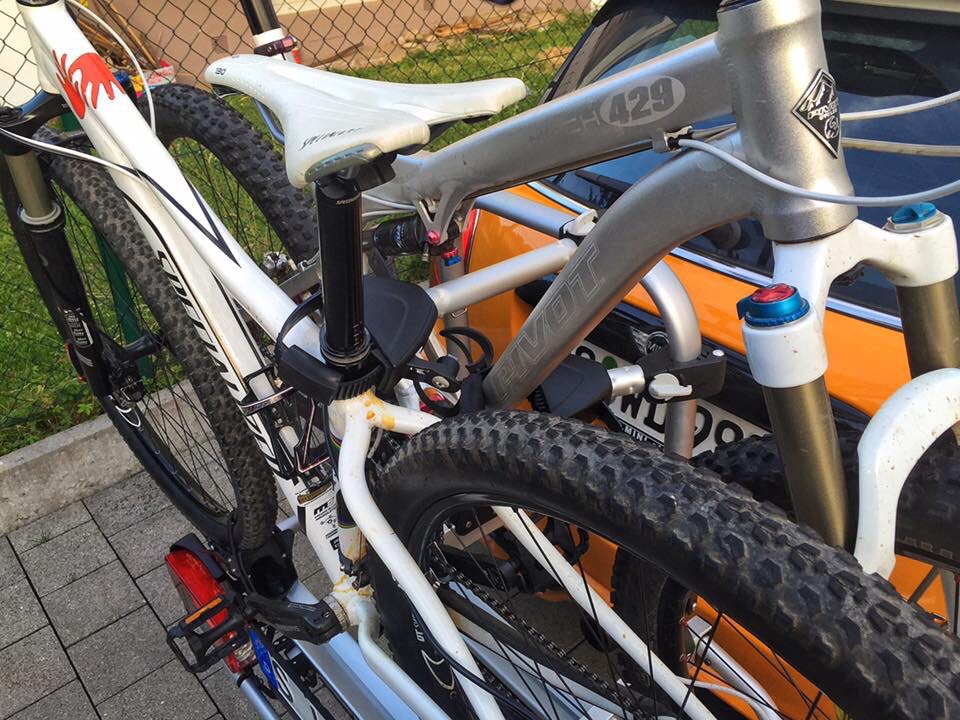
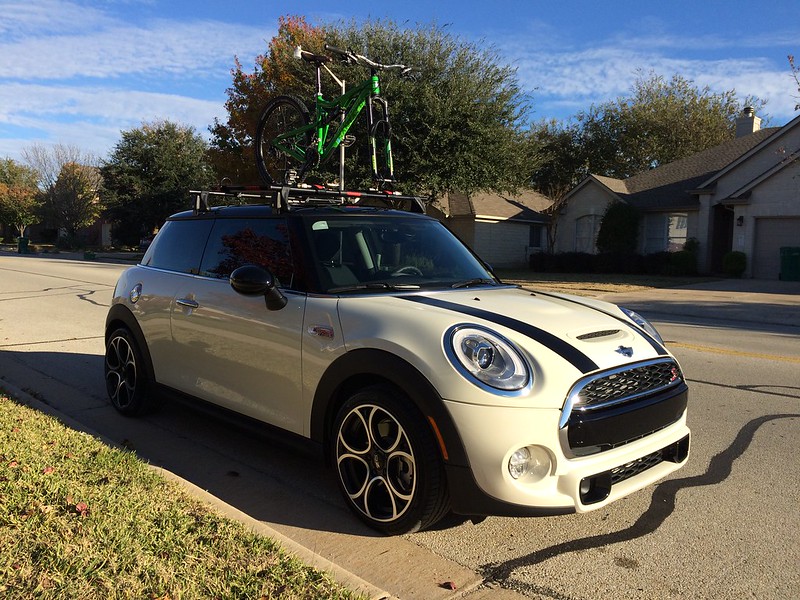
I just put a Yakima on my F56 too. Here are some pics. I moved mine a little further forward than I have seen to my hatch wouldn't hit my back tire.
 Untitled by tx1911fan1, on Flickr
 by tx1911fan1, on Flickr
 by tx1911fan1, on Flickr
 by tx1911fan1, on Flickr
Untitled by tx1911fan1, on Flickr by tx1911fan1, on Flickr by tx1911fan1, on Flickr by tx1911fan1, on Flickr
when I placed my order, I didn't have the bike rack prep option in Canada; so I ended up with a threaded slot on one side (right side) - and some sort of square bracket on the other side, covered with a tow hook cover. Not sure how that would change with the bike rack prep option, in EU it may give you some wiring for brake lights, etc.
And haven't seemed to get an answer on what fits into that square slot on the left hand side of the car. Sorry I couldn't be of much help - but please do update the thread if you find out any additional info. As far as bike racks - I think I'm leaning towards getting some Yakima Q towers and going the roof option; nobody in North America seems to know much about the OEM rack from Mini.
And haven't seemed to get an answer on what fits into that square slot on the left hand side of the car. Sorry I couldn't be of much help - but please do update the thread if you find out any additional info. As far as bike racks - I think I'm leaning towards getting some Yakima Q towers and going the roof option; nobody in North America seems to know much about the OEM rack from Mini.
I too read somewhere that the prep option is for the EU version with the lights and such. Has anyone looked at the VIP Bike Rack threaded insert: http://www.vipcustomparts.com/F56%20parts%20page.htm
Two SS rods and a threaded hole for $200. Seems a little pricey and what you get..
Two SS rods and a threaded hole for $200. Seems a little pricey and what you get..
Agreed, the configurator shows the little electrical connector and such but that accessory, the bike rack with lights is not available in the US. Knowing it wasn't going to be much of a difference we spent the $250 on comfort access instead. Ordered on Monday night (11/24/14) and went into production yesterday (11/25/12). I almost wanted to order it to see what we got but I didn't want to pay to be a guinea pig.
I did however get the rear spoiler added to the build sheet even though it didn't show up in the configurator.

Neutral
Joined: Jan 2013
Posts: 6
Likes: 0
For those with the dual rear tow hooks as part of the "bike rack" package, Cooper Crap is willing to take a look at making a hitch receiver for the car. They just need someone to contact them and provide pics or stop by in person so they can have a look. My MCS unfortunately didn't come with the package so I can't help them out
Thread Starter
|
2nd Gear
Joined: Apr 2014
Posts: 71
Likes: 0
From: Toronto, Canada
I too read somewhere that the prep option is for the EU version with the lights and such. Has anyone looked at the VIP Bike Rack threaded insert: http://www.vipcustomparts.com/F56%20parts%20page.htm
Two SS rods and a threaded hole for $200. Seems a little pricey and what you get..
Two SS rods and a threaded hole for $200. Seems a little pricey and what you get..
Or if cooper crap could offer a threaded mount + their hitch bracket as WyoRacerX mentioned..
I'm really curious what actually fits in that square bracket on the left side... maybe just a cost-saving measure...

1st Gear
Joined: Feb 2015
Posts: 40
Likes: 0
Rear mounted bike rack
So when I ordered mine, my MA told me it was rejecting the "bike rack prep" option (which apparently now is available) so I went ahead and ordered the VIP Custom bracket kit (which, BTW is now $250 with the bracket and SS rods). If anyone is interested I can share my experience with installation. It wasn't that difficult but there were a couple of challenges and it took a bit longer than I expected.
Last edited by KKelly; Mar 28, 2015 at 10:41 AM.

I have the bike rack prep option on the F56s but I'm waiting for Coopercrap to finish their external wishbone hitch. Loved it on my countryman. It was like a parking guard for pushy SUVs.
I use the OEM racks and bike trays as well. Figment issues if you get the spoiler as I did, so you have to reverse direction on the trays, or seat the rails farther forward than installation specs show.
I use the OEM racks and bike trays as well. Figment issues if you get the spoiler as I did, so you have to reverse direction on the trays, or seat the rails farther forward than installation specs show.
1st Gear
Joined: Feb 2015
Posts: 40
Likes: 0
 .
.This is for the VPN 711 bike rack prep kit from VIP Customs.
The bracket requires you to remove the rear bumper cover, which takes a bit more effort than meets the eye. The given instructions are ok but a little lacking in detail as most installation instructions are. I thought I'd make this post more of a supplement to the instructions with a few pictures.
First there is a screw and two nuts that need to be removed from inside the wheel wells (It helps to jack up the car for easy access to the nuts) and folding the wheel well lining back around the tire. This gives you access to remove the electrical clip from the rear side markers on the plastic fender flares (not mentioned the instructions).
The next task is pulling out the fender flares, which is a little intimidating to mess with on a new car because it can seem like you are going to break something when trying to remove them (first image). There are a couple of screws to remove from the below that aren't mentioned in the instructions. There are two segments to the flares, the upper and lower segments which are attached together with more of these molded clips. I tried to separate them first but wasn't successful. Aside from the visible clips, there are two "press-fit" fittings on the inside of the flares that hold them on. If you just reach inside and slowly apply pressure outwards, they will pop out one at a time. When you're finally ready to pull the moulded clips out of the fender, try to apply pressure gradually so as not to "stretch" the plastic. Mine got stretched just a bit on each side and it now puffs out slightly but noticeably (maybe just to me!). I think I could have avoided this by starting where the two flare segments join instead of starting more in the middle of the upper segment. Lesson learned
 .
. The next mage shows the T-25 torx head screw that is under the flare for the bumper cover. This is the whole reason you need to pull back the flares.
Then there are several grey T-25's holding on the rear lights. There's one black T-25 (next picture) that is tucked under the corner of the light that holds on the bumper cover. Take the silver ones out first to get to this one.
The next picture shows a clip that has to be separated to remove the bumper cover. I used a small flat head screwdriver for this and just gently pried the cover out from underneath the clip.
Then you'll have to remove several screws that attach the lower edge of the bumper cover. There's one more towards the passenger side of the car that isn't easy to get to as it is up inside the cover. You'll have to take out the other's first to be able to pull back the cover far enough to get to it (next picture).
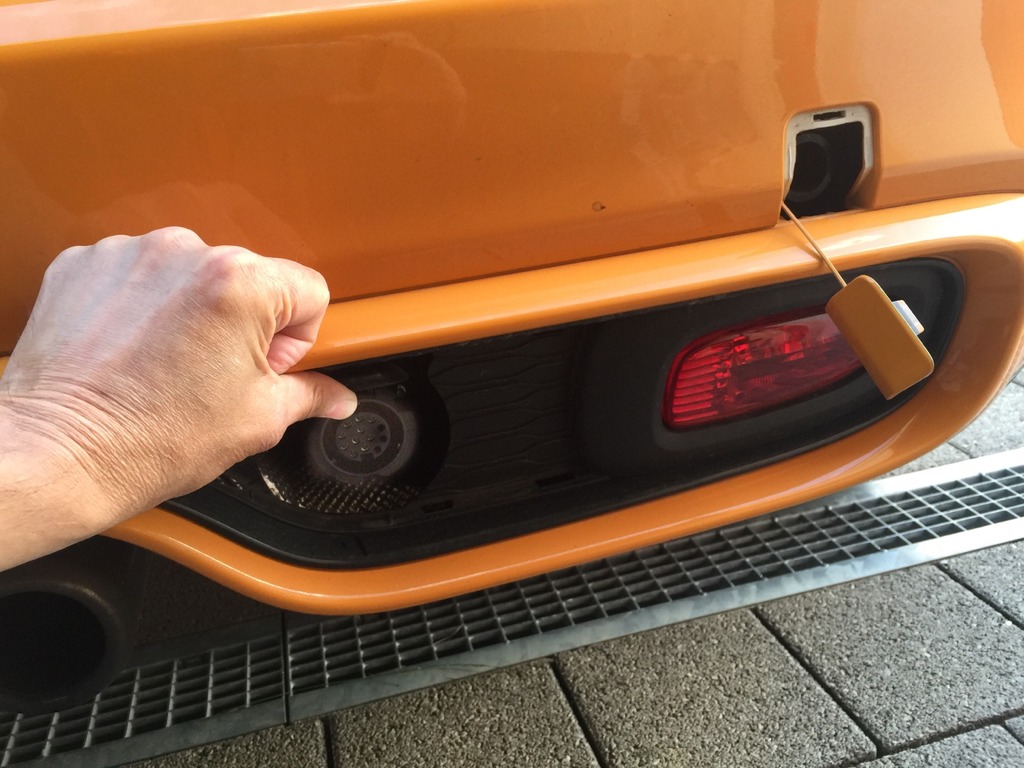
When the cover is removed, you'll see the square hole on the outside of the drivers side of the bumper which is shown on the next picture. You'll be drilling partly through this hole when it's all said and done.
I then cut out the paper template for the holes, and taped it to the bumper (next image). This needs to be precise for everything to fit up. The four 3/8" fastener holes go entirely through the inside and outside of the bumper, but the large 1.5" hole only goes through the first layer. The large hole is a little hard to get started with the included 1.5" hole saw, but it's doable. You'll have to make a pilot for the bit in the center in order to get you started. Also, you'll have to start at an angle and then gradually turn the bit upright due to the upper segment of the bumper sticking out a ways from the center part which make it impossible to start in straight and still have the hole saws bit contacting your pilot hole. Just go real slow with the hole saw and it will work out.
The next image is of getting the bracket positioned for installing the fasteners. It looked like it wasn't going to fit, but once I got it in place with the threaded fitting positioned inside the large hole, I just needed to give it a good whack with my palm to make the angled edge of the bracket fit over the end of the bumper.
The other thing to note is that the threaded fitting on this bracket sits a little farther rearward than the factory one for the tow-hook installed on the RHS. It will be insignificant for the SS rods that I'll be using on both sides but it may make a difference if the bracket is intended to be used for some other purpose as it may put a slight angle on whatever is installed across them.
I hope this helps anyone thinking about installing the VIP kit.
Last edited by KKelly; Mar 28, 2015 at 01:21 PM. Reason: missing picture
1st Gear
Joined: May 2014
Posts: 19
Likes: 0
From: Windham County, CT
Great write-up KKelly. You now have two mounting points for a rear-mount bike frame. If only somebody (MINI) would make one... My gripe is that when I purchased my F56S, the salesperson told me that the rear-mounted racks were "in the works" and would be released soon. I was not aware until I got the car home that the LH side of the bumper didn't even have a threaded hole. GRRRRR.
I suppose I could rig-up something using the SS posts, but I really like the way the MINI cooper style folds up, etc.
I suppose I could rig-up something using the SS posts, but I really like the way the MINI cooper style folds up, etc.
I haven't popped the cap on that other socket. No threads?!
Thanks for the write up kkelly. At some point I would seriously consider copying all of this and putting it in a new post specifically about this product. When I did my DIY install guide for the mini do more product I know a lot of people referenced it directly. On that concealed hitch pulling the bumper and dealing with all of the clips was the prohibitive entry point for a lot of people that I talked to. I ended up doing it on two MINIs and was pretty comfortable with the process though I noted that on my clubman the panels didn't quite piece together as perfectly as when I started.
I thought when I looked at VIPs site they were planning a second version of this hitch that worked with the bike prep kit but maybe I'm mistaken.
1st Gear
Joined: Feb 2015
Posts: 40
Likes: 0
Great write-up KKelly. You now have two mounting points for a rear-mount bike frame. If only somebody (MINI) would make one... My gripe is that when I purchased my F56S, the salesperson told me that the rear-mounted racks were "in the works" and would be released soon. I was not aware until I got the car home that the LH side of the bumper didn't even have a threaded hole. GRRRRR.
I suppose I could rig-up something using the SS posts, but I really like the way the MINI cooper style folds up, etc.
I suppose I could rig-up something using the SS posts, but I really like the way the MINI cooper style folds up, etc.
1st Gear
Joined: Feb 2015
Posts: 40
Likes: 0
I haven't popped the cap on that other socket. No threads?!
Thanks for the write up kkelly. At some point I would seriously consider copying all of this and putting it in a new post specifically about this product. When I did my DIY install guide for the mini do more product I know a lot of people referenced it directly. On that concealed hitch pulling the bumper and dealing with all of the clips was the prohibitive entry point for a lot of people that I talked to. I ended up doing it on two MINIs and was pretty comfortable with the process though I noted that on my clubman the panels didn't quite piece together as perfectly as when I started.
I thought when I looked at VIPs site they were planning a second version of this hitch that worked with the bike prep kit but maybe I'm mistaken.
Thanks for the write up kkelly. At some point I would seriously consider copying all of this and putting it in a new post specifically about this product. When I did my DIY install guide for the mini do more product I know a lot of people referenced it directly. On that concealed hitch pulling the bumper and dealing with all of the clips was the prohibitive entry point for a lot of people that I talked to. I ended up doing it on two MINIs and was pretty comfortable with the process though I noted that on my clubman the panels didn't quite piece together as perfectly as when I started.
I thought when I looked at VIPs site they were planning a second version of this hitch that worked with the bike prep kit but maybe I'm mistaken.
That "second version" of the hitch that your referring to appears to be kind-of a bogus deal. It seems that they used to (a couple months ago) only have an option for buying "the kit" which included the bracket and the two poles for $199... NOW they have an option where you select whether or not you have factory bike-rack prep or not. If not, you get the version with the bracket ($249) which was exactly what you got before for $199, and for $199 you get the version which appears to be poles only (since the bracket isn't necessary) which appears to be a raw deal

Thread Starter
|
2nd Gear
Joined: Apr 2014
Posts: 71
Likes: 0
From: Toronto, Canada
Hey KKelly, digging up an old thread as the weather gets warmer. are you still using the SS rods from VIP customs? if so, how are you liking them and did you find a way to fit two bikes on there? Also, how long are the rods - i'm wondering if it could fit a powderhound 4 for the winter (22.5" based on Yakima's site)
Thanks for the great install write-up btw!
Thanks for the great install write-up btw!