How To Brakes: How to remove & replace parking brake cables in an R53
#1
 02-09-2014, 03:30 PM


Join Date: May 2013
Posts: 135
Likes: 0
Received 0 Likes
on
0 Posts
Brakes: How to remove & replace parking brake cables in an R53
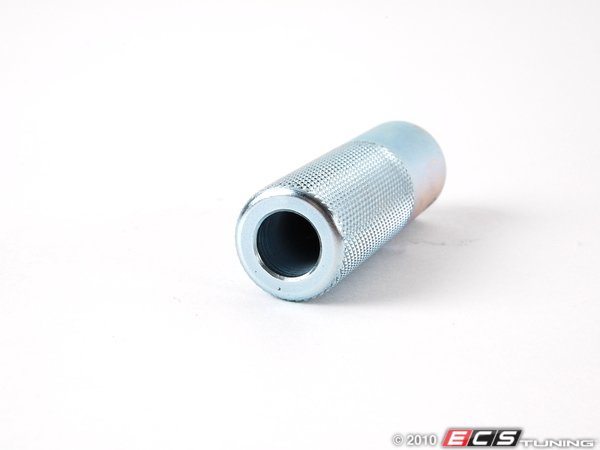
Overview: I went and replaced my parking brake cables yesterday in my R53 2005 MCS. I had been dreading doing it thinking I was going to have to drop my exhaust to get to the cables which wasn’t necessary. I was also concerned I would need the BMW special tool used to compress the old cable out of the body of the car which was absolutely not necessary. As long as you have a deep 12mm socket, you should have no problem using that to push the old cable.
The diagrams in the Bentley manual were really helpful for removing the trim pieces and knowing where all the clips were but if you don’t have it, I wouldn’t sweat it. I wish I could have provided pictures but I was in a rush to do the job. It’s pretty self-explanatory once you see how it all works. Here’s the rundown of what I did.
Tools needed:
Jack/jack stands
Ratchet w/ extension
10mm & 13mm six point sockets
12mm deep socket, preferably a 3/8 or 1/2 drive
Vice grips or pliers
5mm hex socket (for DSC cars only)
10mm and 13mm open ended wrenches (ratcheting preferably!)
Trim removal tools and/or long flat bladed screwdriver
Hammer
drive punch
(1) Plastic 8” cable tie
Optional but recommended to have on hand:
penetrating fluid
air hammer w/ punch chisel (replaces drive punch)
bolt cutters or heavy duty wire cutters
Time required:
2-3 hours
Procedure:
Good luck with it!
Nick Koridis
The diagrams in the Bentley manual were really helpful for removing the trim pieces and knowing where all the clips were but if you don’t have it, I wouldn’t sweat it. I wish I could have provided pictures but I was in a rush to do the job. It’s pretty self-explanatory once you see how it all works. Here’s the rundown of what I did.
Tools needed:
Jack/jack stands
Ratchet w/ extension
10mm & 13mm six point sockets
12mm deep socket, preferably a 3/8 or 1/2 drive
Vice grips or pliers
5mm hex socket (for DSC cars only)
10mm and 13mm open ended wrenches (ratcheting preferably!)
Trim removal tools and/or long flat bladed screwdriver
Hammer
drive punch
(1) Plastic 8” cable tie
Optional but recommended to have on hand:
penetrating fluid
air hammer w/ punch chisel (replaces drive punch)
bolt cutters or heavy duty wire cutters
Time required:
2-3 hours
Procedure:
- Remove the interior trim surrounding the parking brake handle by gently prying up just around the boot being careful not to damage the boot material. Once free invert the material and cut the (1) plastic cable tie holding it in place and leave the boot in place for the moment.
- Next, remove the plastic surround just behind the button of the brake. There are two clips holding it in place – one on the driver’s side and one on the passenger’s. One side (passenger for me) was easier to spread open than the other. I ended up using an old plastic gift card to make a little bit of room and then pushing the clip in with a thin, small flat bladed screwdriver. You may be luckier than I was here. Just go slow and be patient and don’t mar the visible plastic.
- There is one black clip at the top of the parking brake grip that will need to be pulled slightly upwards as you slide the grip off the parking brake. Note the orientation of the clip as the grip only goes on one way and you will need to be oriented properly for installation. You can now remove the boot.
- Next you’ll need to remove the plastic console portion. First remove the (1) screw just in front of the rear cup holder that is now visible. You’ll then need to pry up the console. You can do this with a long screwdriver or flat bar if you’re careful but if you think you’ll be doing this kind of thing often, consider investing in a cheap set of plastic trim removal tools. Neiko makes a set that Amazon sells for about $15 or $20. Alas, I used what I had and was careful and all went fine. Starting at the back by the cup holder on each side working your way forward pry upwards until you hear a pop from the four clips (two in the rear, one in the front). As you pull upwards, you’ll need to remove the wire from the TPMS reset button and any additional buttons located on your console.
- With the console removed, if you have DSC, remove the two 5mm hex head bolts holding down the motion sensor (silver thing with an electrical connector plugged into it). Once unbolted, push in on both top and bottom of the connector and pull out. Unplug the parking brake cable sensor on the back of the parking brake. Both small wires are connected with a plastic retainer pin to the plastic console bracket and should pull straight upward. You can now unscrew the (4) 10mm nuts that hold the bracket in place and remove it.
- With the bracket out of the way, you can now slacken your parking brake using the 13mm adjusting nut underneath the handle until you can disconnect the Bowden cables from the compensator assembly.
- Here, I removed the entire handbrake and its metal bracket which is only being held down by (4) 13mm nuts. This will give you room to work when pushing out the old cables in step 14.
- At this point, we’ll go outside of the car before pushing out the old cables to make sure you can free them up at the brake caliper where they can sometimes get stuck. Jack up the car, get it on stands and remove the rear wheels.
- At the caliper you should be able to use a pair of vice grips or pliers and grab the head of the cable and pull the slack towards you so that you may simply move it out of its spring mechanism. If you’ve got a cable that is completely frozen and will not budge like I did, use an extra-large screwdriver or something to lean your weight into to compress the spring while you remove the cable from the spring mechanism. If you still can’t pull the slack of the cable back after it’s out of the spring, you may need a pair of bolt cutters or a very good pair of wire cutters for step 14 so try now while everything is still in place. If you can’t get it to budge, don’t sweat it and move on.
- Pull the cable out from the hole that it feeds through the brake caliper. There are no fasteners here however these sometimes get rusted up very well into the caliper. If you have trouble, I suggest using some penetrating fluid and a hammer and punch to push the old one out. You may also be able to use an old chisel on the backside of the hole to wedge it between where the cable meets the caliper and metal housing on the cable. Mine was in so tight, I ended up using an air hammer to get it out. If you don’t have access to one and are having trouble, you can always cut the rubber boot off the cable and try using a torch to heat it up and then hammer it out. Although I had a hell of a time on one side, the other pulled straight out.
- Underneath the car, follow the cables back and remove the two 10mm fasteners for the cable bracket with your open ended wrench where it meets the rear subframe.
- You’ll next need to remove the heat shield that covers the area above the rear half of the straight (link) pipe that’s part of the exhaust. I’m unsure what size the fasteners at the rear of the heat shield are because mine had broken through and weren’t being supported by anything. However, the fasteners towards the front of the car use a 10mm socket. Be careful not to strip these as they are thin and usually slightly deformed. Let the heat shield hang on the exhaust pipe while you work.
- Pull straight down on the cables where they each attach at two points on the plastic fuel tank.
- With all of the outside connections free, we’ll move back inside the car. If you were unable to pull all the cable slack back towards the caliper slide of the cable, take a pair of bolt cutters or strong wire cutters and cut as much of the remaining cable off as possible. Using a 12mm deep well socket, place it over the head of the cable and use hammer to tap the socket over the head of the cable. If that alone doesn’t pop the cable out of the body of the car, once it’s securely over the head of the cable, use a screwdriver, punch, or something that will fit through the hole of the socket to tap the cable the rest of the way out. If you don’t have a 12mm deep, a regular 12mm and short extension MAY work here. Although it should, if the 12mm doesn’t seem to be doing the trick (which it did on the OEM and even the aftermarket Doorman cable) you can try stepping down to a 15/32 (if you have it) or a 7/16 socket.
- That should be it! Yank those old suckers out and leave them on their respective sides of the car for comparison or in case you’re unsure as to which new cable belongs on which side. They are different lengths. Installation of the new cables is fairly straightforward at this point however here are some tips:
- Feed the cables in through the subframe and before you insert them into the body of the car, insert them into the wheel caliper to prevent them from binding if you don’t seem to have enough slack. Use a bit of anti-seize compound in the hole the cable feeds through in the caliper.
- Don’t forget to install the new bracket to the rear subframe once you’ve pushed the new cable into the body of the car.
- If using Doorman aftermarket cables, you may find that the left and the right cable heads were manufactured differently like mine were. The Doorman C660804 (left [driver]) was manufactured more similarly to OEM than was Doorman C660700 cable (right [passenger]). On the right, I found that the rubber grommet it comes with that pushes up against the outside body of the car is too thick and I was unable to compress it against the body of the car for it to lock into place. Instead, I removed it and used two nitrile O-rings from the Harbor Freight 225pc pack they sell. I think I put an A010 (1/4” x 3/8” x 1/16”) on the larger portion of the head and an A006 (1/8” x 1/4" x 1/16”) on the smaller portion just below where it flares. Surely the sizes aren’t that crucial but there they are if you find you need them. Also if using the Doorman cables, the left (driver side) didn’t seem to be long enough to reach the rear fuel tank clip. I don’t suspect it’ll be a problem but I’ll keep an eye out for wear the next time I’m under there.
- When adjusting the cables, you’ll likely need to run back the adjusting nut on the parking brake assembly all the way so you can push the ***** of the Bowden cable into the compensator. I had to take mine all the way off and then it just made it but I’m sure you could finesse it with a pair of pliers or have someone compress the spring on the caliper if you had trouble making the connection. Here is what I did to begin my adjustment, however, the top image on page 86 of the link below (BRAKE REPAIRS.pdf) illustrates the correct amount of pre-load on your parking brake. With the brake assembly and its bracket tightened back down, run the parking brake up one click and tighten adjustment nut until the compensator has no more slack. Now run the parking brake up and down a few times and retighten. Pull hard and do this procedure two or three times or until you’ve got it sufficiently adjusted. The BMW TIS specifies that the wheels should be sufficiently immobilized by 4 clicks and should be adjusted if your parking brake extends further than 6 clicks. It also specifies that the brake light may or may not be on with the first click but by the second, it should be on. There should be no resistance on the wheels until the second click.
- When reinstalling, don’t forget your DSC motion sensor, parking brake and TPMS button connectors. Don’t forget to install the screw in front of the rear cup holder. Install the console first, then the boot, then the grip (pulling up on the tab as you slide it back on, remembering it only goes on one way), then zip tie and pop everything into place.
- Check out this link, pages 82-96 for information on parking brakes including exact specs & pictures. There are also plenty more information regarding brakes in there as well. Note: what I refer to as a 'compensator', BMW calls the 'balance arm'.
- I’ve attached a (cell phone, sorry) photo showing the difference between the two new Doorman cable heads. The one on the left is for the driver side of the car and the one on the right is missing its (too thick) grommet before I installed the O-rings. I've also attached a PDF of the writeup for easy printing
Nick Koridis
Last edited by crazyworld; 04-06-2014 at 12:56 PM. Reason: added 'optional tools'
#2
02-16-2014, 09:34 PM


#4
02-17-2014, 09:22 AM
Join Date: May 2013
Posts: 135
Likes: 0
Received 0 Likes
on
0 Posts
#6
03-21-2014, 11:25 AM

2nd Gear
Join Date: Jun 2013
Location: NW Indiana (45 min south of Downtown Chicago)
Posts: 137
Likes: 0
Received 3 Likes
on
2 Posts
Question, my parking brake only catches on one side. I assumed the other side was snapped. I finally got around to looking at them more closely. I found that I am missing that tension spring on the left rear caliper (the side that doesn't catch).
Where can I find this spring? I've looked everywhere.
Could this be why that side isn't catching?
Thanks!
Where can I find this spring? I've looked everywhere.
Could this be why that side isn't catching?
Thanks!
#7
03-22-2014, 07:41 PM
Join Date: May 2013
Posts: 135
Likes: 0
Received 0 Likes
on
0 Posts
You'll likely just need to replace the caliper. Check the marketplace or junk yards. I actually have one, but I believe the caliper needs to be rebuilt as I don't think it was compressing the piston properly.
Not sure if the spring can be swapped out on its own and I wonder what caused it to come off in the first place.
Not sure if the spring can be swapped out on its own and I wonder what caused it to come off in the first place.
Last edited by crazyworld; 03-22-2014 at 08:05 PM.
Trending Topics
#9
03-28-2014, 01:59 PM
2nd Gear
Join Date: Jun 2013
Location: NW Indiana (45 min south of Downtown Chicago)
Posts: 137
Likes: 0
Received 3 Likes
on
2 Posts
Can't figure this out
I'm swapping out the old caliper with the new one and can't figure out how to disassemble this piece out of the old one!
I got the end of the cable to pop out of the what was supposed to be the spring mechanism, but I don't know how to get the stiff, curved metal piece that the cable slides through out of the caliper...
I got the end of the cable to pop out of the what was supposed to be the spring mechanism, but I don't know how to get the stiff, curved metal piece that the cable slides through out of the caliper...
#10
04-06-2014, 12:53 PM
Join Date: May 2013
Posts: 135
Likes: 0
Received 0 Likes
on
0 Posts
it's a late response as i've been very busy lately but hopefully this will help you and anyone else who ends up in the same position.
you are at step 10. this is possibly the hardest part of the entire job. that curved metal part that goes through the caliper is just part of the cable and you need to force it out of the caliper due to corrosion. if you're worried about getting this out, particularly if you live in an area that sees a lot of road salt, ask around to borrow one or just consider buying an impact hammer. it saved my *** on this job, doing outer ball joints, and will surely save my *** again in the future.
the nice part about this job is that if you did find yourself stuck here, you can still go to the store and get what you need to finish the job. good luck.
one last thought. if you are still having trouble without an air hammer, you can pop the entire rest of the cable loose from the body of the car, fuel tanks, and subframe so the only thing holding it in is the caliper. this may help only if the cable is bound up in the hole that goes through the caliper but i only noticed this happening with one of the aftermarket cables and not the other nor the oem cables. that aside, removing the cable from the rest of the car may help you twist the curved metal part that goes through the caliper to free it up so you can pull it straight out the back of the caliper.
Last edited by crazyworld; 04-06-2014 at 01:02 PM.
#11
04-06-2014, 05:08 PM
2nd Gear
Join Date: Jun 2013
Location: NW Indiana (45 min south of Downtown Chicago)
Posts: 137
Likes: 0
Received 3 Likes
on
2 Posts
Thanks a lot for the response. I ended up just cutting it because that caliper was missing the e-brake spring anyway. Once I cut the cable, I just pulled the old caliper off and replaced it with a new one. I also bought ECS's parking brake refresh kit so I was able to load up that slot with penetrating fluid so it doesn't get frozen in there again.
My neighbor has a ton of air compressed tools. He used an air hammer to push the curved steel part through the old caliper. Took him a half hour! It was really frozen in there. Terrible design IMO. Now I have an extra caliper with no spring on the back. Still works, but can't ever be used with a parking brake cable.
Thanks a lot for the help guys!
#12
05-31-2014, 02:25 PM
Just did my R50's rear brake cables, after the right one snapped a couple weeks ago.
Got the parts from ECSTuning. The special tool does work nicely, and $30 isn't that
much considering how much so many of the other special tools go for. I drove the
back up onto Rhino Ramps and chocked a front wheel and left it in 1st gear. I also
took off the spare tire (this is an R50). That gave me plenty of room to work.
Main time consuming issue was figuring out how much of the exhaust shield to loosen
to get nice access to the cables on their way to the front. I freed it up a bit more than
I really needed to.
I thought I'd lower the exhaust a couple inches, and I snapped one rusty bolt on one of
the rear exhaust hangers (I feel stupid about that, since in retrospect I didn't really even
need to loosen or lower them!) but it should hold ok with just the other bolt and the rest
of the hangers fully intact.
Surprisingly, the rear ends of the old cables came off and out of the calipers very easily,
especially for an 11 year old MINI.
Overall, a leisurely 2 hour job.
Last edited by cristo; 05-31-2014 at 02:43 PM.
#13
06-04-2014, 01:36 PM
Platinum Sponsor
We have the rear brake refresh kit here:
http://www.ecstuning.com/Search/SiteSearch/34406777400KT/
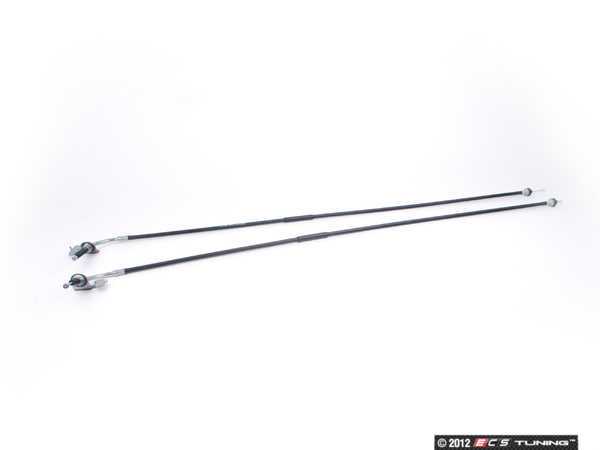
And that little tool if you find it more helpful. Part # 83300494835
http://www.ecstuning.com/Search/SiteSearch/83300494835/
Thanks
http://www.ecstuning.com/Search/SiteSearch/34406777400KT/
And that little tool if you find it more helpful. Part # 83300494835
http://www.ecstuning.com/Search/SiteSearch/83300494835/
Thanks
__________________

MINI Guru/ MINI Owner Since 2004 | NEW Lifetime Part Replacement | Local Pickup
Milltek | Genuine MINI | Forge Motorsport | NM Engineering | ECS Performance | M7 Speed
Customer Service Hours: 8am-8pm EST|Sales Team Hours: 8am-11pm | SAT 10am-7pm 800.924.5172
MINI Guru/ MINI Owner Since 2004 | NEW Lifetime Part Replacement | Local Pickup
Milltek | Genuine MINI | Forge Motorsport | NM Engineering | ECS Performance | M7 Speed
Customer Service Hours: 8am-8pm EST|Sales Team Hours: 8am-11pm | SAT 10am-7pm 800.924.5172
#14
06-14-2014, 02:35 PM
Join Date: May 2013
Posts: 135
Likes: 0
Received 0 Likes
on
0 Posts
I thought I'd lower the exhaust a couple inches, and I snapped one rusty bolt on one of the rear exhaust hangers (I feel stupid about that, since in retrospect I didn't really even need to loosen or lower them!) but it should hold ok with just the other bolt and the rest of the hangers fully intact.
Glad you got it done!
#15
04-03-2015, 12:30 PM

Thanks for doing this write up - another owner here that used it and needed it! 
I'd put off doing mine for the last 2 years (one side broke and the other side was sticky) because I was waiting for my exhaust to rot out - wish I'd read this back then to know I didn't need to take the exhaust off anyway. ARGH. Missed out on all sorts of fun the last 2 winters not being able to use the handbrake!
I'd put off doing mine for the last 2 years (one side broke and the other side was sticky) because I was waiting for my exhaust to rot out - wish I'd read this back then to know I didn't need to take the exhaust off anyway. ARGH. Missed out on all sorts of fun the last 2 winters not being able to use the handbrake!
#16
04-03-2015, 02:37 PM
Platinum Sponsor
Winter is a killer for these lines and this last winter was really bad in the north east. Glad you got it fixed.
__________________
MINI Guru/ MINI Owner Since 2004 | NEW Lifetime Part Replacement | Local Pickup
Milltek | Genuine MINI | Forge Motorsport | NM Engineering | ECS Performance | M7 Speed
Customer Service Hours: 8am-8pm EST|Sales Team Hours: 8am-11pm | SAT 10am-7pm 800.924.5172
MINI Guru/ MINI Owner Since 2004 | NEW Lifetime Part Replacement | Local Pickup
Milltek | Genuine MINI | Forge Motorsport | NM Engineering | ECS Performance | M7 Speed
Customer Service Hours: 8am-8pm EST|Sales Team Hours: 8am-11pm | SAT 10am-7pm 800.924.5172

#18
04-05-2015, 04:33 PM
One thing to note for any people using this write up - I ended up not putting all the console back together at first; figured I wait for all that until I'd tested it out and tensioned them. Wow, all sorts of weirdness happens when that DSC box is swinging around by the wires when going around corners...
Car was probably very confused as to how it got upside down, backwards, etc all in about 1 second. Traction control was going nuts and I couldn't fathom why!
Car was probably very confused as to how it got upside down, backwards, etc all in about 1 second. Traction control was going nuts and I couldn't fathom why!
#19
07-21-2015, 04:25 AM

Some short cuts that worked for me
No need to remove hand grip tip or gaiter. Peel it upside inside out and turn base to come out the console hole, it fits fine sideways. I just spun the entire console sideways to get to the rear. You only need to adjust the nut under the handle and the seats are what will annoy you, not the handle or console.
No socket needed on cable ends. They are a spring steel clip that expands once in the hole so it cant reverse out. It isnt a complete ring and has a space that I found easy to get a small screwdriver under and just take the clip off. 20 seconds to do both sides.
Just the end heat shield needs to be loosened. 2 inch clearance just to wiggle fingers in and look. No real fasteners or work under there. Just need to see the holes and use something to snap it into the clips. A small gap will work.
Also I just cut the two little flaps of carpet blocking the view of the cable ends. Two unneeded credit card sized flaps that are in the way, cut and toss. You wont regret it.
#20
07-21-2015, 07:09 AM
Platinum Sponsor
Thanks for the short cuts info.
__________________
MINI Guru/ MINI Owner Since 2004 | NEW Lifetime Part Replacement | Local Pickup
Milltek | Genuine MINI | Forge Motorsport | NM Engineering | ECS Performance | M7 Speed
Customer Service Hours: 8am-8pm EST|Sales Team Hours: 8am-11pm | SAT 10am-7pm 800.924.5172
MINI Guru/ MINI Owner Since 2004 | NEW Lifetime Part Replacement | Local Pickup
Milltek | Genuine MINI | Forge Motorsport | NM Engineering | ECS Performance | M7 Speed
Customer Service Hours: 8am-8pm EST|Sales Team Hours: 8am-11pm | SAT 10am-7pm 800.924.5172
#21
05-14-2016, 07:50 PM

Just replaced the right side cable on my 2005 cabrio. Used the Dorman cable.
Getting the old cable out of the caliper was a PITA. Ended up cutting it off on both sides of the caliper ear then drilling it out with progressively larger bits (as someone mentioned earlier in this thread). My cable was rusted at the metal bend just before the caliper. I had to cut the bend off in order to be able to push the cable back from the cabin side. After that the12mm socket worked well for releasing the tabs and freeing the old cable. Convertibles have bracing that gets in the way of lowering the heat shield. To get the new cable in I fed a piece of nylon twine through from the cabin side, tied it to the new cable’s ball and pulled it in place so the tip was through the hole (tabs not engaged). From underneath I pushed the cable fully in with a very long screw driver.
Getting the old cable out of the caliper was a PITA. Ended up cutting it off on both sides of the caliper ear then drilling it out with progressively larger bits (as someone mentioned earlier in this thread). My cable was rusted at the metal bend just before the caliper. I had to cut the bend off in order to be able to push the cable back from the cabin side. After that the12mm socket worked well for releasing the tabs and freeing the old cable. Convertibles have bracing that gets in the way of lowering the heat shield. To get the new cable in I fed a piece of nylon twine through from the cabin side, tied it to the new cable’s ball and pulled it in place so the tip was through the hole (tabs not engaged). From underneath I pushed the cable fully in with a very long screw driver.
#22
09-04-2016, 05:23 AM

#23
09-06-2016, 01:53 PM
Platinum Sponsor
Thanks for the order. I done mine and its much better, the old ones were rusted stuck.
__________________
MINI Guru/ MINI Owner Since 2004 | NEW Lifetime Part Replacement | Local Pickup
Milltek | Genuine MINI | Forge Motorsport | NM Engineering | ECS Performance | M7 Speed
Customer Service Hours: 8am-8pm EST|Sales Team Hours: 8am-11pm | SAT 10am-7pm 800.924.5172
MINI Guru/ MINI Owner Since 2004 | NEW Lifetime Part Replacement | Local Pickup
Milltek | Genuine MINI | Forge Motorsport | NM Engineering | ECS Performance | M7 Speed
Customer Service Hours: 8am-8pm EST|Sales Team Hours: 8am-11pm | SAT 10am-7pm 800.924.5172

Thread
Thread Starter
Forum
Replies
Last Post
igzekyativ
MINIs & Minis for Sale
34
07-16-2020 12:54 PM
silence2-38554
R50/R53 :: Hatch Talk (2002-2006)
98
09-21-2016 02:52 PM
JPMontes3
R50/R53 :: Hatch Talk (2002-2006)
3
08-23-2015 01:26 AM