
Removing Dash Pieces?
#1
 05-30-2013, 09:13 AM


#2
05-31-2013, 08:07 AM

Platinum Sponsor
I believe you are talking about the dash trim sections or the dash cluster trim rings?
Here is both:
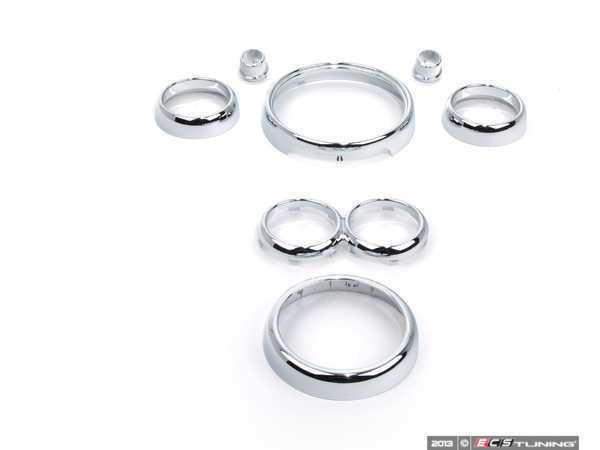
Dependent on your opinions: Here is the standard kit with for R50 R52 R53 MINIs with out the Center Navigation screen.
There is a dash "chrome" trim kit which shows all the pieces seperatly and they are in b the main pic in orientation to the dash and center console. They clip in and you can click through the pics to see the backing.
http://www.ecstuning.com/Search/SiteSearch/51450396710/ES116015/
Here is the one trim in the back of the center console for MINIs without the factory center armrest. It not in the main dash trim kit pics. #8 in diagram.

http://www.ecstuning.com/Search/SiteSearch/51167127912/ES83651/ #8
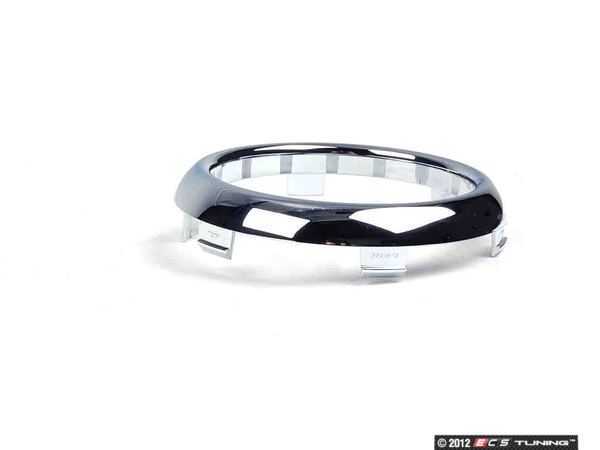
Here is the Tachometer " Chrome Ring " that is the standard version. Non Nav.
http://www.ecstuning.com/Search/SiteSearch/62116977371/ES2207525/
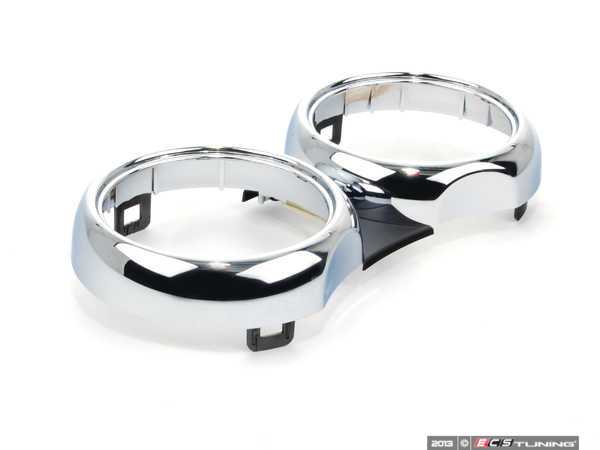
Here is the " Mickey mouse " ears version of the dual gauge, that for Navigation version.
http://www.ecstuning.com/Search/SiteSearch/62116977372/ES171266/
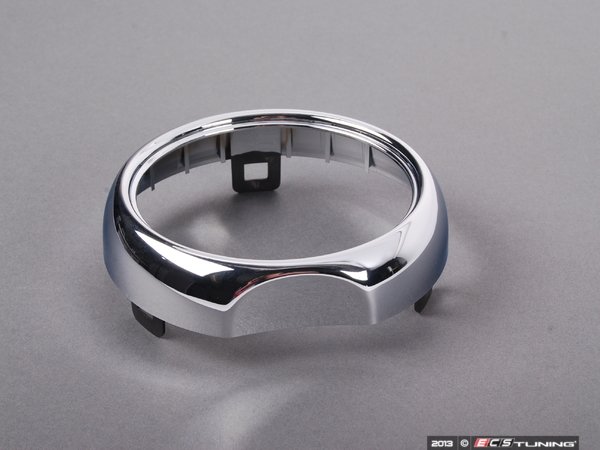
Don't have a pics of the Navagation "chrome " center ring , but its generally the same as the speedometer center ring , just cut in the corners for the display screen edges and a lower lip.
http://www.ecstuning.com/Search/SiteSearch/51457132401/
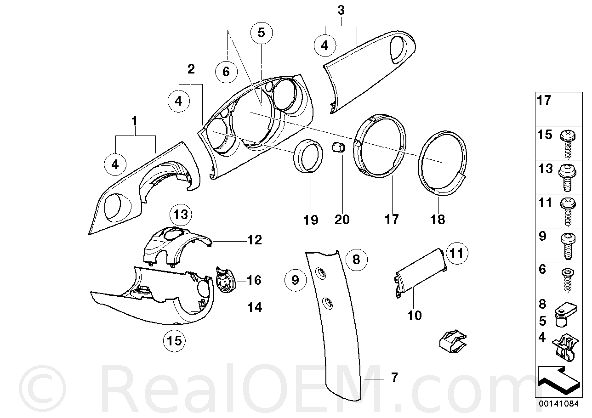
If you are removing the dash trim itself. There is a Three piece dash and a Five piece dash.
5 piece main dash trim -7/2004
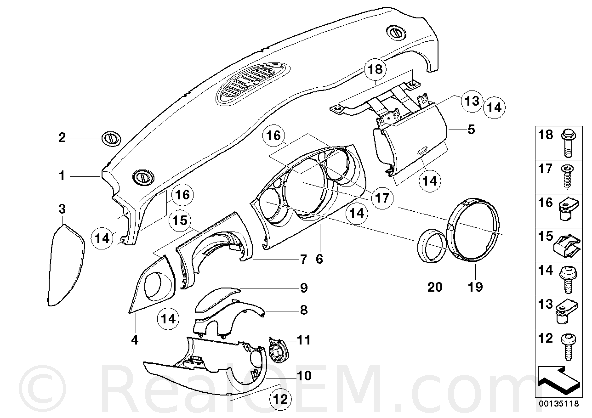
3 piece main dash trim 7/2004+
Thanks , hope that helps.
Here is both:
Dependent on your opinions: Here is the standard kit with for R50 R52 R53 MINIs with out the Center Navigation screen.
There is a dash "chrome" trim kit which shows all the pieces seperatly and they are in b the main pic in orientation to the dash and center console. They clip in and you can click through the pics to see the backing.
http://www.ecstuning.com/Search/SiteSearch/51450396710/ES116015/
Here is the one trim in the back of the center console for MINIs without the factory center armrest. It not in the main dash trim kit pics. #8 in diagram.
http://www.ecstuning.com/Search/SiteSearch/51167127912/ES83651/ #8
Here is the Tachometer " Chrome Ring " that is the standard version. Non Nav.
http://www.ecstuning.com/Search/SiteSearch/62116977371/ES2207525/
Here is the " Mickey mouse " ears version of the dual gauge, that for Navigation version.
http://www.ecstuning.com/Search/SiteSearch/62116977372/ES171266/
Don't have a pics of the Navagation "chrome " center ring , but its generally the same as the speedometer center ring , just cut in the corners for the display screen edges and a lower lip.
http://www.ecstuning.com/Search/SiteSearch/51457132401/
If you are removing the dash trim itself. There is a Three piece dash and a Five piece dash.
5 piece main dash trim -7/2004
3 piece main dash trim 7/2004+
Thanks , hope that helps.
__________________

MINI Guru/ MINI Owner Since 2004 | NEW Lifetime Part Replacement | Local Pickup
Milltek | Genuine MINI | Forge Motorsport | NM Engineering | ECS Performance | M7 Speed
Customer Service Hours: 8am-8pm EST|Sales Team Hours: 8am-11pm | SAT 10am-7pm 800.924.5172
MINI Guru/ MINI Owner Since 2004 | NEW Lifetime Part Replacement | Local Pickup
Milltek | Genuine MINI | Forge Motorsport | NM Engineering | ECS Performance | M7 Speed
Customer Service Hours: 8am-8pm EST|Sales Team Hours: 8am-11pm | SAT 10am-7pm 800.924.5172
#3
05-31-2013, 09:19 AM
Do not undertake any DIY project that you are not qualified to perform. If you have questions about this project, you should consult with experienced professionals and/or your MINI dealer before undertaking it. Always follow standard safety guidelines for car repair in performing DIY projects.
Tools Needed:
Replace everything in the following order:
How to fit OEM chrome line interior into a pre-2005 model To begin with, I suggest you get your hands in there, and remove the speedo and other trim parts!
This first section is how I achieved this.
The "step" name of the photos doesn't mean they're a clear "step" in the procedure, but it just hopefully helps you follow through in the correct order.
(Photos 1 to 5) Firstly, open the door and remove the dash end cover. You can stick a screwdriver or similar into the lower section (there's an indent) and you remove the forward part of the cover. The rear is "hinged" so once you've unclipped it from the front, pull forward/out to remove. Do this on both sides of the car/dash.
Put the steering column in it's lowest position. Then pull the dash rail forward and upward to remove it. Get it out of the car, it's big and most likely will get on your way otherwise.


(Photo 6) At this stage I removed the other trim pieces from the centre section. The vent covers twist, the warning and dimmer covers pull.

(Photos 7 to 8b) You might want to take the chance to stuff cardboard or other foam stuff in any rattly parts of your dash at this stage, if you have any. Remove the two torx t-20 bolts from the top "lip" of the centre piece, and the one torx t-20 screw from below the centre piece. If you have a glovebox, it might cover the screw beneath. Also, some cars only have one screw here, some have none, some have two (one either side).


(Photos 9 to 11) As long as you've removed the screws above, everything now is just clamped into place. Pull the dash centre section out, starting from the bottom. You have to be firm, but be aware of scratching other dash panels etc! You may find the dash "cover" (silver, alloy etc.) might come off of the backing plate, just keep going, it's the plate you need off!


(Photos 12 to 13a) The speedo ring just pulls off, you might want to "squeeze" the bottom clip, but I found it just popped out anyway. Some bits have glue on them, but it's not a problem, it's not really going to cause any problem removing the ring, and if it does, you can peel it off/back with a nail easily.


(Photo 14) This shows the clip at the bottom of the ring.

(Photos 15 to 17) These show you bits of dash etc with the ring removed, other parts replaced. You can fit the new replacement speedo ring with everything together, it just snaps in place.


The next part I pulled off was the front ashtray/cupholder surrounds. Remove the ashtray (if you have one) and simply pull the ring off with your hands.
They are held in by a number of tabs. You need to use the rubber from the old holder in the new chrome piece, it just pulls out and pushes in the new piece. The chrome piece just snaps back in place.


Next up I did the gear shift ring. I did this by removing the old ring from my gaiter, although the new kit comes with a black fake leather gaiter anyway. It's easier to use your own, it just clips off, clips on.
There are several clips (highlighted in the pics below) that need to be released, then clamp the new chrome section over the grey plastic ring that you're left with.
When you put it back, there is one "spike" larger than the others, so you have to put the ring on the right way around, make a note of this when you pull it off.
The ring just pulls out by hand, it's held in by clips, much like the cupholders.


Next is the speedo (yay!)
Hard to take off, very easy to replace. Just push it on, make sure the clips at the base are in line.
The air vents just twist off (clockwise) and the new ones will twist on.


The dimmer and hazard warning covers pull off, and the new ones push on. One was quite tough to push into place.
Then you have a nice sparkly centre piece.


The handbrake kit comprises of three parts - the grip with back cap attached (two parts together, simply unclip and replace grip with your own if you have a leather or other custom grip) and the front cap. Shown in first photo below.
First thing to do is to get the front cap off. This is held in place by 3 clips - 2 together on one side and a single clip on the other (picture 2 below). On my car the single clip came away very easily, some will have to depress the two clips together by carefully inserting a SMALL flat head screw driver. The cap then comes off easily. (picture 3)
Next you need to remove the cloth gaitor from the back cap. Up to you how you do this but it is fairly fragile - this can be gently eased it off - again with the screw driver. (pic 4)
Then you remove the grip as one piece. This is held by a clip at the front and on top. Again this needs to be gently prized upwards with the aid of the screw dirver. (pic 5)
Next you need to remove the cloth gaitor from the back cap. Up to you how you do this but it is fairly fragile - I gently eased it off - again with the screw driver. (pic 4)
Then you remove the grip as one piece. This is held by a clip at the front and on top. Again this needs to be gently prized upwards with the aid of the screw dirver. (pic 5)


Fitting the new one is a simple reversal of the process.
End result looks good and in all it only takes a few minutes.


Next up the rev counter (speedo Oz). This is the tricky bit.
This is for reference only as this comes from MINI as a complete part!
First off, pull the steering down to allow space and undo the two torx t-25 screws BE CAREFUL - the spacers can fall off and be a right pain in the behind to find again!
Then, loosen things up and pull things free. The plastic cover piece over the wires will come free, and you get a bit of space. Unplug the unit and pull it free.
Undo the two philips screws on the back of the unit (no photo, sorry). Then remove the sticker (if you've got one) carefully, and you can see a clip. Push that clip in and remove the front from the back of the unit.
Now the unit is in two pieces, you can unclip the silver trim piece, and clip the new chrome piece in place.
Not too tricky, but it's quite long winded to replace a bit of trim!


That's the complete installation
that you are not qualified to perform. If you have questions about this project, you should consult with experienced professionals and/or your MINI dealer before undertaking it. Always follow standard safety guidelines for car repair in performing DIY projects. Tools Needed:
- Socket Ratchet & Extension Bar
- 10mm Socket
- Flat Head Screwdriver
- Phillips Screwdriver
- T20 Torx Bit / Screwdriver
- Disconnect the BatteryThis is important as you are removing parts that are close to the airbag.
- Remove Side CoversRemove the covers in the door openings, by using a small flat head to gently prise the cover open. It should pop off fairly easy but be careful not to break the clips or mark your interior.

- Remove Dash Top
- Remove All T20 Torx ScrewsEach piece of the dash is attached via T20 torx screws, the left and right hand vents have 1 screw each, Remove these.

The airbag cover has 6 holding it in place, 3 underneath the cover and 3 at the top. Remove these.

The vents/speedometer surround has 2 screws, one at either end of the surround (shown removed below). Remove these.


- Remove Retaining BarNow the dash top and all screws removed you will see 2 straps attached to the airbag cover that are secured on to a metal bar, these straps keep the airbag cover in place on airbag deployment so the cover does not hit the passenger.

Using the ratchet+extension and 10mm socket remove the 2 bolts on the retaining bar. On mine there is some stickers wrapped on to the straps am not sure if these are for a tamper proof purpose or not but I managed to peel mine back with out much damage.
Now carefully slide the bar out free from the straps and place to one side.
- Remove Airbag CoverNow is the time to remove the airbag cover, this is quiet tricky and very important that you be careful not to pull to hard, if you hear any clicks then that’s the small tabs inside the cover breaking.
Firstly pull the cover up from the bottom, if you look were the 3 upper screw’s were attached you can see the tab with the green plastic bits on is part of the cover also and needs to be lifted out carefully from behind there.
The airbag itself is left in place and is covered in a card compartment so be careful not to damage that at all, do not interfere with the airbag.
Once the cover is lifting up you should be able to maneuver it out as you see fit but be very careful.
Now the airbag cover is out, place this to one side and be very careful not to break any clips inside (take a look so you no what breaks upon airbag deployment)
To remove the steering wheel cowl and right hand air vent you need to remove the knee bolster, please click here for instructions on how to do this.
- Left & Right Hand Vents.Now pull on the left hand vent which should just pop out and place to one side. Repeat on the other side.
- Remove Speedometer SurroundThe screws are out so its just a simple job of lifting up one of the tabs with a flat head screwdriver as picture below:

Be careful not to break this tab, the panel should now just fully unclip quiet easily
- Remove Steering CowlOn this step you need to remove the rev counter as part of the rubber surround on the cowl goes underneath this. Undo the 2 Philips screws at the back of the rev counter, unclip the wire harness and then you will see the rubber strip that needs to be lifted over the rev counter support.
Then just pull on all 4 corners and it will unclip.


Replace everything in the following order:
- Airbag CoverAgain be very careful not to break any clips or damage the airbag compartment.
Feed the retaining bar back through the straps and fit the 2 x 10mm bolts.
- Speedometer SurroundThis will just pop straight back in place.
- Steering CowlMake sure you put the rubber strip back under the rev counter support then again this simply pops back in place.
Replace the wire harness and the 2 Philips screws on the rev counter.
- Left & Right Hand VentsPops these back in place and then replace all Torx screws.
- Replace the dash top and 4 T20 Torx screws and then replace side covers.
How to fit OEM chrome line interior into a pre-2005 model To begin with, I suggest you get your hands in there, and remove the speedo and other trim parts!
This first section is how I achieved this.
The "step" name of the photos doesn't mean they're a clear "step" in the procedure, but it just hopefully helps you follow through in the correct order.
(Photos 1 to 5) Firstly, open the door and remove the dash end cover. You can stick a screwdriver or similar into the lower section (there's an indent) and you remove the forward part of the cover. The rear is "hinged" so once you've unclipped it from the front, pull forward/out to remove. Do this on both sides of the car/dash.
Put the steering column in it's lowest position. Then pull the dash rail forward and upward to remove it. Get it out of the car, it's big and most likely will get on your way otherwise.
(Photo 6) At this stage I removed the other trim pieces from the centre section. The vent covers twist, the warning and dimmer covers pull.
(Photos 7 to 8b) You might want to take the chance to stuff cardboard or other foam stuff in any rattly parts of your dash at this stage, if you have any. Remove the two torx t-20 bolts from the top "lip" of the centre piece, and the one torx t-20 screw from below the centre piece. If you have a glovebox, it might cover the screw beneath. Also, some cars only have one screw here, some have none, some have two (one either side).
(Photos 9 to 11) As long as you've removed the screws above, everything now is just clamped into place. Pull the dash centre section out, starting from the bottom. You have to be firm, but be aware of scratching other dash panels etc! You may find the dash "cover" (silver, alloy etc.) might come off of the backing plate, just keep going, it's the plate you need off!
(Photos 12 to 13a) The speedo ring just pulls off, you might want to "squeeze" the bottom clip, but I found it just popped out anyway. Some bits have glue on them, but it's not a problem, it's not really going to cause any problem removing the ring, and if it does, you can peel it off/back with a nail easily.
(Photo 14) This shows the clip at the bottom of the ring.
(Photos 15 to 17) These show you bits of dash etc with the ring removed, other parts replaced. You can fit the new replacement speedo ring with everything together, it just snaps in place.
The next part I pulled off was the front ashtray/cupholder surrounds. Remove the ashtray (if you have one) and simply pull the ring off with your hands.
They are held in by a number of tabs. You need to use the rubber from the old holder in the new chrome piece, it just pulls out and pushes in the new piece. The chrome piece just snaps back in place.
Next up I did the gear shift ring. I did this by removing the old ring from my gaiter, although the new kit comes with a black fake leather gaiter anyway. It's easier to use your own, it just clips off, clips on.
There are several clips (highlighted in the pics below) that need to be released, then clamp the new chrome section over the grey plastic ring that you're left with.
When you put it back, there is one "spike" larger than the others, so you have to put the ring on the right way around, make a note of this when you pull it off.
The ring just pulls out by hand, it's held in by clips, much like the cupholders.
Next is the speedo (yay!)
Hard to take off, very easy to replace. Just push it on, make sure the clips at the base are in line.
The air vents just twist off (clockwise) and the new ones will twist on.
The dimmer and hazard warning covers pull off, and the new ones push on. One was quite tough to push into place.
Then you have a nice sparkly centre piece.
The handbrake kit comprises of three parts - the grip with back cap attached (two parts together, simply unclip and replace grip with your own if you have a leather or other custom grip) and the front cap. Shown in first photo below.
First thing to do is to get the front cap off. This is held in place by 3 clips - 2 together on one side and a single clip on the other (picture 2 below). On my car the single clip came away very easily, some will have to depress the two clips together by carefully inserting a SMALL flat head screw driver. The cap then comes off easily. (picture 3)
Next you need to remove the cloth gaitor from the back cap. Up to you how you do this but it is fairly fragile - this can be gently eased it off - again with the screw driver. (pic 4)
Then you remove the grip as one piece. This is held by a clip at the front and on top. Again this needs to be gently prized upwards with the aid of the screw dirver. (pic 5)
Next you need to remove the cloth gaitor from the back cap. Up to you how you do this but it is fairly fragile - I gently eased it off - again with the screw driver. (pic 4)
Then you remove the grip as one piece. This is held by a clip at the front and on top. Again this needs to be gently prized upwards with the aid of the screw dirver. (pic 5)
Fitting the new one is a simple reversal of the process.
End result looks good and in all it only takes a few minutes.
Next up the rev counter (speedo Oz). This is the tricky bit.
This is for reference only as this comes from MINI as a complete part!
First off, pull the steering down to allow space and undo the two torx t-25 screws BE CAREFUL - the spacers can fall off and be a right pain in the behind to find again!
Then, loosen things up and pull things free. The plastic cover piece over the wires will come free, and you get a bit of space. Unplug the unit and pull it free.
Undo the two philips screws on the back of the unit (no photo, sorry). Then remove the sticker (if you've got one) carefully, and you can see a clip. Push that clip in and remove the front from the back of the unit.
Now the unit is in two pieces, you can unclip the silver trim piece, and clip the new chrome piece in place.
Not too tricky, but it's quite long winded to replace a bit of trim!
That's the complete installation

Thread
Thread Starter
Forum
Replies
Last Post
triple5soul
Stock Problems/Issues
6
11-19-2019 07:46 AM