When you click on links to various merchants on this site and make a purchase, this can result in this site earning a commission. Affiliate programs and affiliations include, but are not limited to, the eBay Partner Network.
I saw that. I was a little confused because it looks like there are 3 other wired in that image going to 1,2 and 3. Wasn't too sure what that was about. do all 3 get soldered together?
No, in the photo Tom has he used 1 & 3 to the new switch that is what I did.
Look at the photo again.
A iron with a fine point helps as does tinning the wires then I added just a little soder at the said wires on the board.
If you have never done anything like this get a practice board to test your methods.
Does not appear to be positive or negative at switch.
The switch momentary pushes volts to open the hatch.
I'm a novice and your instructions were very thorough and descriptive. I did however have problems with removing the plastic shell covers. The clips on either end were really hard to remove and finally they just broke. But the rest of the clips were okay and everything seated properly and snuggly so even with the broken clips, it's not a problem. I tried and tried and tried not to break them. I took the new chrome shell cover off the new part first (as practice) just so I could see how to remove it. I'm glad I did because I broke the the chrome tabs also!
Getting the electrical housing apart with a little bit tricky. I didn't realize I was trying to get out the smaller piece. but it eventually came apart and everything works wonderfully! Thanks again for your post, you truly saved me hundreds of dollars.
Jacquie
😎
Originally Posted by RandyR90S
For all the help I’ve received from DIY posts and videos, here’s my first attempt to ‘give back’….
Ride: 2007 Cooper S R56
Problem: Rear hatch won't open via the handle on the door.
Pops open fine using the key fob.
On my 2007 Mini Cooper S (R56) the rear hatch / trunk lid failed to open using the handle on the trunk. It would only open using the button on the remote key fob.
It also seemed I wasn't getting the same 'feel' when squeezing the handle.
I had assumed (incorrectly) that the latch handle was a lever that pulled a cable attached to a lock mechanism. With only initial research I guessed one of the following:
Broken latch lever and/or attached cable
Programming option/error on the key lock function
Issue with emergency release cable
I started with #2, programming option.
I wondered if somehow the locking options were disabling the rear handle, even though the car was unlocked. I followed the owners manual (page 23) to set the Automatic Locking option to off - central locking system remains unlocked. No luck, and no change.
Next I checked #3 - emergency release cable - since it didn't involve disassembly.
Page 23 of the owner's manual also describes how to lift the rear seat to locate the emergency pull cable. I found the cable pull ring on the passenger side and pulled.
It worked, there seemed to be a reasonable amount of slack in the cable, and it returned when released. Again, not the problem.
I finally went after #1 - failure in the mechanism.
Once removed, I discovered the handle didn't attach to a cable. Instead it was connected to an electrical switch, probably activating the same motor circuit the key fob used. I tested if the switch was bad by jumping the leads at the connector to open the door. This worked, pointing to the handle switch as the problem.
Is the new trunk lid grip improved or is it the same kind the cars came with?
If they haven't improved it, then is it not possible for the new one to break down in a few years?
The switch looked like it was worth 0.50$ I rather doubt they improved the old parts they are selling.
if you can soder a electronic connection or have a friend that can, you can add a better switch.
Seawood,
i have spent a couple of hours on how to solder.
The main thing I’m wondering is how I know which switch to get. I don’t know how amps, v, resistance works. Would any momentary switch work?
Has anyone found any where that sells that piece of rubber that covers the R56 trunk button yet or are we all distended to have to replace the whole unit?
if nothing is malfunctioning yet and all you have is the torn rubber cover ...... why not just glue a layer of something over the top.
I recently found this very problem on Mrs' R-59 and when I asked why she hadn't mentioned it she replied she never uses the ' boot button' <actually did not know there was one> She always uses the button on the FOB ..... I'm concerned about water intrusion tho so went looking for the part yada yada ..... happy to find this discussion.
I think I'm gonna start with nothing more than a hunk of GOOD quality vinyl tape to close the hole off. When that falls off I may go to some silicon sealer and a hunk of black rubber or maybe just a hunk of black plastic. If Mrs does not use the button why spend to save the button even if the painting of a primer replacement scares me not????? I can solder reasonably well too, so the alternate button idea is always an option and one I pondered ... nice to know someone has 'gone before'
Hint to the casual reader .... something to check!!!!!! Many don't use the boot button and it does not show in the normal position so you may not know there is a potential water issue. But a busted rubber cover can allow water to get into the boot assembly and that's never good. Mine would only get wet during a wash but as a compulsive car washer ... that's enuf to be a problem!!
Thought I'd add to the point about vinyl tape. I just noticed mine was tearing, but not gone, so I got some flex tape and made a new layer for the button. That stuff is crazy sticky, and time will tell if it will hold up, but thought I'd share a picture. After doing this the button is nice and firm again.
Now that you know the handle switch is at fault, here’s how to replace and repair….
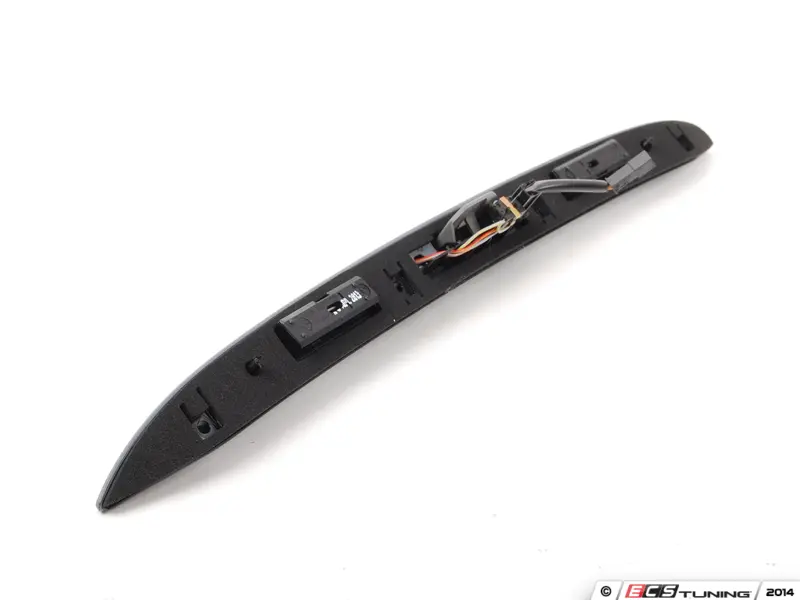
Replace the trunk lid grip
Parts/tools:
Mini Cooper part 51132753603:
Handle, trunk lid, with lamp unit Chrome line exterior
Unfortunately you can't order just the switch - it appears to be molded into the housing.
Likewise, you can't even order the black plastic housing.
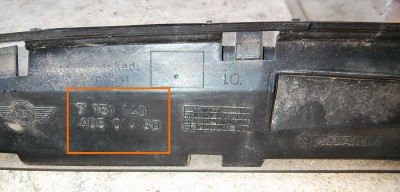
It has a BMW-like part number on it (7 151 140 405 014 50),
but I can't locate that part for sale anywhere (and no Google hits either).
A call to bavauto.com confirms this.
It seems the only option is to order the entire trunk lid grip assembly,
including the cosmetic cover - which you likely don't need.
These are your options, according the listing at RealOem.com :
$94.52 Chrome line exterior 51132753603
$97.37 Trunk lid grip primed 51132754240
$185.51 Trunk lid grip painted (specify color code) 51130430312
Since I'll be reusing my perfectly fine cover...and I'm cheap...I went with the Chrome line exterior.
Swap cosmetic cover
Parts/tools: 2 flathead screwdrivers – one small head, one larger
Remove the plastic cosmetic cover from the old assembly:
Place the old assembly face down on a covered surface (towel, cardboard)
to protect the cosmetic cover
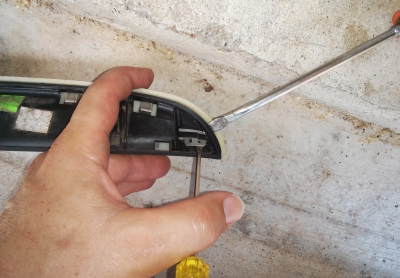
Remove the cosmetic cover by *gently* prying it off the retaining clips on the black housing:
Start at one end (far right or left) and free it from this outer clip.
Do this by lifting up on the tab with a small screwdriver
while simultaneously separating the cover from the housing with a 2nd screwdriver.
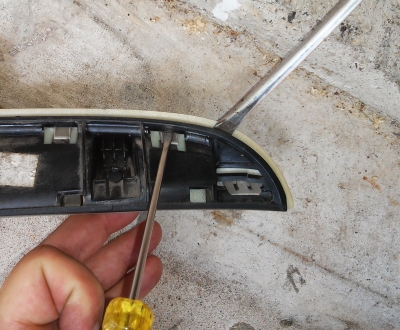
Remove the series of inner tabs/clips.
Place the small screwdriver inside the tab and push down slightly,
effectively lifting the edge of the cover over the 'teeth' of the tab on the black housing.
Simultaneously separate the cover from the housing with a 2nd screwdriver.
Work your way down the line to free all inner clips.
Remove the other outer clip as described above
The cosmetic cover should now lift away from the black housing.
Remove the cover from the new assembly.
Install the original cosmetic cover onto the new assembly:
Hold the original cosmetic cover face down in one hand,
the new black housing in the other.
Line up the bottoms of each by aligning the bottom clips
Pop the tabs in one by one working from end to end
Reinstall trunk lid grip
Reinstall in reverse - very easy.
Check that the rubber seal/O ring is on around the switch
Plug electrical connection back together
Install 4 torx screws holding the grip to the hatch/door
Optional - test operation of the handle
Install license plate holder frame, then license plate
Hopefully this is helpful, and I welcome any comments, corrections and suggestions.
That's a great write up , thanks.....one question...does the Gen 1 hatch grip cosmetic cover come off the same way? My 2005 R53 needs one but I don't want to get it painted since my cover is perfect
If i can remember when i swapped my cover you can peal back a little .
Depends on if the one you want is in stock and how quick you want it, also where you are located, with free shipping it goes economy, which can take a couple days.
If i can remember when i swapped my cover you can peal back a little .
Depends on if the one you want is in stock and how quick you want it, also where you are located, with free shipping it goes economy, which can take a couple days.
I'm in Houston Texas, If I can't get it before next Friday I'll just order it when I get back as I don't want it on my porch for two weeks
Thought I'd add to the point about vinyl tape. I just noticed mine was tearing, but not gone, so I got some flex tape and made a new layer for the button. That stuff is crazy sticky, and time will tell if it will hold up, but thought I'd share a picture. After doing this the button is nice and firm again.
The rubber switch cover on my 2008 also split open. $100 for the entire new unit kinda hard to justify. Maybe some flexible glue might work? How did the Flex Tape work?
Here's my fix. Section of bicycle inner tube plus contact cement. Let's see if it holds. I should have taken the part off, cleaned it and then applied everything. I did it with the part on the car. Not ideal.
I did the same thing you did TomSweazy. I installed a secondary metal switch. Same one as you used, for $6, https://www.ebay.com/itm/16mm-Starter-Switch-Boat-Horn-Momentary-Push-Button-Stainless-Steel-Metal/151508432443?ssPageName=STRK%3AMEBIDX%3AIT&_trksid =p2060353.m2749.l2649.
I thought about trying to replace the original microswitch but I realized that the plastic parts that link the rubber button to the actual switch were in sad shape. The microswitch was working it was those plastic parts that connect the rubber button to the microswitch that had broken off. I didnt think I could get them back on successfully so I decided the new metal switch was a better solution.
You can see the plastic button that came loose sitting on the circuit board.
Taking off the glued-on back cover is the hardest part. As per the videos above just use a heat gun and thin flathead screw driver to pry it open
Here is it taken apart.
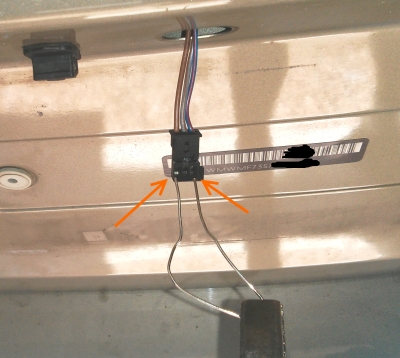
Then I used a razorblade to remove the sheathing on the two wires noted in Tom's pics above (thx Tom!) and soldered in 2 small gauge wires and then I painted on some liquid electric tape (which was mostly dry hence it didnt paint on very well).
You can also use some 3M Scotchlock connectors.
Then drill a small hole to route the new wires through this bulkhead thang and connect to the switch.
Then plug it into the car to make sure it works before you glue the cover back on, using some hot glue or crazy glue. Hot glue is preferable if you have access to a glue gun.
The switch seems like very high quality and it's easy to find/feel without seeing it.
Test the switch function
Parts/tools: paper clip, insulated pliers
The handle in the trunk grip is not a physical lever to a release cable. Instead it's a simple electrical switch. It appears to accomplish the same function as the key fob button, activating the motor that releases the latch. It's a good idea to test/mimic the switch function to make sure that's the culprit.
You can do this by 'jumping' the brown and blue/red wires
Form a paper clip to the width of the 2 outside contacts (brown and blue/red wires)
Hold the paper clip with insulated pliers, touch the 2 outside metal contacts inside the plug.
The hatch should pop open.
If it does it confirms that the switch is at fault
Next: Replace and Install
Thank you for this write up! I’m having a weird issue. The switch seems to be OK (if I measure voltage across the pins, it flips from 0 to 12 and 12 to 0 depending on the pins, so _something_ is happening), but shorting these wires (1 and 3) does nothing. But it does have 12V across these two wires. Is my problem elsewhere? Unlocking with the remote works, but the switch does not.
I thought maybe a fuse is blown somewhere, but since there’s 12V across the wires, that’s not it?…
For all the help I’ve received from DIY posts and videos, here’s my first attempt to ‘give back’….
Ride: 2007 Cooper S R56
Problem: Rear hatch won't open via the handle on the door.
Pops open fine using the key fob.
On my 2007 Mini Cooper S (R56) the rear hatch / trunk lid failed to open using the handle on the trunk. It would only open using the button on the remote key fob.
It also seemed I wasn't getting the same 'feel' when squeezing the handle.
I had assumed (incorrectly) that the latch handle was a lever that pulled a cable attached to a lock mechanism. With only initial research I guessed one of the following:
Broken latch lever and/or attached cable
Programming option/error on the key lock function
Issue with emergency release cable
I started with #2, programming option.
I wondered if somehow the locking options were disabling the rear handle, even though the car was unlocked. I followed the owners manual (page 23) to set the Automatic Locking option to off - central locking system remains unlocked. No luck, and no change.
Next I checked #3 - emergency release cable - since it didn't involve disassembly.
Page 23 of the owner's manual also describes how to lift the rear seat to locate the emergency pull cable. I found the cable pull ring on the passenger side and pulled.
It worked, there seemed to be a reasonable amount of slack in the cable, and it returned when released. Again, not the problem.
I finally went after #1 - failure in the mechanism.
Once removed, I discovered the handle didn't attach to a cable. Instead it was connected to an electrical switch, probably activating the same motor circuit the key fob used. I tested if the switch was bad by jumping the leads at the connector to open the door. This worked, pointing to the handle switch as the problem.
The DIY for the testing and replacement follows….
My release pad was getting janky and I wanted to fix it. It eventually came loose in my hand but I can still reach the button inside. These two pieces fell off. Do they snap back in or is there a break all together? Broken or do they snap together with release button?
The switch goes bad, junk from Mini.
i replaced with a micro switch as is shown above in thread
you will need a solder iron for electronic application, pay attention to wiring.
when I replaced the switch the fob still works .
my handle is still there but does not do anything.
Hi, new member here. recently bought a 2007 Mini Cooper, the trunk latch as the handle underneath was missing and wasn't working so I bought a new one, when i took the old one off the connection was rusted on and broke when i finally got it off the old part so now im guessing i have to buy a new wiring part, does anyone have a part number of this part?
Hi, new member here. recently bought a 2007 Mini Cooper, the trunk latch as the handle underneath was missing and wasn't working so I bought a new one, when i took the old one off the connection was rusted on and broke when i finally got it off the old part so now im guessing i have to buy a new wiring part, does anyone have a part number of this part?
I don’t offhand, but check RealOEM, should be listed in the diagram.
Hi, new member here. recently bought a 2007 Mini Cooper, the trunk latch as the handle underneath was missing and wasn't working so I bought a new one, when i took the old one off the connection was rusted on and broke when i finally got it off the old part so now im guessing i have to buy a new wiring part, does anyone have a part number of this part?
 02-20-2018, 01:57 PM