R60 Mud Flaps Installation
#1
 04-10-2011, 03:03 PM


Join Date: Feb 2011
Location: East Hampton, NY
Posts: 289
Likes: 0
Received 0 Likes
on
0 Posts
Mud Flaps Installation
I purchased a set of front and rear mud flaps for $95 delivered on e-bay from a Mini dealer in NJ. Had them in a few days.
The front pair were a breeze to install since you can turn the wheels right or left to get to the 8MM mounting screws.
There is a 1/4" strip of high adhesive attached to the mud flaps so I wiped down the area with a clean rag soaked with acetone. I held the mud flaps in place by hand first and used a sharp pencil to lightly mark the outline of where the mudflaps would sit so I knew where to wipe the area with acetone.
On the front mud flaps there are also (3) extra screws that need to be installed beyond the (2) factory 8MM 6 point screws that need to be removed and reinstalled.
I pre-drilled the holes for the new screws. The second one down from the top seemed to go through metal so I also put a dab of silicon on the threads to prevent corrosion. I used #10 x 1/2" stainless screws and washers. I didn't use any of the hardware that came with the mud flaps except for (2) of the plastic rivets for the rear mud flaps.
The rear mud flaps were a bit more of a PIA since there are 2 plastic rivets on each side that need to be pulled out and thrown in the trash.
One is all the way at the top of the rear mud flap and the other is all the way at the bottom under the vehicle.
I replaced the top plastic rivet with one that came with the mud flaps but on the bottom one I decided to drill out the hole on the mounting bracket to 1/4" and use a 1/4 x 1 1/4" stainless bolt with stainless washers and a stainless nylon lock nut.
I had to pull the rear wheels off to get at all the mounting screws. You could probably get away without having to pull the rear wheels off to install the 2 extra screws and it would be ok. But I have the tools and the time and my nature is to just do everything right.
If you decide to pull the rear wheels off you'll need to torque them down to 140 Nm (103.3 Ft/Lb) in a star pattern with a 1/2" torque wrench and a 17MM socket and extension. I started by blocking the wheel and then applying 40 Nm to each nut then increased it in 40Mn increments to 120Nm then the final 20Nm more to 140Nn before I lowered the vehicle.
I'd say it took about 2 hours to complete the installation at my own pace nursing a couple of broken ribs and a few of beers along the way.
Comments below each photo

Loosen and remove the 2 black 8MM screws from the front wheel well

Front Mud Flap installed with factory black 8MM screws and (2) #10 stainless steel sheet metal screws and Stainless washers with a dab of clear silicon to the threads.

There is also a screw up underneath the front mud flap that needs to be pre-drilled and installed.
Next the rear Mud Flap installation below.

Jack up your CM from the jacking point and remove the rear wheels one at a time

At the top is a plastic rivet that needs to be pried out with a screwdriver and a pair of pliers. Replace it with one that comes with the mud flaps.
There are also (2) black 8MM 6 point screws that need to be removed and reinstalled. Plus (2) new #10 x 1/2" S/S screws and washers. You can use the hardware supplied if you wish. I always opt to go with stainless since I live in a marine environment.

Under the rear mud flap is another connection point. This comes from the factory with a nylon rivet that also needs to be pried out with a screwdriver and pair of pliers.
I opted to drill it out to 1/4" and install a 1 1/14" stainless through bolt, stainless washers and a stainless nylon lock nut instead of re-installing a nylon rivet that came with the rear mud flaps.

Rear through bolt looking upwards.

Front mud flaps installed

Rear mud flaps installed.
I'll be more than happy to answer any installation questions you may have via PM.
All the best to my fellow CM owners
.
The front pair were a breeze to install since you can turn the wheels right or left to get to the 8MM mounting screws.
There is a 1/4" strip of high adhesive attached to the mud flaps so I wiped down the area with a clean rag soaked with acetone. I held the mud flaps in place by hand first and used a sharp pencil to lightly mark the outline of where the mudflaps would sit so I knew where to wipe the area with acetone.
On the front mud flaps there are also (3) extra screws that need to be installed beyond the (2) factory 8MM 6 point screws that need to be removed and reinstalled.
I pre-drilled the holes for the new screws. The second one down from the top seemed to go through metal so I also put a dab of silicon on the threads to prevent corrosion. I used #10 x 1/2" stainless screws and washers. I didn't use any of the hardware that came with the mud flaps except for (2) of the plastic rivets for the rear mud flaps.
The rear mud flaps were a bit more of a PIA since there are 2 plastic rivets on each side that need to be pulled out and thrown in the trash.
One is all the way at the top of the rear mud flap and the other is all the way at the bottom under the vehicle.
I replaced the top plastic rivet with one that came with the mud flaps but on the bottom one I decided to drill out the hole on the mounting bracket to 1/4" and use a 1/4 x 1 1/4" stainless bolt with stainless washers and a stainless nylon lock nut.
I had to pull the rear wheels off to get at all the mounting screws. You could probably get away without having to pull the rear wheels off to install the 2 extra screws and it would be ok. But I have the tools and the time and my nature is to just do everything right.
If you decide to pull the rear wheels off you'll need to torque them down to 140 Nm (103.3 Ft/Lb) in a star pattern with a 1/2" torque wrench and a 17MM socket and extension. I started by blocking the wheel and then applying 40 Nm to each nut then increased it in 40Mn increments to 120Nm then the final 20Nm more to 140Nn before I lowered the vehicle.
I'd say it took about 2 hours to complete the installation at my own pace nursing a couple of broken ribs and a few of beers along the way.
Comments below each photo
Loosen and remove the 2 black 8MM screws from the front wheel well
Front Mud Flap installed with factory black 8MM screws and (2) #10 stainless steel sheet metal screws and Stainless washers with a dab of clear silicon to the threads.
There is also a screw up underneath the front mud flap that needs to be pre-drilled and installed.
Next the rear Mud Flap installation below.
Jack up your CM from the jacking point and remove the rear wheels one at a time
At the top is a plastic rivet that needs to be pried out with a screwdriver and a pair of pliers. Replace it with one that comes with the mud flaps.
There are also (2) black 8MM 6 point screws that need to be removed and reinstalled. Plus (2) new #10 x 1/2" S/S screws and washers. You can use the hardware supplied if you wish. I always opt to go with stainless since I live in a marine environment.
Under the rear mud flap is another connection point. This comes from the factory with a nylon rivet that also needs to be pried out with a screwdriver and pair of pliers.
I opted to drill it out to 1/4" and install a 1 1/14" stainless through bolt, stainless washers and a stainless nylon lock nut instead of re-installing a nylon rivet that came with the rear mud flaps.
Rear through bolt looking upwards.
Front mud flaps installed
Rear mud flaps installed.
I'll be more than happy to answer any installation questions you may have via PM.
All the best to my fellow CM owners
.
Last edited by Hobie44610; 04-10-2011 at 03:46 PM. Reason: Human Error. A simple typo was made during the task to assemble the photos and submit this post.
#2
04-10-2011, 03:18 PM
4th Gear
Join Date: Jan 2005
Location: Murrieta, California
Posts: 372
Likes: 0
Received 0 Likes
on
0 Posts
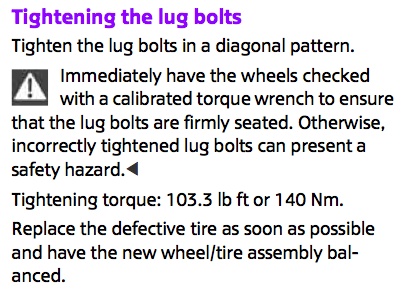
If you decide to pull the rear wheels off you'll need to torque them down to 140 Nm (130.3 Ft/Lb) in a star pattern with a 1/2" torque wrench and a 17MM socket and extension. I started by blocking the wheel and then applying 40 Nm to each nut then increased it in 40Mn increments to 120Nm then the final 20Nm more to 140Nn before I lowered the vehicle.
The manual says to torque the lugs to 103.3, not 130.3.
Here's a screen grab from the .pdf, and my hardcopy manual says the same:
#3
04-10-2011, 03:38 PM
Join Date: Feb 2011
Location: East Hampton, NY
Posts: 289
Likes: 0
Received 0 Likes
on
0 Posts

Did I make any other typos ?
On edit :I must say it was a tremendous task to take the photos along the way and then assemble this post to help out others. If all you could do was jump on my case for a simple typo then all I can say to everyone else here is all I tried to do was help you out.
Last edited by MLPearson79; 04-11-2011 at 10:08 AM. Reason: Disrespectful comments removed.
#4
04-10-2011, 04:42 PM

Join Date: Feb 2008
Location: Jersey City, NJ
Posts: 1,579
Likes: 0
Received 0 Likes
on
0 Posts
#6
04-10-2011, 05:16 PM

4th Gear
Join Date: Sep 2002
Location: Denver, CO
Posts: 430
Likes: 0
Received 0 Likes
on
0 Posts
#7
04-10-2011, 05:27 PM
4th Gear
Join Date: Jan 2005
Location: Murrieta, California
Posts: 372
Likes: 0
Received 0 Likes
on
0 Posts
https://www.northamericanmotoring.co...-calipers.html
Didn't need to be as detailed as yours.
Trending Topics
#8
04-10-2011, 05:33 PM
Join Date: Feb 2011
Location: East Hampton, NY
Posts: 289
Likes: 0
Received 0 Likes
on
0 Posts

#9
04-10-2011, 06:32 PM


#10
04-10-2011, 08:20 PM
Join Date: Feb 2008
Location: Jersey City, NJ
Posts: 1,579
Likes: 0
Received 0 Likes
on
0 Posts

#12
04-11-2011, 10:12 AM


#14
04-11-2011, 03:03 PM

2nd Gear
Join Date: Mar 2011
Location: Fairfield, OH
Posts: 118
Likes: 0
Received 0 Likes
on
0 Posts
#15
04-12-2011, 07:57 AM
Great job on the writeup! Do you find that the stainless hardware stands out too much? Funny, was just looking at eBay auctions for these the other day, too...
Seems a bit overly complicated process for simple mudflaps, but I guess you wouldn't want them to fall off. Right angle tools would likely speed the installation considerably, negating the removal of wheels and whatnot. Besides, I'm sure MINI expects the dealers to install these (and get paid handsomely for it).
Seems a bit overly complicated process for simple mudflaps, but I guess you wouldn't want them to fall off. Right angle tools would likely speed the installation considerably, negating the removal of wheels and whatnot. Besides, I'm sure MINI expects the dealers to install these (and get paid handsomely for it).
#16
04-12-2011, 11:14 AM

FYI, MINI club members get discounts on all parts purchased at dealers. The mudflaps from the dealer comes with a packet of adhesive prep & all hardware. You can ask the parts counter person to print out the installation instructions.
I did my own install about 3 months ago.
I did my own install about 3 months ago.
Last edited by 03mini-S; 04-13-2011 at 05:57 PM.
#18
04-13-2011, 11:25 AM

At the risk of going off topic and being told where I can put my dog (  ) - I belong to BMW Owners, which I assume doesn't do anything for MINI. Is there a national MINI (the one you mention?) and do you have a link?
Thanks,
Selay - Who's Scotch-Irish and loves to squeeze a nickel.
) - I belong to BMW Owners, which I assume doesn't do anything for MINI. Is there a national MINI (the one you mention?) and do you have a link?Thanks,
Selay - Who's Scotch-Irish and loves to squeeze a nickel.
#19
04-13-2011, 03:31 PM
Join Date: Feb 2008
Location: Jersey City, NJ
Posts: 1,579
Likes: 0
Received 0 Likes
on
0 Posts

#21
04-13-2011, 05:55 PM
At the risk of going off topic and being told where I can put my dog ( ) - I belong to BMW Owners, which I assume doesn't do anything for MINI. Is there a national MINI (the one you mention?) and do you have a link?
Thanks,
Selay - Who's Scotch-Irish and loves to squeeze a nickel.
) - I belong to BMW Owners, which I assume doesn't do anything for MINI. Is there a national MINI (the one you mention?) and do you have a link?Thanks,
Selay - Who's Scotch-Irish and loves to squeeze a nickel.
www.phillymini.org
#22
04-26-2011, 12:22 PM

Wanted to say great post. Checked it out a couple of weeks ago before the CM was delivered. Upon driving the CM around for the last week, I noticed that the Tire Dressing they loaded on the tires has nicely spun up on the side of the car. Front doors and down the whole side. It would be in the same pattern that rocks/stuff would get kicked up!
Looks like I will be doing the Front Mudflap install to save the side of the car!
So thanks for the install DIY!
Looks like I will be doing the Front Mudflap install to save the side of the car!
So thanks for the install DIY!
#23
10-17-2011, 06:55 AM

#24
10-17-2011, 04:16 PM
#25
10-17-2011, 04:44 PM
3rd Gear
Join Date: May 2011
Location: Dallas, TX
Posts: 284
Likes: 0
Received 0 Likes
on
0 Posts
I had a tech at MINI of Dallas help me install mine a few months ago during their qtrly DIY Day.....awesome if your MINI dealership offers this by the way....what you do is prior to screwing the guard on, pull a wee bit of the red strip protecting the tape down a bit and fold over so you can see it once the guard is placed. Then screw in the flaps, then once you get the flaps screwed in(and you have previously cleaned the area with the plastic softner they provide), simply pull on the red strip and push hard to seal the flap plastic to the wheel arch plastic. He let me use this cool metal roller that helped seam the plastics together. I will say, we did not have to take off any tires, it was on a lift, but he let me use his flexible screwdriver which enabled me to screw/un-screw the screws without removing the tires. Hope this helps. and I will say, it is a tedious DIY project, way more than say an oil change, but the finished project is awesome...including the rear ones!

