Interior/Exterior R56 Seats into my 04 R53: Installed and pics!
#101
 10-23-2022, 04:28 PM


R57 rear seats will definitely not fit in a R53 .. but nor will R53 convertible seats. Convertible rear seats are totally different than non-convertible seats. Front seats should be the same (i.e. R56 front should be the same as R57 front, unless they have a rollbar built in, in which case they'll fit, but you'll have a rollbar!!)

The following users liked this post:
djtomy (10-23-2022)

#103
11-07-2022, 09:49 AM

#104
11-07-2022, 10:45 AM
Does the rear hatch close OK when there is no rear parcel shelf in the car? If so, I think you probably have a parcel shelf which has sagged a little bit at the back, where it is shaped to go around the rear wiper shape in the rear hatch.
#106
11-07-2022, 11:40 AM
#107
11-30-2022, 10:05 PM
Neutral

#109
11-16-2023, 01:30 PM

UNDER CONSTRUCTION
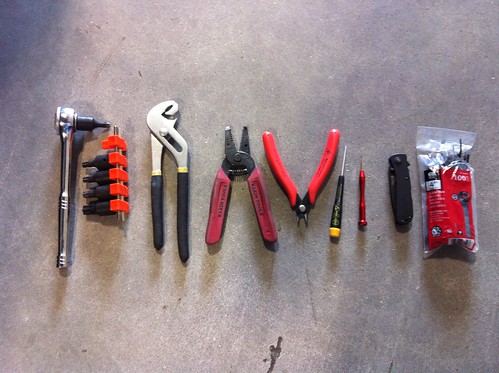
Tools needed
Torx Bits T40 and T60
3/8" Ratchet
Pliers
Wirestrippers (optional)
Diagonal Snips
Small Screwdrivers
Knife
Zip Ties
Beer (not shown)
***Remove you negative battery cable and let the car sit for 20-30 minutes. No use having an airbag deploy and ruin your new seats or having a permanently lit airbag light on your dash***
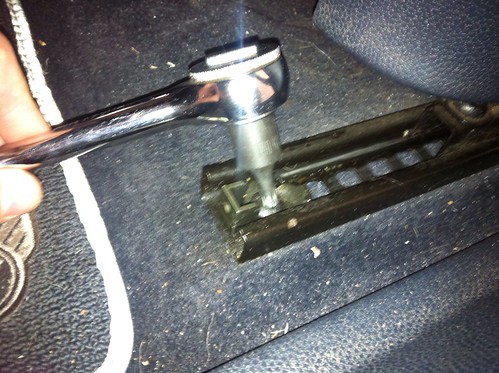
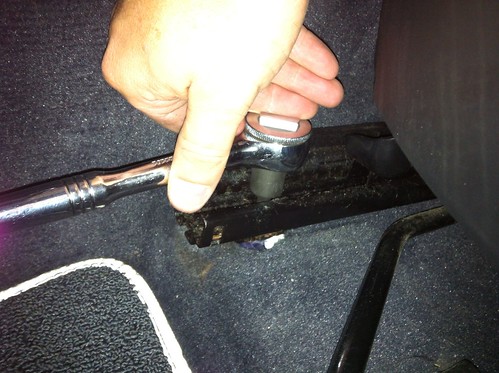
Grab that ratchet and T40 Torx bit and start removing the seat bolts, 4 per seat.
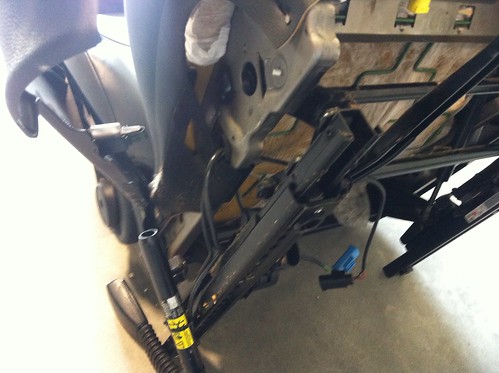
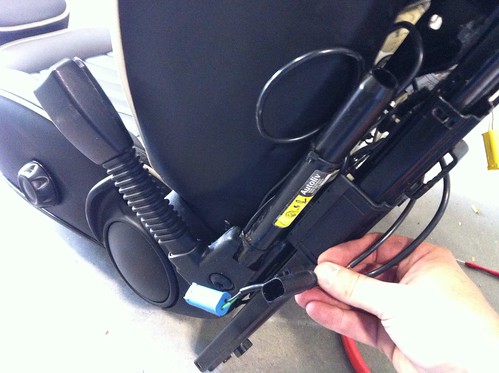
Now tilt the seat back and remove the electrical plugs for the Airbag (yellow) and seat belts (the other two). If you have heated seats there should be another black plug with some heavy gauge wiring. Pull those old seats out and be amazed at the years of crumbs and trash wedged in some of those areas. Take the time to really vacuum out this area. I've always thought I kept a clean car but apparently I dont have a small enough vacuum attachment to really get down in there...note to self!
Mmm tasty...Now you're going to remove the seat belt assembly from your R53 seats. This will installed on the newer R56 seats as the new buckles are different than the earlier models. To remove, use the T60 torx bit. Remember to pull towards you so you dont rack your knuckles on something hard and or sharp. This bolt is held down with blue loctite. Don't worry about all the nastiness in this area, we're going to clean up in a minute.
Now that you have that seatbelt bolt out, it's time to run the wires out. This is easier if you remove the plastic trim on the front and middle portion of the seat. This will open that area enough to easily feed those wires through.
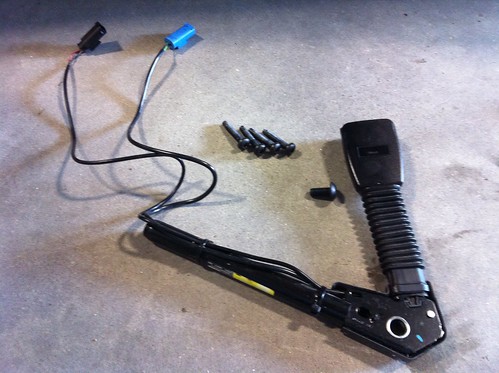
Here is everything you should have removed so far. Seatbelt assembly, bolt and 4 qty seat bolts. Be sure to save that seatbelt bolt, it's a little bit longer than the R56 version and will thread right into the new seats.
Here, we are removing the seatbelts from the R56 seats. Same as above, hold the seat down and prepare to crank on that loctited bolt.
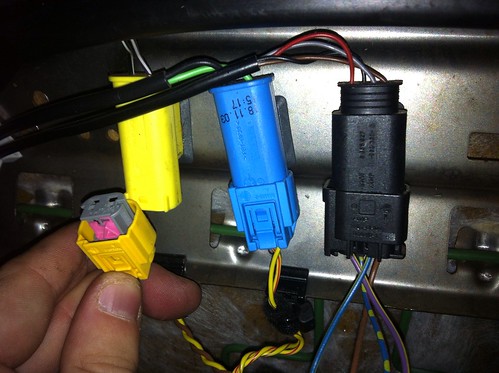
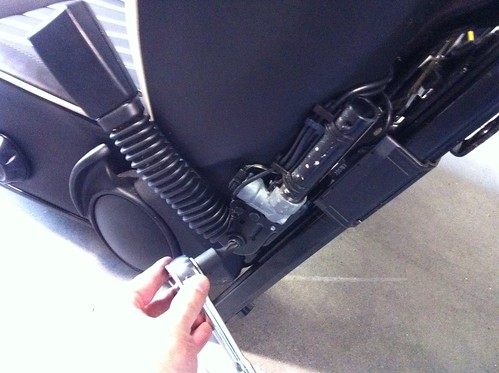
Moving on to the R56 seats. The 1st gen cars used multiple individual plugs, 2nd gen use this "all-in-one" plug. Fortunately the individual plugs are captive within this "master" plug. To separate, use a small flathead screwdriver and press the 2 retainers to slide out the plugs.

They'll come out just like this. You can toss that big ole' yellow plug now.
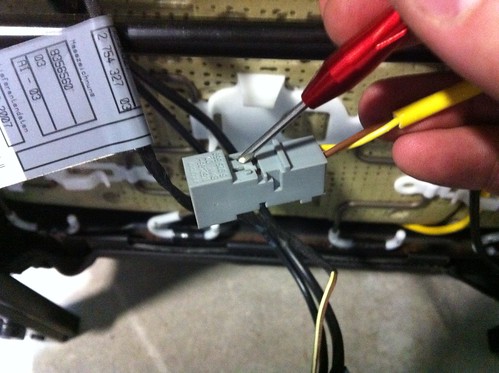
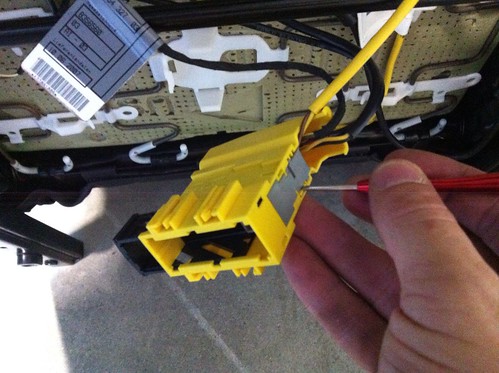
Now we're going to remove the airbag plug and replace with the plug from our 1st gen airbag. This allows the seat to plug right into the existing wire harness already in your car. There are 2 tiny little pin you press to remove the wires and their "pins".
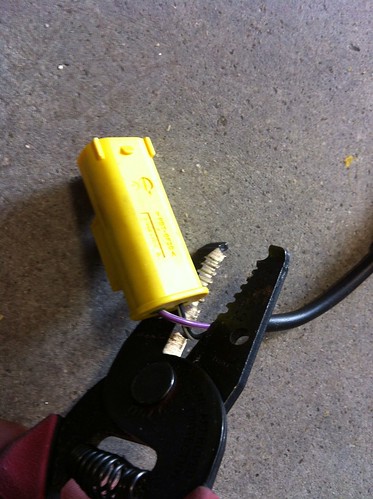
Cut your old yellow airbag plug from your old seats. In hindsight I should have mended the newer plug to the in-car wiring harness. This way you can sell your old airbags and recoup some of your costs. I wanted to retain as much "stock integrity" as possible so I went this route.
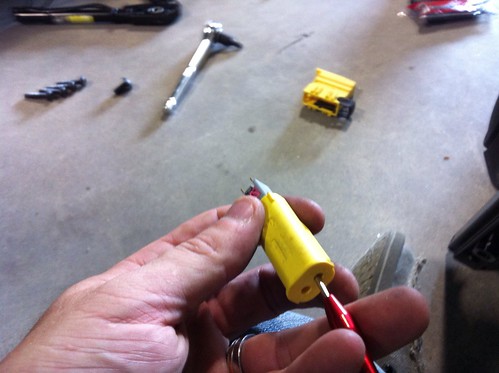
You want to press out the inner plug from your freshly cut airbag connector. Be careful NOT to put your hand or fingers near that open end. The copper contacts are hard and sharp and you will put that SOB right through your finger...ask me how I know
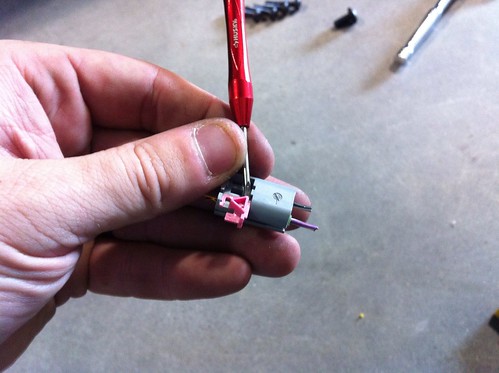
Now that you have that inner plug out, remove that little pink retainer. Set aside so you dont lose it.
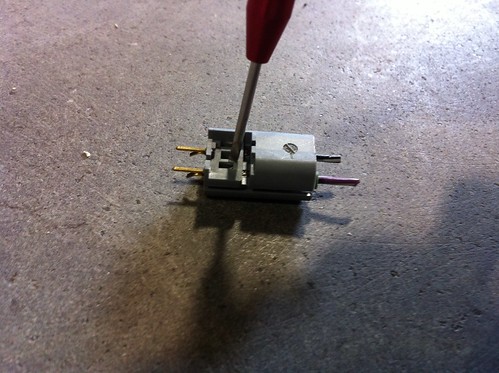
We're going to grab that little screwdriver again and press the old pins out. This will open up the pug to accept the new wires. Thankfully Mini kept them the same for stoopid easy swappin' ***Notice those lil bastard copper contacts. Do you really want THAT going into your finger? Me thinks not.

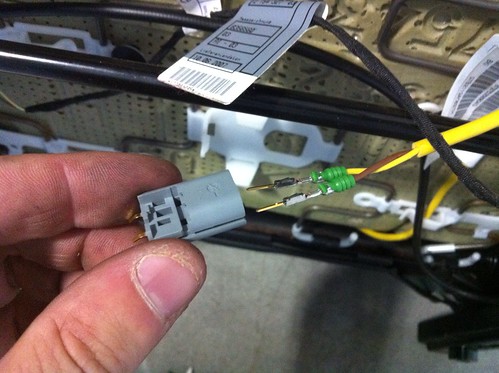
You'll want to trim some of that yellow sheathing from the airbag wire to give you enough room to install the pins. I used a knife and those wire strippers. Secondly, you want to align those pins so those detents grab and wont set your airbag light off in the future.
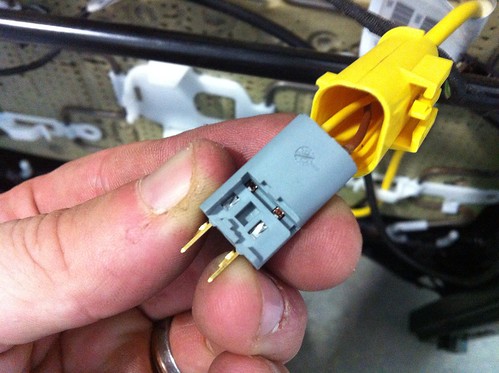
This is with the pins aligned and about to be installed back into the airbag connector. I left the gray portion out of the plug to ensure the connection would be made. You also want to re-install that little pink connector on the backside of that gray plug. I didn't take a pic because it was so small and easy.
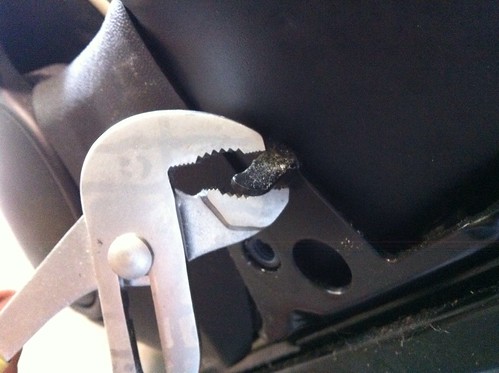
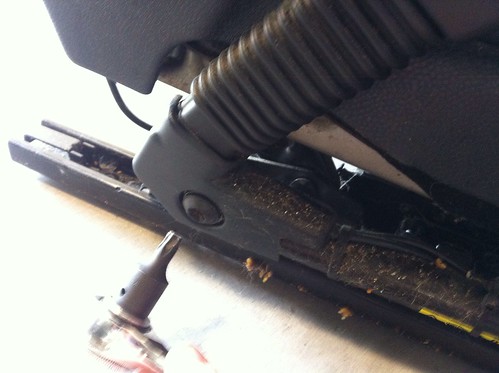
This is the part that will likely cause some some controversy here. On the R53 seat there is a bolt (previously removed) and a pin for alignment of the seat belt assembly. On the R56 seat there is a bent steel "pin" that aligns the seatbelt assembly. I simply bent this piece flat with a pair of pliers and made sure to really crank down on that bolt.
Here we have the bolt installed, feel free to add a drop or two of some loctite to button everything up. I didn't but I might be removing the seats shortly to install heaters and take care of that then. Take car routing the wires through the seat frame. This unit slides on the rails so making the wires taught will limit the seat travel and possibly mess up your plugs/wiring.
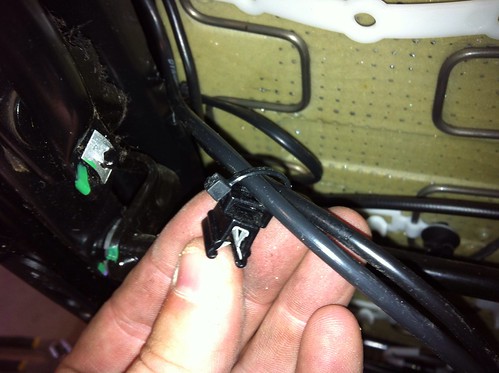
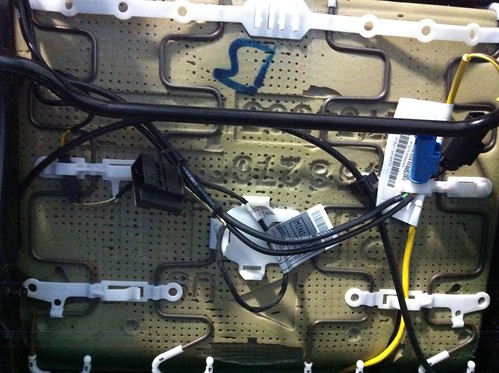
Here are a few shots of the wiring, note zip tie location. Now its time to get those fancy new seats in!!!
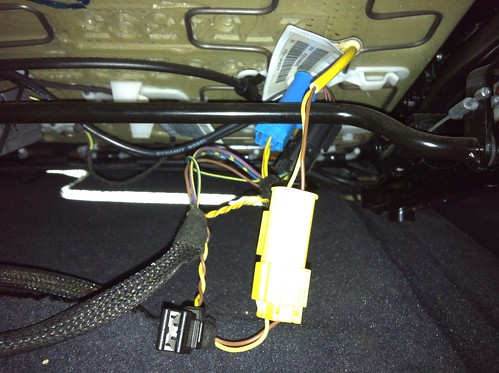
This is the new seat tilted back with the plugs all attached. Note the airbag plug is in front of the bar, move it behind with the rest of the plugs.
Almost done!!! Time to crank those bolts down. Please clean them before installing, mine had a decent amount of grease on them. Go ahead and reconnect that battery cable and...
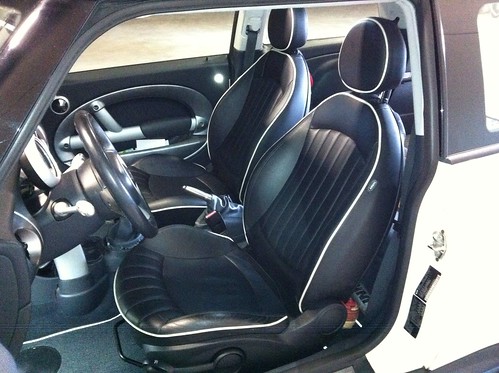
Revel in your new seat goodness. If you were used to the hard leatherette from the old seats like me, be prepared to sneak out at night and sit in your new seats naked...just kidding!
Please let me know if there are any questions.
Tools needed
Torx Bits T40 and T60
3/8" Ratchet
Pliers
Wirestrippers (optional)
Diagonal Snips
Small Screwdrivers
Knife
Zip Ties
Beer (not shown)
***Remove you negative battery cable and let the car sit for 20-30 minutes. No use having an airbag deploy and ruin your new seats or having a permanently lit airbag light on your dash***
Grab that ratchet and T40 Torx bit and start removing the seat bolts, 4 per seat.
Now tilt the seat back and remove the electrical plugs for the Airbag (yellow) and seat belts (the other two). If you have heated seats there should be another black plug with some heavy gauge wiring. Pull those old seats out and be amazed at the years of crumbs and trash wedged in some of those areas. Take the time to really vacuum out this area. I've always thought I kept a clean car but apparently I dont have a small enough vacuum attachment to really get down in there...note to self!
Mmm tasty...Now you're going to remove the seat belt assembly from your R53 seats. This will installed on the newer R56 seats as the new buckles are different than the earlier models. To remove, use the T60 torx bit. Remember to pull towards you so you dont rack your knuckles on something hard and or sharp. This bolt is held down with blue loctite. Don't worry about all the nastiness in this area, we're going to clean up in a minute.
Now that you have that seatbelt bolt out, it's time to run the wires out. This is easier if you remove the plastic trim on the front and middle portion of the seat. This will open that area enough to easily feed those wires through.
Here is everything you should have removed so far. Seatbelt assembly, bolt and 4 qty seat bolts. Be sure to save that seatbelt bolt, it's a little bit longer than the R56 version and will thread right into the new seats.
Here, we are removing the seatbelts from the R56 seats. Same as above, hold the seat down and prepare to crank on that loctited bolt.
Moving on to the R56 seats. The 1st gen cars used multiple individual plugs, 2nd gen use this "all-in-one" plug. Fortunately the individual plugs are captive within this "master" plug. To separate, use a small flathead screwdriver and press the 2 retainers to slide out the plugs.
They'll come out just like this. You can toss that big ole' yellow plug now.
Now we're going to remove the airbag plug and replace with the plug from our 1st gen airbag. This allows the seat to plug right into the existing wire harness already in your car. There are 2 tiny little pin you press to remove the wires and their "pins".
Cut your old yellow airbag plug from your old seats. In hindsight I should have mended the newer plug to the in-car wiring harness. This way you can sell your old airbags and recoup some of your costs. I wanted to retain as much "stock integrity" as possible so I went this route.
You want to press out the inner plug from your freshly cut airbag connector. Be careful NOT to put your hand or fingers near that open end. The copper contacts are hard and sharp and you will put that SOB right through your finger...ask me how I know
Now that you have that inner plug out, remove that little pink retainer. Set aside so you dont lose it.
We're going to grab that little screwdriver again and press the old pins out. This will open up the pug to accept the new wires. Thankfully Mini kept them the same for stoopid easy swappin' ***Notice those lil bastard copper contacts. Do you really want THAT going into your finger? Me thinks not.
You'll want to trim some of that yellow sheathing from the airbag wire to give you enough room to install the pins. I used a knife and those wire strippers. Secondly, you want to align those pins so those detents grab and wont set your airbag light off in the future.
This is with the pins aligned and about to be installed back into the airbag connector. I left the gray portion out of the plug to ensure the connection would be made. You also want to re-install that little pink connector on the backside of that gray plug. I didn't take a pic because it was so small and easy.
This is the part that will likely cause some some controversy here. On the R53 seat there is a bolt (previously removed) and a pin for alignment of the seat belt assembly. On the R56 seat there is a bent steel "pin" that aligns the seatbelt assembly. I simply bent this piece flat with a pair of pliers and made sure to really crank down on that bolt.
Here we have the bolt installed, feel free to add a drop or two of some loctite to button everything up. I didn't but I might be removing the seats shortly to install heaters and take care of that then. Take car routing the wires through the seat frame. This unit slides on the rails so making the wires taught will limit the seat travel and possibly mess up your plugs/wiring.
Here are a few shots of the wiring, note zip tie location. Now its time to get those fancy new seats in!!!
This is the new seat tilted back with the plugs all attached. Note the airbag plug is in front of the bar, move it behind with the rest of the plugs.
Almost done!!! Time to crank those bolts down. Please clean them before installing, mine had a decent amount of grease on them. Go ahead and reconnect that battery cable and...
Revel in your new seat goodness. If you were used to the hard leatherette from the old seats like me, be prepared to sneak out at night and sit in your new seats naked...just kidding!
Please let me know if there are any questions.
thank you Orlando

Thread
Thread Starter
Forum
Replies
Last Post
Interior/Exterior R56 seats in a R53, any problems with heat and pass occupancy sensor?
wikdr53
Interior/Exterior
4
01-31-2018 11:21 AM
Mini Union
R56 :: Hatch Talk (2007+)
0
01-12-2015 12:37 PM