Interior/Exterior Who Has Installed JCW Sport Gauges Themselves?
#1
 04-20-2013, 05:41 PM


Join Date: Feb 2009
Location: St Pete, FL
Posts: 109
Likes: 0
Received 0 Likes
on
0 Posts
Who Has Installed JCW Sport Gauges Themselves?
OK, so I'm seriously considering adding a temperature gauge to my '13 R56, as well as one other gauge from available options (leaning towards the torque gauge). And, I'm looking at this setup:

Which, is MINI part number: 62-11-0-445-458[-A]
Has anyone installed this kit, yet, on their own?
I'm really, really, really interested in seeing the installation instructions before I buy.
I want to make sure I can install this on my own w/o any need for further [re]-programming by my MINI dealer.
Thanks!
Alan

#3
07-15-2013, 01:39 PM

Platinum Sponsor
Posted this in another thread but it was helpful.
Here is the factory John Cooper Works Sport Gauge Double Pod kit.

#1 Dual version
John Cooper Works Sport Gauge Installation Kit - Double Indicator
http://www.ecstuning.com/Search/SiteSearch/62112149355/
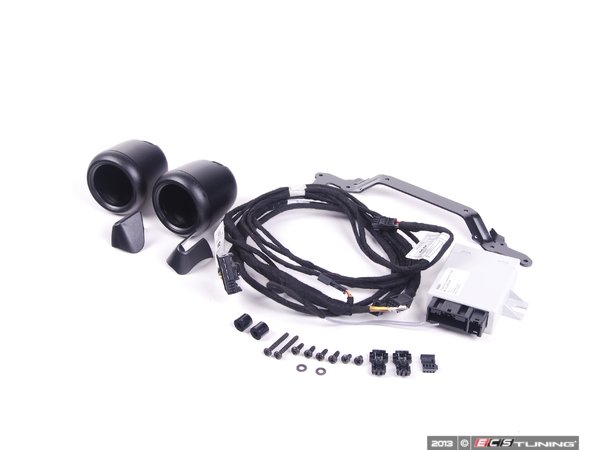
Or
#2 ** Single Pod version, for people who just want to single pod or for R57 MINI Convertible owners with the "Openmeter" on the other side. ** which is in the top pic for the original poster.
John Cooper Works Sport Gauge Installation Kit - Single Indicator Part number 62112150353
http://www.ecstuning.com/Search/SiteSearch/62112150353/
---------------
Here is the gauges by themselves for reference. Click on the items links to see additional pics
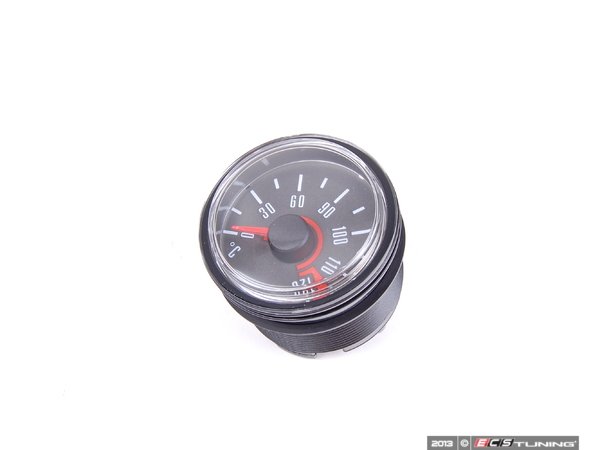
Indicator Cooling Water Temperature - Celsius
http://www.ecstuning.com/Search/SiteSearch/62110445458/
&
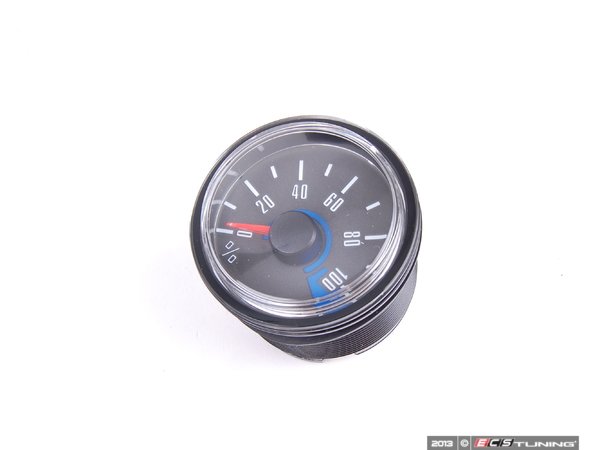
Indicator Relative Torque Gauge - %
http://www.ecstuning.com/Search/SiteSearch/62110445459/
&
Lateral G Force Gauge - G's
http://www.ecstuning.com/Search/SiteSearch/62110426786/ES515302/
--------------
Here is the install guide.
The install guide will help you with the step by step to do the install.
Thanks
Here is the factory John Cooper Works Sport Gauge Double Pod kit.
#1 Dual version
John Cooper Works Sport Gauge Installation Kit - Double Indicator
http://www.ecstuning.com/Search/SiteSearch/62112149355/
Or
#2 ** Single Pod version, for people who just want to single pod or for R57 MINI Convertible owners with the "Openmeter" on the other side. ** which is in the top pic for the original poster.
John Cooper Works Sport Gauge Installation Kit - Single Indicator Part number 62112150353
http://www.ecstuning.com/Search/SiteSearch/62112150353/
---------------
Here is the gauges by themselves for reference. Click on the items links to see additional pics
Indicator Cooling Water Temperature - Celsius
http://www.ecstuning.com/Search/SiteSearch/62110445458/
&
Indicator Relative Torque Gauge - %
http://www.ecstuning.com/Search/SiteSearch/62110445459/
&
Lateral G Force Gauge - G's
http://www.ecstuning.com/Search/SiteSearch/62110426786/ES515302/
--------------
Here is the install guide.
The install guide will help you with the step by step to do the install.
Thanks
__________________

MINI Guru/ MINI Owner Since 2004 | NEW Lifetime Part Replacement | Local Pickup
Milltek | Genuine MINI | Forge Motorsport | NM Engineering | ECS Performance | M7 Speed
Customer Service Hours: 8am-8pm EST|Sales Team Hours: 8am-11pm | SAT 10am-7pm 800.924.5172
MINI Guru/ MINI Owner Since 2004 | NEW Lifetime Part Replacement | Local Pickup
Milltek | Genuine MINI | Forge Motorsport | NM Engineering | ECS Performance | M7 Speed
Customer Service Hours: 8am-8pm EST|Sales Team Hours: 8am-11pm | SAT 10am-7pm 800.924.5172
Last edited by ECSTuning; 05-19-2014 at 06:55 AM.
#4
07-15-2013, 01:40 PM

5th Gear
Join Date: Jul 2012
Location: Richardson, TX
Posts: 777
Likes: 0
Received 0 Likes
on
0 Posts
I have installed no gauges (yet). Looking at the offering from MINI and the ones from CravenSpeed.com and having seen those in person in a 2-gauge set up, that would be the way I'd go. With the Craven you can get up to 4 matching gauges with real, pertinent information, with installation instructions you can read before you buy. I find little value in knowing many G's I'm pulling when I can't tell what my oil pressure is., just sayin'.
#5
07-15-2013, 01:51 PM
Join Date: Feb 2009
Location: St Pete, FL
Posts: 109
Likes: 0
Received 0 Likes
on
0 Posts
#6
07-15-2013, 02:02 PM
#7
07-15-2013, 02:11 PM
yea i found your posting and between that and some other posts on various corners of the internet i did assemble a listing of crap do go through with a project like this. most of it is straight forward but there is some funniness in the wiring part. i also need to boot up my laptop when i get home that has INPA and see if i can also grab the referenced INPA docs.
the biggest thing that could potentially stop me from this project is price and the prospect of potentially having to have the dealer do the install. if i can find a good deal on the parts then i'll go through with it.
the biggest thing that could potentially stop me from this project is price and the prospect of potentially having to have the dealer do the install. if i can find a good deal on the parts then i'll go through with it.
Trending Topics
#8
07-15-2013, 03:30 PM
Join Date: Feb 2009
Location: St Pete, FL
Posts: 109
Likes: 0
Received 0 Likes
on
0 Posts

#10
08-13-2013, 07:53 PM

Just an fyi .the instructions are no good for the 2013 cooper s and jcw .i beleive mini changed the wires in the harness. instructions say to remove pins 1-4 but there is no wire in slot 3 to remove . im working on finding the correct install guide .the one thats all over the web was from 08 .and that diy video just dont tell you any real info except to follow the directions which dont seem to be correct .
#11
11-02-2013, 07:26 PM

Just an fyi .the instructions are no good for the 2013 cooper s and jcw .i beleive mini changed the wires in the harness. instructions say to remove pins 1-4 but there is no wire in slot 3 to remove . im working on finding the correct install guide .the one thats all over the web was from 08 .and that diy video just dont tell you any real info except to follow the directions which dont seem to be correct .
#12
11-05-2013, 02:57 PM
I figured it out. The problem was my own stupidity. For all future DIYers of the gauges, in section 6 the X1880 plug that is mentioned is NOT the plug that connects to the tachometer, instead it is an identical plug that goes all the way up underneath the steering column and plugs in right behind the steering wheel.
#14
11-10-2013, 10:08 PM
Pretty straight forward and easy once I knew which plug was the X1880. They really should be more specific in the directions. If you are planning on doing this, be careful pulling the pins out of the plug.
#16
11-12-2013, 05:41 PM
How do you release the pins so they slide out of the plug? Do you have to work a paper clip into the housing to disengage the tiny metal strip that is angled off to the side in the housing? I know it used to be a real pain getting pins out of housings on my volkswagens. Sometimes the pin would get deformed from all the prying I'd do with a jeweler's screwdriver.
That's where I got them as well. They had the cheapest price by far for 2 gauges, install kit and shipping....with a free MINI hat thrown in. 
Last edited by komet155; 11-12-2013 at 05:48 PM.
#17
11-17-2013, 03:13 AM

Gauge kit
I figured it out. The problem was my own stupidity. For all future DIYers of the gauges, in section 6 the X1880 plug that is mentioned is NOT the plug that connects to the tachometer, instead it is an identical plug that goes all the way up underneath the steering column and plugs in right behind the steering wheel.
Tks
#18
11-26-2013, 11:29 AM
Platinum Sponsor
Thanks
__________________
MINI Guru/ MINI Owner Since 2004 | NEW Lifetime Part Replacement | Local Pickup
Milltek | Genuine MINI | Forge Motorsport | NM Engineering | ECS Performance | M7 Speed
Customer Service Hours: 8am-8pm EST|Sales Team Hours: 8am-11pm | SAT 10am-7pm 800.924.5172
MINI Guru/ MINI Owner Since 2004 | NEW Lifetime Part Replacement | Local Pickup
Milltek | Genuine MINI | Forge Motorsport | NM Engineering | ECS Performance | M7 Speed
Customer Service Hours: 8am-8pm EST|Sales Team Hours: 8am-11pm | SAT 10am-7pm 800.924.5172

#20
11-26-2013, 11:54 AM
Platinum Sponsor
In my Post #3 above.
__________________
MINI Guru/ MINI Owner Since 2004 | NEW Lifetime Part Replacement | Local Pickup
Milltek | Genuine MINI | Forge Motorsport | NM Engineering | ECS Performance | M7 Speed
Customer Service Hours: 8am-8pm EST|Sales Team Hours: 8am-11pm | SAT 10am-7pm 800.924.5172
MINI Guru/ MINI Owner Since 2004 | NEW Lifetime Part Replacement | Local Pickup
Milltek | Genuine MINI | Forge Motorsport | NM Engineering | ECS Performance | M7 Speed
Customer Service Hours: 8am-8pm EST|Sales Team Hours: 8am-11pm | SAT 10am-7pm 800.924.5172
#21
11-26-2013, 03:25 PM
The instruction manual is not a good reference, follow this steps:
1:remove the thachometer
2:discconet the plug of the tachcometer (the tachcometer plug is not where the gauge is connected)
3: remove the uper plastic cover in the steering column
4: remove the lower plastic cover in the steering column, there is two silver screws in the upper part, first remove these screws. Now you can remove the lower cover in the stering column.
5: the plug x1880 is located just behind the steering wheel, you can't see the plug x1880 if u dont remove the lower plastic cover in the steering column.
Notes:
The tachcometer plug is not the plug were you plug the gauge.
The color of the wire is exactly the same as the plug x1880.
The plug x1880 IS BEHIND THE STEERING WHEEL.
Best regards.
#22
12-13-2013, 10:37 PM
Thanks for those specific instructions. I never would have thought to take off lower steering column cover. Did you use the scotchlock type wire tap they supplied or something else? Im thinking of using pos-taps instead because they're a neater, better way of connecting.
I was wondering if there's any special trick to pulling the terminal pins out of the plug....how do they release from the plug housing?
I was wondering if there's any special trick to pulling the terminal pins out of the plug....how do they release from the plug housing?
Last edited by komet155; 12-13-2013 at 10:47 PM.
#23
12-13-2013, 11:14 PM
Gauge kit
Thanks for those specific instructions. I never would have thought to take off lower steering column cover. Did you use the scotchlock type wire tap they supplied or something else? Im thinking of using pos-taps instead because they're a neater, better way of connecting.
I was wondering if there's any special trick to pulling the terminal pins out of the plug....how do they release from the plug housing?
I was wondering if there's any special trick to pulling the terminal pins out of the plug....how do they release from the plug housing?
there is no special trick, use a toothpick and first seen with a magnifying glass, it is very easy, be careful and do not forget to disconnect the battery
#24
12-13-2013, 11:50 PM
Thanks for those specific instructions. I never would have thought to take off lower steering column cover. Did you use the scotchlock type wire tap they supplied or something else? Im thinking of using pos-taps instead because they're a neater, better way of connecting.
I was wondering if there's any special trick to pulling the terminal pins out of the plug....how do they release from the plug housing?
I was wondering if there's any special trick to pulling the terminal pins out of the plug....how do they release from the plug housing?
Best regards
#25
02-03-2014, 05:35 PM

So I just did the JCW gauge install on my 2013 R56s. All put back together, and all works now EXCEPT the left turn signal won't work :(
On first reassemble, neither turn signal would work, and the xenons cam on as soon as car was turned on (I don't have DRLs set up). I shut everything off, disconnected battery again, and re-checked and tested all connections. All checked out. Unplugged and re-plugged all plugs, and reassembled.
This time around, xenons work like they should, and right turn signal works, but left still not. E-flashers do work. All else works, just not the left turn signal.
Any ideas what this might be?
I'm still thinking plugs, but which?