How To HOW TO: R56 - Thermostat Housing + Thermostat
#226
 03-08-2018, 06:09 AM


Thanks to all who have posted here. I have a 2009 JCW Coup with 103k miles on it. I recently noticed a puddle of fluid under the vehicle. I am mechanically inclined, have rebuilt engines, etc. But have become fearful of automotive maintenance due to the complexity of emission controls, electronics, etc. So I drove my MINI to a non-dealer European Auto Specialist for diagnosis and repair.
Thermostat housing replacement:
Parts - $151 - Part number 11538699290
Labor - $438.69 - I have no idea if that is a fixed price or how that cost was determined ???
During the repair, which took over a week, the shop suggested replacing the plastic pipe between the water pump and the thermostat housing. Seemed appropriate given that a connecting plastic part had cracked, so I consented.
Parts - $ 125.56 - Part number 11537589713
Labor - $365.58
Toss in the $9.75 for a quart of BMW anti-freeze, unspecified materials cost of $22.90, sales tax of $69.73, AAA discount of $80.43, and the Grand Total cost of the repair of $1,102.78
Less than 50 miles later - check engine light is ON. So I ordered a BAFX Bluetooth OBD2 scanner and loaded Torque Pro on my Android phone. That was ~$25 well spent!! Two fault codes: P112B & P0117. I emailed the fault codes to the repair shop and asked the question, "Does the replacement thermostat housing assembly include a new coolant temperature sensor?" The response was a phone call requesting that I bring the car back in while not answering my question. I suspect the problem is a failed sensor and or loose connections during reassembly. We'll see.
Needless to say, this is truly a PITA! The shop does not offer a shuttle service, I have two vehicles, but only one driver, I rely on the kindness of friends to provide rides to and from the shop. So the car is back in the shop for diagnosis, no word yet. I post all of this not to complain, rather to underscore the value of this thread. Had I read this before, I would have saved time, frustration, inconvenience, and money by performing the repair mysel! Education is expensive. Again, I thank you to all of those who have shared their experience, expertise, and knowledge. Be bold, you can successfully repair you're own MINI.
#227
04-10-2018, 06:20 AM

Did you check the Mini site to see if your JCW qualifies for reimbursement?
www.mini-rp.com
I'm in the process of receiving my reimbursement check (fingers crossed).
Your part# for the thermostat is correct, that's the same part # the shop used for mine, however my repair+parts was $490 total and took 1 day with my local shop.
They also flushed my coolant because I mixed the wrong kind in when I noticed it
starting to leak and added oil to my car. All of this came out to $490.
#228
08-08-2018, 02:43 PM

Great post Boosted Mini--Thanks!
I just replaced the thermostat housing on my manual 2013 Countryman S (46k miles). and This thread was a great resource.
The job turned out to be a PITA, but that was mostly my fault.
I ordered my housing from Pelican and had it shipped next day (about $160 with shipping) since I really need the car this weekend. I also picked up a gallon of coolant for $20, and a big bag of kitty litter for ~$25 (I used about $2 worth).
An hour in to the job as I was pulling the bolts on the old housing, I realized that the sensor connections were different on the new one, and quickly determined that I did, in fact, need a wiring harness adapter. I then had to wait for the dealership to open before I could even call to ask if they had one. They did, so an hour-ish round trip via Lyft (~$70) and $45 for the adapter (I sure wish I could sell something with that kind of margin) I was back on track, although working on the car through a couple conference calls definitely hurt my time on this job.
The only really difficult part for me was getting the clip back on the water pump pipe. Even with the air cleaner removed, I could just barely get a couple fingers into the spot where I needed a couple fingers *and* a thumb. I thank whatever car gods may be for hemostats. Still, it seemed like my car had way more crowded into that little section of engine compartment than did the photos I saw of other cars undergoing the housing replacement. I must have spent more than 45 minutes on that blasted clip before it clicked into place.
In any case, even with the added Lyft expense, I figure this job came in at just under $300. I didn't get a quote from a shop, but there is probably a 0% chance that I would have spent less than that if I had taken the car in for repair.
When I have to do it in another 45K miles, I bet I can do it in just over an hour.
#229
07-06-2019, 06:02 PM

Neutral
Join Date: Jul 2019
Location: San Francisco Bay Area
Posts: 3
Likes: 0
Received 0 Likes
on
0 Posts
Just did mine (2012 hardtop) today, took me probably 4-5 hours in total, but everything came back together and the engine light is off now 
$112 from FCPEuro (The dealer already had the newer plug configuration a few years ago when they did some warranty work) and $22 for Zerex coolant.
Of course half the time was spent figuring out how things come apart, the other half was spent trying to get that spring clip back into the connection at the rear coolant tube
It took exactly one gallon of coolant, I will top off with distilled water once the car cools down.
-- John
#230
06-19-2023, 10:20 AM
Platinum Sponsor
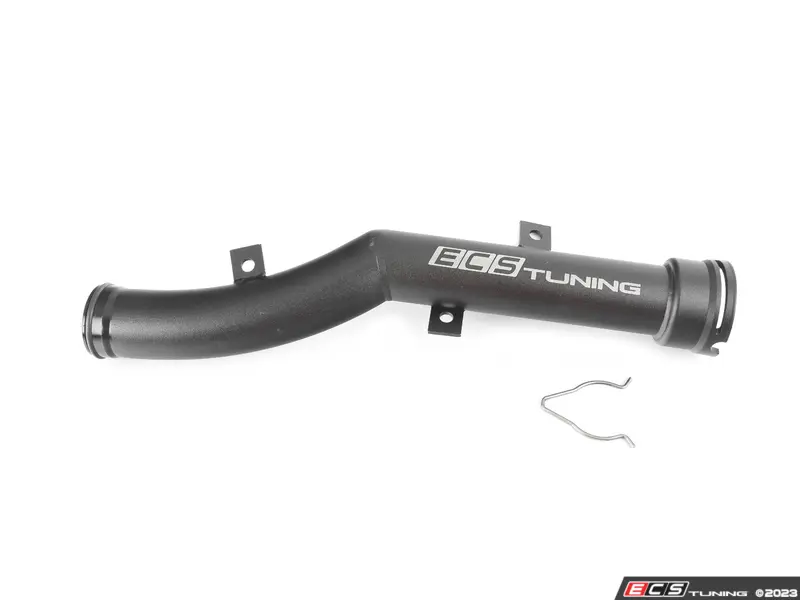
For our MINI people on the forums we have some early release Aluminum Metal MINI Cooper R55 R56 R57 R58 R59 R60 R61 Water Pipes. Not too many in stock so they might go fast. We will have more coming in soon after that.
I have been running this on my personal car for almost over a year. Matches the factory design.
https://www.ecstuning.com/b-ecs-part.../048583la01~a/
I have been running this on my personal car for almost over a year.
Matches the factory design.https://www.ecstuning.com/b-ecs-part.../048583la01~a/
__________________

MINI Guru/ MINI Owner Since 2004 | NEW Lifetime Part Replacement | Local Pickup
Milltek | Genuine MINI | Forge Motorsport | NM Engineering | ECS Performance | M7 Speed
Customer Service Hours: 8am-8pm EST|Sales Team Hours: 8am-11pm | SAT 10am-7pm 800.924.5172
MINI Guru/ MINI Owner Since 2004 | NEW Lifetime Part Replacement | Local Pickup
Milltek | Genuine MINI | Forge Motorsport | NM Engineering | ECS Performance | M7 Speed
Customer Service Hours: 8am-8pm EST|Sales Team Hours: 8am-11pm | SAT 10am-7pm 800.924.5172
Last edited by ECSTuning; 06-29-2023 at 08:32 AM.
#231
06-29-2023, 06:12 AM
I recently did this same job on my 2013 roadster.
https://www.northamericanmotoring.co...placement.html
https://www.northamericanmotoring.co...placement.html
The following users liked this post:
ECSTuning (06-29-2023)
#232
06-29-2023, 07:53 AM

I just did this job for the 2nd time. I got the OEM housing from ECS tuning and it arrived very quickly. One thing I would recommend is that when you pull off the thermostat housing from the water pipe after removing the spring clip, hold the water pipe firmly with your right hand to prevent the pipe from pulling away from the water pump side and breaking. I also sprayed that connection with silicone lube to help in the removal. I've seen videos of people wrestling with the housing with lots of pipe movement, resulting in needing to replace the pipe, too. My car is 15 yrs old (75K) and the pipe was undamaged.
After the thermostat housing comes away from the pipe, you can check from underneath the car with a flashlight to make sure the pipe is still fully seated in the water pump housing.
That spring clip is tough, but remember to grab it and rotate clockwise as you remove it with some long needle nosed pliers. To reinsert, tie a string to it so you don't lose it. I held it between my thumb and first 2 fingers to put it back in and used my pinkie finger to feel for the edge of the water pipe. You really can't do it and watch at the same time ("Use the force, Luke"). Then less than 1/2" to the slot where it goes. Press down and rotate it counter-clockwise till it clicks into place.
The following users liked this post:
ECSTuning (06-29-2023)
#233
06-30-2023, 07:45 AM
Platinum Sponsor
Yep my original plastic Genuine MINI part cracked when touched the old original pipe and i had to clean it out around the back of the water pump/engine housing. It was stuck to it.
__________________
MINI Guru/ MINI Owner Since 2004 | NEW Lifetime Part Replacement | Local Pickup
Milltek | Genuine MINI | Forge Motorsport | NM Engineering | ECS Performance | M7 Speed
Customer Service Hours: 8am-8pm EST|Sales Team Hours: 8am-11pm | SAT 10am-7pm 800.924.5172
MINI Guru/ MINI Owner Since 2004 | NEW Lifetime Part Replacement | Local Pickup
Milltek | Genuine MINI | Forge Motorsport | NM Engineering | ECS Performance | M7 Speed
Customer Service Hours: 8am-8pm EST|Sales Team Hours: 8am-11pm | SAT 10am-7pm 800.924.5172
#234
07-15-2023, 08:46 PM

I replaced the thermostat on my n18 JCW hardtop and wow, I'm never doing that again! I had to basically break all of the wiring harness stabilizers to get enough room for the thermostat. And those hose clamps are the worst...I should have bought the worm style clamps for replacement. I bought a replacement water pipe but by the time I got to the thermostat, I saw no way I could possibly see what I was doing because it's so far underneath the back of the engine so I didn't bother.
After replacing the thermostat and putting everything back, I kept the bleeder screw open and refilled the coolant until it came out of the bleeder. Then ran the car for 10ish mins to get up to temp with the coolant reservoir cap open. Everything looks good, no more code p0597!
Funnily, on my hour-long drive back home I got another CEL, P0171. Turns out I forgot to connect the intake hose from the turbo to the airbox! Symptoms were a high idle of around 1.2k RPM, and hilariously the pops and bangs became like actual gunshots and there was way more blow-off noise.
#235
07-18-2023, 06:03 AM
Platinum Sponsor
Glad you got it done and fixed. Yes its easy to miss some things on your first try.
__________________
MINI Guru/ MINI Owner Since 2004 | NEW Lifetime Part Replacement | Local Pickup
Milltek | Genuine MINI | Forge Motorsport | NM Engineering | ECS Performance | M7 Speed
Customer Service Hours: 8am-8pm EST|Sales Team Hours: 8am-11pm | SAT 10am-7pm 800.924.5172
MINI Guru/ MINI Owner Since 2004 | NEW Lifetime Part Replacement | Local Pickup
Milltek | Genuine MINI | Forge Motorsport | NM Engineering | ECS Performance | M7 Speed
Customer Service Hours: 8am-8pm EST|Sales Team Hours: 8am-11pm | SAT 10am-7pm 800.924.5172
#236
08-07-2023, 11:01 AM
Platinum Sponsor
__________________
MINI Guru/ MINI Owner Since 2004 | NEW Lifetime Part Replacement | Local Pickup
Milltek | Genuine MINI | Forge Motorsport | NM Engineering | ECS Performance | M7 Speed
Customer Service Hours: 8am-8pm EST|Sales Team Hours: 8am-11pm | SAT 10am-7pm 800.924.5172
MINI Guru/ MINI Owner Since 2004 | NEW Lifetime Part Replacement | Local Pickup
Milltek | Genuine MINI | Forge Motorsport | NM Engineering | ECS Performance | M7 Speed
Customer Service Hours: 8am-8pm EST|Sales Team Hours: 8am-11pm | SAT 10am-7pm 800.924.5172

Thread
Thread Starter
Forum
Replies
Last Post