How To Suspension :: Rear Trailing Arm Bushing Insert Install
#1
 07-09-2010, 06:59 PM


Suspension :: Rear Trailing Arm Bushing Insert Install
So I ordered these a couple weeks ago and when they showed up today I braved the 95* weather to install them. I originally got them to try a cure a tire rubbing I am only getting on the passenger side when I get a sharp impact. The other issue I was having was the back end becoming very vague and 'floaty' on off camber turns. I read through the installs that people have done before and honestly it is much easier than any of them sounded. It took me 55mins from the time I put the jack under the car till I put away my torque wrench after doing the lug nuts. Here is brief write up. It is very straight forward.


Here is the front of the rear wheel liner you need to pull back. There is a phillips head screw on the sideskirt that holds the bottom.

Remove this 10mm plastic nut to get more clearance

Here is the bolt that holds the trailing arm to the alignment/unibody connection. Its 18mm, I used a 3/8-1/2 conversion so I could use my bigger breaker bar. With just a 18mm socket the angle would be even better.

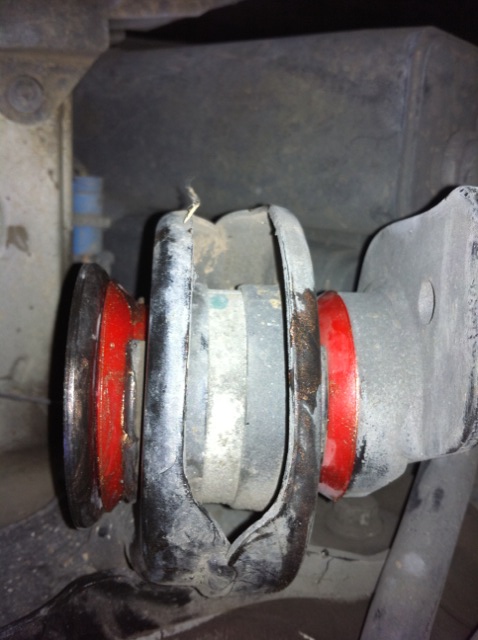
After removing the bolt the trailing arm will sag slightly giving more than enough room to get the bushing into place. I used a detailing brush to clean out the voids in the stock bushing but even with 86k miles it was just some dust.

Getting the powerflex inserts into place is the only thing that is a little fiddly. They fit in to the voids but like some of the motor mount inserts they are slightly oversized. What I did was get the entire lip of the insert seated in the void then as I tightened the bolt back down it fully seated into the OEM bushing.

Overall very easy install. For the price and ease of install I don't really see a down side. Installing the poly upper shock bushings would probably complement this. I am looking forward to doing the front LCA bushings now.
Here is the front of the rear wheel liner you need to pull back. There is a phillips head screw on the sideskirt that holds the bottom.
Remove this 10mm plastic nut to get more clearance
Here is the bolt that holds the trailing arm to the alignment/unibody connection. Its 18mm, I used a 3/8-1/2 conversion so I could use my bigger breaker bar. With just a 18mm socket the angle would be even better.
After removing the bolt the trailing arm will sag slightly giving more than enough room to get the bushing into place. I used a detailing brush to clean out the voids in the stock bushing but even with 86k miles it was just some dust.
Getting the powerflex inserts into place is the only thing that is a little fiddly. They fit in to the voids but like some of the motor mount inserts they are slightly oversized. What I did was get the entire lip of the insert seated in the void then as I tightened the bolt back down it fully seated into the OEM bushing.
Overall very easy install. For the price and ease of install I don't really see a down side. Installing the poly upper shock bushings would probably complement this. I am looking forward to doing the front LCA bushings now.
Last edited by R53Warrior; 07-09-2010 at 07:15 PM.

#3
07-09-2010, 07:13 PM
#4
07-09-2010, 08:05 PM


#7
07-10-2010, 12:58 PM

Cool. Now do a write up with the pre 5/2003 build date trailing arm design.
Pre-5/03
Rear Trailing Arm Front Support Insert PFR5-110

------------
5/03+
Rear Trailing Arm Front Support Insert PFR5-1102

It's ok though. I might just save this one for when I replace the whole bushing carrier, or if someone releases solid bushings, and not just a void insert.
Pre-5/03
Rear Trailing Arm Front Support Insert PFR5-110
------------
5/03+
Rear Trailing Arm Front Support Insert PFR5-1102
It's ok though. I might just save this one for when I replace the whole bushing carrier, or if someone releases solid bushings, and not just a void insert.
Trending Topics
#8
07-10-2010, 02:13 PM
#9
07-17-2010, 07:08 PM
Installed mine today.
I like 'em! There's a nice fast sweeper on my local twisty road that has a bump right in the middle of the corner. Before, the back end would get a bit un-settled over that bump, but with the new bushings it stayed stuck. Nice!
I used a piece of coat hanger to make a hook to keep the inner liner bent out of the way.
Thanks Again!!
Jim
#11
07-18-2010, 09:54 AM

3rd Gear
Join Date: Sep 2002
Location: Lower Makefield, PA
Posts: 158
Likes: 0
Received 0 Likes
on
0 Posts
#12
07-19-2010, 07:22 AM
Jim
#13
08-12-2010, 08:20 PM

I just got in from doing the rear bushing install on my '06 MCS. One side it was really hard to realign the 18mm headed bolt... I probably spent half od my time getting that one bolt in. I finally hooked up my air ratchet so I could easily turn the bolt while fiddling the trailing arm about and it popped right in.

#14
09-14-2010, 06:25 PM
#15
10-09-2012, 01:28 AM

#16
10-09-2012, 07:17 PM
#17
10-09-2012, 07:27 PM
Great! I guess I'll replace the training arm bushings then. I have almost 174000 miles on my car. And reading through the forums it seems they need to be replaced at around every 100000 miles. I'll check on the upper and lower control arm bushings as well. I replaced them then end-links when I installed my coil-overs.
Is it easy to take the old bushings out? Pelican parts have 2 options for me. One with just the bushing, and one with bushings already pressed...
Thanks
Is it easy to take the old bushings out? Pelican parts have 2 options for me. One with just the bushing, and one with bushings already pressed...
Thanks
#18
11-30-2014, 10:38 PM


Thread
Thread Starter
Forum
Replies
Last Post
igzekyativ
MINIs & Minis for Sale
34
07-16-2020 12:54 PM
Minibeagle
Stock Problems/Issues
6
08-13-2015 10:00 AM